How To Smoke A Whole Pig
How to Smoke a Whole Pig – Complete Guide to 48lb Whole Hog BBQ

How to Smoke a Whole Pig – Complete 48lb Whole Hog BBQ
The ultimate BBQ challenge – smoke a 48-pound whole pig to perfection with crispy crackling skin and tender, juicy meat throughout
Ingredients
For the Whole Pig:
- 1 whole pig, approximately 48 lbs (cleaned and prepped)
- 2 cups apple cider vinegar
- 2 cups apple juice
- Your favorite sweet BBQ seasoning (enough to cover exposed meat)
- Cooking oil spray (canola or avocado oil)
Smoking a whole pig is the ultimate BBQ challenge that turns any gathering into an unforgettable event. This whole hog BBQ guide will walk you through everything you need to know to smoke a 48-pound pig from start to finish, including the secrets to getting perfect crackling skin and tender, juicy meat throughout. Whether you’re planning a big party, wedding, or just want to tackle the holy grail of barbecue, this smoked whole pig recipe delivers restaurant-quality results.
Whole pig smoking requires patience, planning, and the right techniques, but it’s not as complicated as people think. The key is understanding how different parts of the pig cook at different rates and using simple methods to keep everything moist while developing that coveted crispy skin. This pig roast recipe focuses on practical techniques that work for backyard pitmasters, not just competition teams with fancy equipment.
The payoff for smoking a whole pig goes way beyond just the food. There’s something primal and satisfying about presenting a whole roasted pig that brings people together like nothing else can. The combination of tender pulled pork, crispy crackling, and the theater of carving creates memories that last long after the meal is over.
Understanding Whole Pig Anatomy and Cooking

Whole hog BBQ presents unique challenges because you’re cooking four different cuts of meat at the same time, each with different ideal temperatures and cooking times. The shoulders and hams are tough cuts with lots of connective tissue that need to reach 195-200°F to become tender. The loins are lean and will dry out if overcooked, so they’re done around 160-170°F. The belly has lots of fat that needs time to render properly.
The key to successful smoked whole pig cooking is understanding that these different sections will finish at different times. The loins will be done first, followed by the hams, with the shoulders taking the longest. This is why injection and proper positioning on the smoker are so important – they help even out the cooking and keep the lean parts moist while the tough parts break down.
A 48-pound pig will feed about 35-40 people generously, assuming about 50% yield after bones, skin, and trimming. This makes it perfect for large gatherings but means you need to plan for a long cook – typically 12-16 hours depending on your smoker temperature and the weather.
The skin is often the most challenging part for beginners. Getting crispy, edible crackling instead of tough leather requires specific techniques with oil spraying and temperature control. Many people overcomplicate this, but the secret is keeping seasoning off the skin and using high heat at the end.
Injection Techniques for Whole Pig Success
The injection mixture of apple cider vinegar and apple juice serves multiple purposes in whole pig smoking. The vinegar helps break down tough fibers in the meat while adding tangy flavor that complements pork beautifully. The apple juice adds sweetness and helps keep the meat moist during the long cook.
Proper injection technique makes a huge difference in the final result. You want to inject every 2-3 inches throughout the thickest parts – the hams, shoulders, and loins. Don’t just inject randomly; think about where the meat is thickest and needs the most help staying moist. The injection should go deep into the muscle, not just under the skin.
Use a meat injector with a large needle to prevent clogging. Inject slowly and withdraw the needle gradually while still pressing the plunger – this distributes the liquid throughout the muscle instead of creating pockets. You’ll use about 1-2 cups of injection for a 48-pound pig, depending on how thoroughly you inject.
Some people add other ingredients to their injection like melted butter, hot sauce, or beer, but apple juice and vinegar is a proven combination that won’t overpower the natural pork flavors. The acid also helps penetrate the meat better than plain liquids.
Seasoning Strategy for Whole Hog
The seasoning approach for smoking a whole pig is different from individual cuts because you have to think about the skin separately from the meat. The cardinal rule is no seasoning on the skin – this prevents crispy crackling and creates tough, leathery skin that nobody wants to eat.
Apply your BBQ seasoning inside the cavity, under the skin where you can access the meat directly, and on any exposed meat surfaces. Lift the skin gently and season the meat underneath, then let the skin fall back into place. This gives you flavor on the meat without interfering with skin texture.
Choose a sweet BBQ rub that complements pork – brown sugar-based rubs work great because they caramelize during cooking and balance the richness of the pork fat. Avoid rubs with too much salt, as the long cooking time can make the meat taste oversalted.
Don’t overthink the seasoning. With a whole pig, the meat and fat flavors are the stars. The seasoning should enhance, not mask, these natural flavors. A simple mix of brown sugar, paprika, garlic powder, and black pepper works perfectly.
Smoker Setup and Temperature Control
Whole pig smoking requires a large smoker or custom setup that can maintain steady temperatures for 12-16 hours. You need enough space for the entire pig to lie flat, plus room for air circulation around it. Many people use custom pits, large offset smokers, or even clean 55-gallon drums for this project.
Temperature control at 250°F is crucial for pig roast recipe success. This temperature is hot enough to break down tough connective tissue but cool enough to prevent the outside from cooking too fast. Higher temperatures cook the exterior before the interior is done, while lower temperatures take too long and can enter the food safety danger zone.
Wood choice matters for flavor but also for heat consistency. Oak and hickory are traditional choices that burn steady and long. Avoid woods that burn too hot or have strong flavors that might overpower the pork. You’ll need a lot of wood – plan on 20-30 pounds for a full cook.
Set up your smoker for indirect cooking with the heat source to one side and the pig on the opposite side. This prevents hot spots and ensures even cooking. Use a water pan if your smoker tends to run dry – the humidity helps keep the meat moist.
Managing the Long Cook
The first three hours of smoking a whole pig are critical for flavor development. This is when the meat absorbs the most smoke, so maintain good smoke production and don’t open the smoker unnecessarily. Every time you open it, you lose heat and smoke, extending the cooking time.
Starting at hour 3, begin spraying the skin with oil every 30-45 minutes. Use a spray bottle with canola or avocado oil – these have high smoke points and neutral flavors. The oil helps conduct heat to the skin and prevents it from drying out before the meat is done.
Monitor internal temperatures in multiple locations. The hams and shoulders will read differently than the loins, and even different areas within the same section can vary. Use multiple probe thermometers if you have them, or check various spots with an instant-read thermometer every few hours.
At around hour 5, tent the pig with aluminum foil to prevent the skin from getting too dark before the meat is done. This is called the “Texas Crutch” and it speeds up cooking while protecting the surface. Leave the foil loose so steam can escape – you don’t want to braise the pig.
The Crackling Technique
Getting perfect crackling is what separates good whole hog BBQ from great whole hog BBQ. The secret is the high-heat finish combined with oil spraying throughout the cook. About 30 minutes before the pig is done, remove all foil and crank your smoker to 375-400°F.
Continue spraying oil on the skin as the temperature rises. You’ll see the skin start to bubble and blister – this is exactly what you want. The high heat renders the fat under the skin and creates those crispy bubbles that make great crackling.
Some pitmasters use a propane torch for extra blistering, but this isn’t necessary if your smoker can reach 400°F. The torch is just insurance for getting extra crispy spots or fixing areas that didn’t bubble enough.
The skin should sound hollow when you tap it and break cleanly when you press on it. If it’s still chewy, you need more time at high heat. Don’t rush this step – proper crackling is worth the extra time.
Ingredients
For the Whole Pig:
- 1 whole pig, approximately 48 lbs (cleaned and prepped)
- 2 cups apple cider vinegar
- 2 cups apple juice
- Your favorite sweet BBQ seasoning (enough to cover exposed meat)
- Cooking oil spray (canola or avocado oil)
Step-by-Step Instructions
Prepare the Injection
Mix the apple cider vinegar and apple juice in a large measuring cup or bowl. Stir well to combine. This mixture provides both moisture and flavor – the vinegar helps tenderize tough muscle fibers while the apple juice adds sweetness that complements pork perfectly.
Load your meat injector with the mixture. If you don’t have a meat injector, you can find them at most kitchen supply stores or online. Choose one with a large needle that won’t clog easily.
Inject the Pig
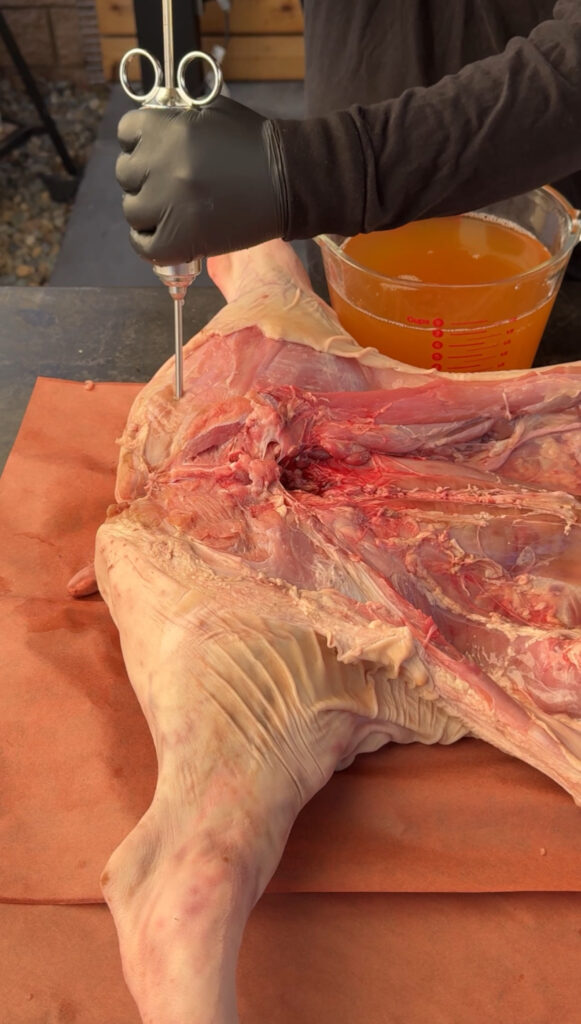
Start with the hams (back legs), injecting every 2-3 inches in a grid pattern. Push the needle deep into the muscle and inject slowly while withdrawing. This distributes the liquid throughout the muscle instead of creating pockets.
Move to the shoulders (front legs) and repeat the same process. These are the toughest parts of the pig and benefit most from injection. Don’t skip this step – proper injection makes the difference between moist, flavorful meat and dry disappointment.
Inject the loins (back area) more lightly since they’re naturally tender and can become mushy if over-injected. Focus on the thickest parts where the meat might dry out during the long cook.
Season the Pig
Pat the entire pig dry with paper towels, paying special attention to the skin. Any moisture will prevent proper seasoning adhesion and interfere with crispy skin development.
Apply your BBQ seasoning inside the cavity first. Be generous here since this is where you can really build flavor. Then carefully lift sections of skin and season the meat underneath. Don’t worry about getting seasoning everywhere – focus on the areas where you can access meat directly.
Remember the cardinal rule: no seasoning on the skin itself. This prevents proper crackling and creates tough, leathery skin that nobody wants to eat.
Set Up Your Smoker
Preheat your smoker to 250°F using your preferred wood. Oak and hickory are traditional choices that provide steady heat and good flavor without being overpowering. Make sure you have plenty of fuel – whole pig smoking is a marathon, not a sprint.
Set up for indirect cooking with the heat source to one side. Place a water pan under the cooking area if your smoker tends to run dry. The humidity helps keep the meat moist during the long cook.
Start the Cook
Place the pig belly-side down on the smoker rack. This position protects the more delicate belly meat while allowing the back and sides to develop color and flavor. Make sure there’s space around the pig for air circulation.
Close the smoker and don’t open it for the first 3 hours. This is when the meat absorbs the most smoke flavor, so maintain good smoke production and stable temperature. Every time you open the smoker, you lose heat and extend the cooking time.
Begin Oil Spraying
At hour 3, start spraying the skin lightly with oil every 30-45 minutes. Use a spray bottle with canola or avocado oil for best results. The oil helps conduct heat to the skin and prevents it from drying out before the meat is done.
Don’t soak the skin – just a light misting is enough. Too much oil can cause flare-ups or make the skin soggy. You want just enough to keep the surface from getting too dry.
Monitor and Tent
Around hour 5, check the color development on the skin. If it’s getting quite dark but the internal temperatures aren’t close to done, tent the pig loosely with aluminum foil. This prevents over-browning while allowing the meat to continue cooking.
Start checking internal temperatures at this point. Use multiple probe thermometers if you have them, or check various spots with an instant-read thermometer. The different sections will cook at different rates.
The High-Heat Finish
About 30 minutes before the pig reaches target temperatures, remove all foil and increase your smoker temperature to 375-400°F. This high-heat finish is crucial for developing proper crackling.
Continue spraying with oil as the temperature rises. You’ll see the skin start to bubble and blister – this is exactly what you want. The high heat renders the fat under the skin and creates those crispy bubbles that make perfect crackling.
Check for Doneness
The pig is done when the hams reach 195°F, shoulders are 195-200°F, and loins are 160-170°F. The different sections finish at different times, which is normal. The meat should be tender and pull apart easily.
Don’t rely only on temperature – use a probe or fork to test tenderness. The meat should offer little resistance when pierced, and the juices should run clear.
Rest the Pig
Remove the pig from the smoker and tent loosely with foil. Let it rest for at least 1 hour before carving. This resting time allows the juices to redistribute throughout the meat, ensuring every bite is moist and flavorful.
The pig will stay hot for several hours, so don’t worry about it getting cold. Use this time to prepare sides, set up your serving area, and get ready for the big reveal.
Carve and Serve
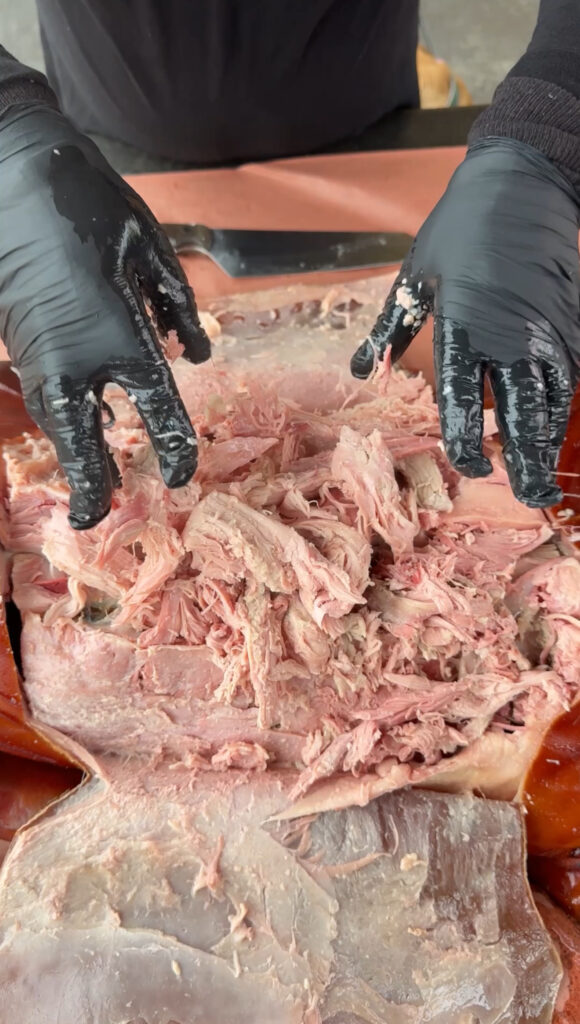
Start by breaking off pieces of the crispy skin – this is “pig candy” and should be served on the side for people to enjoy. Use a sharp knife to carve the loins into chops, and pull the shoulder and ham meat for serving.
Separate the different cuts and present them on large platters. The variety of textures and flavors from different parts of the pig is part of what makes whole hog BBQ special.
Timing and Planning Your Cook
Smoking a whole pig requires careful timing since you can’t speed up the process if you’re running late. Plan on 12-16 hours total cooking time for a 48-pound pig at 250°F. Start your cook the night before if you’re serving lunch, or early morning for dinner.
Weather affects cooking time significantly. Cold, windy conditions can add 2-4 hours to your cook, while hot, still weather might speed things up. Always build in extra time – it’s better to finish early and hold the pig warm than to have hungry guests waiting.
Have a backup plan for holding the finished pig if it gets done early. A large cooler lined with towels can keep a whole pig hot for 4-6 hours. This gives you flexibility if the cook goes faster than expected.
Consider having someone help you, especially for moving the pig and managing the fire. Whole pig smoking is easier and more enjoyable with an extra pair of hands.
Troubleshooting Common Issues
If the skin isn’t crisping properly, increase the heat and continue oil spraying. Some pigs have thicker skin that needs more time at high temperature. Don’t give up – proper crackling is worth the extra effort.
Uneven cooking is common with whole pigs. If one section is cooking faster, position that area farther from the heat source or shield it with foil. The goal is getting everything done at roughly the same time.
If the meat seems dry during cooking, increase your oil spraying frequency and consider adding a water pan for humidity. Dry heat can suck moisture out of the meat faster than expected.
Temperature stalls are normal, especially around 160°F. This is when moisture evaporating from the surface cools the meat. Be patient – the temperature will eventually start climbing again.
Food Safety Considerations
Whole pig smoking requires attention to food safety since you’re dealing with a large amount of meat over a long time period. Keep the pig refrigerated until you’re ready to start cooking, and get it on the smoker within 2 hours of taking it out of refrigeration.
Maintain smoker temperatures above 225°F to ensure food safety. Lower temperatures can allow bacteria to grow, especially in the thick sections of meat. Use calibrated thermometers to ensure accuracy.
Check internal temperatures in multiple locations, especially the thickest parts of the hams and shoulders. All parts of the pig should reach safe minimum temperatures – 145°F for loins and 195°F for shoulders and hams.
Don’t rely on visual cues alone for doneness. The outside can look perfect while the inside is still undercooked. Always use a meat thermometer to verify safe internal temperatures.
Plan on 12-16 hours total cooking time at 250°F. Weather affects this significantly – cold, windy conditions can add 2-4 hours, while hot, still weather might speed things up. Always build in extra time and start early. It’s better to finish early and hold the pig warm than to have hungry guests waiting.
Seasoning on the skin prevents proper crackling and creates tough, leathery skin that nobody wants to eat. The seasoning interferes with the high-heat finish that creates those crispy bubbles. Instead, season inside the cavity and under the skin where you can access the meat directly. The skin should only get oil spray, nothing else.
Different sections finish at different temperatures: hams should reach 195°F, shoulders 195-200°F, and loins 160-170°F. This is normal since you’re cooking four different cuts simultaneously. The shoulders and hams need higher temps to break down connective tissue, while the lean loins are done at lower temps to prevent drying out.
The secret is oil spraying every 30-45 minutes throughout the cook, combined with a high-heat finish at 375-400°F for the last 30 minutes. Remove all foil and continue spraying oil as the temperature rises. You’ll see the skin bubble and blister – that’s exactly what you want. The skin should sound hollow when tapped and break cleanly when pressed.
You need a smoker large enough for the entire pig to lie flat with room for air circulation. Many people use custom pits, large offset smokers, or even clean 55-gallon drums. If your smoker isn’t big enough, consider smoking a smaller pig (20-30 lbs) or doing a pig pickin’ style where you butterfly the pig to make it flatter and more compact.
Conclusion
Smoking a whole pig represents the pinnacle of backyard BBQ achievement. While it requires planning, patience, and attention to detail, the techniques in this guide will help you create an unforgettable meal that brings people together like nothing else can. The combination of tender pulled pork, crispy crackling, and the spectacle of presenting a whole roasted pig creates memories that last long after the meal is over.
The key to successful whole hog BBQ is understanding that you’re cooking multiple cuts simultaneously and adapting your technique accordingly. With proper injection, seasoning, and temperature control, you can achieve restaurant-quality results that will have your guests talking about your pig roast recipe for years to come.
Whether you’re planning a wedding, family reunion, or just want to tackle the ultimate BBQ challenge, this smoked whole pig method delivers consistent results with techniques that work for backyard pitmasters.
Ready to Take Your Cooking to the Next Level?
This is where I keep all my most-used products, gear, and favorite cooking tools — check it out:
🔥 View My Cooking Gear & ToolsRecipe Categories
If you loved this recipe, you’ll find more to savor across our diverse categories. From beef to pork, chicken to turkey, seafood to appetizers, there’s a wealth of flavors waiting for you. Explore them all at CWFeats.
