Grilled Cowboy Steaks with Smoky Garlic Herb Butter
Grilled cowboy steaks with smoky garlic herb butter transform thick-cut bone-in ribeyes into restaurant-quality steaks through proper dry brining and a unique smoke-infusion technique. These cowboy ribeye steaks start with an overnight dry brine – generously salting the meat and refrigerating uncovered so the salt penetrates deeply while the surface dries for better crust formation. The next day, the steaks get a light coat of avocado oil and all-purpose seasoning before hitting a grill set up for two-zone cooking at 300°F. After a quick sear over direct heat to develop char marks, the steaks move to indirect heat to finish cooking gradually. The secret weapon is the smoky garlic herb butter – melted butter mixed with fresh garlic, parsley, rosemary, and thyme, then infused with actual smoke by suspending it over a lit lump of charcoal for two to three minutes.
What makes this cowboy steak recipe special is how the dry brine fundamentally improves texture and flavor beyond what surface seasoning alone could achieve. The overnight salt exposure draws moisture to the surface through osmosis, then that moisture reabsorbs back into the meat carrying dissolved salt with it. This seasons the steak throughout rather than just on the surface while the exposed, uncovered refrigeration dries the exterior for superior crust development during searing. The smoky butter adds another dimension – the charcoal smoke infuses the melted butter with aromatic compounds that taste like hours of slow smoking compressed into two minutes.
This garlic herb butter steak recipe delivers steakhouse results at home with surprisingly straightforward technique. The two-zone grilling setup prevents the common mistake of cooking thick steaks over direct heat the entire time, which burns the outside before the center cooks. The indirect finish allows the interior to reach perfect doneness while the butter basting adds richness and amplifies the smoke flavor. Master this method and you’ll never want to cook thick steaks any other way.
Understanding Cowboy Steaks
Cowboy steaks are bone-in ribeyes cut extra thick – typically two inches or more – with a long section of rib bone left attached that extends several inches from the meat. This extended bone gives the steak its “cowboy” name, evoking the image of a rancher’s bone-handled tools. The bone isn’t just for show – it adds flavor during cooking while helping conduct heat into the center of the thick steak. The bone also provides a convenient handle for flipping and adds dramatic presentation when serving.
The ribeye section these steaks come from is prized for its exceptional marbling – intramuscular fat that melts during cooking to create incredibly tender, juicy, flavorful meat. Located along the upper rib section of the cow (ribs six through twelve), this area doesn’t get much exercise, resulting in tender muscle with abundant fat marbling. The combination of the large ribeye cap (spinalis dorsi), the central eye, and the complex (complexus) creates varied texture and flavor throughout the steak.
Two to two and a half pounds per steak might seem excessive, but remember that weight includes the bone (which weighs several ounces) and fat that renders during cooking. A cowboy steak this size typically serves two people comfortably, or one person with a hearty appetite. The thickness is crucial – thin steaks would overcook before developing proper crust, while these thick cuts allow you to achieve a perfect medium-rare center with deeply caramelized exterior.
Look for steaks with good marbling throughout – white flecks of intramuscular fat evenly distributed through the red meat. Avoid steaks with large pockets of fat or minimal marbling, as these won’t provide the same richness and tenderness. Prime grade offers the most marbling, followed by Choice and Select. Even Choice grade cowboy steaks are excellent – you don’t need to splurge for Prime unless you want maximum marbling.
The Science of Dry Brining
Dry brining – salting meat and refrigerating it uncovered for hours or days – fundamentally improves both texture and flavor through multiple mechanisms. When salt contacts the meat’s surface, it initially draws out moisture through osmosis. This seems counterintuitive – won’t removing moisture make the meat dry? But after thirty to forty-five minutes, that surface moisture begins reabsorbing back into the meat, now carrying dissolved salt with it. This seasons the steak throughout its thickness rather than just on the surface.
The salt also affects muscle proteins directly. It dissolves some of the proteins that form the meat’s structure, allowing them to retain more moisture during cooking. This is why properly dry-brined steaks stay juicier than unsalted steaks cooked to the same temperature – the proteins hold onto water more effectively. The salt also changes how proteins coagulate during heating, creating more tender texture.
The overnight refrigeration serves another crucial purpose: drying the surface. The uncovered steak sits in the refrigerator’s low-humidity environment, allowing surface moisture to evaporate. This dried surface browns and crisps dramatically better than a wet surface during searing. Wet surfaces create steam that prevents browning, while dry surfaces immediately start developing Maillard reaction and caramelization that create crust and complex flavor.
The timing matters – at least eight hours and up to forty-eight hours produces best results. Less than eight hours doesn’t allow adequate time for the salt to penetrate and the surface to dry. More than forty-eight hours in the fridge can make the exterior too dried and leathery. For thick cowboy steaks, twelve to twenty-four hours is the sweet spot. Use kosher salt rather than table salt for dry brining – its coarser crystals distribute more evenly and are easier to control.
Creating Smoke-Infused Butter

The smoky garlic herb butter combines classic compound butter technique with an ingenious smoke-infusion method that adds genuine smoke flavor without hours of slow smoking. Traditional compound butter mixes softened butter with herbs, garlic, and seasonings, then gets rolled into a log and chilled to slice over hot steaks. This version goes further by suspending melted butter over a piece of lit charcoal, allowing smoke to infuse directly into the fat.
The technique works because smoke is composed of tiny particles and aromatic compounds that dissolve readily in fat. Butter’s high fat content makes it an ideal medium for capturing smoke flavor. The covered environment traps smoke around the butter, forcing it to absorb maximum smoke in just two to three minutes. The result tastes like the steak spent hours in a smoker, though the actual smoke exposure is brief.
The charcoal must be lump charcoal rather than briquettes for this technique. Lump charcoal is pure wood that’s been charred, producing clean smoke with wood aromatics. Briquettes contain binders, fillers, and sometimes lighter fluid residue that create acrid, chemical smoke unsuitable for food. A piece about the size of a walnut produces adequate smoke without overwhelming the butter. The charcoal should be fully lit and glowing red-orange with light smoke rising from it.
Fresh garlic, parsley, rosemary, and thyme create the classic herb profile that complements beef beautifully. The garlic must be sautéed gently in the melting butter – raw garlic would taste harsh and sharp while cooked garlic becomes sweet and mellow. The heat also releases the herbs’ essential oils, making them more aromatic. Smoked paprika reinforces the smoke flavor while adding color, though it’s optional if you’re using the charcoal technique.
The butter serves multiple purposes during grilling. It bastes the steak with fat that promotes additional browning and crust development. The butter’s milk solids caramelize on the hot surface, adding nutty, toasted notes. The garlic and herbs create aromatic crust on the steak’s exterior. And the smoke flavor permeates the meat, adding depth that makes the steak taste like it was smoked rather than simply grilled.
Two-Zone Grilling Setup
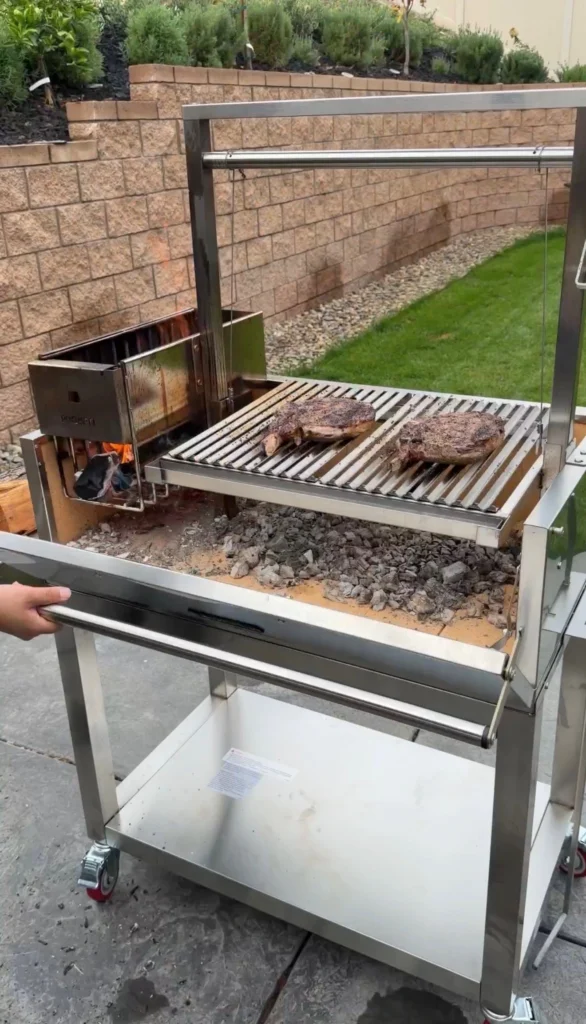
Two-zone grilling creates two distinct heat zones on your grill – one side with direct heat for searing, the other side with no heat underneath for indirect cooking. This setup is essential for thick steaks because direct heat alone would char the outside before the center reaches desired doneness. The indirect zone provides gentle, oven-like heat that gradually brings the interior to temperature after the initial sear develops crust.
For a charcoal grill, arrange all the lit coals on one side of the grill, leaving the other side completely empty. For a gas grill, light burners on one side while leaving the other burners off. The result is a hot zone (direct heat) typically around 450-500°F and a cool zone (indirect heat) around 300-350°F. This temperature differential gives you complete control over the cooking process.
The 300°F target temperature for indirect cooking is crucial. Lower temperatures around 225-250°F work but extend cooking time significantly – thick steaks might take an hour or more. Higher temperatures above 350°F cook too quickly, making it hard to hit precise doneness without overcooking. The 300°F sweet spot cooks thick steaks in twenty to thirty minutes on indirect heat after the initial sear, providing enough time to gradually bring the center to temperature without rushing.
Adding wood chunks (oak or hickory) to the fire enhances smoke flavor, though it’s optional since the butter already provides smoke. Oak provides medium, versatile smoke that complements beef without overwhelming. Hickory is stronger and more assertive – use it if you want pronounced smoke flavor. Avoid mesquite which can be overpowering. Two or three fist-sized chunks produce adequate smoke without being excessive.
Achieving Perfect Doneness
Internal temperature is the only reliable indicator of steak doneness. Visual cues like color or feel can be misleading, especially with thick steaks where the exterior looks done long before the center reaches temperature. An instant-read thermometer takes the guesswork out – insert it into the thickest part of the steak, avoiding the bone which conducts heat and gives false readings.
The temperature targets are: rare (120°F), medium-rare (130°F), medium (140°F), medium-well (150°F), and well-done (160°F+). For thick cowboy steaks, medium-rare to medium provides the best balance of tender texture and beefy flavor. Rare leaves too much unrendered fat that tastes greasy and has chewy texture. Well-done dries out the meat and makes it tough. Medium-rare (130°F) allows enough time for fat to render while keeping the center rosy and juicy.
Remember that steaks continue cooking during resting – the residual heat in the exterior gradually works its way toward the center, raising the internal temperature five to ten degrees. This “carryover cooking” means you should remove steaks from the grill five degrees before your target temperature. For medium-rare (final temp 130°F), remove at 125°F. For medium (final temp 140°F), remove at 135°F.
Resting is non-negotiable for thick steaks. During cooking, heat causes the meat’s proteins to contract, squeezing juices toward the center. If you cut into the steak immediately after cooking, all those juices run out onto the cutting board. Resting five to ten minutes allows the proteins to relax and juices to redistribute throughout the meat. The steak stays juicier with every bite rather than looking like a crime scene on your plate.
The Searing and Basting Process
The initial sear over direct heat develops the flavorful crust through Maillard reaction – the chemical process where proteins and sugars on the meat’s surface break down and recombine into hundreds of new flavor compounds. This browning is where most of the steak’s flavor comes from. Two to three minutes per side over high heat creates deep brown crust with visible grill marks while the interior stays raw. Don’t move the steak during searing – let it sit undisturbed so it releases naturally when properly crusted.
After searing, the steak moves to indirect heat where it cooks more gently. The bone side should face the heat source since the bone acts as an insulator, protecting the meat attached to it. Close the grill lid to create an oven environment that cooks from all sides rather than just the bottom. This allows the steak to cook evenly throughout rather than being burnt on the bottom and raw on top.
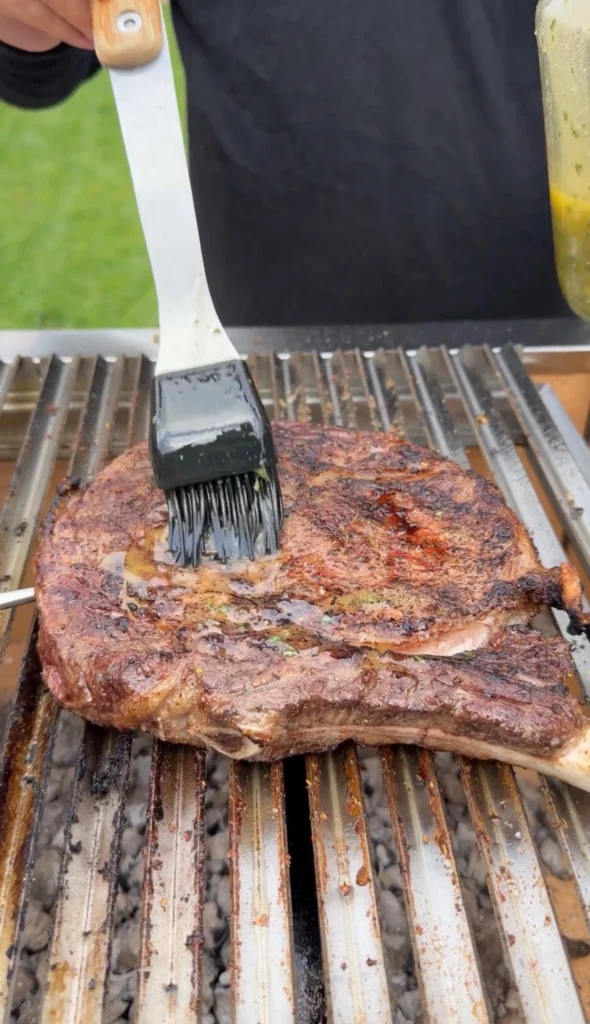
Basting begins about ten minutes before the steak reaches target temperature. Earlier basting wastes butter that drips off, while waiting until the last minutes ensures the butter has time to caramelize on the hot surface without burning. Use a spoon or brush to coat both sides generously with the warm smoky butter. The butter will sizzle and smoke when it hits the hot steak – this is good, creating additional browning and flavor.
Baste twice during the final ten minutes – once immediately when you check the temperature, then again three to four minutes later. Each basting adds another layer of garlic herb flavor while the smoke-infused butter permeates the meat. The butter’s milk solids brown on contact with the hot steak, creating aromatic, nutty notes. The final result is steak with deeply flavored crust that tastes simultaneously grilled, smoked, and herb-crusted.
Ingredients
For the Steaks:
- 2 cowboy ribeye steaks (about 2 inches thick, 2-2.5 lbs each)
- Kosher salt (for dry brining overnight)
- 1-2 tbsp avocado oil (binder)
- 2 tbsp low-sodium all-purpose seasoning (or your favorite steak rub)
For the Smoky Garlic Herb Butter:
- 8 oz (2 sticks) unsalted butter
- 6 cloves fresh garlic, minced
- 2 tbsp fresh parsley, finely chopped
- 1 tbsp fresh rosemary, finely chopped
- 1 tbsp fresh thyme, finely chopped
- ½ tsp black pepper
- ½ tsp smoked paprika (optional, enhances smokiness)
- 1 small lump of lit lump charcoal (for smoke infusion)
Step-by-Step Instructions
Dry Brine the Steaks the Day Before
Remove the cowboy steaks from their packaging and pat completely dry with paper towels. Place a wire rack on a rimmed baking sheet – the rack allows air to circulate around the steaks while the sheet catches any drips. Place the steaks on the rack with space between them.
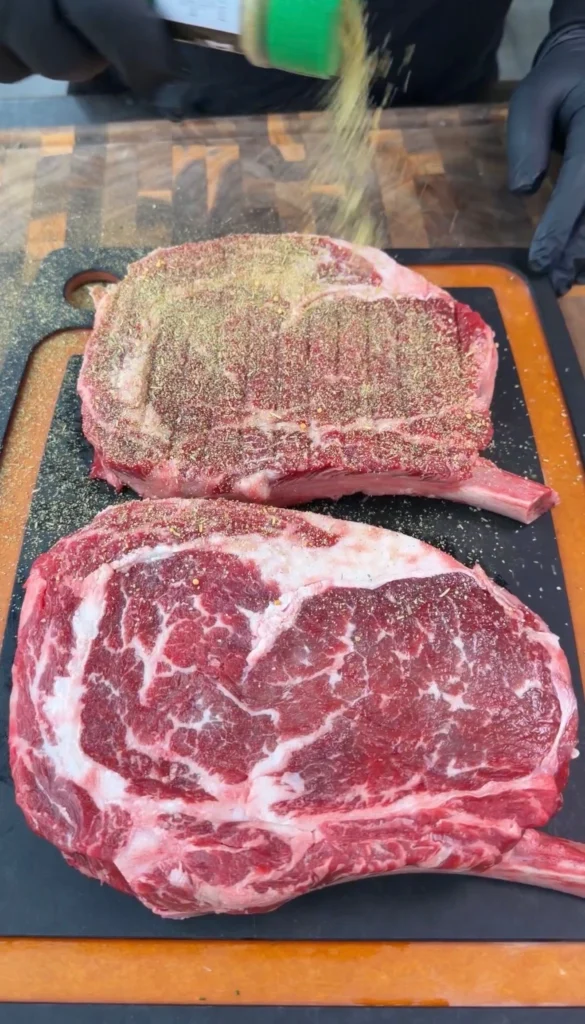
Generously season both sides of each steak with kosher salt. Use more than seems reasonable – you want visible salt crystals covering the surface. Don’t worry about over-salting; much of it will be absorbed and the rest can be brushed off. Salt the bone and edges too. The goal is complete coverage that will penetrate throughout the thick meat.
Place the salted steaks uncovered in the refrigerator. Uncovered is crucial – covering would trap moisture and prevent the surface from drying. The low humidity in the refrigerator will gradually dry the exterior while the salt penetrates. Refrigerate for at least twelve hours and up to twenty-four hours. The longer time allows more thorough seasoning and better surface drying.
Prepare the Steaks for Grilling
Remove the dry-brined steaks from the refrigerator thirty to forty-five minutes before grilling to take off the chill. Cold steaks don’t cook evenly – the exterior overcooks before the center warms up. Room temperature steaks cook more uniformly from edge to center.
Pat the steaks completely dry again with paper towels. Any surface moisture from the dry brine will interfere with searing. The surface should feel tacky and dry to the touch. If there’s excess salt visible on the surface, you can brush some off, but most will have been absorbed overnight.
Drizzle or brush a thin coating of avocado oil over all surfaces of each steak. The oil acts as a binder that helps the seasoning adhere while promoting better browning. Avocado oil has a high smoke point (around 500°F) making it ideal for high-heat grilling without burning. Sprinkle the all-purpose seasoning evenly over both sides of each steak, pressing gently to adhere. Set the seasoned steaks aside while you prepare the butter.
Make the Smoky Garlic Herb Butter

In a small saucepan, melt the two sticks (eight ounces) of unsalted butter over low heat. Once melted, add the six cloves of minced garlic. Let the garlic sizzle gently for one to two minutes until fragrant and just starting to turn golden around the edges. Don’t let it brown deeply or burn – you want the garlic to soften and release its flavor without developing bitter, burnt notes. The heat should be gentle enough that the butter barely bubbles.
Stir in the two tablespoons of finely chopped fresh parsley, one tablespoon each of finely chopped fresh rosemary and thyme, half teaspoon of black pepper, and half teaspoon of smoked paprika if using. Stir everything together and remove the saucepan from heat. The herbs will wilt slightly in the hot butter, releasing their essential oils. Set aside while you prepare the charcoal smoke infusion.
For the smoke infusion technique: Light a small piece of lump charcoal (about walnut-sized) using a torch or by placing it in the hot grill coals until glowing red-orange with light smoke rising. Using tongs, carefully place the lit charcoal in a small heatproof bowl. Immediately place a slightly larger heatproof bowl containing the melted butter mixture directly over the charcoal, making sure the bowls don’t touch. Cover both bowls tightly with aluminum foil or a large metal bowl, creating a sealed environment that traps the smoke.
Let the butter sit covered over the smoking charcoal for two to three minutes. You’ll smell the smoke permeating the butter. After two to three minutes, carefully remove the covering (it will be smoky inside – don’t breathe deeply right when you remove it) and lift the butter bowl away from the charcoal. Remove the charcoal from the bowl using tongs and discard it safely in a metal container with water. The butter should now smell noticeably smoky with a light gray tinge from the smoke. Keep the butter warm until needed for basting.
Set Up the Grill for Two-Zone Cooking
Light your charcoal grill or preheat your gas grill. For charcoal, light enough coals to cover half the bottom of the grill in a single layer. Once the coals are covered with white ash and glowing red (about fifteen to twenty minutes), arrange them all on one side of the grill, leaving the other side completely empty. This creates your hot direct-heat zone and cool indirect-heat zone.
For a gas grill, light the burners on one side to high while leaving the burners on the other side completely off. Close the lid and preheat for ten to fifteen minutes. Aim for about 300°F on the indirect side and 450-500°F on the direct side. Use a grill thermometer to verify temperatures if your grill doesn’t have built-in gauges.
If using wood chunks for additional smoke, add two or three fist-sized pieces of oak or hickory to the hot coals now. On a gas grill, place wood chunks in a smoker box or wrap in foil with holes poked in it, then place directly over the lit burners. Wait until the wood starts smoking lightly before adding the steaks.
Clean and oil the grill grates using a grill brush, then wipe with an oil-soaked paper towel held with tongs. This prevents sticking and helps create good grill marks.
Sear the Steaks Over Direct Heat
Place both cowboy steaks directly over the hot side of the grill (the side with coals or lit burners). You should hear immediate, aggressive sizzling. Don’t move the steaks – let them sit undisturbed for two to three minutes to develop deep brown crust and grill marks. The steaks will release naturally from the grates when properly seared; if they’re sticking, they need more time.
After two to three minutes, use tongs to lift one corner and check the bottom. It should be deeply browned with visible char marks. If it’s pale or light brown, give it another minute. Once properly seared, flip the steaks and sear the second side for two to three minutes. The goal is a dark brown, almost black crust on both sides with the interior still completely raw. You’re just developing flavor on the exterior – the actual cooking happens next.
Move to Indirect Heat to Finish
Using tongs, carefully transfer the seared steaks to the cool side of the grill (the side with no coals or burners underneath). Position them so the bone side faces toward the heat source – the bone acts as insulation protecting the meat. Close the grill lid to create an oven environment.
Cook undisturbed for ten to fifteen minutes with the lid closed. The steaks are cooking indirectly now, with heat circulating around them rather than directly underneath. This gentle cooking allows the interior to gradually come up to temperature without burning the exterior.
After ten to fifteen minutes, insert an instant-read thermometer into the thickest part of each steak, avoiding the bone. For medium-rare, you’re looking for 125°F (remember it will rise to 130°F during resting). For medium, target 135°F (will rise to 140°F). If the steaks haven’t reached temperature yet, close the lid and continue cooking, checking every five minutes.
Baste with Smoky Butter
Once the steaks reach about ten to fifteen degrees below your target temperature (around 115-120°F for medium-rare), begin basting. Use a spoon or basting brush to generously coat the top surface of each steak with the warm smoky garlic herb butter. The butter will sizzle and smoke when it hits the hot steak. Make sure to get herbs and garlic pieces onto the meat for maximum flavor.
Close the lid and cook for three to four minutes. Open the grill and baste again, coating both the top and sides. Flip the steaks and baste the other side as well. Close the lid and continue cooking until the internal temperature reaches five degrees below your target (125°F for medium-rare, 135°F for medium).
The total indirect cooking time will be twenty to thirty minutes depending on the exact thickness of your steaks and your grill’s temperature. The basting adds flavor while the butter’s fat promotes additional browning and crust development during these final minutes.
Rest, Butter, and Serve
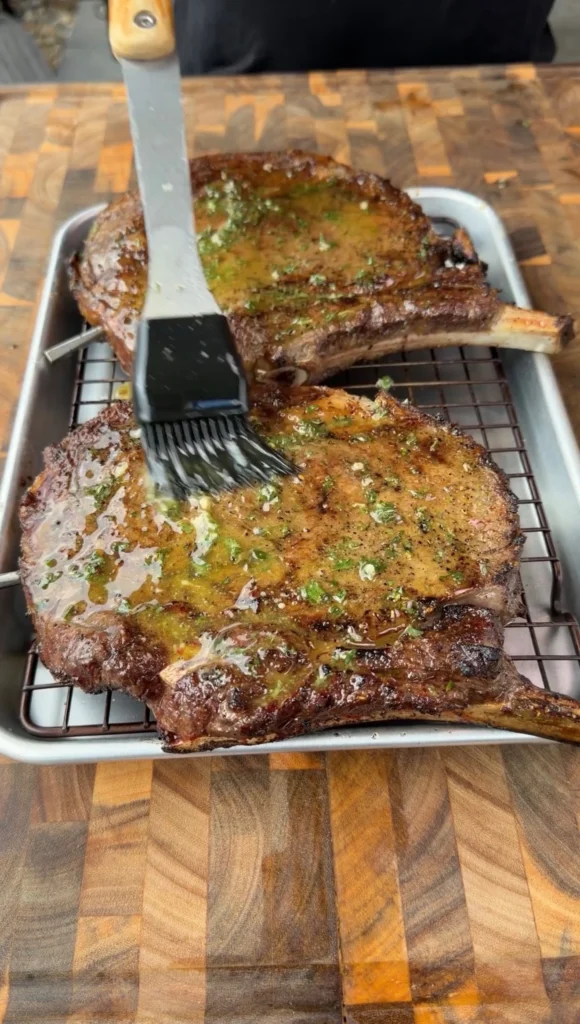
Once the steaks reach target temperature (125-135°F depending on desired doneness), remove them from the grill and transfer to a cutting board. Immediately spoon or brush more of the warm smoky butter over the top of each hot steak. The butter will melt and pool around the steaks, mixing with the juices.
Tent the steaks loosely with aluminum foil and let rest for five to ten minutes. This rest period is crucial – it allows the juices to redistribute throughout the meat while the temperature rises another five to ten degrees from carryover cooking. Don’t skip this step or cut into the steaks early, or all the juices will run out.
After resting, the steaks should register 130°F for medium-rare or 140°F for medium. Spoon any accumulated juices from the cutting board over the steaks. You can serve the cowboy steaks whole for dramatic presentation – each massive steak feeds two people. Or slice them: cut along the bone to remove it, then slice the meat against the grain into thick strips. Arrange the sliced meat on a platter and drizzle with any remaining warm butter. Serve with the bone alongside for dramatic effect and for anyone who wants to gnaw on the perfectly seasoned bone.
FAQ
Can I use a different cut instead of cowboy ribeye? Bone-in ribeyes of any thickness work with this method, though thinner steaks require less cooking time. Boneless ribeyes also work perfectly. T-bone or porterhouse steaks are excellent alternatives that use the same technique. Strip steaks work too but have less marbling than ribeyes. The method doesn’t work as well for leaner cuts like sirloin that benefit from marinades rather than dry brining.
What if I don’t want to do the charcoal smoke trick? The butter is still delicious without the smoke infusion – just skip that step. The smoked paprika provides subtle smokiness, or you can add a few drops of liquid smoke to the butter (use sparingly as it’s concentrated). However, the charcoal technique is so easy and dramatic it’s worth trying at least once.
Can I dry brine for longer than 24 hours? Up to forty-eight hours works, though beyond that the exterior can become too dried and the texture slightly mealy. Twelve to twenty-four hours is the sweet spot for thick cowboy steaks. If you only have a few hours, even two to four hours of dry brining is better than none, though you won’t get the same deep seasoning and surface drying.
How do I know when the steak is done without a thermometer? You really need a thermometer for thick steaks – visual cues are unreliable. The feel test (pressing on the meat) is imprecise and takes practice. An instant-read thermometer costs less than one cowboy steak and removes all guesswork. It’s an essential tool for grilling thick cuts. Insert it through the side into the center for most accurate reading.
Can I make the butter ahead of time? Yes, make the butter (with or without smoke infusion) up to three days ahead. Store refrigerated in an airtight container. Reheat gently before using for basting – don’t microwave it as the herbs can burn. Gently warm in a small saucepan over low heat until just melted. The smoke flavor actually intensifies as the butter sits.
Conclusion
Grilled cowboy steaks with smoky garlic herb butter prove that restaurant-quality results at home require technique more than expensive equipment. The overnight dry brine fundamentally improves the meat through deep seasoning and surface drying that creates superior crust. The two-zone grilling setup prevents the common mistake of cooking thick steaks over direct heat throughout, which burns the exterior before the center cooks. The smoke-infused butter adds genuine smoke flavor in minutes rather than hours while the fresh herbs and garlic create aromatic richness.
What makes this cowboy steak recipe so successful is how each step builds on the previous one. The dry brine prepares the meat for optimal seasoning and crust development. The quick sear creates flavorful browning. The indirect finish gently brings the interior to perfect doneness. The butter basting adds layers of smoke, garlic, and herb flavor while promoting additional caramelization. The result is steak with deeply flavored crust and perfectly cooked interior that rivals the best steakhouses.
These garlic herb butter steaks work beautifully for special occasions and weekend grilling alike. The overnight dry brine requires planning ahead but involves minimal work. The actual grilling takes only thirty to forty minutes and uses straightforward technique accessible to any home cook with a grill. Master the fundamentals – proper seasoning, two-zone cooking, and accurate temperature monitoring – and you’ll consistently produce steaks that impress family and guests while costing a fraction of restaurant prices.
Ready to Take Your Cooking to the Next Level?
This is where I keep all my most-used products, gear, and favorite cooking tools — check it out:
🔥 View My Cooking Gear & ToolsRecipe Categories
If you loved this recipe, you’ll find more to savor across our diverse categories. From beef to pork, chicken to turkey, seafood to appetizers, there’s a wealth of flavors waiting for you. Explore them all at CWFeats.