Honey barbecue grilled party ribs transform traditional rack ribs into finger-food perfection by cutting them into individual bones before grilling. These BBQ party ribs start with two racks of St. Louis-style pork ribs – the rectangular cut with consistent meat-to-bone ratio that’s ideal for even cooking. After removing the membrane and cutting between each bone, the individual ribs get coated in BBQ seasoning and hit the grill at 300-350°F for initial crisping and smoke exposure. The real magic happens when the ribs go into a foil tray covered in honey BBQ sauce – a simple mixture of barbecue sauce, honey, and butter that creates sticky-sweet glaze. The covered tray returns to the grill for thirty to forty-five minutes, essentially braising the ribs in the sweet sauce until they’re pull-apart tender.
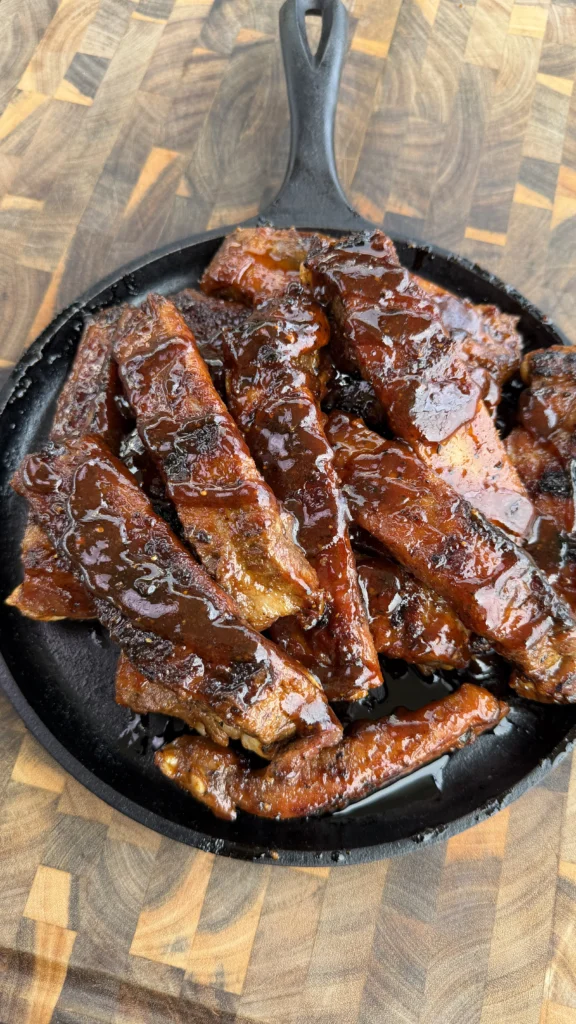
Honey Barbecue Grilled Party Ribs
St. Louis-style pork ribs cut into individual bones, seasoned with BBQ rub, grilled until crispy, then wrapped in foil with honey-butter BBQ sauce until tender and glazed
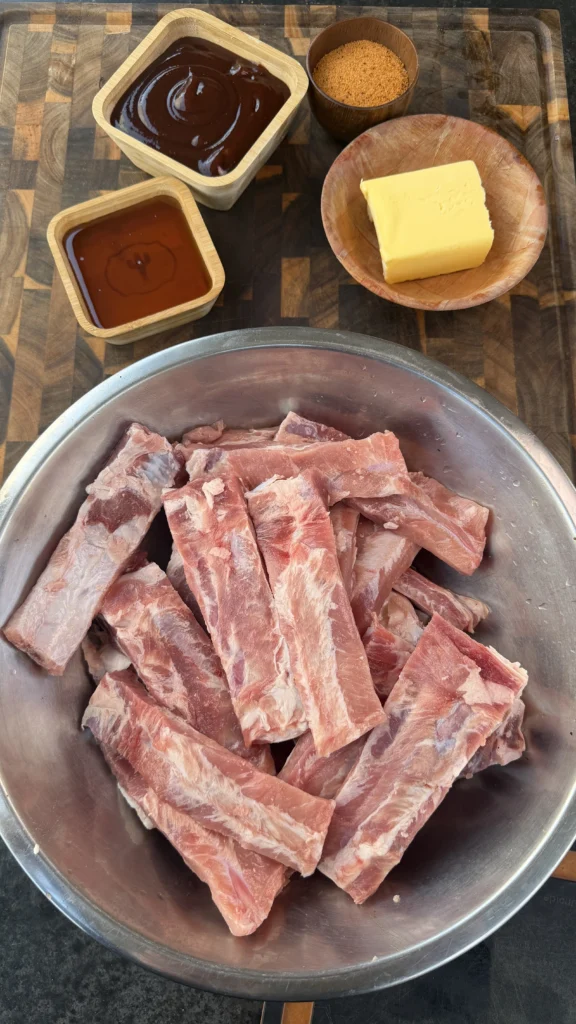
Ingredients
For the Ribs:
- 2 racks St. Louis-style pork ribs
- 3-4 tbsp your favorite BBQ seasoning
- Cooking oil (as a binder, optional)
For the Honey BBQ Sauce:
- 1 ½ cups BBQ sauce (any brand or homemade)
- 1 cup honey
- 6 oz (¾ stick) unsalted butter
What makes this honey BBQ rib recipe special is how cutting the ribs into individual bones before cooking creates more surface area for crust development and sauce penetration. Traditional racks have the bones protected on one side, but individual ribs get seasoned and sauced on all sides. The party rib format also makes serving easier – no knives needed, just grab and eat. The honey-butter BBQ sauce provides the perfect balance of sweet, tangy, and rich that appeals to all ages while creating glossy glaze that looks as good as it tastes.
This grilled BBQ rib recipe delivers competition-quality results through a simplified process that’s more forgiving than traditional low-and-slow methods. The higher temperature (300-350°F versus typical 225°F) cooks the ribs faster while the foil-wrapped braising step ensures they become tender regardless of minor temperature fluctuations. The final uncovered glazing step caramelizes the honey BBQ sauce into lacquered coating that makes these ribs irresistible at any gathering.
Understanding St. Louis-Style Ribs
St. Louis-style ribs are spare ribs that have been trimmed into a rectangular shape by removing the sternum bone, cartilage, and rib tips. This trimming creates uniform thickness from end to end, ensuring even cooking throughout the rack. The rectangular shape also looks cleaner and more professional than untrimmed spare ribs with their irregular edges and varying meat distribution. St. Louis-style ribs typically weigh two and a half to three and a half pounds per rack with ten to thirteen bones.
The meat-to-bone ratio on St. Louis-style ribs is ideal – enough meat to be satisfying but not so much that the bones become secondary. The meat sits in layers between the bones with good fat marbling that renders during cooking to create juicy, flavorful results. Unlike baby back ribs which are smaller and leaner, St. Louis-style ribs have more fat and connective tissue that needs longer cooking to break down but rewards patience with richer flavor and more tender texture.
The bone structure in St. Louis-style ribs is straighter and flatter than spare ribs, making them easier to cut into individual pieces. Each bone is roughly the same length with similar meat coverage, so when you separate them, you get uniform portions that cook at the same rate. This consistency is crucial when making party ribs – you don’t want some bones overdone while others are underdone.
St. Louis-style ribs are widely available at grocery stores and butcher shops, often sold in cryovac packaging. Look for ribs with good meat coverage across all bones rather than racks where some bones have little meat. The meat should be pink-red without gray discoloration, and there should be visible marbling throughout. Avoid racks with excessive fat caps or minimal meat between the bones.
Why Cut Ribs Into Individual Bones
Cutting ribs into individual bones before cooking might seem unconventional, but it provides several advantages for party-style cooking. The separation creates dramatically more surface area – every side of each bone gets exposed to heat, smoke, and seasoning rather than just the two exterior surfaces of a rack. This means more crust development, more bark formation, and more caramelized sauce coating. Each individual rib becomes its own flavor-packed bite.
The individual bones also cook more evenly than racks. In a traditional rack, the bones on the ends receive more heat exposure than the bones in the middle, often resulting in dry ends and undercooked centers. When separated, each bone gets equal heat exposure from all sides. This eliminates hot spots and ensures every piece reaches the same level of doneness simultaneously.
From a serving perspective, individual ribs are perfect for parties and gatherings. Guests can grab one or two bones without utensils or plates, eating them while standing and socializing. There’s no awkward cutting or tearing required – each bone is already portioned. The finger-food format makes these ribs ideal for casual outdoor events, game day parties, or any situation where you want food that’s easy to eat while mingling.
The cutting also allows the honey BBQ sauce to penetrate from all directions during the foil-wrapped braising step. Instead of sauce only coating the exterior of a rack, it surrounds each individual bone, seeping into every crevice and ensuring maximum flavor penetration. This creates more intensely flavored ribs than you’d get from saucing a whole rack.
Membrane Removal Technique
The membrane (also called the silverskin) is a thin, tough layer of connective tissue on the bone side of ribs. This membrane doesn’t break down during cooking – it stays rubbery and chewy, creating an unpleasant textural barrier between your teeth and the tender meat underneath. Removing it before cooking is essential for ribs that are enjoyable to eat. Without membrane removal, sauce can’t penetrate the bone side, seasoning doesn’t stick, and each bite requires pulling through tough skin.
Removing the membrane is straightforward with proper technique. Start at one end of the rack – often there’s a flap of membrane already lifting at the corner. Slide a butter knife or your finger under the membrane to create a starting point, then grab the loosened membrane with a paper towel for better grip. The paper towel prevents slipping since the membrane is slick. Pull firmly and steadily toward the other end of the rack, and ideally the entire membrane comes off in one piece. If it tears, just start again where it broke.
Sometimes the membrane is already removed by the butcher – check before you start cutting. If you see shiny, slick silver-white tissue on the bone side, that’s membrane that needs removal. If the bone side looks like dull pink meat with visible texture, the membrane is already gone. Some packaged ribs advertise “membrane removed” on the label, saving you this step.
For party ribs where you’re cutting into individual bones, you could technically skip membrane removal since you’re cutting through it anyway when separating the bones. However, removing it first makes cutting easier and ensures better seasoning coverage on all surfaces. The choice is yours – it takes an extra three minutes but improves the final texture.
The Three-Component Honey BBQ Sauce
The honey BBQ sauce combines three simple ingredients that work synergistically to create complex flavor and luxurious texture. The barbecue sauce base provides the foundational flavor – tangy, spicy, tomato-forward notes that define BBQ. You can use any style – Kansas City sweet and thick, Carolina vinegar-based, Memphis tomato-pepper, or your homemade favorite. The sauce you choose determines the overall character, so pick one you genuinely enjoy eating straight from the bottle.
Honey contributes natural sweetness that’s more complex than regular sugar. The floral, slightly fruity notes in honey complement the spices in BBQ sauce while adding glossy sheen and sticky texture. As the honey heats, it becomes more fluid and helps the sauce cling to the ribs. During the final glazing step, the honey caramelizes slightly, creating deeper color and more complex sweet-roasted flavor. One cup of honey to one and a half cups of sauce creates noticeably sweet glaze that appeals to most palates without being cloying.
Butter – six ounces or three-quarters of a stick – adds richness and helps the sauce coat more evenly. The fat in butter carries flavor compounds more effectively than water-based sauces alone, making every element taste more intense. Butter also creates silkier mouthfeel and helps the sauce emulsify into uniform consistency rather than separating into watery and thick parts. As it melts, the milk solids in butter add subtle nutty, caramelized notes that round out the sauce’s flavor profile.
The combination creates sauce that’s simultaneously sweet, tangy, rich, and slightly smoky (from the BBQ sauce’s spices). The consistency should be pourable but not runny – thick enough to coat the ribs but thin enough to seep into all the crevices. The warm sauce penetrates better than cold sauce, so keep it gently heated until you’re ready to use it for coating the ribs.
Grilling Temperature and Setup
The 300-350°F temperature range for grilling these party ribs is significantly higher than traditional low-and-slow smoking at 225°F, but it works perfectly for this style of cooking. The higher heat creates more aggressive browning and crust development during the initial grilling phase while still allowing adequate time for the meat to cook through. Since these ribs will be wrapped in foil with liquid (the sauce), they won’t dry out even at this higher temperature.
Setting up for indirect heat prevents flare-ups and hot spots that would char the ribs before they cook through. For a charcoal grill, bank all the coals to one side, leaving the other side empty. For a gas grill, light burners on one side while leaving the other burners off. This creates a cooler zone where you can move ribs if they’re getting too dark. However, since these are individual bones rather than full racks, they cook quickly enough that you can often use more direct heat than you would with traditional racks.
The grill should be preheated for at least ten to fifteen minutes to ensure the grates are hot and clean. Hot grates sear the meat immediately upon contact, creating attractive grill marks and preventing sticking. Use a grill brush to clean any residue from previous cooking, then oil the grates lightly using a paper towel dipped in oil and held with tongs. This creates a non-stick surface that makes flipping the individual ribs easier.
Wood chunks or chips can be added for smoke flavor if desired, though they’re optional. Since these ribs spend significant time wrapped in foil, they won’t absorb as much smoke as traditional unwrapped smoking would provide. If using wood, oak or hickory work well with pork. Two or three fist-sized chunks provide adequate smoke without overwhelming the honey BBQ flavor.
The Foil-Wrapped Braising Technique
Wrapping the sauced ribs in foil and returning them to the grill creates a braising environment where the meat cooks in the moisture from the sauce. This technique – similar to the famous “Texas crutch” used in competition BBQ – dramatically accelerates the tenderizing process. The foil traps steam and heat around the ribs, essentially creating an oven environment where the meat braises in the honey BBQ sauce. This breaks down the collagen and connective tissue that would take hours to break down in dry heat.
The foil also prevents the sauce from burning. During the thirty to forty-five minute wrapped cooking time, the sauce reduces slightly and its sugars begin caramelizing, but the enclosed environment prevents direct heat from scorching the honey before the ribs tenderize. The steam keeps everything moist while the sauce’s flavors penetrate deep into the meat. The ribs essentially poach in the sweet, tangy sauce, absorbing its flavors while becoming fall-off-the-bone tender.
Using a foil tray rather than wrapping each rib individually makes the process more manageable and allows you to toss the ribs in sauce for even coating. A disposable aluminum roasting pan works perfectly – it’s large enough to hold all the individual ribs in a single layer while being easy to handle with grill gloves. The tray can go directly on the grill grates, and you can easily peek under the foil to check progress without unwrapping everything.
The covered cooking time of thirty to forty-five minutes depends on several factors: the thickness of your ribs, the exact temperature of your grill, and your desired texture. Start checking after thirty minutes by piercing a rib with a fork – it should slide in with minimal resistance when done. Some people prefer ribs that still have slight chew (thirty to thirty-five minutes), while others want fall-off-the-bone tender (forty to forty-five minutes). The choice is personal preference.
Final Glazing for Caramelized Finish
The last ten minutes of uncovered cooking transforms the ribs from tender and sauced to beautifully glazed with caramelized, slightly tacky coating. Removing the foil allows moisture to evaporate from the sauce, concentrating its flavors and thickening its consistency. The sauce that seemed thin when you first poured it over the ribs has now reduced into glossy glaze that clings to every surface. The honey’s natural sugars caramelize during this step, creating deeper color and complex sweet-roasted notes.
This uncovered finishing step also crisps the exterior slightly after the moist braising environment. While the ribs have become tender during covered cooking, they can be somewhat soft throughout. The final ten minutes of exposure to direct heat firms up the surface, creating textural contrast between the crispy-tacky exterior and the tender meat underneath. This is the difference between good ribs and great ribs – the interplay of textures makes each bite more interesting.
Watch the ribs carefully during this final glazing – the thin line between perfectly caramelized and burnt is narrow when working with honey-based sauces. The sauce should darken to mahogany with some darker spots where it’s concentrated, but not black char. If you see the sauce starting to burn, reduce the heat or move the tray to a cooler part of the grill. Some people like to move the individual ribs directly onto the grill grates for the last minute or two, exposing them to direct flame for extra caramelization and slight char. This is optional but creates even more dramatic flavor.
The finished ribs should look deeply colored with glossy sheen, and when you touch them (carefully – they’re hot), the surface should feel slightly tacky and sticky. That tackiness is the concentrated honey BBQ sauce that’s been reduced to candy-like consistency. As the ribs cool for a few minutes before serving, this glaze will firm up slightly while remaining tender enough to bite through easily.
Ingredients
For the Ribs:
- 2 racks St. Louis-style pork ribs
- 3-4 tbsp your favorite BBQ seasoning
- Cooking oil (as a binder, optional)
For the Honey BBQ Sauce:
- 1 ½ cups BBQ sauce (any brand or homemade)
- 1 cup honey
- 6 oz (¾ stick) unsalted butter
Step-by-Step Instructions
Prep the Ribs and Remove Membrane
Remove both racks of St. Louis-style ribs from their packaging and place them bone-side up on a large cutting board. Check if the membrane (the thin, shiny layer on the bone side) is still attached. If you see slick, silver-white tissue, it needs to be removed.
To remove the membrane, start at one end of the rack where you can often find a loose corner. Slide a butter knife or your finger under the membrane to create a starting point, lifting it away from the bones. Grab the loosened membrane with a paper towel for better grip – it’s slippery without the paper towel. Pull firmly and steadily toward the opposite end of the rack. The membrane should peel off in one piece, though it sometimes tears. If it tears, just start again where it broke. Repeat with the second rack.
Once the membrane is removed from both racks, you’ll see dull pink meat on the bone side with visible texture rather than shiny tissue. Now use a sharp chef’s knife to cut between each bone, separating the racks into individual ribs. Cut as close to the bone as possible to maximize meat on each piece. You should end up with twenty to twenty-six individual rib bones total from both racks, depending on how many bones each rack had.
Season the Individual Ribs

If using oil as a binder, lightly drizzle or brush cooking oil over all surfaces of the individual ribs. The oil helps the seasoning stick and promotes better browning, though it’s optional – the natural moisture on the meat surface is often sufficient. Place all the individual ribs on a large baking sheet or platter.
Generously season all sides of each rib with your favorite BBQ seasoning. Use three to four tablespoons total for all the ribs – don’t be shy with seasoning since some will fall off during handling and cooking. Make sure to season the meat sides, bone sides, and all edges. The individual bone format means there’s a lot of surface area to cover. Pat the seasoning gently to help it adhere.
Let the seasoned ribs sit at room temperature for fifteen to twenty minutes while you preheat the grill. This rest allows the seasoning to dissolve slightly into the meat’s surface moisture while taking the chill off if the ribs came straight from the refrigerator. Room temperature ribs cook more evenly than cold ribs.
Preheat Grill and Set Up for Indirect Heat
Preheat your grill to 300-350°F. For a charcoal grill, light enough coals to cover about half the bottom of the grill. Once they’re covered with white ash and glowing red (about fifteen to twenty minutes), bank them all to one side, leaving the other side empty. This creates your hot direct-heat zone and cooler indirect-heat zone.
For a gas grill, light the burners on one side to medium-high while leaving the burners on the other side off. Close the lid and let the grill preheat for ten to fifteen minutes. Use a grill thermometer to verify you’re in the 300-350°F range. Adjust burner settings as needed to maintain this temperature.
Clean the grill grates with a grill brush to remove any residue from previous cooking. Using a paper towel dipped in cooking oil and held with long tongs, wipe the grates to create a non-stick surface. This prevents the ribs from sticking and makes flipping easier.
Initial Grilling – Crisp and Brown
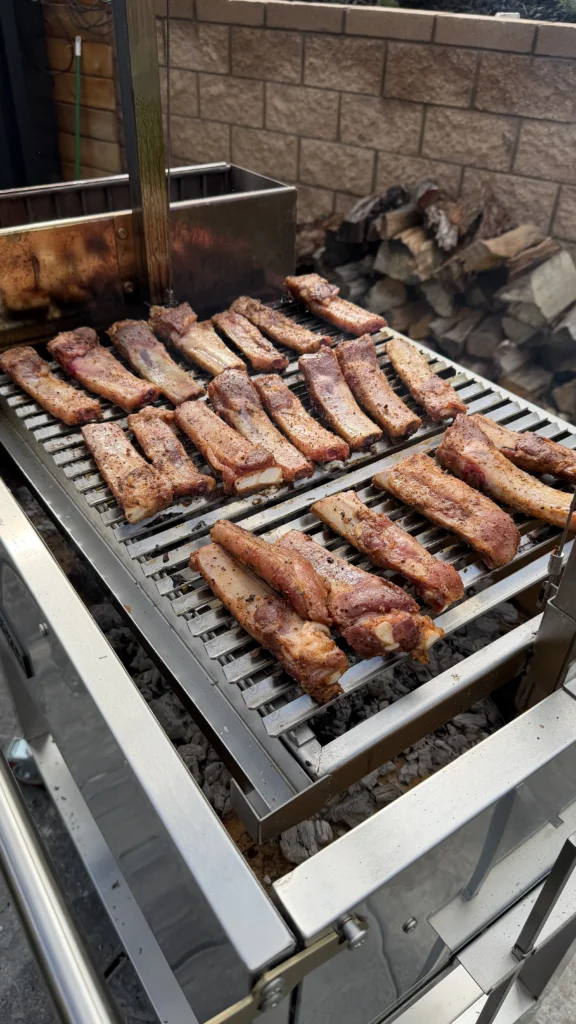
Place all the individual ribs on the grill grates, bone-side down. You can use the hotter side of the grill for this initial phase since you want good browning and crust development. Arrange the ribs so they’re not touching each other – you want air and heat to circulate around each piece.
Close the grill lid and cook for about ten minutes. During this time, open the grill occasionally and move the ribs around, rotating their positions to ensure even cooking. Some spots on the grill are hotter than others, so rotating prevents some ribs from getting too dark while others barely brown. You’re looking for the ribs to develop some color and for the exterior to crisp up slightly.
After ten minutes, flip each rib to the meat side using tongs. The bone side should now have some browning and the surface should look dry rather than raw and moist. Close the lid and continue grilling for another thirty to forty minutes, continuing to rotate the ribs every ten to fifteen minutes for even cooking.
During this phase, the ribs are developing deep color and caramelized crust while beginning to cook through. The meat should darken from pink-red to more brownish-red, and you should see some rendered fat on the surface. The exterior should look deeply colored but not charred. If any ribs are getting too dark, move them to the cooler side of the grill.
Make the Honey BBQ Sauce
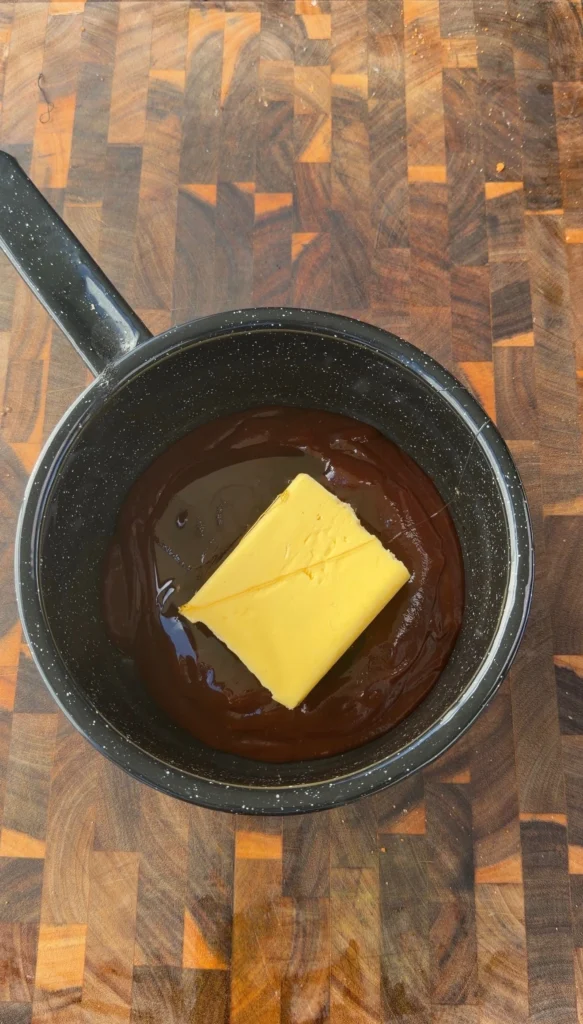
While the ribs are grilling, prepare the honey BBQ sauce. In a small saucepan, combine one and a half cups of your favorite BBQ sauce, one cup of honey, and six ounces (three-quarters of a stick) of unsalted butter. Place over medium-low heat.
Stir the mixture as the butter melts, combining everything into smooth, uniform sauce. Once the butter has completely melted and everything is well mixed, reduce the heat to low and let simmer very gently for two to three minutes. The sauce should be hot, smooth, and glossy. Don’t let it boil vigorously – you just want it warm enough that all components are fully combined.
Remove the sauce from heat and set aside. Keep it warm if possible – warm sauce penetrates and coats better than cold sauce. If you made the sauce ahead and it cooled, gently reheat it before using.
Sauce the Ribs
After the ribs have grilled for a total of forty to fifty minutes (ten minutes bone-side down, then thirty to forty minutes meat-side down), they should be deeply colored with good crust formation. Remove all the ribs from the grill and place them in a large disposable aluminum foil pan or roasting pan. The pan should be big enough that the ribs can fit in roughly a single layer, though some overlap is fine.
Pour the entire batch of warm honey BBQ sauce over the ribs in the pan. Using tongs, toss and turn the ribs to coat every piece thoroughly with sauce. Every surface should be covered in the glossy honey BBQ mixture. Work quickly so the sauce stays warm and fluid.
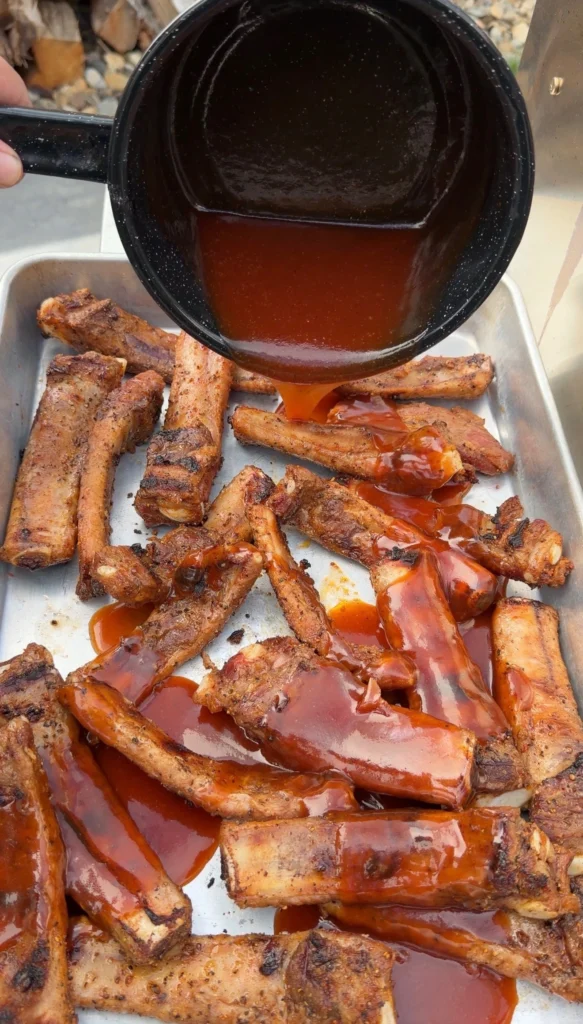
Cover the entire pan tightly with heavy-duty aluminum foil, crimping the edges to seal completely. You want to trap all the steam and heat inside. If your foil isn’t quite large enough, use two overlapping sheets to ensure complete coverage.
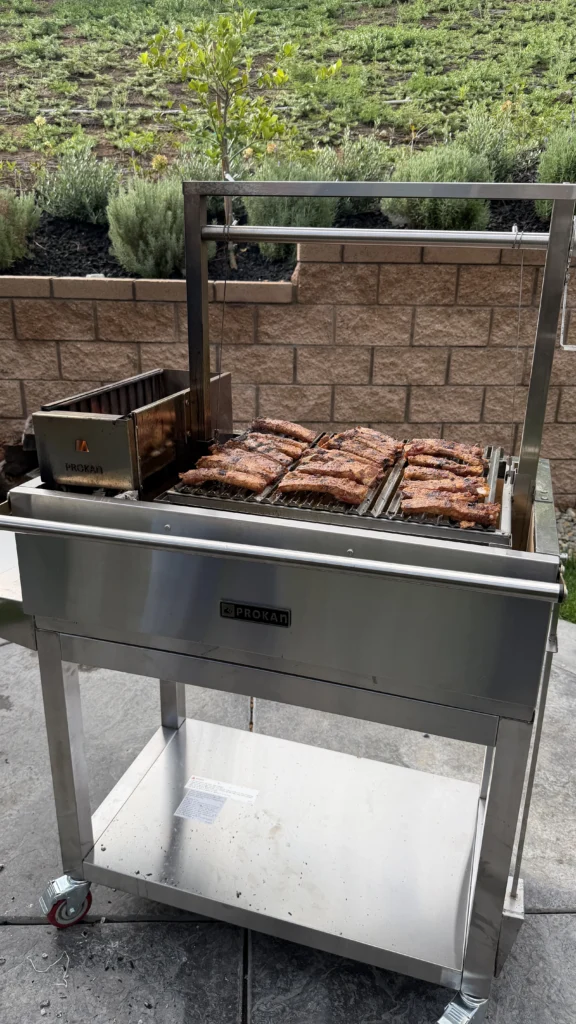
Return to Grill for Tenderizing
Place the covered foil pan directly on the grill grates. The exact location doesn’t matter as much now since the foil creates its own enclosed environment, but avoid the very hottest spots if possible. Close the grill lid.
Cook covered for thirty to forty-five minutes. During this time, the ribs are braising in the honey BBQ sauce, with the steam and heat trapped by the foil breaking down the connective tissue and tenderizing the meat. The sauce’s flavors are penetrating deeply while its sugars begin caramelizing.
After thirty minutes, carefully lift one corner of the foil (watch for hot steam) and pierce a rib with a fork to test tenderness. The fork should slide in with minimal resistance when the ribs are done. If there’s still significant resistance, re-cover and cook another ten to fifteen minutes. For fall-off-the-bone texture, cook the full forty-five minutes.
Final Glazing – Uncovered Finish
Once the ribs are tender, carefully remove the foil covering (again, watch for hot steam that will rush out). The ribs should be sitting in reduced sauce that’s thickened considerably and darkened in color. Return the uncovered pan to the grill.
Cook uncovered for the final ten minutes, allowing the sauce to thicken further and caramelize on the ribs’ surface. You’ll see the sauce reducing and concentrating, becoming glossier and tackier. The ribs’ exterior will firm up slightly and develop deeper color as the honey caramelizes.
Watch carefully during this final phase – the concentrated sugars can burn quickly. If you see any spots turning black rather than deep brown, reduce the heat or move the pan to a cooler area. For extra caramelization, you can optionally remove individual ribs from the pan and place them directly on the grill grates over direct heat for one to two minutes, watching carefully to prevent burning.
Rest and Serve
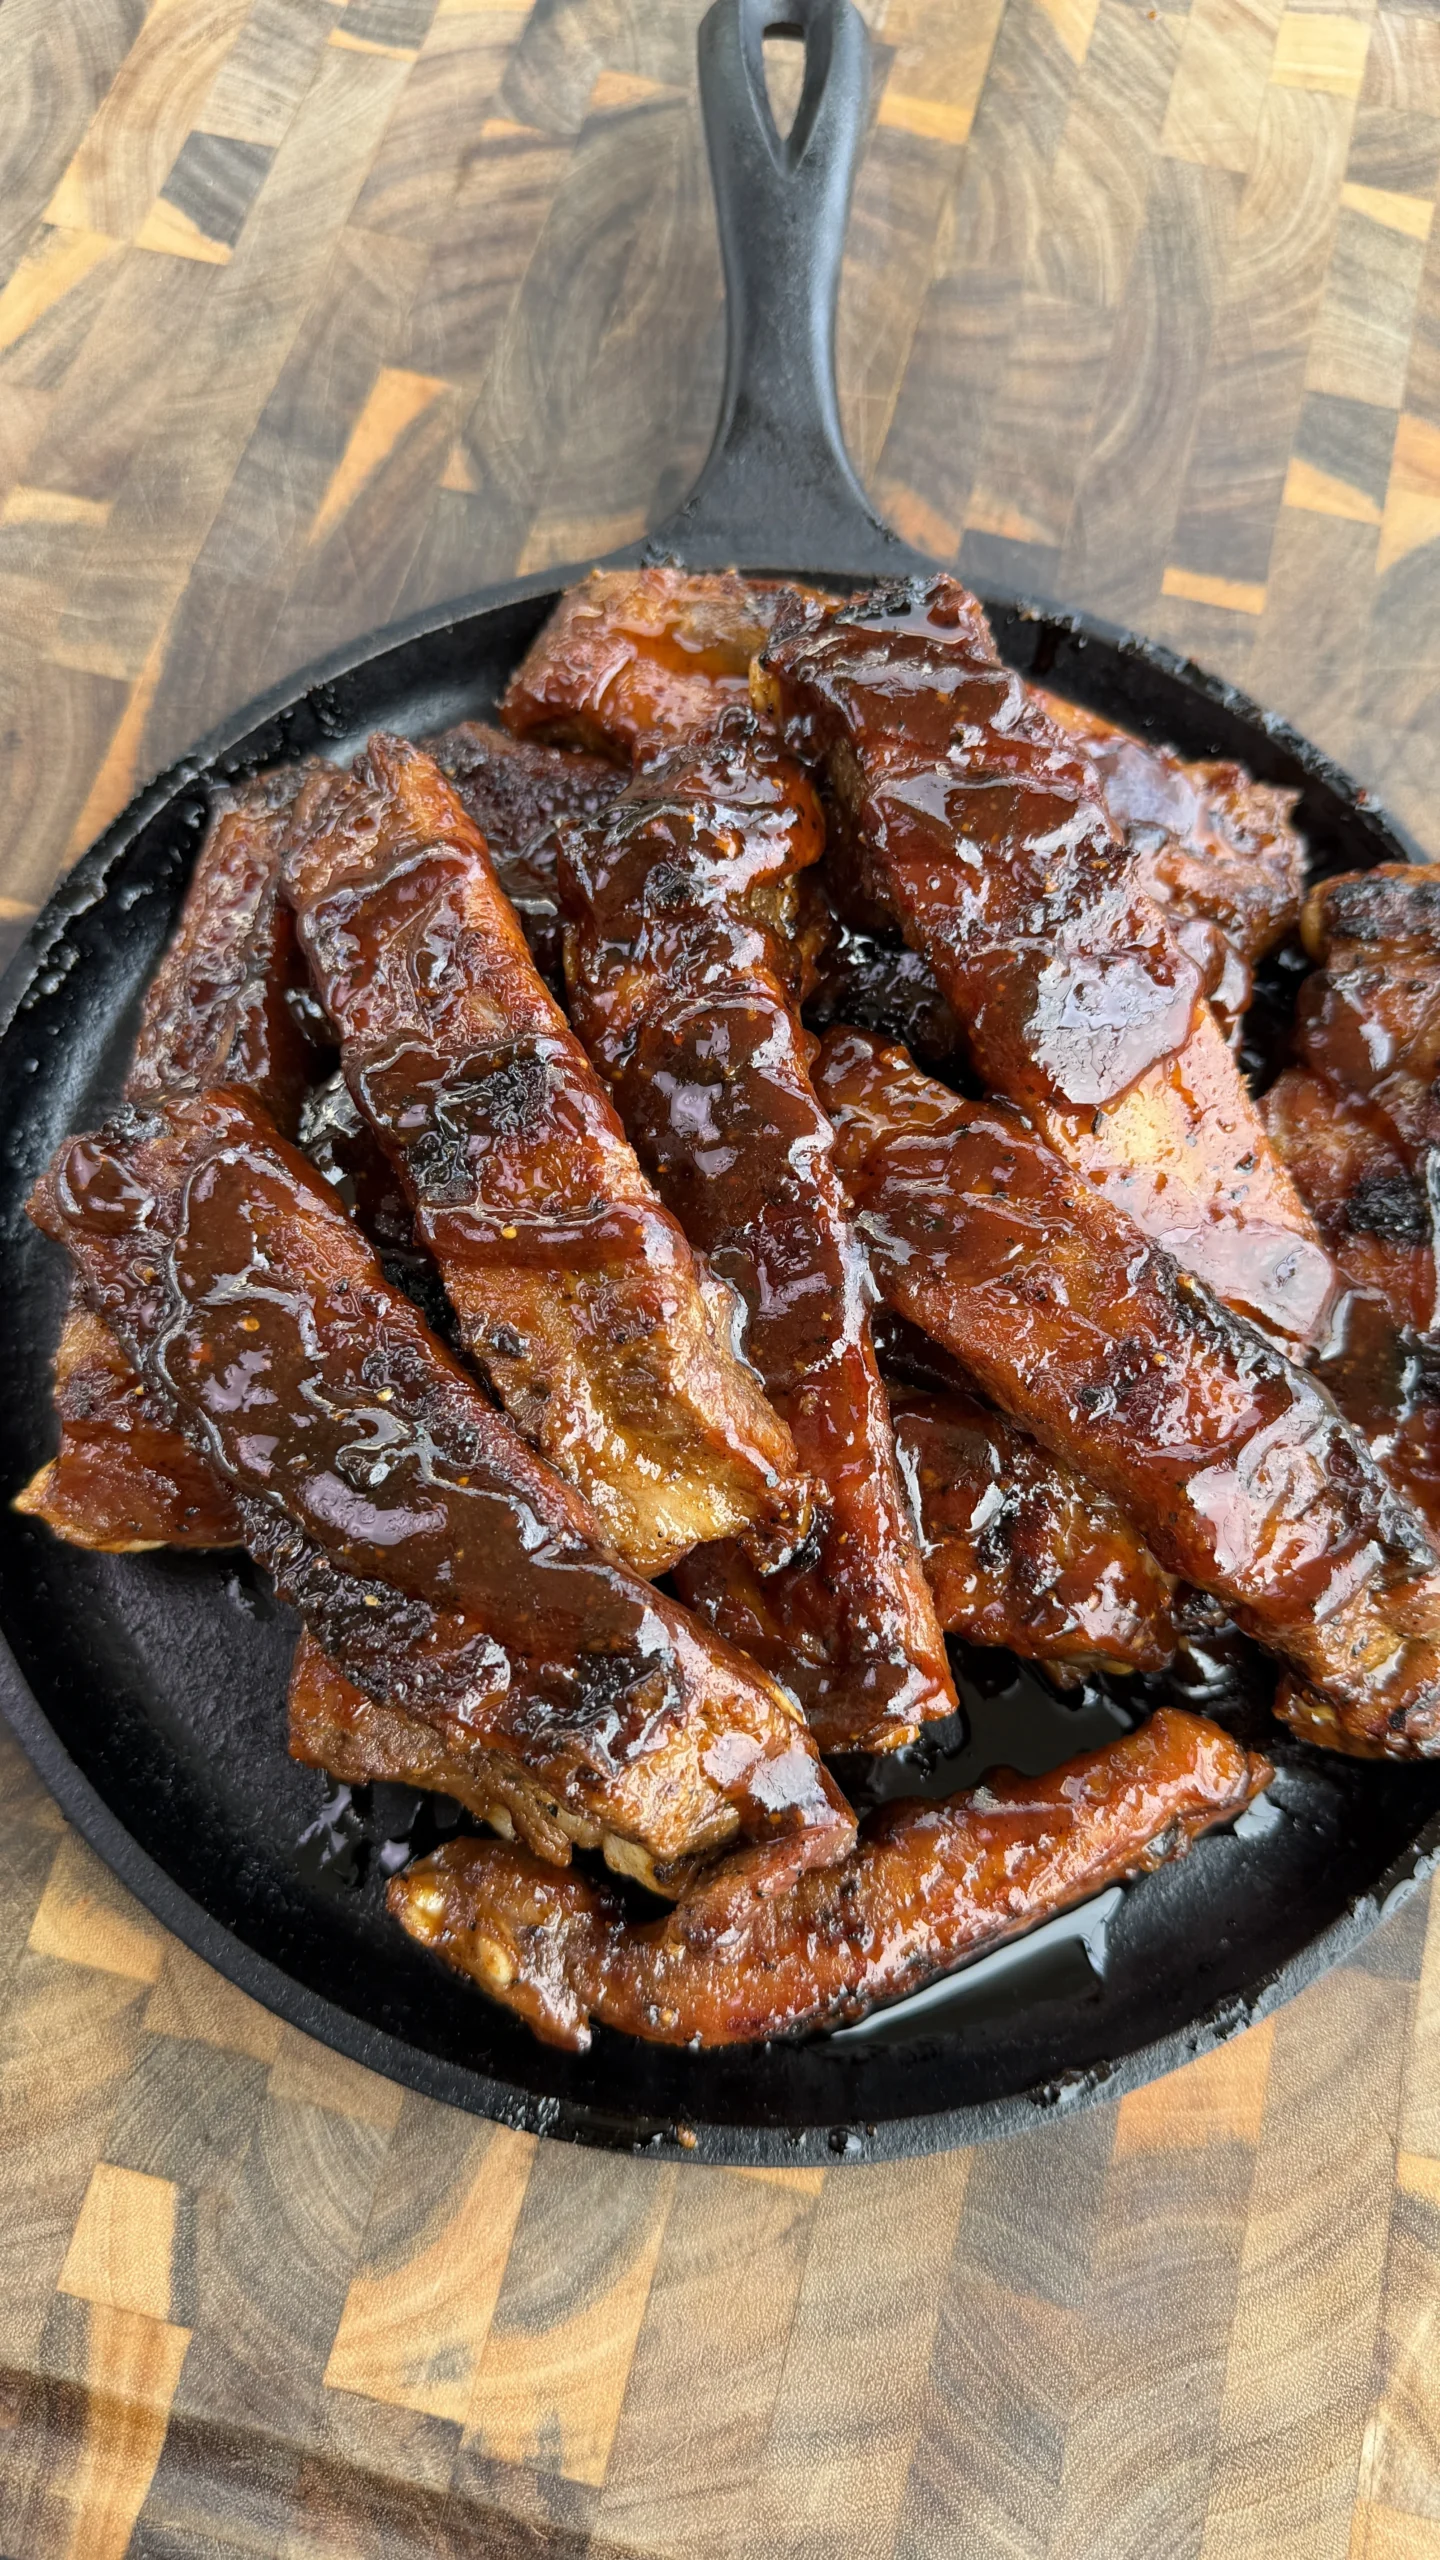
Once the ribs are deeply glazed with mahogany color and slightly tacky surface, remove the pan from the grill. Let the ribs rest in the pan for five minutes before serving. This brief rest allows the sauce to set slightly and the temperature to drop from dangerously hot to merely very warm, making them safer to eat.
The ribs should be fall-apart tender with sticky-sweet glaze coating every surface. Each rib should pull cleanly away from the others with minimal effort. Arrange the glazed ribs on a serving platter, spooning any extra sauce from the pan over the top. Serve warm with plenty of napkins – these are gloriously messy finger food that’s impossible to eat neatly.
FAQ
Can I use baby back ribs instead of St. Louis-style?
Yes, baby back ribs work with this method, though they’re smaller and leaner so they’ll cook faster. Reduce the wrapped cooking time to twenty to thirty minutes instead of thirty to forty-five. Baby backs also have less meat per bone, so you’ll need three racks instead of two to serve the same number of people. The technique remains the same.
What if I don’t have a foil pan?
You can make a double-layer foil packet instead. Place the sauced ribs on a large double-layer of heavy-duty foil, fold up the edges, and crimp to seal tightly. This creates the same steaming environment as a covered pan. Just be careful when opening – the steam will be trapped inside and can burn you.
Can I make these in the oven instead of on the grill?
Absolutely. Preheat oven to 350°F. Place seasoned individual ribs on a foil-lined baking sheet and roast for forty to fifty minutes. Transfer to a foil pan with sauce, cover, and return to oven for thirty to forty-five minutes. Uncover and roast final ten minutes for glazing. They won’t have grill marks or smoke flavor, but they’ll be tender and delicious.
How do I store and reheat leftovers?
Store leftover ribs in an airtight container refrigerated for up to four days. Reheat in a covered foil pan in a 300°F oven or grill for fifteen to twenty minutes until warmed through. You can also microwave individual ribs, though they won’t be as crispy. Add a splash of water or extra BBQ sauce before reheating to prevent drying.
Can I prep these ahead of time?
You can cut and season the ribs up to twenty-four hours ahead. Store covered in the refrigerator, then bring to room temperature before grilling. The honey BBQ sauce can be made several days ahead and refrigerated, then gently reheated before using. However, the actual grilling should be done the day of serving for best texture.
Conclusion
Honey barbecue grilled party ribs prove that restaurant-quality ribs don’t require expensive smokers or twelve-hour cook times. Cutting the ribs into individual bones before cooking creates more surface area for seasoning and sauce while making them perfect party food that requires no utensils. The simplified cooking method – initial grilling for crust, foil-wrapped braising for tenderness, final glazing for caramelization – delivers consistently excellent results without demanding constant temperature monitoring or specialized equipment.
What makes this honey BBQ rib recipe so successful is how each step builds toward the final result. The BBQ seasoning creates the foundational flavor, the initial grilling develops crust and grill marks, the foil-wrapped braising tenderizes the meat while infusing it with sweet sauce, and the final uncovered cooking caramelizes everything into glossy perfection. The honey-butter BBQ sauce provides the ideal balance of sweet, tangy, and rich that appeals to all ages.
These grilled BBQ party ribs work beautifully for any casual gathering where you want impressive food that’s easy to eat and serve. The individual bone format makes portioning effortless while the sticky-sweet glaze ensures they’ll be the first thing to disappear from the buffet. Master this technique and you’ll have a signature party dish that consistently gets requests for the recipe.
Honey Barbecue Grilled Party Ribs
Ingredients
Method
- Place both racks of St. Louis-style ribs bone-side up on a cutting board. Check if the membrane (thin, shiny layer on bone side) is still attached. To remove it, slide a butter knife under the membrane at one end to create a starting point. Grab the loosened membrane with a paper towel for better grip and pull firmly toward the opposite end. It should peel off in one piece. Repeat with second rack. Once membrane is removed, use a sharp knife to cut between each bone, separating the racks into individual ribs. You should have 20-26 individual rib bones total.
- If using oil as a binder, lightly drizzle cooking oil over all surfaces of the individual ribs. Place all ribs on a large baking sheet. Generously season all sides of each rib with BBQ seasoning, using 3-4 tablespoons total. Make sure to season meat sides, bone sides, and all edges. Pat seasoning gently to help it adhere. Let seasoned ribs sit at room temperature for 15-20 minutes while preheating grill.
- Preheat grill to 300-350°F. For charcoal, bank all coals to one side, leaving other side empty. For gas, light burners on one side, leave other burners off. Close lid and preheat 10-15 minutes. Clean grill grates with a brush, then wipe with oil-soaked paper towel using tongs.
- Place all individual ribs on grill grates bone-side down. Arrange so they’re not touching. Close lid and cook about 10 minutes, occasionally moving ribs around to ensure even cooking. After 10 minutes, flip each rib to meat side. Close lid and continue grilling 30-40 minutes, rotating ribs every 10-15 minutes. Ribs should develop deep color and caramelized crust. Total initial grilling time: 40-50 minutes.
- While ribs grill, combine 1½ cups BBQ sauce, 1 cup honey, and 6 ounces butter in a small saucepan. Place over medium-low heat and stir as butter melts. Once butter has completely melted and everything is well mixed, reduce heat to low and simmer gently 2-3 minutes until smooth and glossy. Remove from heat and keep warm.
- After ribs have grilled 40-50 minutes total and are deeply colored, remove all ribs from grill and place in large disposable aluminum foil pan. Pour entire batch of warm honey BBQ sauce over ribs. Using tongs, toss to coat every piece thoroughly with sauce. Cover entire pan tightly with heavy-duty aluminum foil, crimping edges to seal completely.
- Place covered foil pan directly on grill grates. Close grill lid. Cook covered 30-45 minutes. Ribs are braising in the honey BBQ sauce, with steam and heat breaking down connective tissue. After 30 minutes, carefully lift one corner of foil (watch for hot steam) and pierce a rib with a fork to test tenderness. Fork should slide in with minimal resistance when done. If needed, re-cover and cook another 10-15 minutes.
- Once ribs are tender, carefully remove foil covering (watch for hot steam). Return uncovered pan to grill. Cook uncovered final 10 minutes, allowing sauce to thicken and caramelize on ribs’ surface. Watch carefully – concentrated sugars can burn quickly. For extra caramelization, optionally place individual ribs directly on grill grates over direct heat for 1-2 minutes.
- Remove pan from grill and let ribs rest 5 minutes before serving. Ribs should be fall-apart tender with sticky-sweet glaze coating every surface. Arrange on serving platter, spooning any extra sauce from pan over top. Serve warm with plenty of napkins.
Notes
– Baby back ribs can substitute but are smaller – use 3 racks and reduce wrapped time to 20-30 minutes
– Can be made in 350°F oven if you don’t have a grill
– For fall-off-the-bone texture, cook full 45 minutes wrapped
– Watch carefully during final glazing – honey can burn quickly
– Leftover ribs keep refrigerated 4 days; reheat in covered foil pan
– The foil-wrapped braising step is key to tenderizing
– Individual bone format makes these perfect party finger food
– Use your favorite BBQ sauce – the base flavor determines final taste
Tried this recipe?
Let us know how it was!Ready to Take Your Cooking to the Next Level?
This is where I keep all my most-used products, gear, and favorite cooking tools — check it out:
🔥 View My Cooking Gear & ToolsRecipe Categories
If you loved this recipe, you’ll find more to savor across our diverse categories. From beef to pork, chicken to turkey, seafood to appetizers, there’s a wealth of flavors waiting for you. Explore them all at CWFeats.