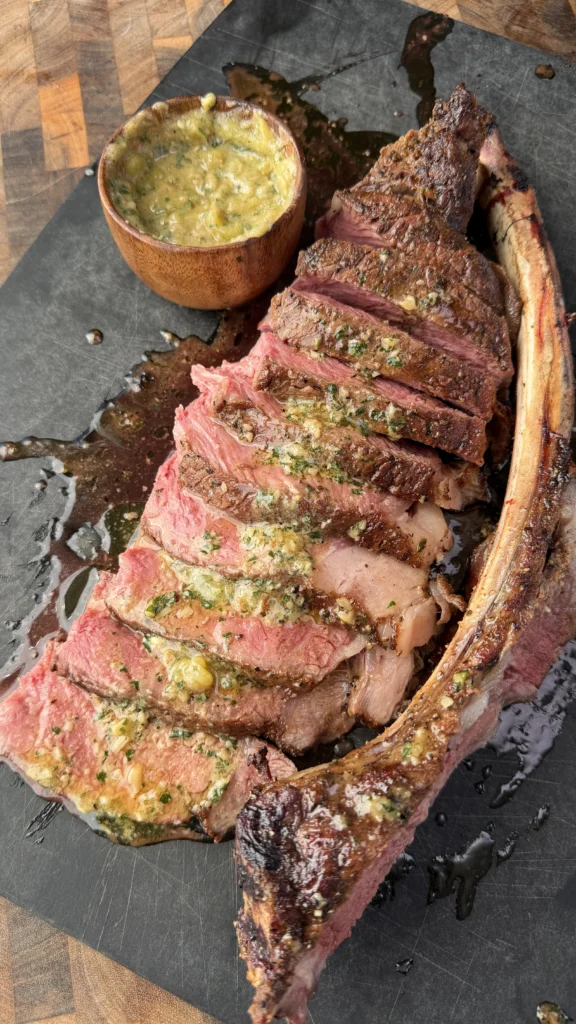
Grilled tomahawk steak with roasted garlic blue cheese butter transforms an impressive bone-in ribeye into a showstopping centerpiece through proper seasoning, two-zone grilling technique, and luxurious compound butter. This tomahawk ribeye recipe starts with a massive four-pound steak – a bone-in ribeye with an extended rib bone left attached that can measure twelve to fifteen inches long. The steak gets patted dry, lightly coated with oil, then generously seasoned with kosher salt and coarse black pepper before resting at room temperature for forty-five to sixty minutes. The grill setup uses two-zone heat with direct flames for searing and indirect heat for gradually bringing the thick steak to perfect doneness. After achieving a deep brown crust through searing, the steak moves to indirect heat where it cooks gently until reaching 130°F for medium-rare.
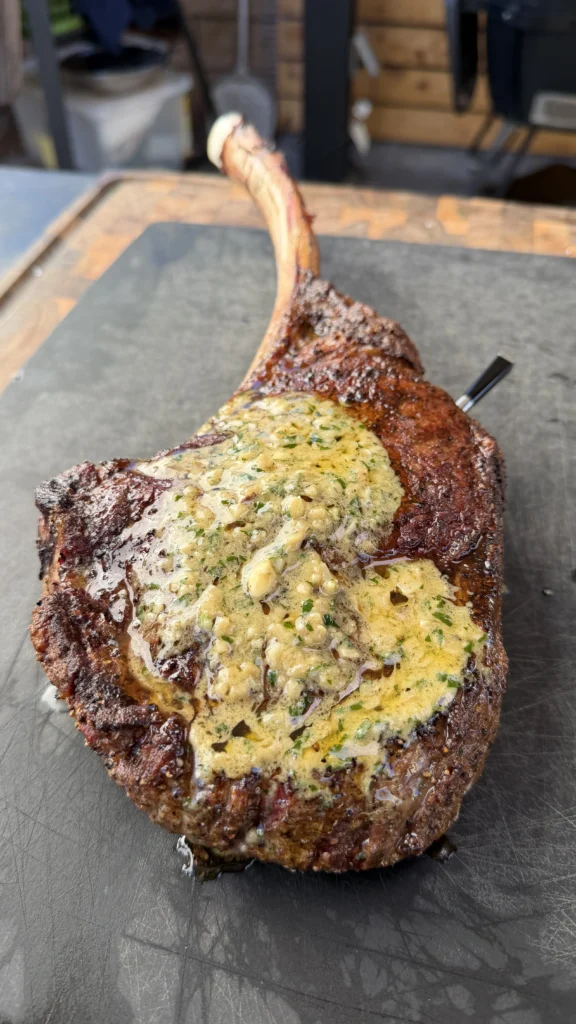
What makes this blue cheese butter steak recipe special is the compound butter that crowns the finished meat. Roasted garlic cloves get mashed into softened butter along with crumbled blue cheese, Worcestershire sauce, and fresh parsley, then rolled into a log and chilled. The roasting transforms raw garlic’s harsh bite into sweet, caramelized richness that provides savory depth without overpowering the blue cheese’s pungent, tangy character. When sliced and placed on the hot rested steak, the butter melts into glossy pools that seep into every crevice while the blue cheese provides sharp contrast to the rich, beefy ribeye.
This grilled tomahawk ribeye recipe delivers steakhouse-quality results through technique rather than expensive equipment. The two-zone setup prevents burning the exterior before the thick interior cooks through – a common mistake when grilling massive cuts. The fifteen-minute rest after cooking allows juices to redistribute while the compound butter melts, creating sauce that enhances rather than masks the perfectly cooked beef. Master this method and you’ll have a signature dish that consistently impresses at special occasions.
Grilled Tomahawk Steak with Roasted Garlic Blue Cheese Butter
Four-pound tomahawk ribeye seasoned with salt and pepper, reverse-seared over two-zone heat until medium-rare, topped with compound butter made from roasted garlic and blue cheese
Ingredients
For the Steak:
- 1 tomahawk ribeye (about 4 lbs)
- Kosher salt
- Coarse black pepper
- Avocado or olive oil (for coating)
For the Roasted Garlic Blue Cheese Butter:
- 1 stick (½ cup) unsalted butter, softened
- 1 small head of garlic
- 2 tbsp crumbled blue cheese (Gorgonzola or Roquefort)
- 1 tsp Worcestershire sauce
- 1 tsp fresh parsley, finely chopped
- Salt and black pepper to taste
Understanding Tomahawk Ribeye Steaks
Tomahawk ribeyes are bone-in ribeye steaks cut extra thick – typically two to three inches – with the entire rib bone left attached and “frenched” (meat and fat cleaned off) to create a long handle resembling a tomahawk axe. The extended bone serves both aesthetic and functional purposes: it looks dramatically impressive when presented whole, provides a convenient handle for flipping during grilling, and conducts heat into the center of the thick steak during cooking. The bone also adds subtle flavor as marrow and connective tissue around it render during the long cooking process.
These steaks typically weigh three to four pounds, with the bone accounting for about half a pound of that weight. Despite the intimidating size, a tomahawk is simply a bone-in ribeye – it comes from the same primal cut (ribs six through twelve) as regular ribeyes and has the same exceptional marbling and tenderness. The difference is purely in the presentation and thickness. What you’re paying for with a tomahawk is the impressive bone and extra thickness, not fundamentally different meat quality.
The thickness is what necessitates special cooking technique. A three-inch thick steak can’t be cooked over direct heat the entire time – the exterior would char to carbon before the center reached rare. Tomahawks require the reverse sear or two-zone method: gentle indirect heat to gradually bring the interior to temperature, followed by high direct heat for final crust development. This technique ensures edge-to-edge pink with a deeply caramelized exterior.
Look for tomahawks with abundant marbling – white flecks of intramuscular fat distributed throughout the red meat. Prime grade offers the most marbling, followed by Choice and Select. Even Choice tomahawks are excellent – you don’t need Prime unless you want maximum marbling and can justify the premium price. The meat should be bright red without gray discoloration, and the fat should be white or cream-colored, not yellow which indicates older beef.
The Science of Dry Brining Large Steaks
Salt applied to meat’s surface initiates osmosis – the salt draws moisture from within the meat to the surface, then after thirty to forty minutes, that moisture begins reabsorbing back into the meat, now carrying dissolved salt with it. This seasons the steak throughout its thickness rather than just on the surface. For thick tomahawk steaks, this deep seasoning is crucial – surface salt alone wouldn’t penetrate far enough into three inches of meat.
The overnight dry brine option mentioned in the recipe provides even more benefits beyond seasoning. Extended salt exposure breaks down some of the muscle proteins, making the meat more tender while helping it retain moisture during cooking. The uncovered refrigeration during overnight brining also dries the surface significantly. This dried exterior browns and crisps dramatically better than a wet surface during searing because moisture creates steam that prevents browning.
However, the recipe offers flexibility – either a simple forty-five to sixty minute room temperature rest with salt and pepper, or the more involved overnight dry brine. For weeknight cooking or when you don’t have time to plan ahead, the shorter rest works fine. For special occasions when you want absolute maximum flavor and texture, the overnight brine is worth the minimal extra effort. Both methods work because tomahawks are thick enough that they benefit from any salting time.
Roasted Garlic’s Transformation
Raw garlic contains sulfur compounds that taste pungently sharp and almost burning – the familiar “garlic breath” that lingers for hours. Roasting garlic at 400°F for thirty-five to forty minutes completely transforms its character through heat-driven chemical reactions. The sulfur compounds volatilize and mellow while the garlic’s natural sugars caramelize, creating sweet, nutty, almost buttery flavor with just a hint of the original garlic character remaining.
The roasting technique is straightforward but requires proper preparation. Slicing the top quarter-inch off the garlic head exposes the cloves while keeping them held together in their papery skin. Drizzling with oil before wrapping in foil serves two purposes: the oil conducts heat more evenly throughout the head, and it prevents the garlic from drying out during the long roasting time. The foil packet traps steam that helps soften the cloves.
The finished roasted garlic should be deeply golden to light brown with cloves so soft they squeeze out of their skins like paste. If the garlic is still firm or pale after forty minutes, continue roasting in ten-minute increments until properly soft. Under-roasted garlic retains too much sharp bite and won’t mash smoothly into the butter. Over-roasted garlic can taste bitter, though this is harder to achieve – garlic is fairly forgiving during roasting.
Blue Cheese Selection and Balance
Blue cheese’s distinctive pungent, tangy character comes from Penicillium roqueforti mold cultures that create blue-green veins throughout the cheese. Different varieties offer different intensity levels. Roquefort (French sheep’s milk blue) is intensely sharp and salty with complex mineral notes. Gorgonzola (Italian cow’s milk blue) ranges from dolce (sweet, mild) to piccante (sharp, assertive). Domestic blues vary widely in intensity but are generally milder than European varieties.
For this compound butter, choose a blue cheese whose intensity matches your preference. If you love bold blue cheese flavor, use Roquefort or aged Gorgonzola. If you want subtler blue presence, use young Gorgonzola dolce or domestic blue. The two tablespoons in the recipe creates noticeable but not overwhelming blue cheese flavor – enough to be a prominent taste without making the butter taste like pure blue cheese dressing.
Crumbling the blue cheese rather than leaving it in large chunks ensures even distribution through the butter. Larger pieces would create pockets of intense blue flavor rather than balanced presence throughout. The blue cheese doesn’t need to be completely smooth – small crumbles add textural interest – but it should be relatively fine rather than chunky.
The balance between blue cheese, roasted garlic, butter, and Worcestershire creates compound butter that’s more complex than any single ingredient. The butter provides rich, creamy base. The roasted garlic adds savory sweetness. The blue cheese contributes sharp tang. The Worcestershire adds umami depth and slight fermented complexity. Fresh parsley brightens everything with herbal notes. Together they create sauce that enhances the steak without masking its beefy flavor.
Two-Zone Grilling for Thick Cuts
Two-zone grilling creates two distinct heat zones on your grill – one side with direct heat for searing (typically 450-500°F), the other with no heat underneath for gentler indirect cooking (around 250-300°F). This setup is essential for thick steaks like tomahawks because it allows you to sear for crust development, then finish cooking gradually without burning the exterior.
For a charcoal grill, light enough coals to cover one-third to one-half the grill bottom. Once they’re covered in white ash and glowing red, bank them all to one side using a charcoal rake or long tongs. Leave the other side completely empty – no coals at all. For a gas grill, light all burners to high for preheating, then turn off the burners on one side once the grill is hot, leaving only one side’s burners on high.
The searing phase happens over the direct heat side. Four to five minutes per side at high heat creates the Maillard reaction – the chemical process where proteins and sugars on the meat’s surface break down and recombine into hundreds of new flavor compounds. This browning creates the “steak flavor” we associate with great beef. The goal is deep mahogany to almost black crust on both sides with some char on the edges where the thick fat cap renders.
After searing, the steak moves to the indirect side where it cooks more like being in an oven – surrounded by ambient heat rather than direct flame underneath. Close the lid to create a convection environment where hot air circulates around the steak. This gentle cooking allows the interior to gradually come up to target temperature while the already-crusted exterior doesn’t burn. For a four-pound tomahawk, this indirect phase takes twenty-five to thirty-five minutes to reach 130°F for medium-rare.
The bone side should face toward the heat source during indirect cooking if possible. The bone acts as insulation, protecting the meat attached to it from receiving too much heat. This helps create more even doneness throughout the thick steak rather than having the side facing the heat overcooked while the far side is underdone.
Temperature Targets and Doneness
Internal temperature is the only reliable doneness indicator for thick steaks. Visual cues fail because the exterior looks done long before the center reaches temperature. The feel test (pressing the meat) is imprecise and requires experience. An instant-read thermometer inserted into the thickest part of the steak (avoiding the bone which conducts heat differently) tells you exactly what’s happening inside.
For tomahawk ribeyes, these are the standard temperature targets: rare (120°F), medium-rare (130°F), medium (140°F), medium-well (150°F), and well-done (160°F+). Medium-rare to medium is the sweet spot for ribeyes. Rare leaves too much unrendered fat that tastes waxy and greasy. Well-done dries out the meat and makes it tough. Medium-rare (130°F) provides enough heat for the abundant marbling to render into juicy, flavorful goodness while keeping the center rosy and tender.
Remember that steaks continue cooking during resting – carryover cooking raises the internal temperature five to ten degrees as residual heat from the exterior works its way toward the center. This means you should remove the steak five degrees before your target temperature. For medium-rare (final temp 130°F), remove at 125°F. For medium (final temp 140°F), remove at 135°F.
The fifteen-minute rest after cooking is non-negotiable for thick steaks. During cooking, heat causes the meat’s proteins to contract, squeezing juices toward the cooler center. If you cut into the steak immediately, all those juices flood out onto the cutting board. Resting allows the proteins to relax and juices to redistribute throughout the meat. The steak will be just as hot after resting since tomahawks retain heat extremely well due to their mass and the bone acting as a heat reservoir.
Tent the steak loosely with aluminum foil during resting. Loose tenting keeps it warm without trapping so much steam that the hard-won crispy crust becomes soggy. Some people skip the foil entirely for maximum crust retention, though the steak will cool slightly more during the rest.
Serving and Slicing tomahawk ribeyes
A four-pound tomahawk serves three to four people depending on appetites and what else you’re serving. Remember that nearly half a pound is bone, so the actual meat portion is about three and a half pounds – roughly fourteen ounces per person for four servings. This is a hearty portion but reasonable for a special occasion meal.
Presentation options vary based on preference. For maximum drama, present the whole tomahawk at the table with compound butter slices melting on top, then carve in front of guests. For easier serving, slice the meat off the bone in the kitchen, then slice across the grain into thick medallions and arrange on a platter with the bone alongside for visual impact.
Slicing against the grain is crucial for tenderness. The “grain” refers to the direction of the muscle fibers – look at the meat’s surface and you’ll see parallel lines running in one direction. Cutting perpendicular to these lines (against the grain) creates short fibers that are easy to chew. Cutting parallel to the grain (with the grain) leaves long fibers that are tough and stringy even in tender cuts like ribeye.
For ribeyes, the grain typically runs from the bone outward toward the exterior edge. This means you slice perpendicular to the bone, creating medallions. Each slice should be about half-inch thick – thick enough to be substantial but thin enough to showcase the perfect medium-rare center. Arrange slices slightly overlapping on a platter, drizzle with any accumulated juices, and place compound butter slices on top so they melt over everything.
The bone itself shouldn’t be wasted – it has bits of meat attached and rich marrow inside. Offer it to someone who wants to gnaw on it, or save it for making beef stock where it will add incredible flavor and body.
Ingredients
For the Steak:
- 1 tomahawk ribeye (about 4 lbs)
- Kosher salt
- Coarse black pepper
- Avocado or olive oil (for coating)
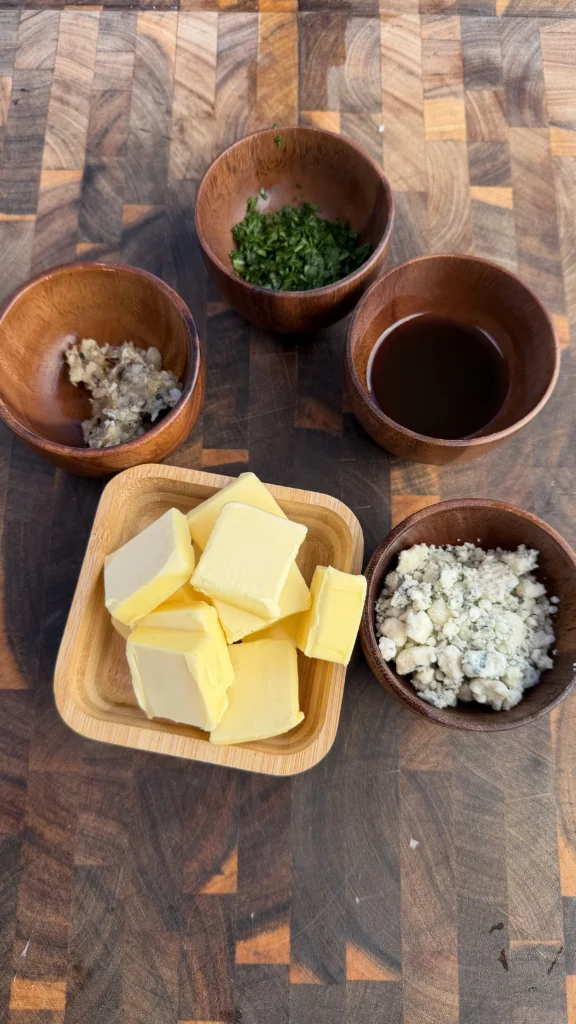
For the Roasted Garlic Blue Cheese Butter:
- 1 stick (½ cup) unsalted butter, softened
- 1 small head of garlic
- 2 tbsp crumbled blue cheese (Gorgonzola or Roquefort)
- 1 tsp Worcestershire sauce
- 1 tsp fresh parsley, finely chopped
- Salt and black pepper to taste
Step-by-Step Instructions
Roast the Garlic
Preheat your oven to 400°F. Take one small head of garlic and slice off the top quarter-inch to expose the tops of all the cloves while keeping the head intact. The cloves should be visible and sliced cleanly across their tops rather than being fully removed from the head.
Place the trimmed garlic head on a piece of aluminum foil large enough to wrap it completely. Drizzle about one teaspoon of olive oil over the exposed cloves, letting it seep into the cuts between cloves. The oil helps conduct heat and prevents drying during roasting. Wrap the garlic head completely in the foil, creating a sealed packet.
Place the foil-wrapped garlic directly on the oven rack or on a small baking sheet. Roast for thirty-five to forty minutes until the cloves are very soft and golden to light brown in color. You should be able to smell the sweet, mellow garlic aroma. To test doneness, carefully open the foil (watch for hot steam) and squeeze one clove gently – it should feel very soft, almost mushy.
Once roasted, remove from the oven and let cool for ten to fifteen minutes until cool enough to handle. Squeeze the softened cloves out of their papery skins into a small bowl – they should slide out easily, leaving the skins behind. Mash the roasted cloves into a smooth paste using a fork. You should have about two tablespoons of roasted garlic paste. Set aside to cool completely before mixing into the butter.
Make the Compound Butter
Place one stick (half cup) of unsalted butter in a medium bowl. The butter must be softened to room temperature – it should be soft enough to mash easily with a fork but not melted into liquid. If the butter is cold and hard, let it sit at room temperature for thirty to forty-five minutes or microwave on low power in five-second bursts until softened.
Add the roasted garlic paste, two tablespoons of crumbled blue cheese, one teaspoon of Worcestershire sauce, one teaspoon of finely chopped fresh parsley, and a pinch each of salt and black pepper to the softened butter. Using a fork, mash and stir everything together vigorously until all ingredients are well incorporated and the mixture is relatively uniform. You want the blue cheese crumbles distributed throughout rather than sitting in clumps, though some small pieces of blue cheese are fine for texture.

Taste the compound butter (it’s safe to taste since there’s no raw meat) and adjust seasoning if needed. It should taste prominently of roasted garlic and blue cheese with underlying butter richness and slight tang from the Worcestershire. The parsley should add fresh, herbal notes.
Lay out a sheet of plastic wrap on the counter. Scrape all the compound butter onto the center of the plastic wrap, then use the wrap to shape it into a log about one and a half inches in diameter and six inches long. Roll the plastic wrap around the butter log tightly, then twist the ends to seal. Refrigerate for at least one hour and up to five days. The chilling firms the butter so you can slice it cleanly later. The butter can also be frozen for up to three months.
Season the Tomahawk Steak
Remove the tomahawk ribeye from its packaging and place on a cutting board. Pat the entire steak completely dry with paper towels – both sides, all edges, and around the bone. Any surface moisture will interfere with browning and crust development. The surface should feel tacky and dry to the touch rather than wet or slimy.
Drizzle or brush a light coating of avocado or olive oil over all surfaces of the steak. The oil helps the seasoning adhere while promoting better browning through heat conduction. Avocado oil has a higher smoke point (around 500°F) making it ideal for high-heat grilling, though olive oil works fine too. Use just enough to create a light coating – you don’t want oil dripping off the steak.
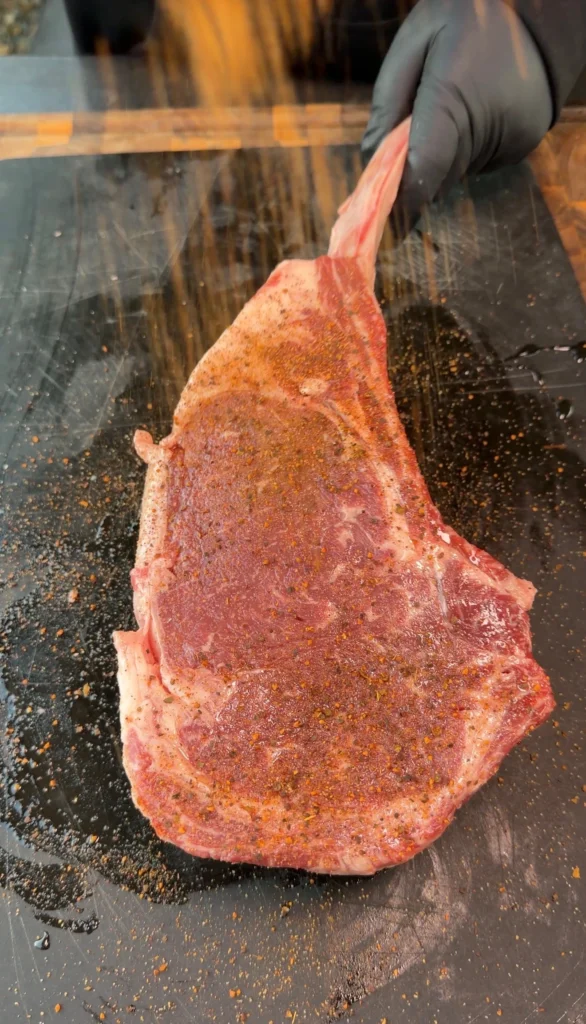
Season the steak very generously with kosher salt and coarse black pepper on both sides, all edges, and around the bone. For a four-pound tomahawk, use at least two to three tablespoons of kosher salt total – this seems like a lot but much of it falls off during handling and the thick meat needs aggressive seasoning to taste properly seasoned throughout. Don’t be shy with the pepper either – two tablespoons of coarse ground pepper creates good peppery crust.
For the simple seasoning approach (not overnight dry brine): Let the seasoned steak sit at room temperature for forty-five to sixty minutes before grilling. This takes the chill off and allows the salt to begin penetrating the surface.
For the overnight dry brine approach: After seasoning, place the steak on a wire rack set over a baking sheet and refrigerate uncovered overnight (up to twenty-four hours). Remove from the refrigerator sixty to ninety minutes before grilling to take the chill off. The extended salt exposure seasons more deeply while the uncovered refrigeration dries the surface dramatically for better crust.
Prepare the Grill for Two-Zone Cooking
Light your charcoal grill or preheat your gas grill. For charcoal, light enough coals to cover one-third to one-half the grill bottom – you want substantial direct heat for searing. Once the coals are covered in white ash and glowing red (about fifteen to twenty minutes), use a charcoal rake or long tongs to bank all the coals to one side of the grill. Leave the other side completely empty with no coals underneath. This creates your hot direct-heat zone (around 450-500°F) and cool indirect-heat zone (around 250-300°F).
For a gas grill, light all burners to high and close the lid. Preheat for ten to fifteen minutes. Once hot, turn off the burners on one side while leaving the other side’s burners on high. This creates the same two-zone setup as charcoal.
Clean the grill grates thoroughly with a grill brush to remove any residue from previous cooking. Using a paper towel dipped in oil and held with long tongs, wipe the grates to create a non-stick surface. This prevents the steak from sticking and helps create good sear marks.
If you have a grill thermometer, verify that the direct heat side is reading 450-500°F and the indirect side is reading 250-300°F. If the temperatures aren’t in these ranges, adjust the coals or burner settings accordingly.
Sear the Tomahawk
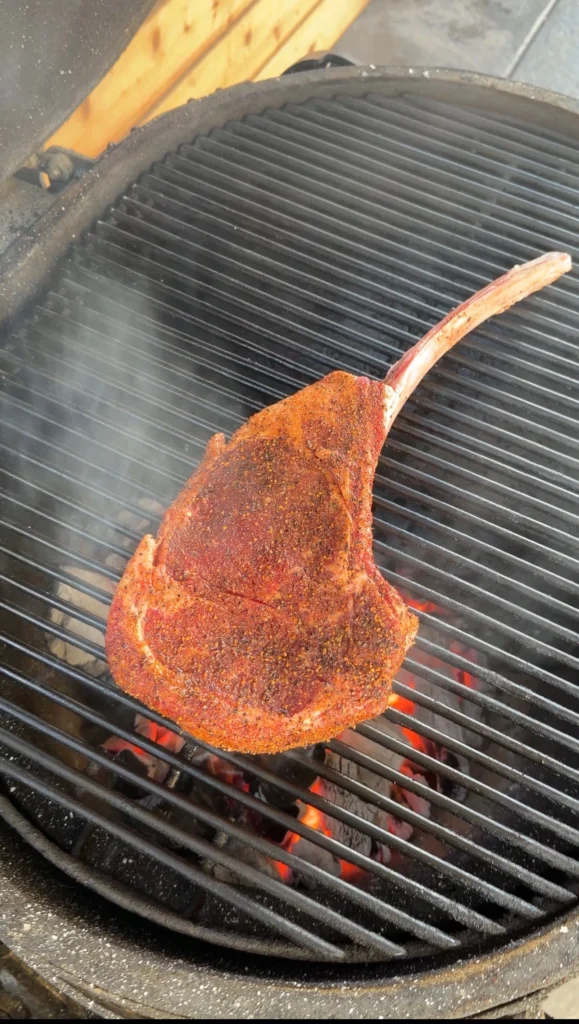
Place the seasoned tomahawk ribeye directly over the hot side of the grill (the side with coals or lit burners). You should hear immediate, aggressive sizzling. Position the steak so the bone extends away from the heat – you don’t need to sear the bone itself. Close the grill lid to create high heat environment.
Sear for four to five minutes without moving the steak. Resist the urge to lift or peek – let it sit undisturbed so it develops proper crust and releases naturally from the grates. After four to five minutes, use long tongs to carefully lift one edge and check the bottom. It should be deeply browned to almost black with visible grill marks. If it’s pale or light brown, give it another minute or two.
Once properly seared, flip the steak using tongs or a large spatula, being careful not to tear the crust. Sear the second side for another four to five minutes until equally browned and crusted. You’re just developing exterior crust at this point – the interior should still be completely raw. The thick fat cap on the edge will be rendering and may cause some flare-ups. If flames get too high, move the steak temporarily to the indirect side until they subside, then return to finish searing.
After both sides are seared (total sear time: eight to ten minutes), use tongs to stand the steak up on its fat cap edge to sear the edges for one to two minutes total. This renders some of the thick fat and creates additional crust. The bone doesn’t need searing.
Move to Indirect Heat to Finish
Using tongs, carefully transfer the seared tomahawk to the indirect heat side of the grill (the side with no coals or burners underneath). Position the steak so the bone side faces toward the heat source – the bone acts as insulation protecting the meat attached to it. Close the grill lid to create a convection oven environment.
Cook undisturbed with the lid closed for fifteen to twenty minutes. The steak is cooking gently now through ambient heat rather than direct flame. This slow cooking allows the interior to gradually come up to temperature without further browning the already-crusted exterior.
After fifteen to twenty minutes, insert an instant-read thermometer into the thickest part of the steak, avoiding the bone which conducts heat differently and gives false readings. For medium-rare, you’re targeting 125°F (remember it will rise to 130°F during resting). For medium, target 135°F (will rise to 140°F). If the steak hasn’t reached temperature yet, close the lid and continue cooking, checking every five minutes.
The total indirect cooking time for a four-pound tomahawk will typically be twenty-five to thirty-five minutes to reach 125-135°F, though exact time depends on the steak’s thickness, your grill’s temperature, outside air temperature, and how often you open the lid (which loses heat). Start checking after twenty minutes and be patient – thick steaks take time.
Rest the Steak
Once the steak reaches five degrees below your target temperature (125°F for medium-rare, 135°F for medium), remove it from the grill using tongs or a large spatula. Transfer to a cutting board or large platter. The steak should be deeply crusted on the exterior with beautiful grill marks.
Tent the steak loosely with aluminum foil – lay a sheet over it without wrapping tightly or sealing the edges. The loose covering keeps it warm without trapping so much steam that the crispy crust becomes soggy. Let the steak rest for a full fifteen minutes without cutting into it. This rest period is crucial for allowing juices to redistribute throughout the meat.
During the rest, the internal temperature will continue rising five to ten degrees from carryover cooking, reaching your target temperature (130°F for medium-rare, 140°F for medium). The steak will also relax, making it easier to slice cleanly rather than shredding under the knife.
Top the grilled tomahawk with Compound Butter and Serve
After the fifteen-minute rest, remove the foil tent. Remove the compound butter log from the refrigerator and unwrap it. Using a sharp knife, slice the butter into medallions about quarter-inch thick. Each slice should be a clean round that will melt attractively.
Place three to four slices of the roasted garlic blue cheese butter directly on top of the hot steak, spacing them along the length of the meat. The residual heat from the steak will immediately begin melting the butter, creating glossy pools that seep into the crust and mix with accumulated meat juices.
For tableside presentation, bring the whole tomahawk to the table with the butter melting on top for dramatic effect. Let guests admire it, then carve at the table or return to the kitchen for slicing. For kitchen slicing, use a sharp chef’s knife to cut the meat away from the bone, then slice the meat against the grain into thick medallions (about half-inch thick). Arrange the slices slightly overlapping on a platter. Drizzle with any accumulated juices and melted butter from the cutting board. Place additional butter slices on top of the sliced meat. Present the bone alongside for visual impact.
Serve immediately while hot. The combination of perfectly cooked ribeye with crispy crust, medium-rare center, and rich roasted garlic blue cheese butter melting over everything is steakhouse-quality decadent. Each slice should have visible pink center with thin band of gray at the edges, deep brown crust, and glossy butter coating.
FAQ
Can I cook this grilled tomahawk in the oven instead of on the grill?
Yes, use the reverse sear method. Preheat oven to 275°F. Place seasoned steak on a wire rack over a baking sheet and roast until internal temp reaches 115-120°F (about 45-60 minutes). Then sear in a smoking-hot cast iron skillet with oil for 2-3 minutes per side to develop crust. It won’t have grill marks or smoke flavor but will be tender and delicious.
What if I don’t like blue cheese?
Substitute aged white cheddar, Gruyère, or Parmesan for sharp, nutty flavor without blue cheese’s pungent character. Or make garlic herb butter by omitting the blue cheese and increasing parsley to two tablespoons plus adding thyme and rosemary. The roasted garlic butter alone is excellent on steak.
Can I use a different cut of steak?
The technique works for any thick bone-in ribeye, T-bone, or porterhouse. Boneless ribeyes also work perfectly – just reduce cooking time by about ten minutes since there’s no bone to conduct heat. Leaner cuts like strip steaks benefit from this method but won’t be as rich and juicy as ribeyes with their abundant marbling.
How do I know when the grill is the right temperature?
Use a grill thermometer if your grill has one. Otherwise, hold your hand five inches above the grates over the direct heat side – you should only be able to keep it there for three to four seconds before it’s too hot. For the indirect side, you should be able to hold your hand there for eight to ten seconds comfortably.
Can I make the compound butter ahead of time?
Absolutely – it keeps refrigerated for five days or frozen for three months. Make a double or triple batch and freeze in logs, then slice off what you need for steaks, chops, chicken, or vegetables. The butter actually improves after a day or two as the flavors meld.
Conclusion
Grilled tomahawk steak with roasted garlic blue cheese butter proves that impressive special-occasion meals rely more on technique than expensive equipment. The two-zone grilling method prevents the common mistake of burning thick steaks’ exteriors before their centers cook through, instead delivering edge-to-edge pink with deeply caramelized crust. The roasted garlic blue cheese butter elevates the perfectly cooked beef through the synergy of sweet roasted garlic, pungent blue cheese, rich butter, and savory Worcestershire sauce.
What makes this blue cheese butter steak recipe so successful is how each component serves a specific purpose. The aggressive seasoning and optional overnight dry brine ensure proper flavor throughout the thick meat. The high-heat sear develops the Maillard reaction that creates “steak flavor.” The gentle indirect finish cooks the interior evenly without further darkening the crust. The rest redistributes juices while the compound butter melts into luxurious sauce that enhances without masking.
This grilled tomahawk ribeye works beautifully for anniversaries, holidays, or any special occasion when you want to serve an impressive centerpiece. The dramatic presentation of a four-pound steak with a foot-long bone never fails to impress guests. Master the fundamentals – two-zone heat, proper temperature monitoring, and adequate resting – and you’ll consistently produce steakhouse-quality results that justify the premium price of tomahawk steaks.
Ready to Take Your Cooking to the Next Level?
This is where I keep all my most-used products, gear, and favorite cooking tools — check it out:
🔥 View My Cooking Gear & ToolsRecipe Categories
If you loved this recipe, you’ll find more to savor across our diverse categories. From beef to pork, chicken to turkey, seafood to appetizers, there’s a wealth of flavors waiting for you. Explore them all at CWFeats.