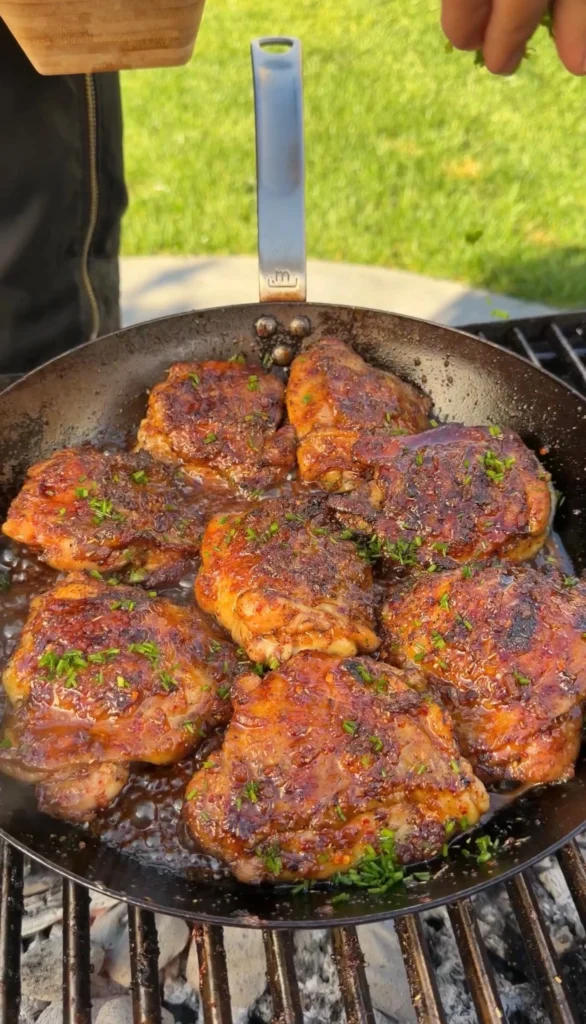
Honey garlic chicken thighs are bone-in, skin-on chicken thighs coated with a poultry seasoning and olive oil wet rub. You grill or cook them on a griddle until the skin is crispy and the internal temperature reaches 175°F. Then they get glazed in a sticky sauce made from honey, soy sauce, minced garlic, apple cider vinegar, and butter. The sauce simmers directly on the grill until thickened and glossy. The wet rub technique seasons the meat under and over the skin, which keeps the chicken juicy while the skin renders and crisps. After grilling, the thighs go straight into the sauce pan where they get basted until every surface is sticky and caramelized. This grilled chicken thighs recipe gives you crispy skin, tender dark meat, and a sweet-savory glaze.
The whole process takes about 60 minutes from start to finish. You make a paste with poultry seasoning and olive oil. Lift the chicken skin and rub the mixture underneath and on top. Grill the thighs until fully cooked. While the chicken finishes, you make the honey garlic sauce in a pan right on the grill. Add the cooked thighs to the sauce and baste them thoroughly. Let everything sit with the lid closed for 10 minutes so the sauce sets. These sticky chicken thighs are perfect served over rice, with roasted vegetables, or alongside grilled corn and coleslaw.
Why Should You Rub Seasoning Under the Skin Instead of Just On Top?
Rubbing your poultry seasoning mixture under the skin instead of just on the surface changes everything. Chicken skin is essentially a waterproof barrier made of fat and protein. It prevents seasonings from reaching the meat if you only apply them to the outside. When you lift the skin and apply seasoning directly to the meat, you bypass that barrier. You get flavor where it matters most.
The technique works because chicken thighs have a natural pocket between the skin and meat. You can easily slide your fingers under the skin to separate it without tearing. This creates a space where you can spread your wet rub. The olive oil in the rub helps the seasoning cling to the meat. It also keeps the meat moist during high heat grilling. The poultry seasoning infuses directly into the chicken as it cooks. Most blends contain sage, thyme, rosemary, and black pepper.
When you season only the outside of the skin, most flavor stays on the crispy exterior. The skin itself becomes flavorful, but the meat tastes bland. By seasoning under the skin, you ensure every bite has savory, herbal notes from your poultry blend. The fat layer under the skin also bastes the meat from the inside as it renders during cooking. This keeps the chicken juicy and adds another dimension of flavor.
Professional chefs use this double-seasoning approach when they want chicken with flavor all the way through. The seasoning on top of the skin crisps and caramelizes during grilling. The seasoning underneath penetrates the meat. You get complexity in every bite instead of all the flavor being concentrated in the crust.
Why Does Dark Meat Need to Reach 175°F Instead of 165°F?
Cooking bone-in chicken thighs to 175°F instead of 165°F transforms tough, chewy dark meat into tender texture. While 165°F is technically safe for killing bacteria, dark meat contains significantly more collagen and connective tissue than white meat. That collagen breaks down into gelatin between 170-180°F.
Collagen is the protein that holds muscle fibers together. Chicken thighs have a lot of it because those muscles get used constantly for walking and standing. When you cook dark meat to only 165°F, the collagen is still partially intact. The meat has a rubbery, stringy texture. When you push the temperature to 175°F, the collagen melts into gelatin. This makes the meat silky and tender. It also makes it taste richer and more succulent.
The other reason to cook thighs hotter is fat rendering. Chicken thighs have more intramuscular fat than breasts. That fat renders fully at higher temperatures. At 165°F, you have pockets of soft, unrendered fat that feel greasy. At 175°F, most of that fat has melted and either dripped away or absorbed into the meat. You get chicken that’s moist but not fatty.
Dark meat is forgiving because of its higher fat content. The fat keeps it moist even at higher temps. This is why thighs are ideal for grilling. You can push them hotter without ruining them, and the payoff is dramatically better texture than undercooked dark meat.
How Does Making the Sauce on the Grill Improve Flavor?
Simmering your honey garlic sauce directly on the grill adds layers of flavor you can’t replicate indoors. When you place a pan over live fire or hot grill grates, the sauce picks up subtle smoke flavor. It caramelizes faster because of the direct radiant heat. It develops more complex flavor through the Maillard reaction when sugars in the honey hit high temperatures.
The science behind this is heat intensity and heat type. A stovetop burner provides even, controlled heat through conduction. A grill provides both conductive heat from the hot pan and radiant heat from below. The bottom of your sauce gets hotter faster and starts caramelizing while the top is still liquid. This creates concentration and complexity. The sugars in the honey toast and develop nutty, caramel notes. The garlic softens and mellows. The soy sauce reduces and intensifies.
Making the sauce on the grill also keeps your entire cooking process in one place. The rendered chicken fat and drippings from the thighs often fall onto the grill grates and vaporize back up around the sauce pan. This infuses the sauce with chicken flavor. If you have charcoal, you get that distinct smoky note that complements the savory-sweet profile.
The 5-7 minute simmer time is critical for thickening. Honey is already viscous, but when you reduce it with soy sauce and vinegar over high heat, you evaporate water and concentrate the sugars. This makes the sauce sticky and glossy. That thickness allows it to coat the chicken thighs and cling to every surface. A thin sauce won’t give you that shellacked appearance. The grill’s high heat accelerates both reduction and caramelization and tender meat.
Why Does Apple Cider Vinegar Balance the Sweetness of Honey?
Adding apple cider vinegar to your honey garlic sauce is essential for creating balance. Honey is intensely sweet, and while soy sauce adds saltiness and umami, those flavors alone aren’t enough to cut through the sugar. The acidity in apple cider vinegar sharpens the flavors and makes them more vibrant instead of heavy.
The chemistry of acid and sugar interaction is about taste perception. Sweetness and acidity are on opposite ends of the flavor spectrum. When you combine them in the right ratio, they enhance each other rather than compete. The vinegar doesn’t make the sauce taste sour. It makes the honey taste more complex and less flat. You notice the floral, caramel notes in the honey more clearly when there’s acid to contrast against them.
Apple cider vinegar specifically works better than white vinegar or lemon juice because it has its own subtle sweetness and fruity undertone. White vinegar is too sharp and harsh. Lemon juice can make the sauce taste citrusy, which doesn’t pair naturally with soy sauce and garlic. Apple cider vinegar has a mellow acidity that adds brightness without overwhelming other flavors.
The vinegar also serves a functional purpose beyond flavor. The acetic acid helps break down the proteins on the chicken surface slightly, which improves the sauce’s ability to penetrate and stick. It also helps emulsify the butter into the honey and soy sauce, creating a smoother, more cohesive glaze. Without vinegar, your sauce would taste flat and overly sweet, and it wouldn’t coat the chicken as effectively. One tablespoon transforms the entire flavor profile.
Step-by-Step Instructions
Step 1: Make the Wet Rub and Prep the Chicken
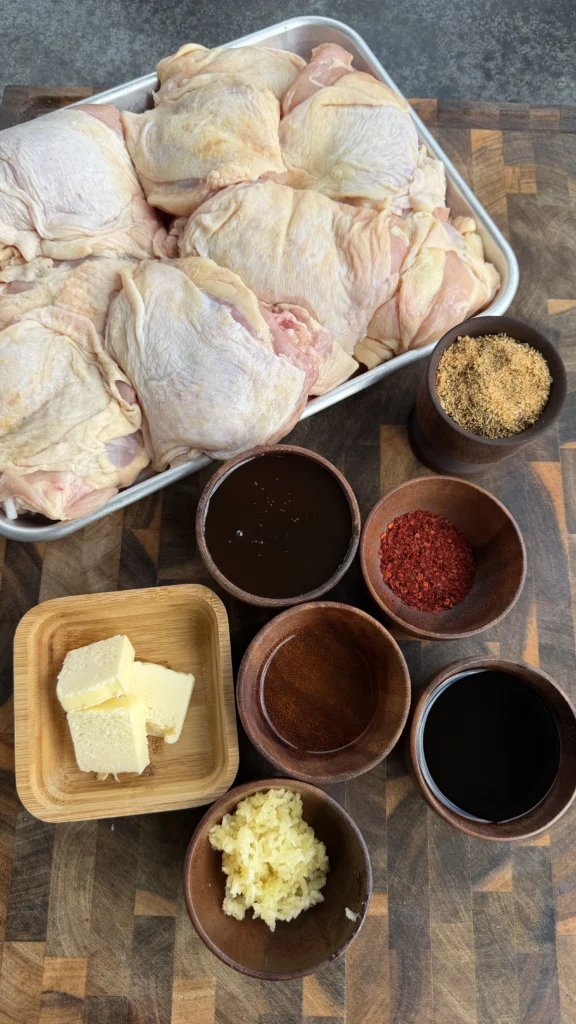
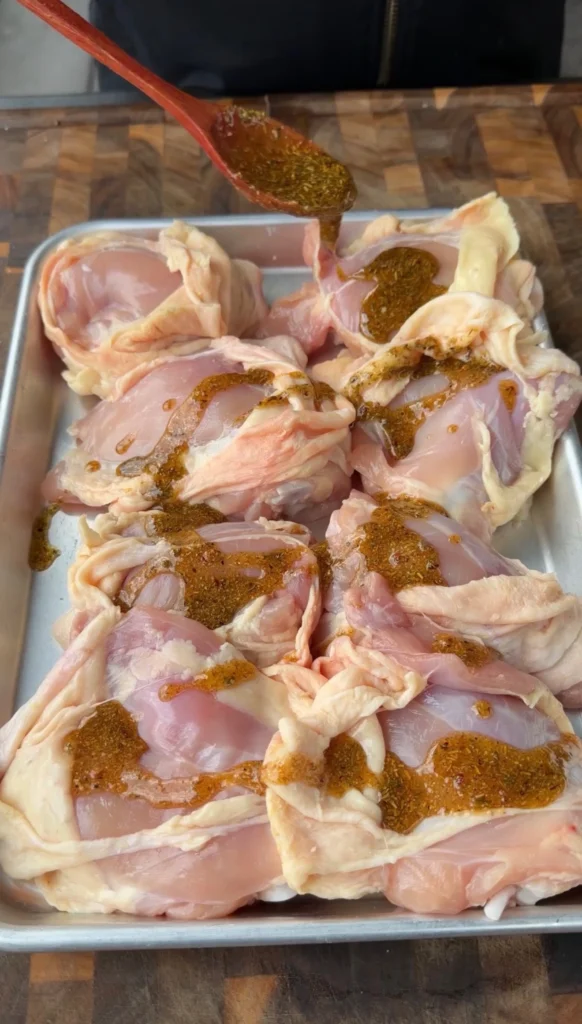
In a small bowl, combine ½ cup of your favorite poultry seasoning with ½ cup olive oil. Stir until you have a thick, paste-like consistency. The oil should fully incorporate into the seasoning so it’s spreadable but not runny. If your poultry seasoning is very dry and absorbs all the oil, add another tablespoon or two of oil until you get a wet paste.
Pat the chicken thighs completely dry with paper towels. This is important because moisture on the surface prevents the skin from crisping during grilling. Working with one thigh at a time, gently slide your fingers under the skin starting at the thickest part. Be careful not to tear it. You should be able to create a pocket between the skin and meat that goes almost all the way to the edges.
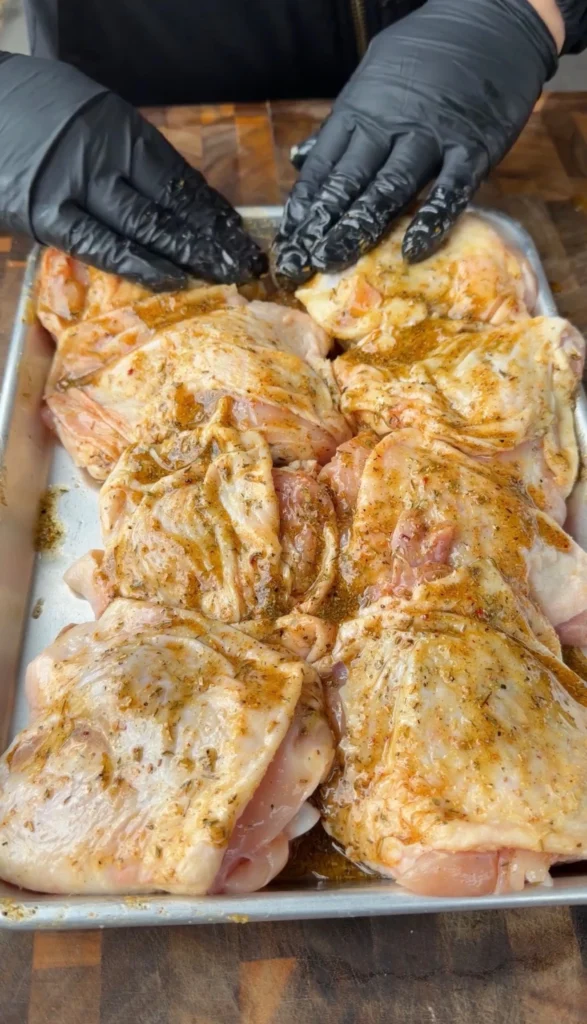
Take about 1 tablespoon of the wet rub and spread it directly onto the meat under the skin. Use your fingers to distribute it evenly across the entire surface. Then rub another tablespoon on top of the skin, making sure to coat it completely. Repeat with all remaining thighs. You should use all of the wet rub between the 8-10 thighs, with roughly equal amounts going under and over the skin.
Step 2: Preheat and Prepare Your Grill
If you’re using a charcoal grill, set it up for two-zone cooking with coals banked on one side. You want direct heat for initial searing and rendering, and indirect heat for finishing. For a gas grill, preheat all burners to medium-high (around 400°F), then turn off one or two burners to create an indirect zone. You want a direct heat zone between 400-450°F and an indirect zone around 300-325°F.
Clean your grill grates with a wire brush and oil them lightly using tongs and a paper towel dipped in vegetable oil. If you’re using a flat-top griddle, preheat it to 375-400°F and oil the surface. The grill is ready when you can hold your hand 6 inches above the grates for only 3-4 seconds before it’s too hot.
Step 3: Grill the Chicken Thighs
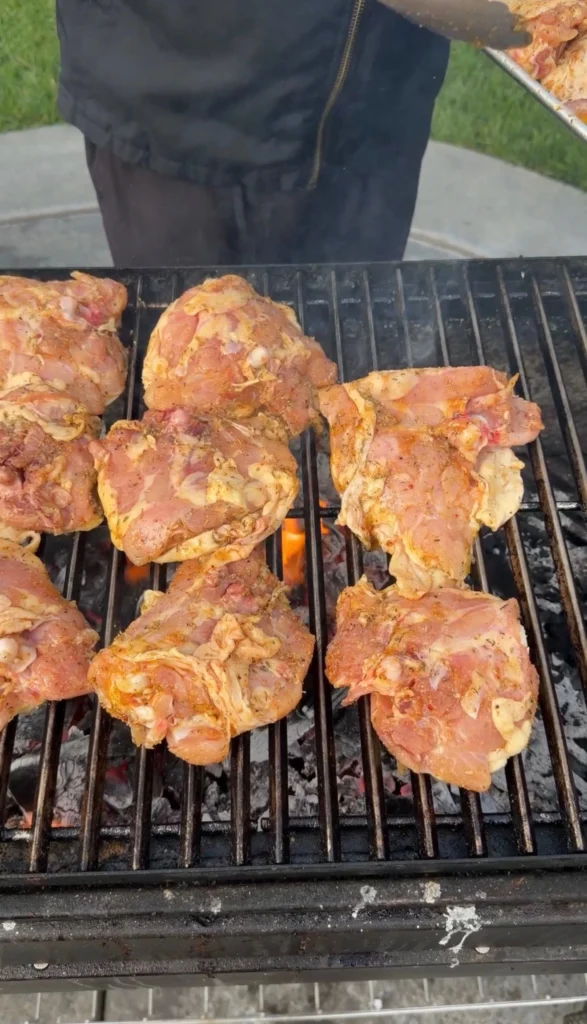
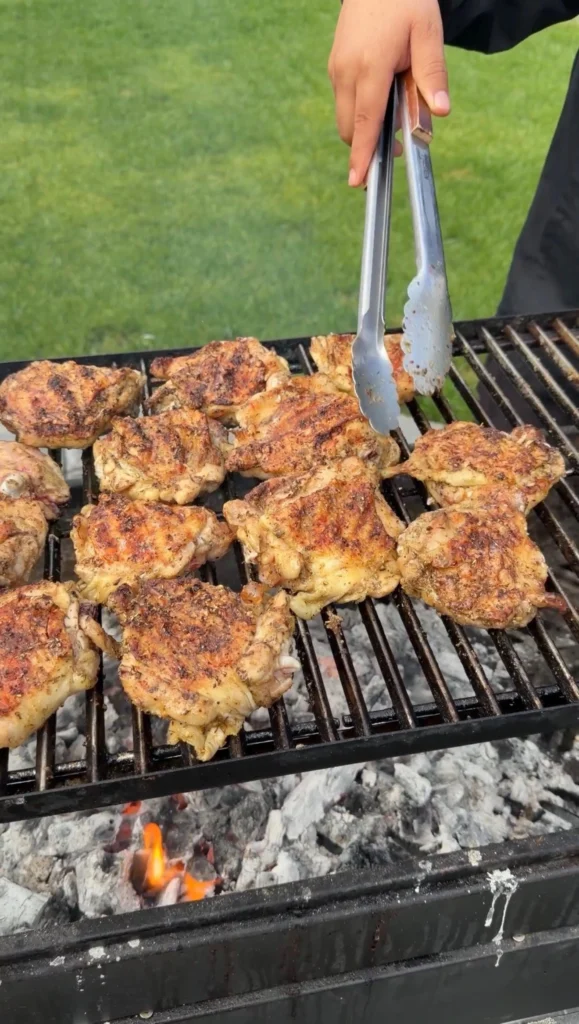
Place the chicken thighs skin-side down over direct heat. Arrange them so they’re not touching. Let them cook undisturbed for 7-8 minutes. You want the skin to render its fat and crisp up before you flip them. You should see the skin turning golden brown and shrinking slightly as the fat renders. If you’re getting excessive flare-ups from dripping fat, move the thighs slightly to the side but keep them over direct heat.
Flip the thighs using tongs and cook for another 7-8 minutes on the meat side. You’ll notice the thighs starting to firm up and the edges browning. After this initial sear, move all the thighs to the indirect heat zone. Close the lid and let them cook for an additional 15-20 minutes, flipping once halfway through.
Check the internal temperature with an instant-read thermometer inserted into the thickest part without touching bone. You’re looking for 175°F for perfectly tender dark meat. If they’re not there yet, continue cooking and check every 5 minutes. The skin should be deeply golden and crispy, and the meat should feel firm when pressed.
Step 4: Make the Honey Garlic Sauce on the Grill
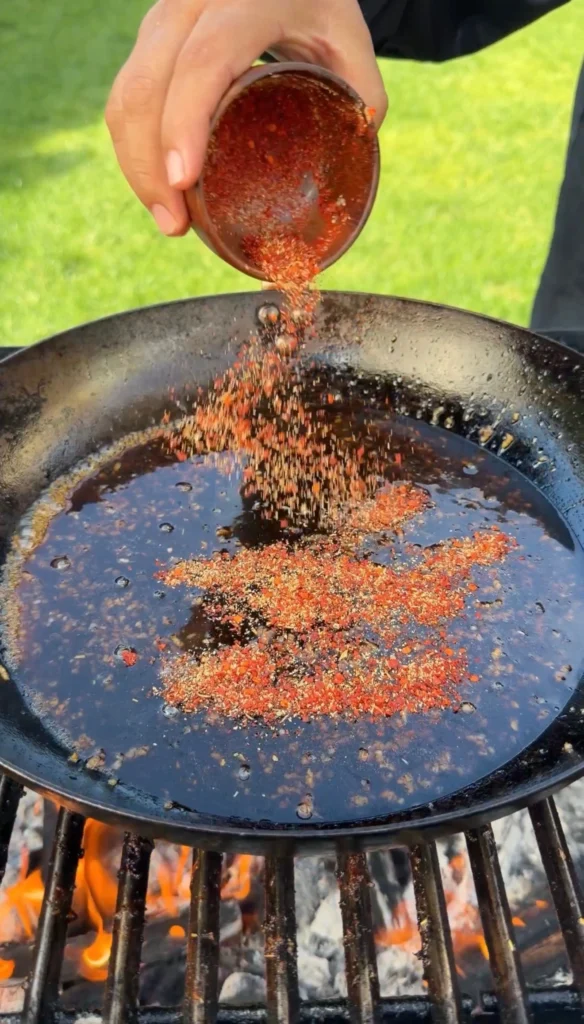
While the chicken is finishing on indirect heat, place a medium saucepan or cast iron skillet directly on the grill grates over direct heat. Add ½ cup honey, ¼ cup soy sauce, 6 cloves minced garlic, 1 tablespoon apple cider vinegar, 1 tablespoon butter, and 1 teaspoon red pepper flakes if using.
Stir the mixture continuously as it comes to a simmer. The honey and soy sauce will start to bubble aggressively. Let the sauce simmer for 5-7 minutes, stirring occasionally, until it reduces by about one-third. The sauce should become noticeably thicker. You’ll know it’s ready when you drag a spoon through it and the sauce coats the back of the spoon without immediately running off.
The garlic should soften and become fragrant, and the sauce should turn a deep amber color from the caramelizing honey. If the sauce starts to smoke or burn, move the pan slightly to a cooler spot on the grill. The consistency should be like warm maple syrup, thick and viscous but still pourable.
Step 5: Glaze the Chicken Thighs
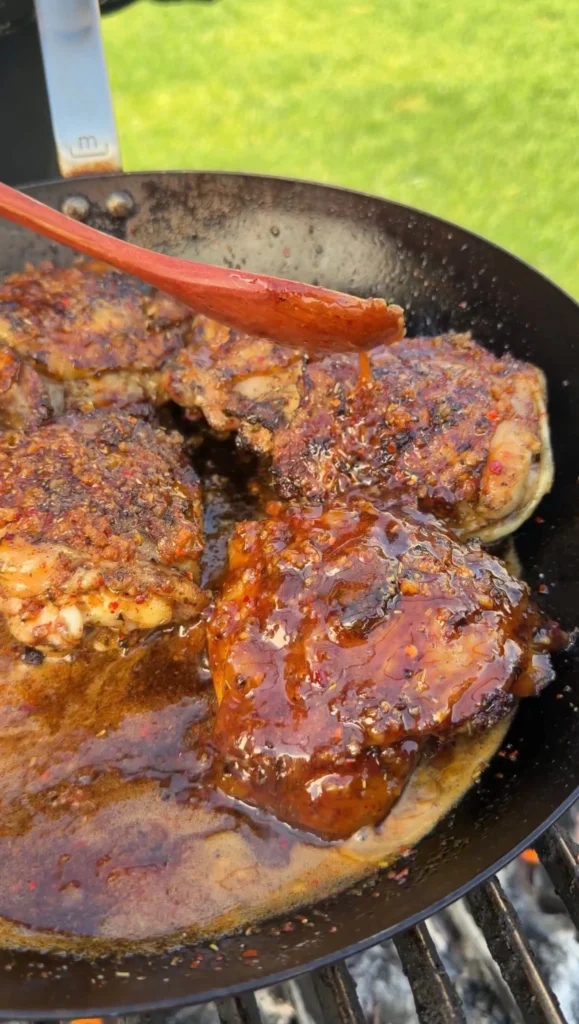
Once the chicken reaches 175°F, transfer all the thighs directly into the pan with the honey garlic sauce. Use tongs to turn each thigh so it’s coated on all sides. Then use a spoon to baste sauce over the top of each piece, making sure to get into all the crevices. Work quickly so the sauce stays hot and fluid.
After all the thighs are coated, close the grill lid and let everything sit for 10 minutes. Don’t stir or move the chicken during this time. The residual heat from the grill will gently warm the sauce from below, causing it to thicken and caramelize on the chicken surface. The sauce will transform from liquid to a sticky, glossy glaze that adheres to the skin.
After 10 minutes, open the lid and check the glaze. The sauce should look shellacked and shiny, not runny. If there’s still a lot of liquid pooling in the pan, you can turn the heat up slightly and let it reduce for another 2-3 minutes while gently basting the thighs. You want just enough sauce left to coat the chicken with minimal excess in the pan.
Step 6: Garnish and Serve
Transfer the glazed chicken thighs to a serving platter. Make sure to spoon any remaining sauce from the pan over the top. The thighs should glisten and look lacquered. Immediately sprinkle 2 tablespoons of freshly chopped chives over the chicken while it’s still hot. The residual heat will release the chive’s aromatic oils and add a fresh, oniony note that cuts through the sweetness.
Serve the thighs hot alongside your choice of sides. They pair excellently with steamed jasmine rice, roasted vegetables, grilled corn on the cob, creamy coleslaw, or garlic mashed potatoes. The sauce is rich enough that you don’t need additional toppings or condiments, but a squeeze of fresh lime juice can add brightness if you want it.
These honey garlic chicken thighs are best eaten immediately while the glaze is still tacky and warm. If you have leftovers, store them in an airtight container in the refrigerator for up to 3 days. Reheat in a 325°F oven for 15 minutes until warmed through.

Honey Garlic Chicken Thighs
Ingredients
Method
- Mix ½ cup poultry seasoning with ½ cup olive oil in a bowl until you have a thick paste. Pat chicken thighs dry, then lift the skin on each thigh and rub about 1 tablespoon of the mixture under the skin and another tablespoon on top. Make sure every thigh is thoroughly coated both under and over the skin.
- Preheat your grill to medium-high (400-450°F) with a two-zone setup. Bank coals on one side for direct heat and leave the other side empty for indirect heat. Clean and oil the grates. If using a flat-top griddle, preheat to 375-400°F.
- Place chicken thighs skin-side down over direct heat and cook for 7-8 minutes until the skin is golden and crispy. Flip and cook another 7-8 minutes on the meat side. Move thighs to indirect heat, close the lid, and cook for 15-20 minutes until they reach 175°F internal temperature. Flip once halfway through.
- While chicken finishes cooking, place a saucepan on the grill over direct heat. Add honey, soy sauce, garlic, apple cider vinegar, butter, and red pepper flakes. Stir and simmer for 5-7 minutes until the sauce reduces by one-third and thickens to the consistency of warm maple syrup.
- Transfer all cooked thighs directly into the sauce pan. Use tongs to turn each thigh until fully coated, then baste with a spoon. Close the grill lid and let the thighs sit in the sauce for 10 minutes so the glaze sets and becomes sticky.
- Transfer thighs to a serving platter, spoon any remaining sauce over the top, and garnish with fresh chopped chives. Serve immediately with rice, roasted vegetables, or your favorite sides.
Notes
Tried this recipe?
Let us know how it was!Frequently Asked Questions
Can I Use Boneless, Skinless Chicken Thighs Instead?
You can use boneless, skinless thighs, but you’ll lose the textural contrast of crispy skin. You also won’t be able to use the under-skin seasoning technique that makes this recipe special. Without skin, you’ll need to adjust your approach by marinating the chicken in the wet rub for at least 30 minutes before grilling. The cooking time will also be shorter. Boneless, skinless thighs only need about 15-20 minutes total on the grill to reach 175°F.
The bigger issue is that skinless thighs are more prone to drying out during grilling. There’s no fat layer protecting the meat from direct heat. You’ll need to watch them more carefully and consider lowering your grill temperature to 350-375°F to prevent overcooking the exterior before the interior reaches temperature. The glaze will still work beautifully, but you won’t get that satisfying crispy-sticky contrast between rendered skin and caramelized sauce.
If you’re using boneless, skinless thighs, consider grilling them over indirect heat the entire time rather than starting with a direct sear. This gentler approach prevents the surface from drying out. You can always finish them with a quick 2-3 minute sear over direct heat after glazing if you want some char on the surface.
What If I Don’t Have a Grill Can I Make This in the Oven?
You can absolutely make honey garlic chicken thighs in the oven with excellent results. Preheat your oven to 425°F and arrange the seasoned thighs skin-side up on a wire rack set over a foil-lined baking sheet. This setup allows air to circulate under the thighs and helps the skin crisp up like it would on a grill.
Roast the thighs for 35-40 minutes until they reach 175°F internal temperature and the skin is deeply golden and crispy. While they cook, make the honey garlic sauce on your stovetop in a saucepan over medium heat, following the same simmering process. Once the thighs reach temperature, transfer them to a large skillet or baking dish, pour the sauce over them, toss to coat, then return everything to the oven for 10 minutes at 375°F to let the glaze set.
The advantage of the oven method is consistency. You don’t have to worry about hot spots or flare-ups. The disadvantage is less caramelization and no smoke flavor. To compensate, you can add a small amount of liquid smoke (¼ teaspoon) to the honey garlic sauce, though this is optional.
Can I Make the Honey Garlic Sauce Ahead of Time?
Yes, you can make the honey garlic sauce up to 3 days in advance. Store it in an airtight container in the refrigerator. When you’re ready to use it, gently reheat the sauce in a saucepan over low heat. Stir frequently until it returns to its original glossy, pourable consistency. You may need to add a tablespoon or two of water if the sauce has thickened too much during storage.
The flavors in the sauce actually improve after sitting for a day because the garlic mellows and the honey fully integrates with the soy sauce and vinegar. The only downside to making it ahead is that you’ll need to reheat it thoroughly before tossing the chicken in it. Cold sauce won’t coat the hot thighs properly and won’t reduce to that characteristic sticky glaze.
If you’re meal prepping, you can also fully cook the chicken thighs and glaze them, then store everything together. The sauce will soak into the meat slightly during storage, which makes the leftovers even more flavorful when reheated. Just be aware that the crispy skin will soften during refrigeration, though you can partially restore it by reheating the thighs in a 400°F oven for 10-12 minutes.
What Poultry Seasoning Blend Works Best for This Recipe?
Any commercial or homemade poultry seasoning blend will work, but the best ones contain sage, thyme, rosemary, black pepper, and either marjoram or oregano. These herbs complement the sweetness of honey and the umami of soy sauce without competing with the garlic. Popular brands like McCormick, Spice Islands, or Simply Organic all work well if you’re buying pre-made blends.
If you want to make your own poultry seasoning, combine 2 tablespoons dried sage, 1 tablespoon dried thyme, 1 tablespoon dried rosemary, 1 tablespoon dried marjoram, 1 teaspoon black pepper, and ½ teaspoon ground nutmeg. This gives you a complex blend that’s slightly more aromatic than most store-bought versions. You can adjust the ratios based on your preferences. If you want more earthiness, add more sage. If you want more brightness, increase the thyme.
Avoid using poultry seasoning blends that contain salt as the primary ingredient. Soy sauce in the glaze already adds significant sodium. If your blend is very salty, reduce the amount you use or skip adding extra salt elsewhere in the recipe. The wet rub technique with olive oil helps any seasoning blend work well because the oil carries the flavors into the meat and prevents the dried herbs from burning.
Ready to Take Your Cooking to the Next Level?
This is where I keep all my most-used products, gear, and favorite cooking tools — check it out:
🔥 View My Cooking Gear & ToolsRecipe Categories
If you loved this recipe, you’ll find more to savor across our diverse categories. From beef to pork, chicken to turkey, seafood to appetizers, there’s a wealth of flavors waiting for you. Explore them all at CWFeats.