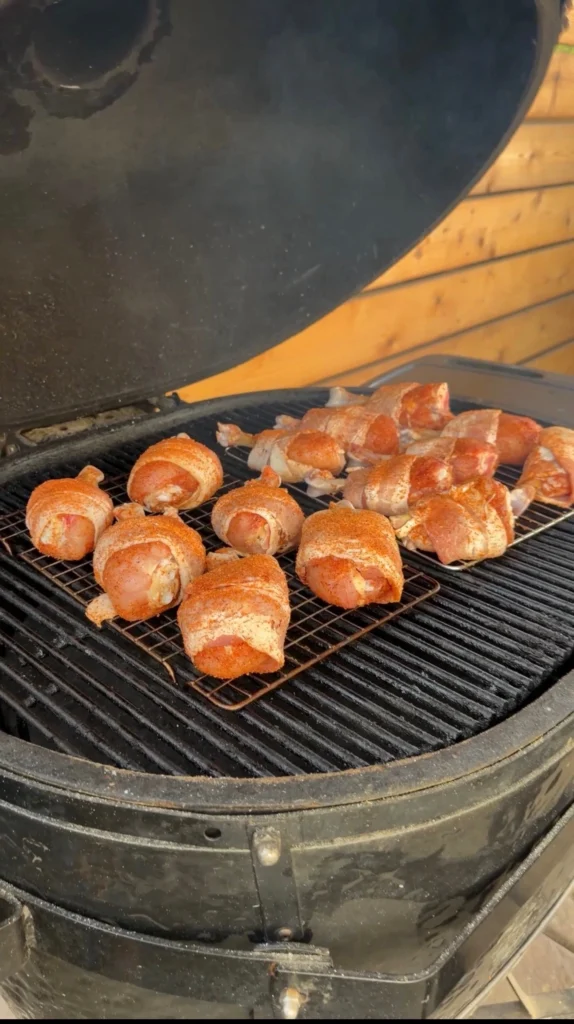
Honey sriracha bacon-wrapped chicken lollipops is skinless chicken drumsticks frenched into lollipop shape, seasoned with kosher salt, garlic powder, smoked paprika, and black pepper, wrapped completely in thin-cut bacon, then smoked at 300°F over applewood using indirect heat until the internal temperature reaches 185°F. During the final 10 minutes of cooking, you brush the lollipops with honey sriracha glaze made from honey, sriracha, soy sauce, butter, apple cider vinegar, and garlic powder. This creates a sticky, caramelized coating over crispy bacon. The dark meat cooks to 185°F to break down collagen into gelatin. You get tender, fall-off-the-bone chicken with sweet heat from the glaze balanced by salty, smoky bacon.
The entire process takes about 1 hour 40 minutes from start to finish. This includes 30 minutes to french the drumsticks, remove the skin, season the meat, and wrap each piece in bacon. You get 50 to 60 minutes of smoking time depending on drumstick size and temperature consistency. A 10-minute rest period after cooking lets the juices redistribute and the glaze set into a shiny coating.
These smoked chicken lollipops deliver crispy bacon exterior with juicy dark meat inside. The bacon wrapping serves multiple purposes
The frenching technique transforms regular drumsticks into elegant presentation pieces. You push the meat down the bone to create a lollipop handle. This exposes clean bone for easy holding. It concentrates the meat into a compact ball at the bottom. This shape cooks more evenly than a traditional drumstick. The uniform meat distribution ensures consistent doneness throughout.

Why Removing the Skin Before Wrapping in Bacon Creates Better Texture
The Double Fat Layer Problem
Chicken skin contains a subcutaneous fat layer between the skin and the meat. When you wrap a skin-on drumstick in bacon, you create two separate fat layers. The chicken skin fat and the bacon fat don’t integrate. They cook at different rates and create competing textures.
The chicken skin under bacon stays trapped in a humid environment. The bacon above it prevents air circulation. The skin can’t dehydrate properly. It stays soft and rubbery instead of crisping. Meanwhile, the bacon on top gets crispy from exposure to dry smoke heat. You end up with crispy bacon over flabby chicken skin. This creates an unpleasant contrast.
The two fat layers also don’t render at the same pace. Chicken skin fat renders around 250 to 275°F. Bacon fat renders at similar temperatures. But the bacon is exposed to direct heat. The chicken skin is insulated beneath. The bacon fat drips away while the chicken skin fat stays trapped between the skin and the bacon. You get greasy pockets instead of clean, crispy texture.
How Bacon Adheres Better to Meat Than to Skin
When you wrap bacon around bare chicken meat, the bacon makes direct contact with protein. As both cook, the proteins on the surface of the chicken and the proteins in the bacon bond slightly. This creates better adhesion. The bacon stays in place during cooking.
Chicken skin is slippery. It’s coated in natural oils. The bacon doesn’t grip it well. As the lollipops cook, the bacon can slide around or unwrap. The skin beneath contracts and pulls. This loosens the bacon wrap. You end up with gaps where the bacon has separated from the chicken.
Direct bacon-to-meat contact also allows better flavor transfer. The salt and smoke in the bacon penetrate into the chicken meat as they cook together. With skin in between, the flavors stay more separated. The skin acts as a barrier. You taste bacon on the outside and relatively bland chicken on the inside instead of integrated flavors throughout.
Fat Rendering and Moisture Management
Skinless chicken wrapped in bacon has only one fat source to render. The bacon fat melts and drips away cleanly. This leaves crispy bacon and moist meat. The bacon fat that renders out during cooking bastes the chicken as it drips down. But excess fat falls away into the drip pan or through the grates. You don’t end up with greasy chicken.
With skin left on under the bacon, you have two fat sources rendering simultaneously. The chicken skin fat has nowhere to go. It’s trapped under the bacon. This creates an oily layer between the bacon and the meat. When you bite into the lollipop, your teeth go through crispy bacon, then hit a layer of greasy fat, then finally reach the meat. The texture is unpleasant.
Removing the skin also exposes the actual chicken meat to smoke. Smoke penetrates meat more effectively than it penetrates skin. The skinless drumsticks absorb more smoke flavor. The bacon adds additional smoke character. You get layers of smoke from both the direct smoking and the bacon’s natural smokiness.
Time Efficiency in Prep
Removing the skin takes about 30 seconds per drumstick. You can grip the skin at one end and pull it off in one motion. It slides off easily when the chicken is cold. This small time investment dramatically improves the final product.
If you tried to crisp chicken skin under bacon, you’d need much higher heat for much longer. The skin might eventually crisp at 400°F or above. But by that time, the bacon would be burnt. The chicken would be overcooked. At the moderate 300°F used for these lollipops, chicken skin under bacon will never achieve acceptable texture.
Why 300°F Smoking Temperature Works Better Than Low and Slow
Balancing Bacon Crisping with Chicken Cooking
At 300°F, bacon crisps properly in about 50 to 60 minutes. This matches the time needed to cook chicken drumsticks to 185°F internal temperature. Lower temperatures don’t render bacon fat quickly enough. Higher temperatures burn the bacon before the chicken is done.
Traditional low-and-slow smoking at 225 to 250°F takes too long for bacon. At these temperatures, bacon might take 90 minutes or more to crisp. By that time, the chicken would be significantly overcooked. Even dark meat dries out eventually when held at temperature for too long.
The 300°F sweet spot allows the bacon to render its fat gradually. The fat drips away instead of steaming the bacon from the inside. The exterior gets crispy while the chicken underneath stays moist. The moderate heat prevents the sugars in the honey sriracha glaze from burning during the final glazing phase.
Smoke Penetration at Moderate Heat
Smoke flavor still penetrates well at 300°F. The temperature is high enough to create good airflow in the smoker. This circulates smoke around the lollipops evenly. But it’s not so high that it forms a hard crust on the exterior that blocks smoke absorption.
Applewood smoke at 300°F creates mild, sweet smoke character. It complements the honey in the glaze without overwhelming. Stronger woods like hickory or mesquite would be too aggressive at this temperature. The applewood provides background smoke flavor. It enhances rather than dominates.
The wrapped bacon also acts as a smoke vehicle. Bacon is naturally smoked during processing. As it cooks on your smoker, it absorbs additional smoke. This smoke flavor integrates with the chicken. You get double smoke impact from both the direct smoking and the bacon wrap.
Preventing Rubbery Bacon
Bacon cooked below 275°F tends to stay rubbery. The fat doesn’t render completely. It remains soft and chewy. At 300°F, the fat liquefies fully. It drips away or integrates into the surrounding chicken. The bacon proteins firm up and become crispy.
Thin-cut bacon is particularly sensitive to temperature. Thick-cut bacon can handle lower temperatures because it has more mass. Thin bacon needs higher heat to crisp properly. The 300°F temperature ensures even thin bacon becomes brittle and snappy instead of limp and bendable.
The indirect heat setup at 300°F also prevents direct flame contact. Direct grilling at 300°F would char the bacon in spots while leaving other areas undercooked. Indirect heat provides even temperature all around. Every part of the bacon wrap crisps uniformly.
Timing the Glaze Application
When smoking at 300°F, the chicken reaches 175°F in about 50 minutes. This gives you a 10-minute window to apply glaze and let it set before pulling at 185°F. The timing works perfectly.
At lower temperatures like 225°F, reaching 175°F might take 75 minutes. Then you still need 10 more minutes for glazing. The total cook time extends to 85 minutes or longer. The bacon has been rendering for too long. It starts to dry out and become brittle instead of crispy.
At higher temperatures like 350°F, the chicken races to 175°F in 35 to 40 minutes. You barely have time to make the glaze. The rapid temperature climb also makes it easy to overshoot 185°F. You might pull at 190 or 195°F by accident. The meat starts to dry out at these higher temperatures despite being dark meat.
How Frenching Drumsticks Creates Better Chicken Lollipops
The Technique Explained
Frenching a drumstick means pushing the meat down the bone toward the joint end. This exposes several inches of clean bone at the top. The meat compacts into a ball at the bottom. The bone becomes a handle.
To french properly, cut around the bone at the narrow end with a sharp knife. Scrape the meat and tendons away from the bone using the back of your knife or a paper towel for grip. Push the meat downward firmly. It bunches up at the thick end of the drumstick. Clean any remaining bits of meat or cartilage from the exposed bone.
The process takes practice but becomes faster with repetition. Your first few lollipops might take 2 to 3 minutes each. After you’ve done a dozen, you can french a drumstick in 30 to 45 seconds. The key is using a sharp knife and working confidently.
Even Cooking Through Uniform Shape
Regular drumsticks have an irregular shape. The narrow end near the bone joint is much thinner than the thick end with the drumstick knuckle. When you cook a regular drumstick, the thin end overcooks before the thick end reaches temperature.
Frenching creates a more uniform ball of meat. When you push the meat down, you redistribute it. The narrow end meat moves toward the thick end. This creates a compact, relatively round shape. The meat thickness is more consistent throughout.
This uniform shape cooks more evenly. Every part of the meat reaches 185°F at approximately the same time. You don’t have some sections that are overcooked and dry while others are still underdone. The compact ball also has less surface area exposed to heat. This helps it stay moist.
Better Bacon Coverage
A regular drumstick requires more bacon to wrap completely. The long, tapered shape means you need to overlap bacon significantly to cover the narrow end. This creates thick spots with multiple bacon layers and thin spots with gaps.
A frenched lollipop requires exactly one slice of bacon. You wrap it in a spiral around the meat ball. The compact shape allows complete coverage without excessive overlap. You get consistent bacon thickness all the way around. This creates even crisping.
The ball shape also prevents bacon from sliding off during cooking. On a tapered drumstick, bacon can slide down toward the thick end as the fat renders. On a lollipop, the meat ball is at the bottom. There’s nowhere for the bacon to slide. It stays in place throughout the cook.
Professional Presentation
Chicken lollipops look impressive on a serving platter. The exposed bone handle gives them an elegant, restaurant-quality appearance. They’re clearly designed to be picked up and eaten by hand. This makes them perfect party food.
Regular drumsticks are casual. Lollipops are sophisticated. The extra effort of frenching signals to your guests that you’ve put thought and care into the food. The uniform appearance also makes plating easier. Each lollipop is roughly the same size and shape. They arrange neatly on the platter.
The bone handle also serves a practical purpose. Guests can hold the clean bone without getting sauce and grease all over their hands. The meat is at the bottom. They bite the glazed end. The bone stays relatively clean. This is better than grabbing a saucy whole drumstick that coats your entire hand.
Why the Glaze Goes On During the Final 10 Minutes Instead of Throughout
Preventing Sugar Burning
The honey sriracha glaze contains ¾ cup of honey. Honey is pure sugar. When exposed to 300°F heat for extended periods, sugar caramelizes and eventually burns. If you brushed the glaze on at the beginning of the cook, it would char long before the chicken finished.
Burnt sugar tastes bitter and acrid. It creates a black crust instead of a glossy coating. The honey also contains volatile aromatic compounds that evaporate when overheated. You lose the floral, sweet honey flavor. All that remains is burnt bitterness.
By waiting until the chicken reaches 175°F to apply glaze, you give the sugars only 10 minutes of heat exposure. This is enough time for caramelization to create color and flavor complexity. But not enough time for burning. The glaze sets into a sticky, lacquered finish without crossing into burnt territory.
Building Layers of Glaze
Ten minutes allows for multiple glaze applications. You brush the first coat when the chicken hits 175°F. After 3 to 4 minutes, you brush a second coat. After another 3 to 4 minutes, you can add a third coat if desired. Each layer adds thickness and intensity.
The first coat partially sets as the chicken continues cooking. The second coat sticks to the tacky first layer. You build up a substantial glaze coating through multiple applications. This creates better coverage than a single heavy coat applied all at once.
The multi-layer approach also helps the glaze penetrate into the bacon crevices. The first thin coat seeps into gaps and folds. Subsequent coats build up on the surface. You get glaze both on top of the bacon and worked into the texture of the bacon weave.
Temperature for Glaze Adhesion
At 175°F internal chicken temperature, the surface of the lollipops is hot enough to help the glaze stick. The butter in the glaze melts immediately on contact. It helps the honey and sriracha spread evenly. The heat also causes some of the liquid components to evaporate. This thickens the glaze slightly right on the surface.
If you applied glaze to cold chicken, it would be too thick. It wouldn’t spread well. Much of it would slide off instead of adhering. If you applied it to chicken that was already at 185°F, the surface would be so hot that the glaze would bubble and potentially separate. The 175°F timing is the sweet spot.
The bacon is also reaching peak crispness at this point. It’s rendered most of its fat. The surface is starting to brown deeply. The glaze caramelizes against the hot bacon. This creates additional flavor through Maillard reactions between the sugars and the bacon proteins.
Moisture Retention
Applying glaze too early traps moisture under the coating. This steam prevents the bacon from crisping properly. The glaze forms a barrier. Water vapor from the cooking chicken can’t escape. You end up with steamed, soft bacon under a glazed surface instead of crispy bacon with glaze on top.
By glazing late, you let the bacon crisp for 50 minutes unobstructed. All the moisture escapes. The bacon becomes brittle and crunchy. Then you add the glaze. The glaze sits on top of already-crispy bacon. It doesn’t have time to soften the bacon before the lollipops are done.
The glaze also helps seal in the remaining chicken juices during the final 10 minutes. Once the coating sets, less moisture escapes from the meat. The chicken stays juicier. But this only works because you’ve let most of the excess moisture cook off first during the initial 50 minutes.
Why Thin-Cut Bacon Works Better Than Thick-Cut for Wrapping
Flexibility and Wrapping
Thin-cut bacon is more flexible than thick-cut. It bends and molds around the curved surface of the chicken lollipop easily. You can wrap it tightly without gaps. Thick-cut bacon is stiffer. It doesn’t conform to the meat shape as well.
The flexibility matters especially at the edges where you start and end the wrap. Thin bacon can be tucked under itself or secured with a toothpick without breaking. Thick bacon resists bending at sharp angles. It cracks or tears when you try to tuck it. This creates loose ends that can unwrap during cooking.
Thin bacon also requires less overlap to create complete coverage. One slice spiraled around a lollipop provides full wrapping. Thick bacon might leave small gaps between wraps. You’d need to use two slices to get complete coverage. This doubles the fat content and makes the lollipops too rich.
Rendering Time Matches Cooking Time
Thin-cut bacon renders its fat in about 50 to 60 minutes at 300°F. This perfectly matches the time needed to cook chicken drumsticks to 185°F. By the time the chicken is done, the bacon is crispy. The timing syncs up naturally.
Thick-cut bacon takes longer to render. It might need 75 to 90 minutes at 300°F to achieve the same level of crispness. If you pulled the chicken at 185°F after 60 minutes, the thick bacon would still be chewy and fatty. It wouldn’t have rendered completely.
You could cook longer to crisp thick bacon. But then the chicken would overcook. Even dark meat has limits. Beyond 195°F, it starts to dry out and become stringy. The 185°F target is optimal for tenderness. Thin bacon allows you to hit this target with properly crisped bacon.
Fat-to-Meat Ratio
Thin-cut bacon has a better fat-to-meat ratio for wrapping. It provides enough bacon flavor and fat to baste the chicken. But it doesn’t overwhelm with grease. Thick-cut bacon has so much fat that it can make the lollipops too rich.
When thick bacon renders, it releases a lot of liquid fat. This fat needs somewhere to go. On a lollipop, it drips down the meat and pools at the bottom. The bottom portion of the lollipop can end up sitting in rendered fat. This makes it greasy instead of just moist.
Thin bacon releases less total fat volume. The fat that renders drips away cleanly. The bacon crisps without creating pools of grease. You get the flavor benefits of bacon fat basting the chicken. But you don’t end up with oily lollipops.
Visual Presentation
Thin bacon creates cleaner spiral lines when wrapped around lollipops. You can see distinct wraps going around the meat. This looks intentional and artistic. Thick bacon creates chunkier, less defined spirals. The visual effect is less refined.
The thinner profile also shows off the glaze better. With thin bacon, the glaze sits in the valleys between bacon wraps. It creates contrast between the dark glazed bacon and the lighter chicken peeking through gaps. Thick bacon has deeper crevices. The glaze pools in them instead of creating definition.
For serving, thin bacon lollipops are easier to eat. You can bite through the bacon wrap more easily. Thick bacon requires more aggressive biting. This can pull the bacon off the chicken or cause the lollipop to come apart. Thin bacon stays attached better when bitten.
Honey Sriracha Chicken Lollipops
Bacon-wrapped, smoked, glazed to perfection
Ingredients
Chicken
- 14 chicken drumsticks (skin removed)
- 14 slices thin-cut bacon (1 per drumstick)
- Toothpicks as needed
Seasoning
- 1½ teaspoons kosher salt
- 1½ teaspoons garlic powder
- 1 teaspoon smoked paprika
- 1 teaspoon black pepper
Honey Sriracha Glaze
- ¾ cup honey
- ½ cup sriracha (adjust to taste)
- 3 tablespoons soy sauce
- 3 tablespoons unsalted butter
- 1½ tablespoons apple cider vinegar
- 1½ teaspoons garlic powder
Remove the skin before wrapping in bacon. Chicken skin under bacon doesn’t crisp properly. It stays rubbery and chewy. The bacon provides all the crispy fat layer you need. Removing the skin also helps the bacon adhere better to the meat.
Step-by-Step Instructions
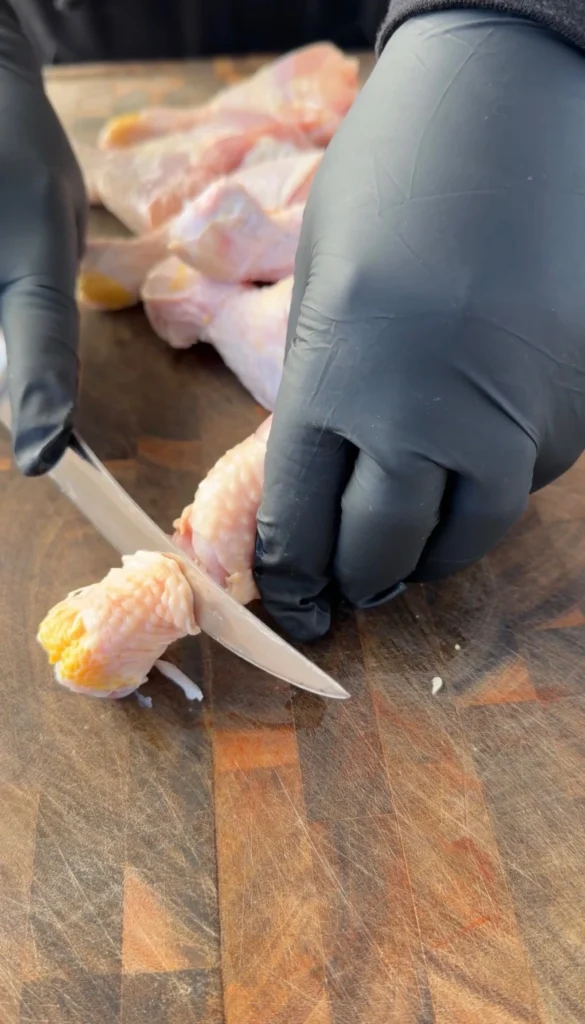
Step 1: French the Drumsticks and Remove Skin
Remove chicken drumsticks from refrigeration. Let them sit at room temperature for 15 to 20 minutes while you work. This makes the skin easier to remove and the meat easier to handle.
Working with one drumstick at a time, locate the narrow end of the drumstick near the joint. Use a sharp knife to cut through the skin and meat around the bone. Make a circular cut about 1 inch from the end of the bone.
Scrape the meat away from the bone using the back of your knife. Push the meat downward toward the thick end of the drumstick. Use a paper towel for better grip if the meat is slippery. Continue pushing until you’ve exposed 2 to 3 inches of clean bone.
Remove any remaining tendons or bits of meat from the exposed bone. You want it completely clean. The bone is now your lollipop handle. The meat should be compacted into a ball at the bottom.
Grip the chicken skin at the top of the meat ball. Pull it down and off the drumstick in one motion. The skin should slide off easily. If it sticks, use your knife to help separate it from the meat. Discard the skin.
Repeat this process for all 14 drumsticks. Work methodically. Each one should take 45 seconds to 1 minute once you get into a rhythm.
Step 2: Season the Drumsticks
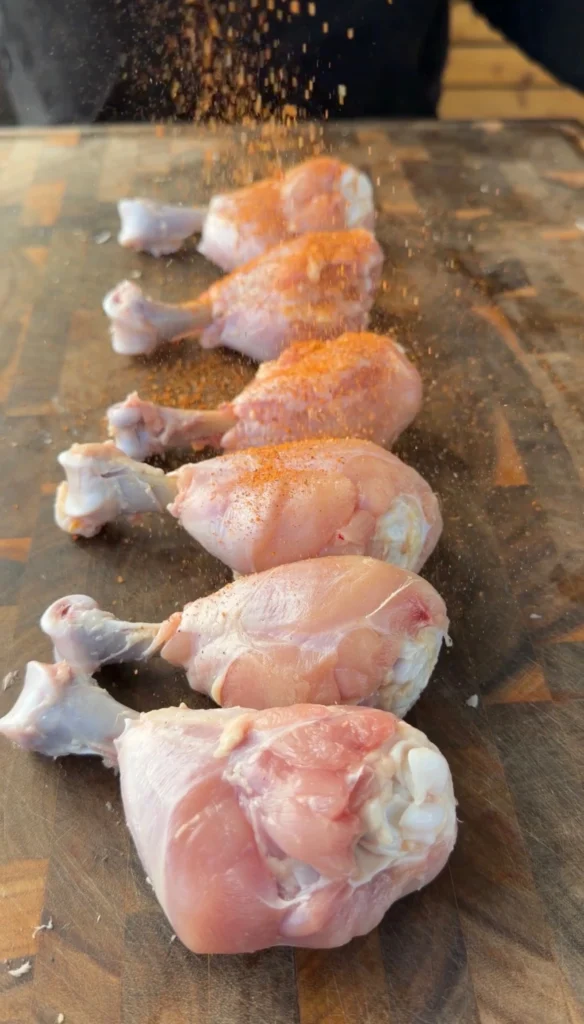
In a small bowl, combine 1½ teaspoons kosher salt, 1½ teaspoons garlic powder, 1 teaspoon smoked paprika, and 1 teaspoon black pepper. Mix well.
Sprinkle the seasoning mixture evenly over all the drumsticks. Make sure to coat every surface of the exposed meat. Don’t season the exposed bone. Season only the meat ball at the bottom.
Use your hands to rub the seasoning into the meat. Apply light pressure to help it adhere. The seasoning should coat the drumsticks evenly. No large clumps or bare spots.
Let the seasoned drumsticks sit for 10 minutes while you prep the bacon. This allows the salt to start penetrating the meat. It also helps the seasoning stick better when you wrap the bacon.
Step 3: Wrap Each Lollipop in Bacon
Take one slice of thin-cut bacon. Start at the top of the meat ball, just below the exposed bone. Press the end of the bacon slice against the meat.
Wrap the bacon in a spiral around the meat ball, working your way down. Overlap each wrap by about ¼ inch. This ensures complete coverage with no gaps. Keep the bacon tight as you wrap. Don’t leave it loose.
When you reach the bottom of the meat ball, tuck the end of the bacon underneath. Or secure it with a toothpick. The goal is to prevent the bacon from unwrapping during cooking.
Make sure the entire meat ball is covered. No bare chicken should be visible. The bacon should hug the meat snugly. Gaps will allow moisture to escape and create uneven cooking.
Repeat for all 14 lollipops. Place finished lollipops on a sheet pan or platter. They’re ready for the smoker.
Step 4: Prepare the Smoker
Preheat your smoker to 300°F. Use applewood for smoke. Cherry or pecan also work well. Avoid strong woods like mesquite or hickory. They overpower the sweet glaze.
Set up for indirect heat. The lollipops should not be directly over the heat source. You want ambient heat to surround them. This prevents the bacon from burning on the bottom while the top stays undercooked.
Make sure the smoker is producing thin, blue smoke. Not thick, white smoke. Thick smoke creates bitter, sooty flavor. Thin smoke creates clean, sweet smoke character. If you see billowing white smoke, wait until it clears before adding the chicken.
Oil the grates lightly if your smoker grates tend to stick. Use a paper towel dipped in neutral oil. Wipe it across the grates with tongs. This prevents the bacon from gluing to the metal.
Step 5: Smoke the Lollipops
Once the smoker reaches 300°F and is producing clean smoke, arrange the bacon-wrapped lollipops on the grates. Space them about 1 inch apart. This allows smoke to circulate around each piece.
Position them bone-side up. The meat ball should be on the grate. The clean bone handle should point upward. This orientation helps the bacon render evenly. Fat drips down away from the meat instead of pooling.
Close the smoker lid. Let the lollipops cook undisturbed for 40 minutes. Resist the urge to open the smoker. Every time you lift the lid, you lose heat and smoke. The temperature drops. This extends cooking time.
After 40 minutes, check the internal temperature of one of the larger lollipops. Insert an instant-read thermometer into the center of the meat ball. Avoid hitting the bone. You’re looking for 165 to 170°F at this point.
If they haven’t reached temperature yet, close the lid and check again in 5-minute intervals. When one lollipop reads 165 to 170°F, check several others. They should all be in a similar range.
Step 6: Make the Honey Sriracha Glaze

While the lollipops smoke, make the glaze. In a small saucepan, combine ¾ cup honey, ½ cup sriracha, 3 tablespoons soy sauce, 3 tablespoons unsalted butter, 1½ tablespoons apple cider vinegar, and 1½ teaspoons garlic powder.
Place the saucepan over low heat on your stovetop or on the coolest part of your smoker. Stir constantly as the butter melts. You want all the ingredients to combine into a smooth mixture.
Once the butter has melted completely, continue simmering for 5 to 7 minutes. Stir occasionally. The glaze should thicken slightly. It should coat the back of a spoon. If it’s still thin and watery after 7 minutes, simmer for another 2 to 3 minutes.
Taste the glaze. Adjust if needed. The glaze should taste sweet with noticeable heat and savory undertones.
Remove from heat. Keep the glaze warm but not bubbling. You’ll use it soon for basting. If it cools too much and thickens significantly, reheat briefly before using.
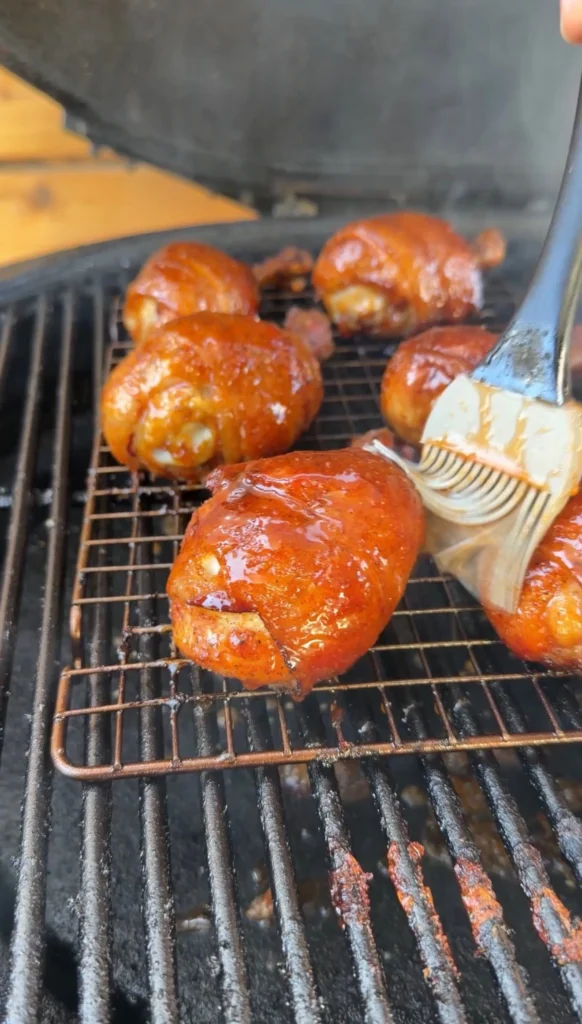
Step 7: Glaze the Lollipops
When the lollipops reach an internal temperature of 175°F in the thickest part, begin glazing. Use a silicone basting brush. Dip it in the warm honey sriracha glaze.
Brush a generous coat of glaze over every surface of each lollipop. Coat the bacon completely. Make sure to get into all the crevices and spirals. Don’t glaze the exposed bone handle. Focus on the bacon-wrapped meat ball.
Close the smoker lid. Wait 3 to 4 minutes. During this time, the glaze will start to set. The sugars will begin caramelizing. The internal temperature will continue climbing toward 185°F.
Open the lid again. Apply a second coat of glaze. Use even more generous amounts this time. The glaze should look thick and glossy on the bacon. The first coat created a tacky base. The second coat builds thickness.
Close the lid for another 3 to 4 minutes. Check the internal temperature. If you’re at or above 185°F, the lollipops are done. If you’re at 180 to 183°F, wait another minute or two.
You can apply a third coat of glaze if desired. This creates an even stickier coating. But two coats are usually sufficient. The glaze should be deeply caramelized. It should look dark and glossy with visible bubbling.
Step 8: Rest and Serve
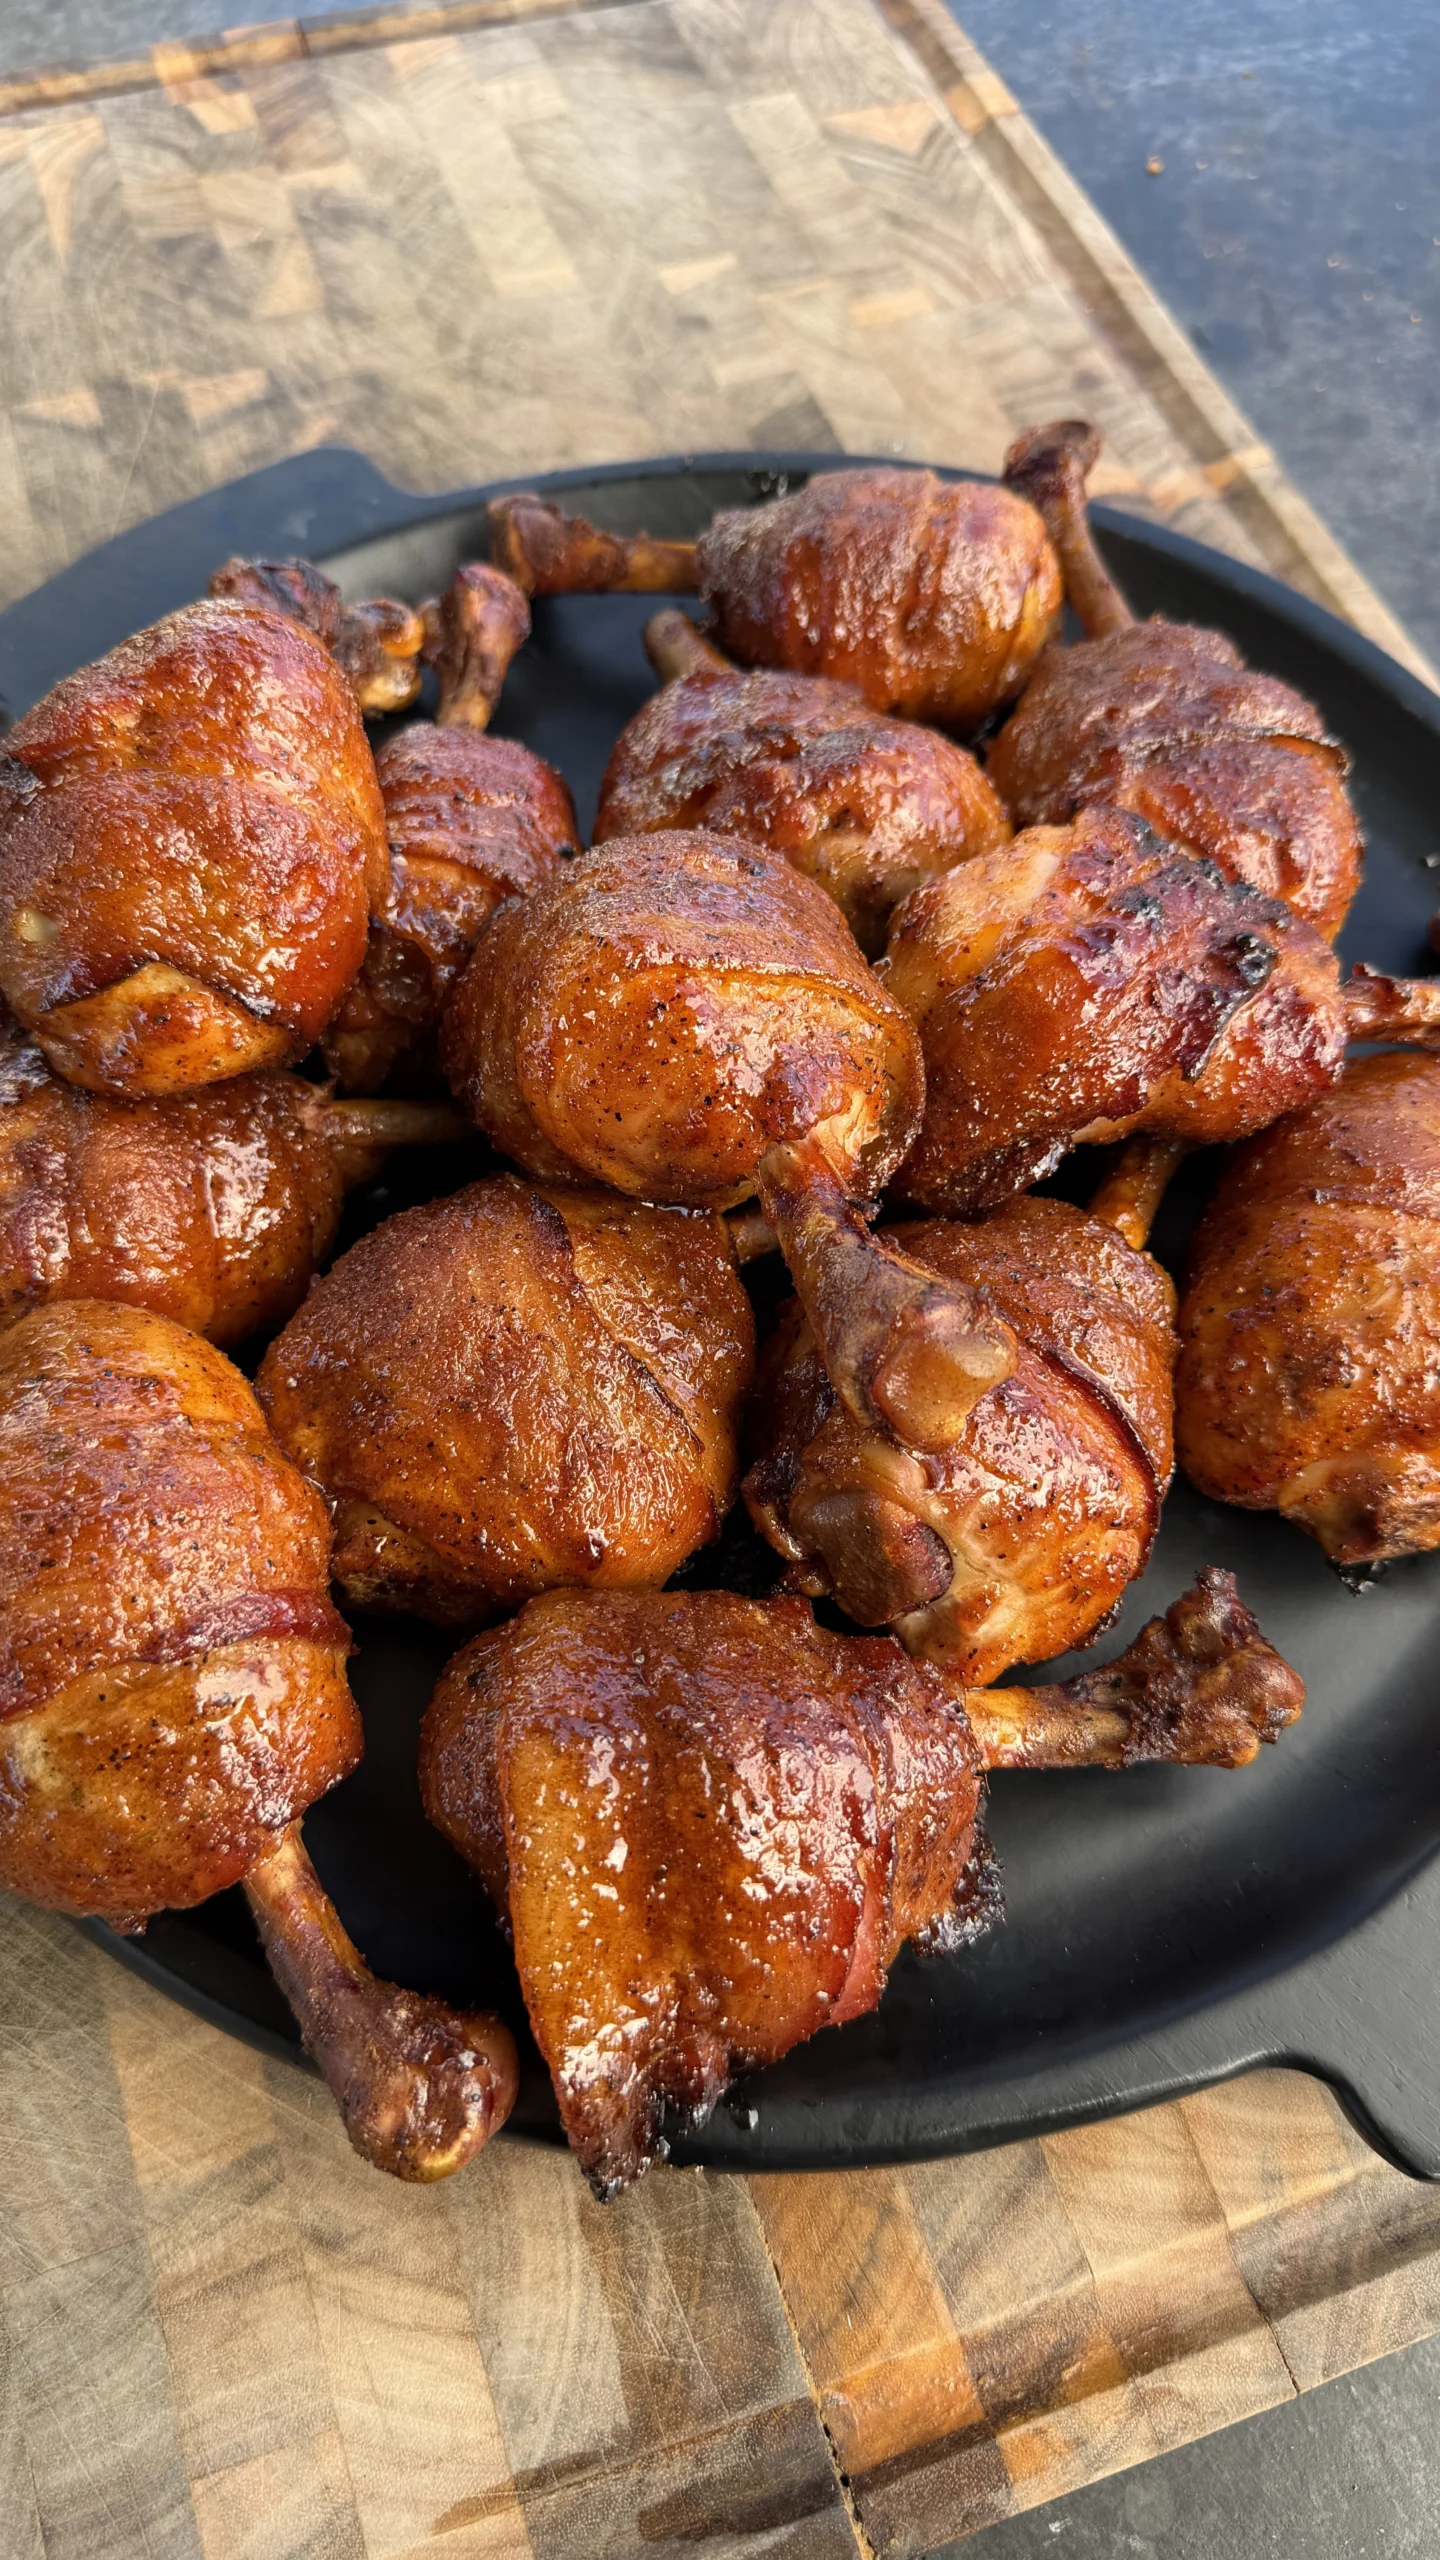
Remove all the lollipops from the smoker when they reach 185°F internal temperature. Transfer them to a clean platter or cutting board. Be careful. They’re extremely hot and the glaze is liquid.
Let them rest for 10 minutes uncovered. Don’t tent with foil. The steam would soften the crispy bacon. You want the bacon to stay crunchy. The glaze will also set during this rest. It goes from liquid to thick and sticky.
During the rest, the internal temperature may climb another 2 to 3 degrees from carryover cooking. This is fine. The juices will redistribute through the meat. When you bite into a lollipop after resting, the juices stay inside instead of running out.
Remove any toothpicks you used to secure the bacon. Check each lollipop carefully. Make sure you don’t leave any toothpicks behind. They’re easy to miss under the glaze.
Arrange the rested lollipops on a serving platter. The exposed bone handles should all point the same direction for visual appeal. Serve immediately while still warm. The bacon is at peak crispness. The glaze is perfectly sticky.
Honey Sriracha Bacon-Wrapped Chicken Lollipops
Ingredients
Equipment
Method
- French each drumstick by cutting around the bone at the narrow end. Scrape meat down toward the thick end to expose 2 to 3 inches of clean bone. Remove all skin from each drumstick.
- Mix salt, garlic powder, smoked paprika, and black pepper. Season all drumsticks evenly on the meat portions only.
- Wrap each drumstick in one slice of thin-cut bacon in a spiral pattern, covering all exposed meat. Secure ends with toothpicks if needed.
- Preheat smoker to 300°F with applewood for smoke. Set up for indirect heat.
- Place bacon-wrapped lollipops on smoker grates bone-side up. Smoke for 40 to 50 minutes until internal temperature reaches 175°F.
- While lollipops smoke, combine all glaze ingredients in a saucepan over low heat. Simmer 5 to 7 minutes, stirring until smooth and slightly thickened. Keep warm.
- When lollipops reach 175°F internal temperature, brush generously with glaze. Close lid. Wait 3 to 4 minutes. Apply second coat of glaze. Continue cooking until internal temperature reaches 185°F, about 10 more minutes total.
- Remove from smoker. Rest for 10 minutes uncovered. Remove toothpicks. Serve immediately while bacon is crispy and glaze is sticky.
Nutrition
Notes
Tried this recipe?
Let us know how it was!Frequently Asked Questions
Can You Make These Chicken Lollipops in the Oven Instead of a Smoker?
You can make bacon-wrapped chicken lollipops in the oven. But you’ll miss the smoke flavor. Preheat your oven to 375°F. Arrange the lollipops on a wire rack set over a rimmed baking sheet. The rack allows air circulation and fat drainage.
Roast for 45 to 50 minutes until the internal temperature reaches 185°F. The bacon will crisp from the oven heat. But it won’t have the same depth as smoked bacon. About 10 minutes before done, start glazing with the honey sriracha sauce.
For a hint of smoke, add 1 teaspoon of liquid smoke to the glaze. This won’t replicate real smoking. But it adds some smoky character. You can also finish the lollipops under the broiler for 2 to 3 minutes. This crisps the bacon further and caramelizes the glaze.
The texture will be similar to smoked lollipops. The bacon gets crispy. The chicken cooks to 185°F for proper tenderness. You just lose the authentic smoke flavor that makes the smoked version special.
What If You Can’t Find Thin-Cut Bacon?
If you can’t find thin-cut bacon, use regular-cut bacon. It will work but requires adjustments. The main issue is longer rendering time. Regular bacon takes about 15 to 20 minutes longer to crisp at 300°F.
To compensate, start checking the chicken temperature earlier. When it reaches 165 to 170°F, check the bacon crispness. If the bacon isn’t crispy yet, continue cooking. Pull when the chicken hits 185°F regardless of bacon texture. Slightly chewy bacon is better than overcooked dry chicken.
You can also increase the smoker temperature to 325°F when using regular bacon. The higher heat helps the bacon crisp faster. This brings the timing back in line with the chicken cooking time. Just watch the glaze carefully. It can burn faster at 325°F.
Thick-cut bacon is not recommended. It takes too long to render. The chicken would be seriously overcooked by the time thick bacon crisps properly. If thick bacon is your only option, consider partially cooking the bacon first. Bake bacon slices at 350°F for 10 to 15 minutes before wrapping. This pre-renders some fat. Then proceed with wrapping and smoking as directed.
How Spicy Are These Chicken Lollipops?
The spice level is moderate. The glaze contains ½ cup of sriracha spread across 14 lollipops. Each lollipop gets about 2 teaspoons of glaze. The honey and butter balance the heat. Most people find them pleasantly spicy without being overwhelming.
If you’re sensitive to heat, reduce the sriracha to ¼ cup. Increase the honey to 1 cup to maintain volume. This creates a milder, sweeter glaze. The sriracha flavor is still present but the heat is significantly reduced.
For spicier lollipops, increase sriracha to ¾ cup. You can also add 1 teaspoon of cayenne pepper to the glaze. Or use a hotter sauce like habanero hot sauce instead of sriracha. Just remember that the sweetness of the honey can only balance so much heat.
The bacon also moderates the perceived heat. The fat in bacon coats your mouth. This reduces how intensely you taste the capsaicin. Salt and smoke from the bacon also distract from the heat. The overall effect is complex flavor where heat is one component, not the dominant one.
Can You Prep These Chicken Lollipops Ahead of Time?
You can prep the lollipops several hours ahead. French and skin the drumsticks up to 4 hours before cooking. Season and wrap them in bacon. Place on a sheet pan. Cover tightly with plastic wrap. Refrigerate until ready to smoke.
The glaze can be made up to 3 days ahead. Store in an airtight container in the refrigerator. Reheat gently before using. Stir well to re-emulsify the butter.
Don’t apply the glaze ahead of time. The acid in the sriracha and vinegar can start breaking down the bacon if it sits too long. The glaze should only go on during the final 10 minutes of cooking.
You cannot fully cook these ahead and reheat successfully. The bacon loses its crispness when refrigerated. Reheating makes it chewy instead of crispy. These are best cooked and served fresh. If you must make ahead, smoke them without glazing. Refrigerate overnight. Reheat in a 350°F oven. Glaze during the last 10 minutes of reheating.
For parties, you can french and wrap the lollipops in the morning. Refrigerate until evening. Pull them out 30 minutes before smoking to bring to room temperature. Then smoke as directed.
Why Pull Chicken Lollipops at 185°F Instead of 165°F?
Dark meat chicken should be cooked to 185°F instead of the standard 165°F poultry temperature. The higher heat breaks down collagen into gelatin. This creates tender, fall-off-the-bone texture. At 165°F, drumsticks are safe to eat. But the meat is still somewhat chewy and stringy.
Chicken thighs and drumsticks contain more collagen than breast meat. The leg muscles work harder during the bird’s life. They develop tough connective tissue. This collagen needs sustained heat above 175°F to convert into soft gelatin.
The higher temperature also allows more intramuscular fat to render. Dark meat has about three times more fat than breast meat. At 165°F, much of this fat remains solid. It feels greasy. At 185°F, the fat fully liquefies. It either drips away or integrates as moisture.
Dark meat is forgiving. It stays moist even at 185°F because of the higher fat content and gelatin from broken-down collagen. Breast meat would become dry and chalky at this temperature. But drumsticks remain juicy and tender.
The bacon wrapping also helps. As the bacon fat renders, it bastes the chicken. This adds additional fat to keep the meat moist. Even if you slightly overcook to 190°F, the lollipops stay edible because of all this fat protection.
Ready to Level Up?
Take your backyard cooking from good to legendary.
This is where I keep all my most-used smokers, knives, and favorite cooking tools.
Shop My Gear CollectionExplore More Recipes
Find more diverse flavors at CWFeats.com