Applewood Smoked Baby Back Ribs

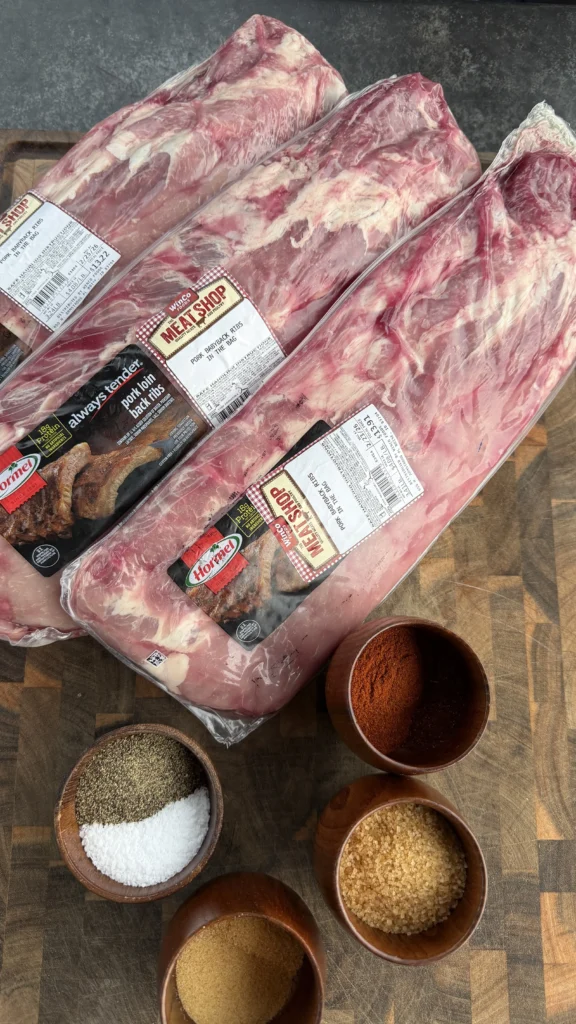
Classic applewood smoked baby back ribs are 3 racks of baby back ribs (2 to 2½ pounds each) with the membrane removed, patted dry, optionally coated with yellow mustard as a binder, then seasoned generously with a dry rub made from brown sugar, paprika, salt, pepper, garlic powder, onion powder, chili powder, and optional cayenne.
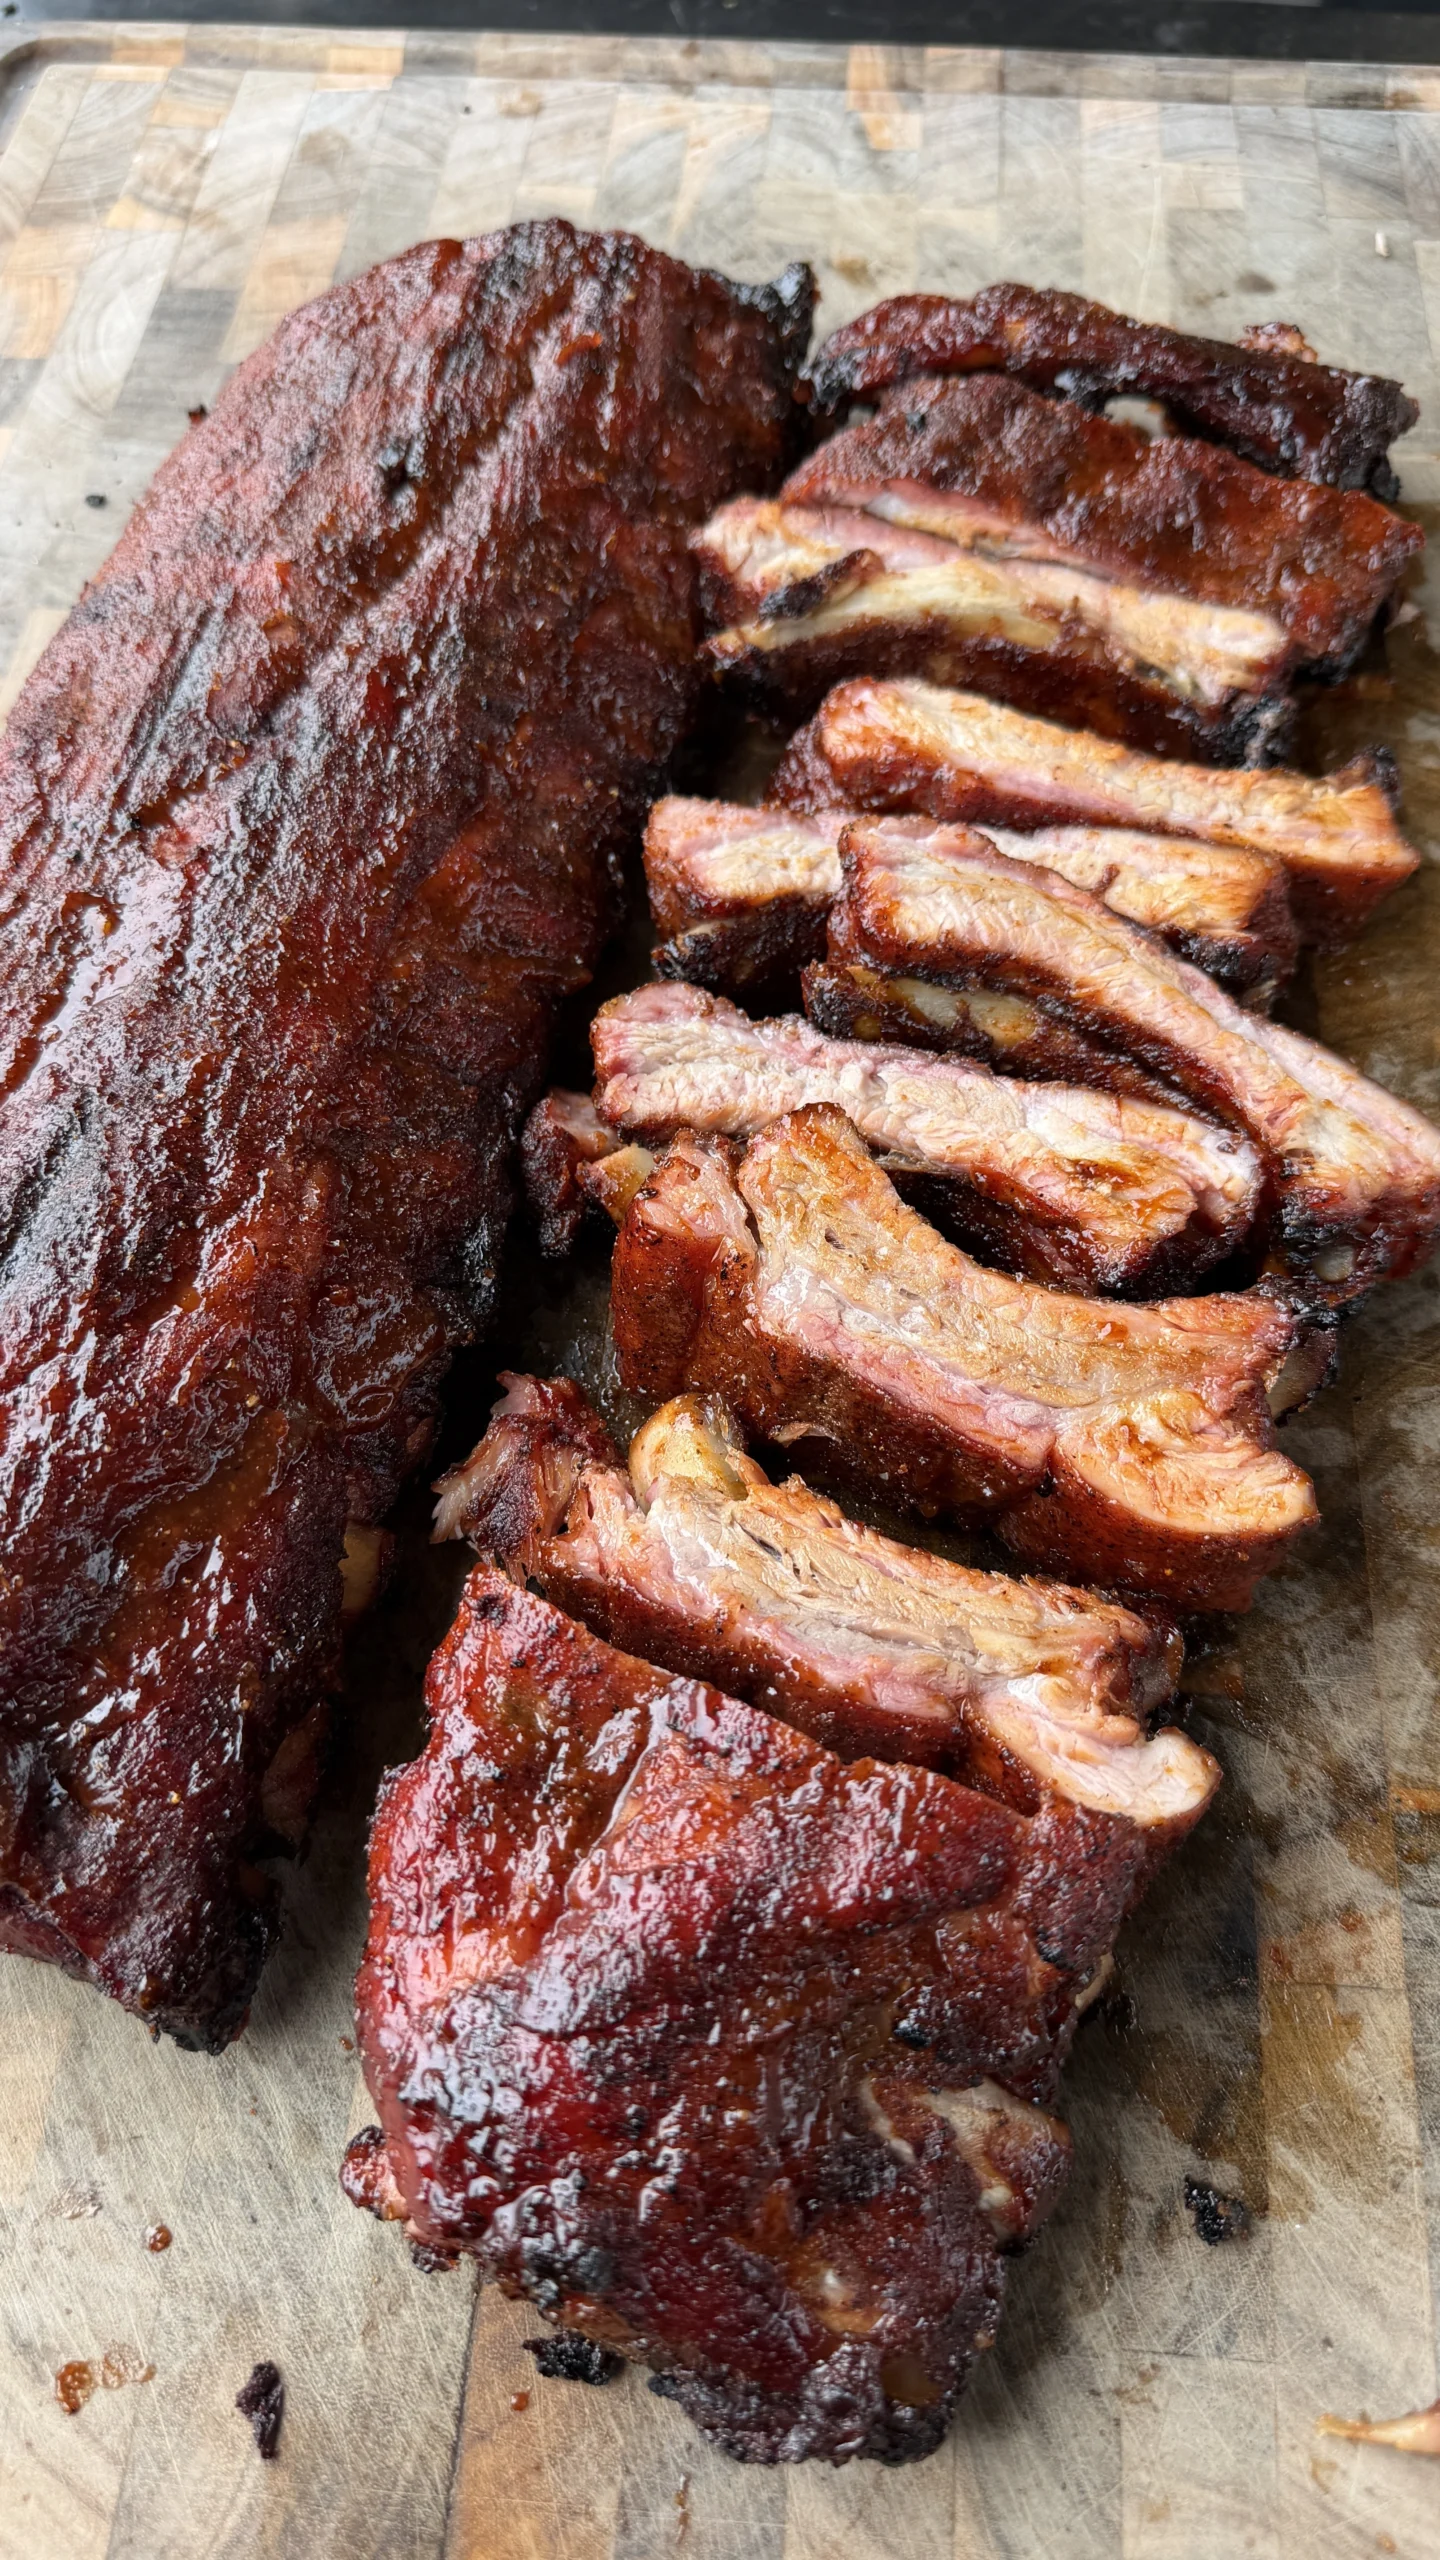
You smoke the ribs meat-side up at 250°F over applewood pellets for approximately 3 hours until the bark is dark and set, spritzing with apple juice after 2 hours if they appear dry. Then you increase the smoker temperature to 275°F, wrap each rack tightly in heavy-duty foil with BBQ sauce on both sides and a spritz of apple juice, and cook for approximately 1 hour until the internal temperature reaches 200 to 203°F and a toothpick slides through with little resistance. Finally, you unwrap the ribs, brush them with additional BBQ sauce, and cook for 10 to 15 minutes at 275°F until the sauce becomes tacky and set.
These applewood smoked ribs serve 6 to 9 people with each rack providing 2 to 3 servings depending on appetite and sides. Baby back ribs are smaller and more tender than spare ribs. Each rack contains 10 to 13 bones. A typical serving is 4 to 5 bones per person for a main course. The ribs pair well with classic BBQ sides like coleslaw, baked beans, cornbread, and potato salad.
Jump to RecipeWhat Makes Baby Back Ribs Different from Spare Ribs
Size and Bone Structure
Baby back ribs come from the upper portion of the rib cage near the spine. They’re called “baby” because they’re smaller and more curved than spare ribs, not because they come from young pigs. A typical baby back rack weighs 2 to 2½ pounds and contains 10 to 13 bones. The bones are shorter, typically 3 to 6 inches long.
Spare ribs come from the lower portion of the rib cage closer to the belly. They’re larger and flatter than baby backs. A spare rib rack weighs 3 to 4 pounds and also contains 10 to 13 bones. But the bones are longer, typically 6 to 12 inches. The meat distribution is different. Spare ribs have more meat between the bones but less meat on top of the bones.
St. Louis style ribs are spare ribs with the sternum bone, cartilage, and rib tips removed. This creates a more rectangular rack that cooks more evenly. The trimming brings spare ribs closer to baby back size. But the meat character remains different. Baby backs are still more tender.
Meat Texture and Fat Content
Baby back ribs have lean, tender meat. The loin muscle that runs along the top of baby backs is the same muscle used for pork chops. This creates exceptionally tender texture when cooked properly. The meat is fine-grained and delicate.
Spare ribs have more intramuscular fat and connective tissue. The meat comes from the belly area where the muscles work harder. This creates tougher raw meat that requires proper low and slow cooking to break down. When cooked correctly, spare ribs become incredibly rich and succulent. But they need careful temperature and time management.
The fat content difference affects cooking time. Baby backs cook faster than spare ribs. Three hours of smoking at 250°F is typically sufficient for baby backs to reach tenderness. Spare ribs need 4 to 5 hours at the same temperature. The extra collagen in spare ribs takes longer to convert to gelatin.
Flavor Profile
Baby back ribs taste more like pork chops. The flavor is clean, slightly sweet, and mild. The lean meat absorbs smoke flavor readily. Rubs and sauces are prominent in each bite. This makes baby backs ideal for showcasing quality BBQ sauce and well-balanced rubs.
Spare ribs have more pronounced pork flavor. The higher fat content creates richer, beefier taste. The meat flavor is bold enough to stand up to aggressive rubs and thick sauces. Competition BBQ teams often prefer spare ribs because they deliver more intense pork character.
For home cooks and backyard BBQ, baby backs are more universally appealing. The milder flavor and tender texture please a wider range of palates. Kids especially prefer baby backs. The bones are smaller and easier to handle. The meat pulls off cleanly for neat eating.
Price and Availability
Baby back ribs typically cost $1 to $3 more per pound than spare ribs. The premium pricing reflects higher demand and lower yield per pig. Each pig produces only one set of baby backs. The smaller size means less total meat per rack.
Despite the higher cost, baby backs are widely available in grocery stores. Most supermarkets stock them year-round. You can find them fresh or frozen. The consistent availability makes them convenient for planning cookouts without special ordering.
Spare ribs are often on sale at warehouse stores and butcher shops. Buying in bulk can bring the price down significantly. For feeding large groups on a budget, spare ribs make sense. For smaller gatherings where quality trumps quantity, baby backs justify the premium.
Should You Remove the Membrane from Ribs Before Smoking
What the Membrane Is and Where It’s Located
The membrane is a thin, translucent layer of connective tissue on the bone side of ribs. It’s technically called the peritoneum. This tissue covers the back of the rib bones and holds everything together. When you buy ribs, the membrane is almost always still attached unless the butcher removed it.
You can identify the membrane by flipping the ribs over to the bone side. The membrane appears shiny and silvery. It feels slippery when you touch it. It covers the entire back surface of the rack. Some areas might have thicker membrane than others. The thickest section is usually near the center of the rack.
The membrane serves a purpose when the pig is alive. It protects internal organs and provides structural support. But once the ribs are cooked, the membrane becomes an obstacle to enjoyable eating. It doesn’t break down during smoking like other connective tissues do.
Why Leaving the Membrane Creates Problems
The membrane acts as a barrier during smoking and seasoning. It prevents smoke penetration from the bone side. The ribs only absorb smoke through the meat side. This creates uneven smoke flavor. The meat near the bones tastes less smoky than the meat on top.
Rub application is also affected by the membrane. When you season ribs with membrane attached, the rub sits on top of the membrane. It doesn’t contact the meat directly on that side. During cooking, the rub can slide around on the slippery membrane. You end up with bare spots and clumped seasoning.
The membrane also prevents rendering fat and collagen from escaping during cooking. These liquids get trapped between the membrane and the meat. The bone side stays wetter and steamier. The bark doesn’t form properly on that side. You get mushy texture instead of the slight crust you want.
Most importantly, the membrane is chewy and unpleasant to eat. When you bite into ribs with membrane attached, it feels like tough plastic. You have to work around it or spit it out. It ruins the eating experience. Even perfectly smoked ribs feel amateurish if the membrane wasn’t removed.
How to Remove the Membrane Properly
Start at one end of the rack, typically the wider end. Use a butter knife or your finger to work under the membrane near a bone. Slide the knife between the membrane and the bone. Lift a corner to create a flap you can grab.
Once you have a flap, grab it with a paper towel. The membrane is slippery. Paper towel provides grip. Pull the membrane away from the bones in one smooth motion. It should peel off like plastic wrap. Pull at a slight angle away from the bones rather than straight up.
If the membrane tears during removal, don’t worry. Start again where it tore. Work underneath with the knife and grab another section. Most racks require pulling in 2 to 3 sections to remove everything. As long as you get all the membrane off eventually, the method doesn’t matter.
Some butchers sell ribs with the membrane already removed. Ask at the meat counter. This saves time and effort. But many butchers leave it on because it helps hold the ribs together during handling and transport. Expect to remove it yourself in most cases.
When You Might Leave the Membrane On
Competition BBQ teams occasionally leave the membrane on intentionally. The membrane helps hold the rack together during transport to judging. Ribs that fall apart or separate look unappealing in the turn-in box. The membrane provides structural support.
For competition, the membrane strategy works because judges typically eat only 1 to 2 bites per entry. They might not encounter the membrane in those bites. If they do, it’s a minor flaw compared to meat that’s falling apart. The presentation advantage outweighs the eating disadvantage.
For backyard cooking where people eat full racks or half racks, always remove the membrane. The eating experience matters more than presentation for home BBQ. You want every bite to be tender and delicious. The membrane prevents this. The few minutes spent removing it create dramatically better ribs.
Why 250°F Works Better Than 225°F for Pellet Smoker Ribs
Collagen Breakdown Speed
Pork ribs contain significant collagen in the connective tissue between bones. This collagen needs to convert to gelatin for tender ribs. The conversion happens between 160°F and 205°F. Higher cooking temperatures accelerate this conversion.
At 225°F, the ribs spend more time in the conversion zone. But the process is slow. The collagen breaks down gradually over 5 to 6 hours. This extended cooking time allows moisture to escape. The ribs can become dry even as they tenderize.
At 250°F, the collagen conversion happens faster. The ribs reach tender texture in 4 to 5 hours total. Less time at temperature means less moisture loss. The ribs stay juicier while still achieving full tenderness. The 25-degree temperature increase creates noticeably better results.
The faster cooking also prevents the meat from becoming mushy. Ribs cooked at 225°F for too long can overcook. They fall off the bone without any bite resistance. At 250°F, you reach proper tenderness right as the collagen fully converts. The timing is more forgiving.
Bark Development
Bark is the crusty, caramelized exterior that forms on smoked meat. It develops through the Maillard reaction and spice polymerization. These processes happen faster at higher temperatures. At 225°F, bark formation is slow. The ribs can look pale or have minimal crust after 3 hours.
At 250°F, the bark sets more quickly. After 3 hours of smoking, the exterior is dark and crusty. The rub has adhered completely. The surface no longer looks wet or raw. This proper bark protects the meat during wrapping. It doesn’t wash off when you add sauce to the foil.
The higher temperature also renders surface fat more efficiently. Baby back ribs have a fat cap on top. At 225°F, this fat renders slowly and can stay rubbery. At 250°F, the fat renders and drips away. The meat underneath browns properly. You get better texture on the meat side.
Smoke Ring Formation
The smoke ring is the pink layer just below the surface of smoked meat. It forms when nitrogen dioxide from burning wood reacts with myoglobin in meat. This reaction happens most efficiently when meat temperature is below 140°F. Once the meat exceeds 140°F, smoke ring development stops.
At 225°F, the ribs heat slowly. They spend more time below 140°F. In theory, this should create a thicker smoke ring. But in practice, the difference is minimal with ribs. The meat is thin. Even at 250°F, it stays below 140°F for the first hour.
The smoke ring is primarily aesthetic for ribs. It doesn’t affect flavor or tenderness significantly. Most people care more about bark and texture than smoke ring thickness. The 250°F temperature produces adequate smoke ring while delivering superior bark and tenderness.
Pellet Smoker Efficiency
Pellet smokers maintain temperature through automatic pellet feeding. At 225°F, the smoker runs at lower power. It burns fewer pellets per hour. But it also produces less consistent smoke. The combustion is cooler and less complete. You can get bitter, creosote-heavy smoke instead of clean blue smoke.
At 250°F, the pellet smoker runs more efficiently. The combustion is hotter and cleaner. The smoke is thin and blue. This clean smoke tastes better. It provides that sweet applewood character without acrid bitterness. The ribs absorb good smoke flavor instead of harsh smoke.
The 250°F temperature is also easier for pellet smokers to maintain. Temperature swings are smaller. The PID controller has less work to do. At 225°F, especially in cold weather, pellet smokers can struggle. They cycle frequently trying to maintain low temperature. The 250°F setting is more stable.
Does Wrapping Ribs in Foil Make Them More Tender
The Texas Crutch Method Explained
Wrapping ribs in foil during cooking is called the Texas Crutch. This technique originated in Texas BBQ competitions where speed mattered. Wrapped ribs cook faster and reach tenderness more predictably than unwrapped ribs.
The foil creates a sealed environment around the ribs. Steam can’t escape. The ribs essentially braise in their own juices plus whatever liquid you add to the foil. This wet cooking environment tenderizes meat faster than dry smoking alone.
For the Texas Crutch with ribs, you typically smoke unwrapped for 2 to 3 hours first. This develops bark and smoke flavor. Then you wrap and continue cooking for 1 to 2 hours. Finally, you unwrap and glaze for 10 to 15 minutes. This three-stage process balances smoke flavor, tenderness, and bark quality.
How Wrapping Affects Texture and Bark
Wrapping makes ribs extremely tender. The braising action breaks down collagen rapidly. Ribs that might take 6 hours unwrapped can be tender in 4 hours when wrapped. This time savings is significant for weeknight cooking or when you’re on a schedule.
However, wrapping softens the bark. The steam in the foil rehydrates the crusty exterior. When you unwrap the ribs, the bark is darker but softer than it was before wrapping. The final glazing phase helps re-set the bark. But it never regains the same crustiness as ribs cooked entirely unwrapped.
Some pitmasters prefer unwrapped ribs for this reason. They want maximum bark. They’re willing to extend cooking time to achieve it. Unwrapped ribs cooked for 5 to 6 hours develop incredibly thick, crunchy bark. The trade-off is potentially drier meat and longer cooking.
For most home cooks, wrapped ribs deliver better results. The guaranteed tenderness outweighs the slightly softer bark. Ribs that are fall-off-the-bone tender with good bark are better than ribs with great bark that are tough. Wrapping ensures tenderness for less experienced cooks.
What to Add to the Foil
Adding liquid to the foil when wrapping creates steam and additional flavor. Popular options include apple juice, apple cider vinegar, beer, or pineapple juice. The liquid should barely cover the bottom of the foil. Too much liquid boils the ribs rather than steaming them.
BBQ sauce added to the foil infuses flavor directly into the meat. The sauce mingles with rendered fat and meat juices. This creates a rich basting liquid. When you unwrap the ribs, save this liquid. You can reduce it in a saucepan and use it as a finishing sauce.
Butter is another common addition. A few tablespoons of butter in the foil adds richness. The butter melts and coats the ribs. Combined with brown sugar from the rub, it creates a glaze-like coating. Competition teams often use butter, honey, and brown sugar together in the foil.
Avoid adding too much of anything. The goal is enhancing, not drowning. A couple tablespoons of liquid and sauce is sufficient. The ribs will generate their own juices during the wrapped phase. Those natural juices combined with your additions create the braising environment.
Applewood Smoked Ribs
Baby backs, applewood, wrapped & glazed at 275°F
Ingredients
Ribs
- 3 racks baby back ribs (2-2½ lbs each)
- 2 tablespoons yellow mustard (optional binder)
- ½ cup apple juice (for spritzing)
- Applewood pellets
Dry Rub
- 3 tablespoons brown sugar
- 2 tablespoons paprika
- 2 teaspoons kosher salt
- 2 teaspoons coarse black pepper
- 2 teaspoons garlic powder
- 2 teaspoons onion powder
- 1 teaspoon chili powder
- ½ teaspoon cayenne pepper (optional)
Classic BBQ Sauce
- 1½ cups ketchup
- ½ cup brown sugar
- ¼ cup apple cider vinegar
- 2 tablespoons Worcestershire sauce
- 2 tablespoons yellow mustard
- 1 tablespoon smoked paprika
- 1 teaspoon garlic powder
- 1 teaspoon onion powder
- ½ teaspoon black pepper
Remove the membrane before seasoning. It prevents smoke and rub penetration and creates chewy, unpleasant texture when cooked. Use a butter knife to lift a corner, then grab with paper towel and pull in one smooth motion. This single step dramatically improves the final ribs.
Step-by-Step Instructions
Step 1: Prepare the Ribs
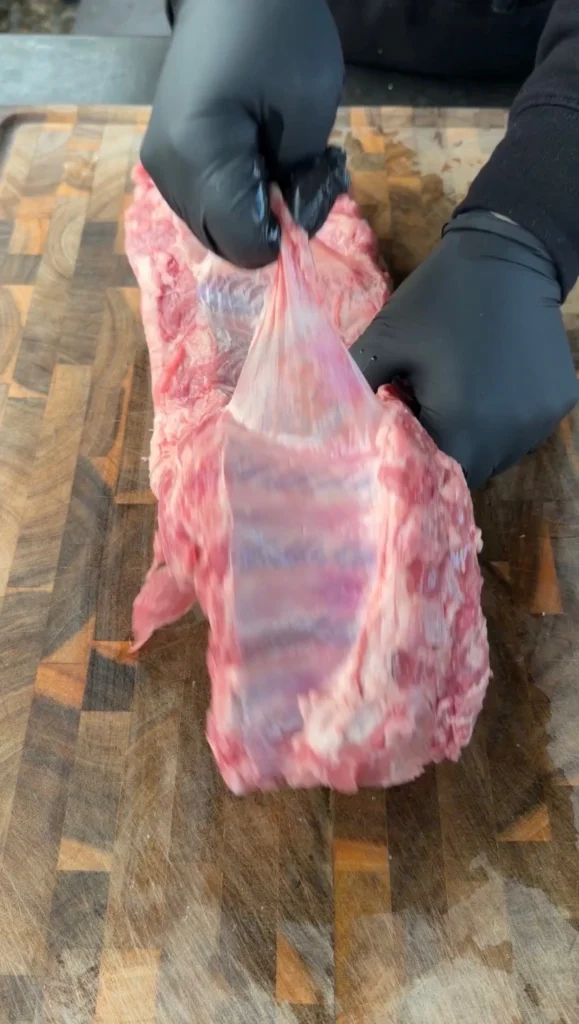
Remove 3 racks of baby back ribs from packaging. Place them bone-side up on a large cutting board. Look for the silvery membrane covering the back of the bones.
Insert a butter knife under the membrane near one end of the rack. Work the knife between the membrane and the bone to create a flap. Once you have a corner lifted, grab it with a paper towel. The membrane is slippery. Paper towel provides grip.
Pull the membrane away from the bones in one smooth motion. It should peel off like plastic wrap. If it tears, start again where it tore and continue removing sections until all membrane is gone. Repeat for all 3 racks.
Pat the ribs completely dry with paper towels on both sides. Trim off any loose pieces of meat or excess fat hanging from the edges. These pieces can burn during smoking.
If using yellow mustard as a binder, apply a thin layer to all surfaces of the ribs. The mustard helps the rub adhere. Don’t worry about mustard flavor. It cooks away completely and isn’t detectable in the finished ribs.
Step 2: Make and Apply the Dry Rub
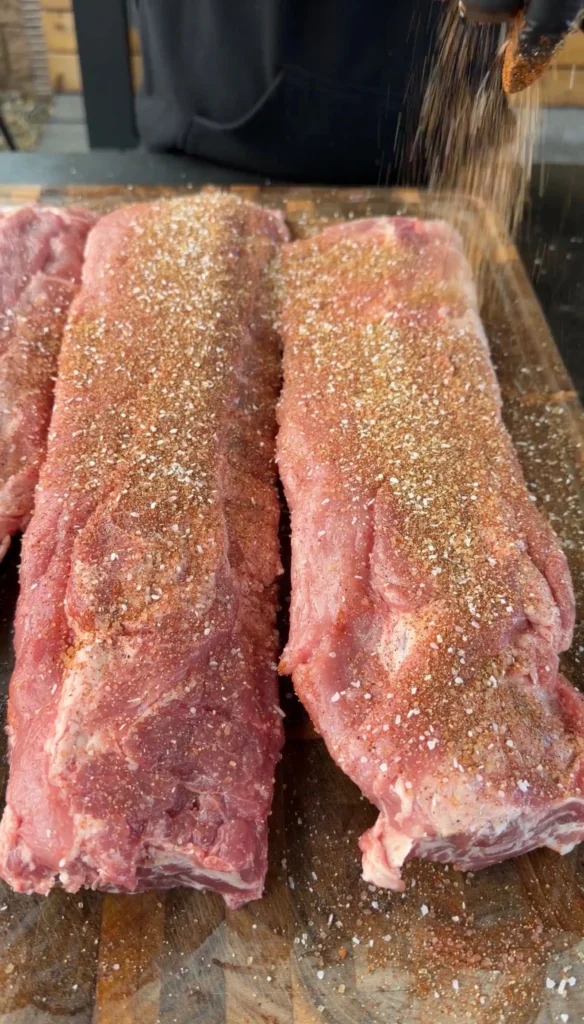
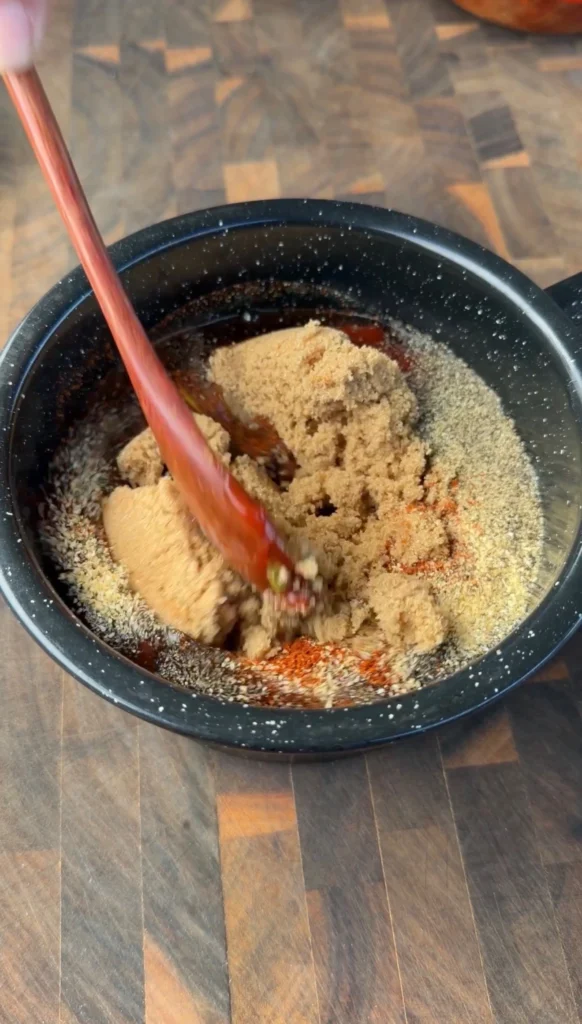
In a medium bowl, combine 3 tablespoons brown sugar, 2 tablespoons paprika, 2 teaspoons kosher salt, 2 teaspoons coarse black pepper, 2 teaspoons garlic powder, 2 teaspoons onion powder, 1 teaspoon chili powder, and ½ teaspoon cayenne if using. Mix thoroughly until all ingredients are evenly distributed.
Season the ribs generously on all sides with the dry rub. Start with the bone side. Apply rub and pat it into the meat. Flip the ribs meat-side up and apply more rub. Use all the rub across the 3 racks. Don’t be shy. The ribs should be well-coated but not caked with rub.
Let the seasoned ribs sit at room temperature for 20 to 30 minutes while the smoker preheats. This allows the salt to penetrate slightly and helps the ribs cook more evenly by taking the chill off.
Step 3: Preheat the Pellet Smoker
Fill the pellet hopper with applewood pellets. Turn on the smoker and set it to 250°F. Close the lid and let it preheat for 10 to 15 minutes.
The smoker is ready when it reaches and maintains 250°F. You should see thin blue smoke coming from the chimney. Thick white smoke indicates the pellets aren’t burning cleanly. If you see white smoke, increase the temperature slightly or give it more time to stabilize.
Clean the grill grates with a grill brush if needed. You want clean grates for the ribs to sit on. Residue from previous cooking can stick to the ribs.
Step 4: Smoke the Ribs

Place all 3 racks of ribs directly on the grill grates meat-side up. Position them so they fit without overlapping. If your smoker is small, you might need to use a rib rack to stand them vertically. This saves space and allows all racks to fit.
Close the lid and smoke for approximately 3 hours at 250°F. Don’t open the smoker frequently. Each time you open it, heat and smoke escape. This extends cooking time.
After 2 hours, check the ribs. If they appear dry, lightly spritz them with apple juice using a spray bottle. The moisture prevents the surface from drying out. But don’t oversaturate. A light mist is sufficient.
Continue smoking until the bark is dark and set. The rub should look dry and crusty, not wet. The surface should no longer glisten. This typically takes 3 hours total but can vary by 30 minutes either direction depending on rib thickness and smoker consistency.
Step 5: Make the BBQ Sauce
While the ribs smoke, make the BBQ sauce. In a medium saucepan, combine 1½ cups ketchup, ½ cup brown sugar, ¼ cup apple cider vinegar, 2 tablespoons Worcestershire sauce, 2 tablespoons yellow mustard, 1 tablespoon smoked paprika, 1 teaspoon garlic powder, 1 teaspoon onion powder, and ½ teaspoon black pepper.
Place the saucepan over medium-low heat. Stir to combine all ingredients. Bring to a gentle simmer. Reduce heat to low and simmer for 10 minutes, stirring occasionally. The sauce should thicken slightly and become glossy.
Remove from heat and let cool. Taste and adjust seasoning if needed. You can add more vinegar for tanginess, more brown sugar for sweetness, or more black pepper for heat. The sauce should balance sweet, tangy, and savory flavors.
Reserve the sauce until you’re ready to wrap the ribs. Make sure it’s at room temperature before using it in the foil. Hot sauce on ribs creates too much steam in the foil.
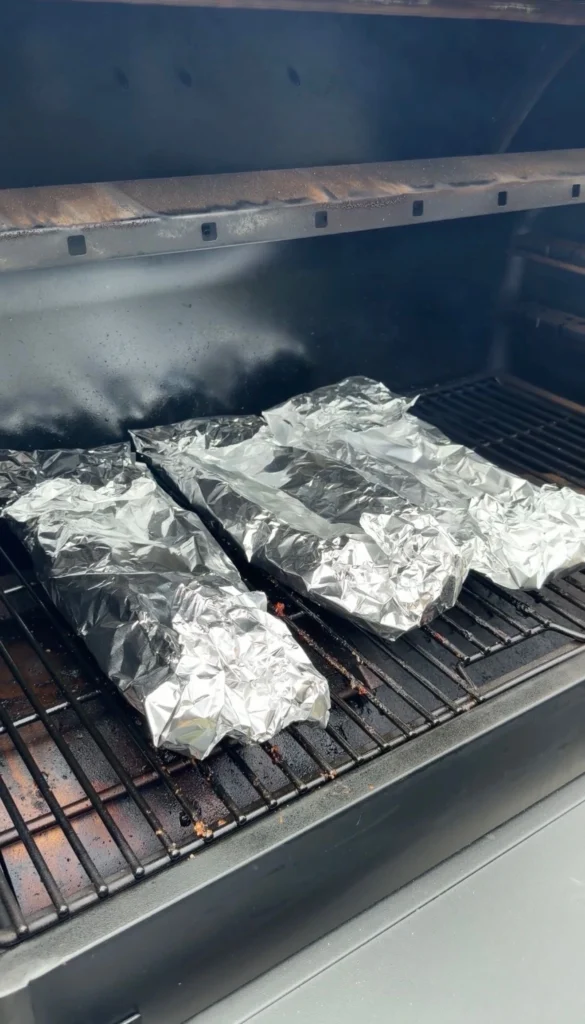
Step 6: Wrap the Ribs in Foil
After about 3 hours of smoking, increase the smoker temperature to 275°F. While it’s heating, prepare to wrap the ribs.
Tear off 3 sheets of heavy-duty aluminum foil, each large enough to wrap one rack completely. Lay them on a work surface.
Spread a thin layer of BBQ sauce on the center of each piece of foil where the ribs will sit. About 2 to 3 tablespoons per rack.
Place each rack of ribs meat-side down onto the sauce on the foil. Lightly spritz the bone side with apple juice. Then spread another 2 to 3 tablespoons of BBQ sauce over the bone side.
Bring the long edges of the foil up and fold them together to create a seal. Fold the short ends up and over to create a tight packet. The ribs should be completely enclosed. No steam should be able to escape.
Return the wrapped ribs to the smoker at 275°F. Cook for approximately 1 hour. You’re looking for an internal temperature of 200 to 203°F in the thickest part of the meat.
Step 7: Check for Doneness
After 1 hour of wrapped cooking, carefully open one foil packet. Be cautious of the steam that escapes. It’s very hot.
Insert an instant-read thermometer into the thickest part of the meat between bones. Don’t touch bone. The temperature should read 200 to 203°F.
Perform the toothpick test. Insert a toothpick or wooden skewer between bones. It should slide in and out with minimal resistance, like sliding through soft butter.
If the ribs aren’t tender yet, reseal the foil and continue cooking. Check every 15 minutes until they reach proper tenderness. Some racks cook faster than others due to thickness variations.
Step 8: Glaze and Set the Sauce
Once the ribs reach 200 to 203°F and pass the toothpick test, carefully unwrap them. The ribs and foil are extremely hot. Use tongs and gloves.
Place the unwrapped ribs back on the grill grates meat-side up. Brush them generously with the remaining BBQ sauce. Use about ¼ cup of sauce per rack.
Close the lid and cook for 10 to 15 minutes at 275°F. The sauce should become tacky and set. It should look glossy but not runny. The sauce should adhere to the ribs without dripping off.
Watch carefully during this phase. The sugars in the sauce can burn quickly. If you see the sauce starting to blacken, remove the ribs immediately. You want caramelization, not carbonization.
Step 9: Rest and Serve
Remove the ribs from the smoker when the sauce is set. Place them on a cutting board. Let them rest for at least 10 minutes before slicing. This allows the juices to redistribute. If you cut immediately, juices run out and the ribs are drier.
After resting, cut between the bones to separate individual ribs. Use a sharp knife. Don’t saw. Make clean cuts straight down.
Arrange the ribs on a serving platter. Brush with additional sauce if desired or serve extra sauce on the side. Garnish with fresh herbs if you want visual appeal for photos.
Serve immediately while hot. The ribs are best eaten fresh but can be held in a warm oven at 170°F for up to 1 hour if needed.
Classic Applewood Smoked Baby Back Ribs
Ingredients
Equipment
Method
- Remove membrane from back of each rib rack using butter knife and paper towel. Pat ribs dry. Trim excess fat. Optionally coat with yellow mustard as binder.
- Combine all dry rub ingredients in bowl. Season ribs generously on all sides. Let sit at room temperature 20 to 30 minutes.
- Preheat pellet smoker to 250°F with applewood pellets. Clean grates.
- Place ribs meat-side up on grates. Smoke for approximately 3 hours. After 2 hours, spritz with apple juice if ribs appear dry. Smoke until bark is dark and set, surface no longer looks wet.
- While ribs smoke, combine all BBQ sauce ingredients in saucepan. Simmer over medium-low heat for 10 minutes, stirring occasionally, until slightly thickened and glossy. Remove from heat and cool.
- After 3 hours, increase smoker to 275°F. Lay out 3 sheets of heavy-duty foil. Spread thin layer of BBQ sauce on each. Place ribs meat-side down on sauce. Spritz bone side with apple juice. Add more sauce on top. Wrap tightly. Return to smoker.
- Cook wrapped ribs for approximately 1 hour until internal temperature reaches 200 to 203°F in thickest part. Test with toothpick. It should slide through with little resistance.
- Unwrap ribs carefully. Place on grates meat-side up. Brush with remaining BBQ sauce. Cook 10 to 15 minutes at 275°F until sauce becomes tacky and set.
- Remove from smoker. Rest 10 minutes. Slice between bones and serve immediately.
Nutrition
Notes
Tried this recipe?
Let us know how it was!Frequently Asked Questions
Can You Smoke Ribs Without Wrapping Them?
You can smoke ribs entirely unwrapped. This creates maximum bark thickness and crust. The ribs cook at 250°F for 5 to 6 hours without the wrapping phase. The bark becomes very dark and crusty. The texture is firmer than wrapped ribs.
Unwrapped ribs require more attention. You need to monitor them closely to prevent drying out. Spritz with apple juice every 45 minutes after the first 2 hours. The moisture helps maintain proper texture without softening the bark.
The main challenge with unwrapped ribs is timing. They take longer and doneness can be unpredictable. Some racks might be ready at 5 hours. Others need 6 hours. The lack of the braising environment from foil means slower collagen breakdown.
For competition BBQ where bark is heavily judged, unwrapped ribs can score higher. For backyard cooking where tenderness and foolproof results matter more, wrapping is recommended. The wrapped method delivers consistently excellent ribs with less experience required.
What Other Woods Work Well for Smoking Ribs?
Hickory is the traditional choice for pork ribs. It provides bold, bacony smoke flavor. The smoke is more aggressive than applewood. Hickory creates deep mahogany color. It pairs especially well with spicy rubs and thick tomato-based sauces.
Cherry wood provides mild, fruity smoke with reddish tint. The color is visually appealing. The flavor is slightly sweeter than applewood. Cherry works well if you want pronounced smoke flavor without the heaviness of hickory.
Pecan offers nutty, rich smoke similar to hickory but slightly milder. It’s popular in Texas and Southern BBQ. Pecan creates excellent balance between fruit woods and hickory. It works with both sweet and savory rub profiles.
Oak provides clean, neutral smoke. It’s the wood used in many competition BBQ setups. Oak lets the rub and sauce flavors shine without adding strong wood character. It’s ideal if your rub and sauce are complex and you don’t want wood flavor competing.
Avoid mesquite for ribs. Mesquite is very strong and can make ribs taste bitter over long cooking times. It works for beef cooked hot and fast. But for 4 to 5-hour rib cooks, mesquite is too intense.
How Do You Store and Reheat Leftover Ribs?
Cool leftover ribs to room temperature within 2 hours of finishing. Wrap them tightly in aluminum foil or place in an airtight container. Refrigerate for up to 4 days. The ribs stay good longer than some meats because of the low cooking temperature and wrapped phase.
For freezing, wrap individual portions in plastic wrap, then in foil. Label with the date. Freeze for up to 3 months. The sauce and rub protect the meat from freezer burn better than unseasoned meat.
To reheat refrigerated ribs, preheat oven to 250°F. Wrap ribs in foil with 2 tablespoons of apple juice or water per rack. Heat for 20 to 30 minutes until warmed through. The foil and liquid create steam that prevents drying.
For frozen ribs, thaw in refrigerator overnight before reheating. Don’t microwave ribs from frozen. The uneven heating creates rubbery texture. Slow reheating in the oven maintains texture better.
You can also reheat ribs on the grill. Wrap in foil with liquid and place over indirect heat at 275°F for 15 to 20 minutes. This method is ideal when you’re already grilling other food.
Can You Make These Ribs in a Regular Gas or Charcoal Grill?
You can smoke ribs on a gas or charcoal grill using indirect heat. For gas grills, light burners on one side only. Place ribs on the unlit side. Add wood chips in a smoker box or foil packet on the lit side. Maintain 250°F by adjusting burner settings.
For charcoal grills, arrange coals on one side only. Place a drip pan with water on the empty side. Position ribs over the drip pan away from direct heat. Add wood chunks directly to the coals. Adjust vents to maintain 250°F.
The main challenge is temperature consistency. Regular grills fluctuate more than pellet smokers. You need to monitor and adjust frequently. Add fresh charcoal every hour to maintain heat. For gas, you might need to adjust burner settings as outside temperature changes.
The smoke flavor is often better on charcoal than pellet smokers. Charcoal creates authentic BBQ smoke character. Wood chunks on charcoal provide excellent flavor. Gas grills with wood chips work but the smoke is less intense.
The ribs taste just as good cooked on regular grills if you maintain proper temperature. The pellet smoker convenience is the main advantage, not quality. Skilled grillers can match pellet smoker results on charcoal or gas.
Why Do Competition BBQ Teams Pull Ribs at Specific Temperatures?
Competition judges evaluate ribs on appearance, taste, and texture. The texture judging is very specific. Ribs should have “clean bite.” This means the meat pulls away from the bone when you bite but doesn’t fall off on its own.
The 200 to 203°F internal temperature range produces this exact texture. Below 195°F, ribs are typically tough. The collagen hasn’t fully converted. Above 205°F, ribs become too tender. They fall off the bone which judges penalize.
Competition teams also use the toothpick test extensively. They check multiple spots on each rack. Every bite a judge takes should have identical texture. Consistent doneness across the entire rack requires careful temperature monitoring.
Teams often cook ribs to specific bend angles too. When held at one end, competition ribs should bend to about 90 degrees before starting to crack. This visual test confirms proper doneness. It’s another way to verify the 200 to 203°F range without constantly probing.
For backyard cooking, you can be slightly less precise. Ribs at 198°F or 205°F are both delicious. But if you want to practice competition-level techniques, the 200 to 203°F target teaches excellent temperature control skills.
Ready to Level Up?
Take your backyard cooking from good to legendary.
This is where I keep all my most-used smokers, knives, and favorite cooking tools.
Shop My Gear CollectionExplore More Recipes
Find more diverse flavors at CWFeats.com
