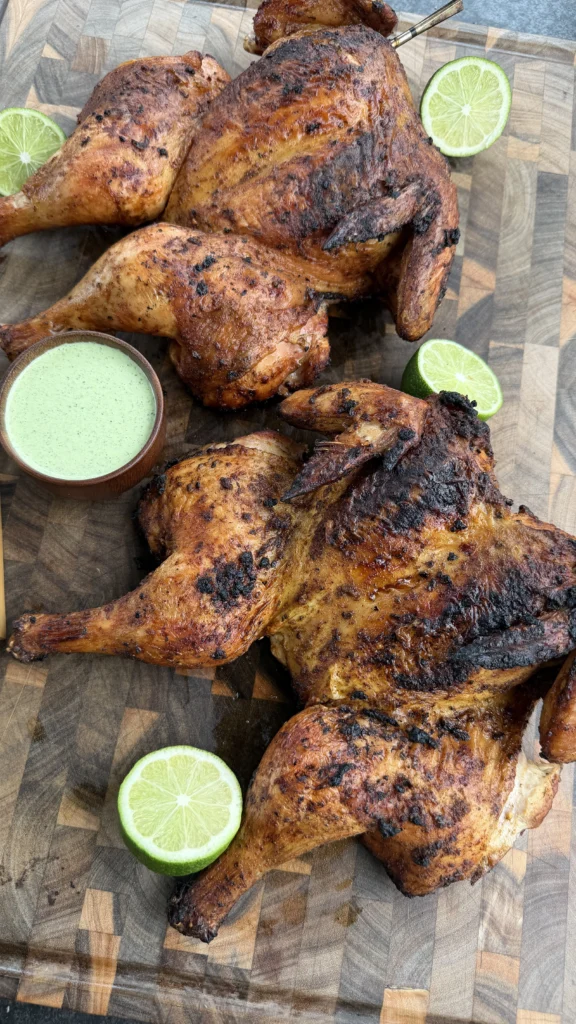
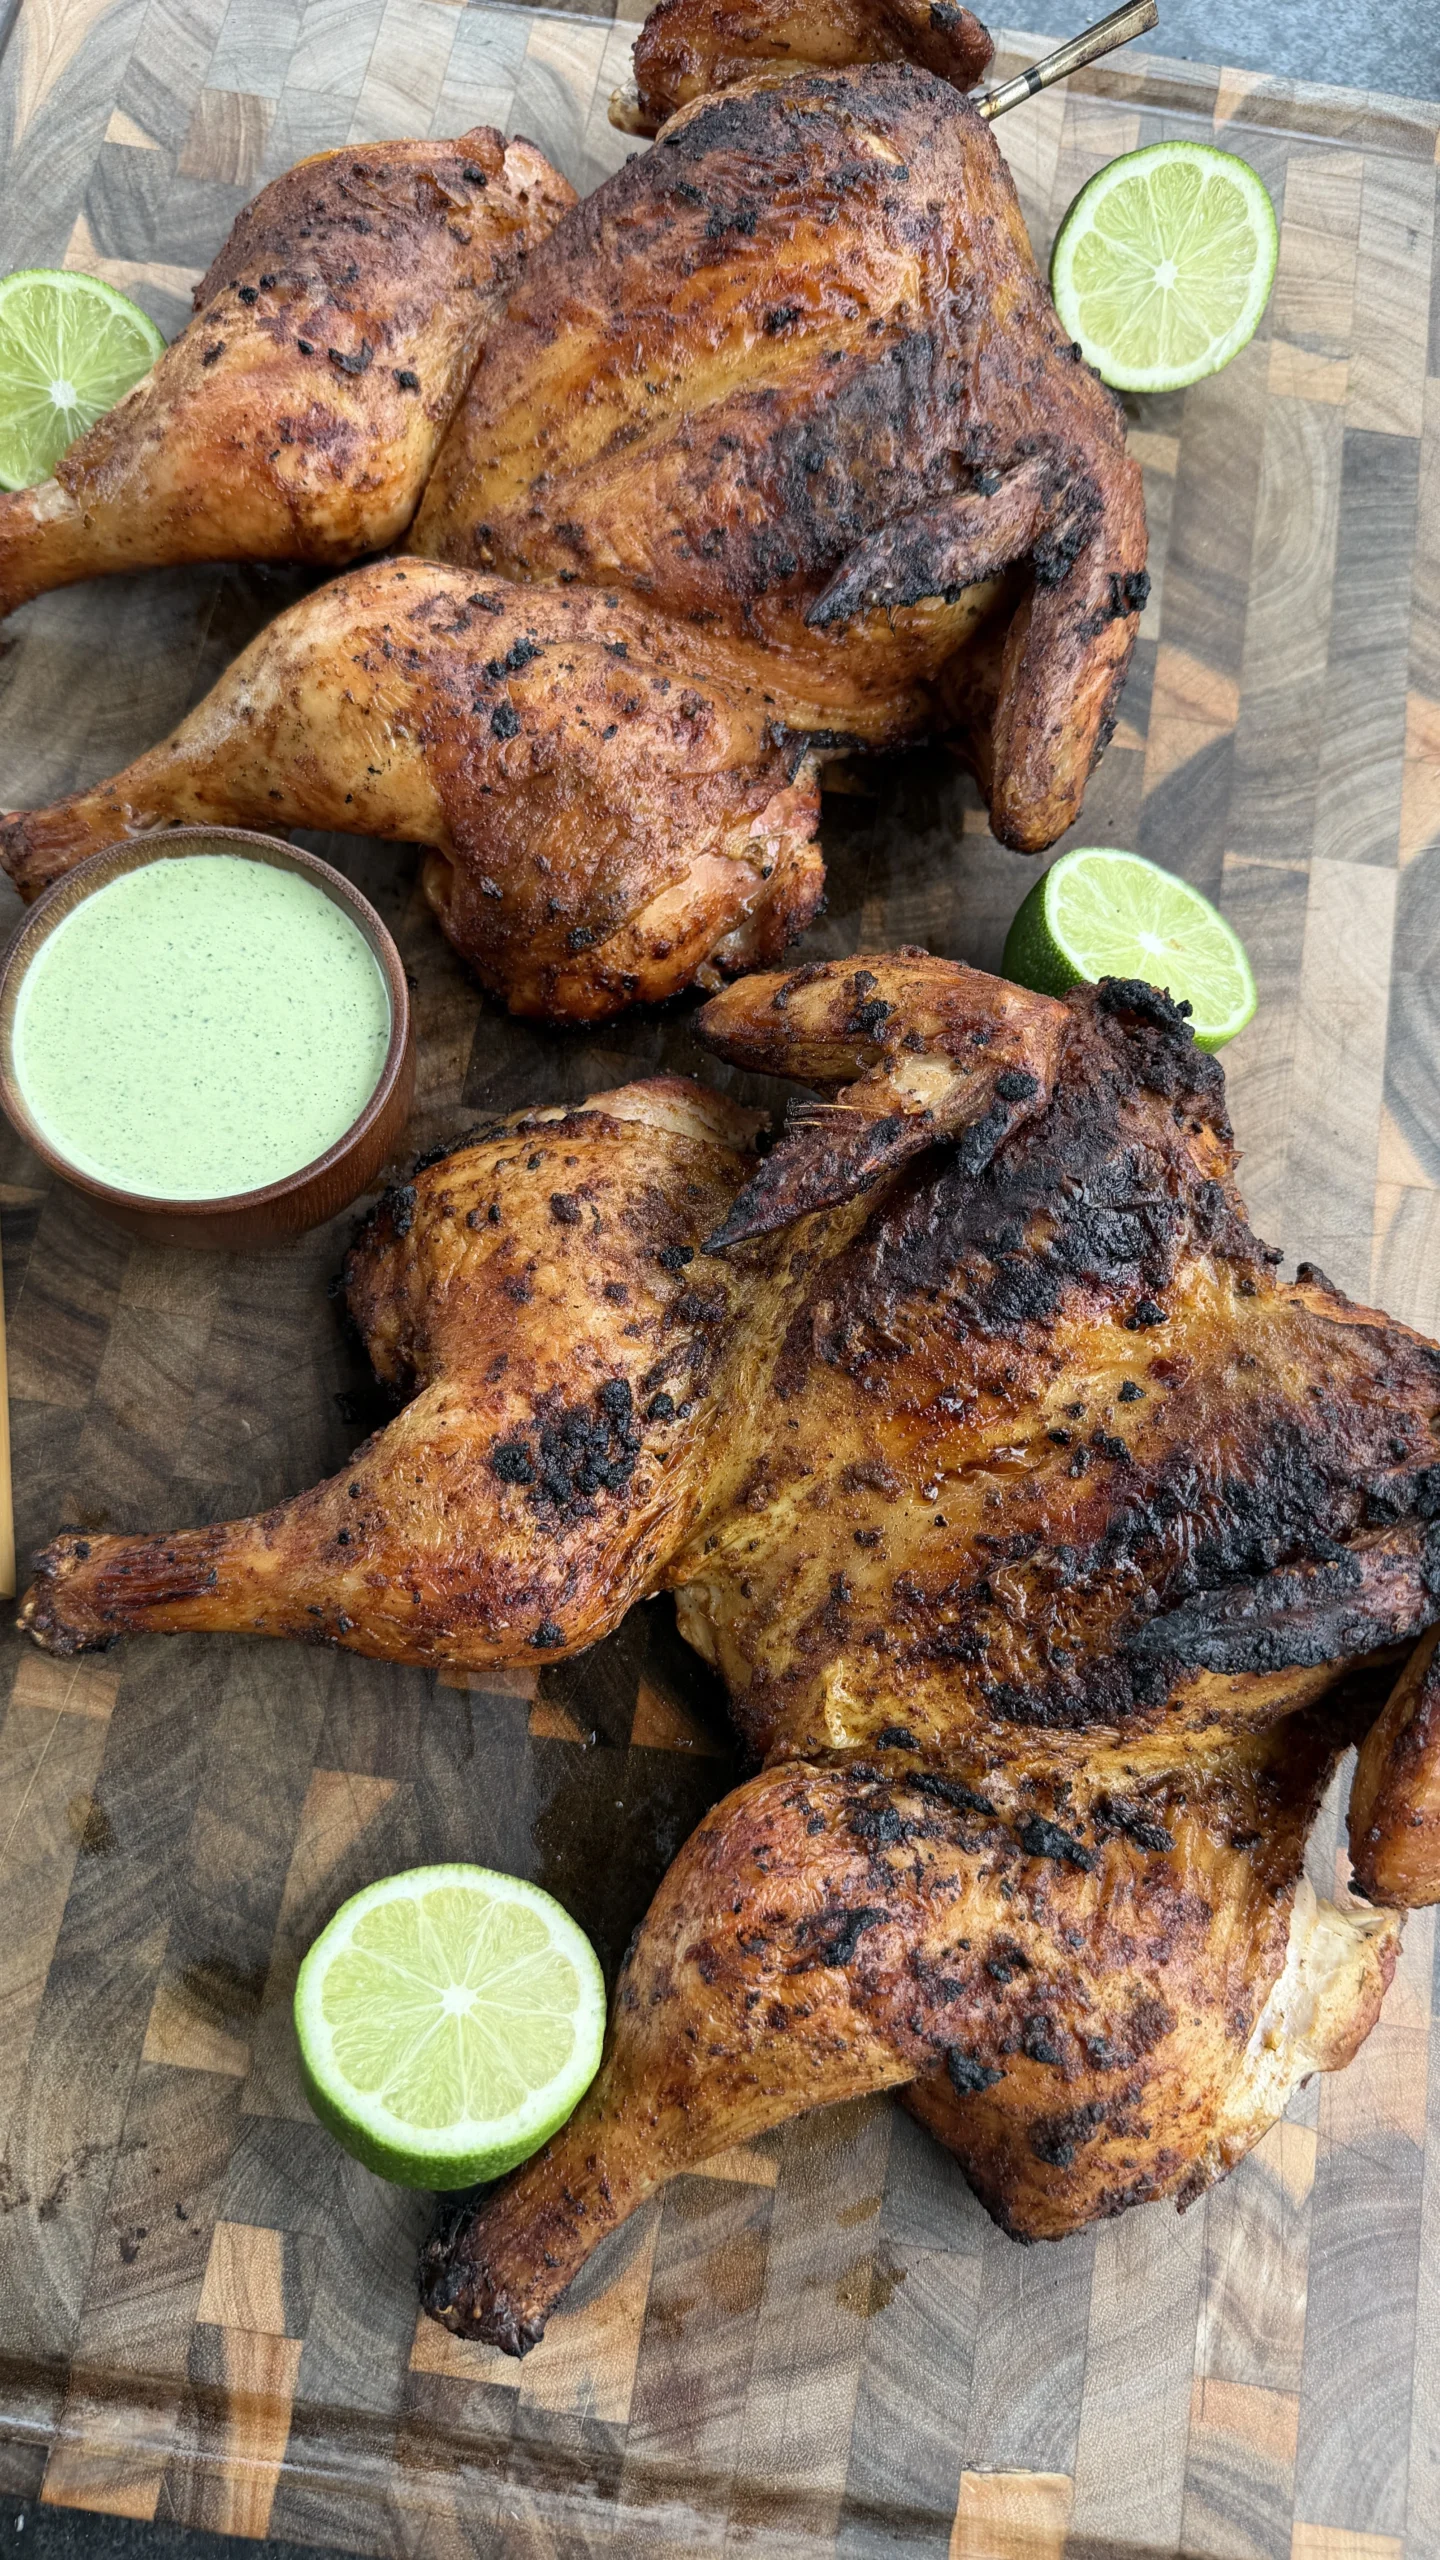
Peruvian-style grilled spatchcock chicken is two whole chickens (4 to 5 pounds each) spatchcocked by removing the backbone with kitchen shears and pressing flat, then marinated for 4 to 24 hours in a mixture of garlic paste, smoked paprika, cumin, dried oregano, soy sauce, lime juice, red wine vinegar, salt, and black pepper applied both under and over the skin. You grill the chickens over charcoal at 300°F with the skin side up for approximately 85% of the cooking time, about 50 to 60 minutes, until the internal breast temperature reaches 140°F. Then you flip the chickens skin-side down directly over the coals for the final 10 to 15 minutes to char the skin, render remaining fat, and crisp the exterior until the breast reaches 165°F and thighs reach 175°F. The chickens are served with ají verde, a creamy Peruvian green sauce made by blending mayo, cilantro, jalapeños, garlic, lime juice, olive oil, and optional parmesan until smooth.
The entire process takes about 5 to 25 hours depending on marinade time. Spatchcocking the chickens takes 10 to 15 minutes for both. Preparing the marinade takes 5 minutes. The minimum 4-hour marinade is acceptable but overnight (12 to 24 hours) produces superior flavor. Grilling takes 60 to 75 minutes total depending on chicken size and charcoal heat. Making the ají verde takes 5 minutes. Resting before serving adds 10 minutes. The marinade and sauce can be prepared a day ahead to streamline the cooking day.
These Peruvian grilled chickens serve 8 to 10 people with each whole chicken providing 4 to 5 servings.
Jump to RecipeWhy Spatchcocking Creates More Even Cooking Than Roasting Whole Chickens
Uniform Thickness for Consistent Heat Penetration
Whole chickens have dramatically different thicknesses. The breast is thick and substantial. The wings and legs taper to thin ends. The cavity creates an air pocket in the center. This variation means different parts cook at different rates when roasted whole.
Spatchcocking flattens the chicken into a relatively uniform layer. The breast, thighs, and legs all sit at roughly the same height when pressed flat. The thickness from top to bottom is more consistent across the entire bird. Heat penetrates more evenly when the chicken presents a uniform surface.
The flattened position also eliminates the cavity. With whole roasted chicken, heat must penetrate from the outside and circulate through the cavity to cook the interior. The cavity creates an insulated space that slows cooking. Spatchcocked chicken has no cavity. Every part of the meat is directly exposed to heat on one side or the other.
This consistency prevents the common problem of overcooked breast meat and undercooked thighs. With whole roasted chicken, you often pull it when the breast reaches 165°F only to find the thighs are barely 155°F. Spatchcocked chicken allows all parts to finish simultaneously.
More Surface Area Exposed to Direct Heat
Spatchcocked chicken presents both sides to heat. When cooking skin-side up, the bottom side receives direct heat from the grill grates. The top side receives radiant heat reflected from the lid or surrounding air. The chicken cooks from both directions simultaneously.
Whole roasted chicken only receives heat on the exterior. The bottom sits on a roasting pan. The top and sides get oven heat. But the process is slower because heat must work its way from the outside in through thick meat and around bones.
The increased surface area also means more skin gets crispy. Whole roasted chicken has skin on all sides, but only the top skin crisps well. The bottom skin often steams and stays rubbery where it contacts the pan. Spatchcocked chicken on a grill has all skin exposed to air and heat. Nearly all the skin can crisp, not just the top.
Bones Conduct Heat Into Meat
The flattened position of spatchcocked chicken positions bones differently than whole roasting. The backbone is removed. The breastbone is cracked. The leg and thigh bones spread out. These bones conduct heat directly into the surrounding meat.
Bones heat faster than meat because they have different thermal properties. Hot bones transfer heat to adjacent meat. In spatchcocked chicken, the spread-out bones create multiple heat pathways into the thickest parts of the bird. The breast meat cooks from the skin surface and from the heated breastbone underneath.
Whole roasted chickens have bones positioned vertically. The heat transfer is less efficient. The bones receive heat primarily from the exterior and slowly warm through. The benefit of bone heat conductivity is reduced compared to the spread-out positioning of spatchcocked birds.
Faster Cooking Time Reduces Moisture Loss
Spatchcocked chickens cook in 60 to 75 minutes at 300°F. Whole roasted chickens of the same size take 90 to 120 minutes at similar temperature. The 30 to 45 minute difference matters for moisture retention.
Longer cooking times allow more moisture to evaporate. Even at proper temperature, extended heat exposure dries meat. The proteins contract more. More liquid is squeezed out. Faster cooking preserves more natural juices in the meat.
The time savings also makes spatchcocking practical for weeknight cooking. A whole roasted chicken might require 2 hours total with prep and cooking. Spatchcocked chicken from marinade to table can be under 90 minutes including grilling and resting. This transforms chicken from special occasion to regular dinner.
What Makes Peruvian Chicken Marinade Different from Other Grilled Chicken
Soy Sauce Creates Umami Depth Unusual in Latin American Cooking
Peruvian cuisine uniquely incorporates Asian influences from Chinese and Japanese immigration to Peru. The soy sauce in this marinade reflects that fusion. Soy sauce adds savory, umami depth that traditional Latin American marinades don’t have.
The soy sauce also contributes salt more effectively than salt alone. The fermented soy proteins enhance the chicken’s natural flavors. The glutamates in soy sauce make the chicken taste more chicken-like, similar to how salt does but through different mechanisms.
Most grilled chicken marinades from other Latin American countries rely on citrus, herbs, and chili peppers for flavor. Mexican marinades use lime and chili. Argentine marinades use chimichurri elements. Brazilian marinades feature cachaça or beer. None typically include soy sauce. This makes Peruvian chicken distinctive.
Smoked Paprika Provides Color and Smoke Without Chili Heat
The marinade uses smoked paprika rather than fresh chili peppers. Smoked paprika contributes deep red color, smoky flavor, and slight sweetness without significant heat. This allows the chicken to have bold color and smoke character while remaining accessible to heat-sensitive eaters.
Traditional Peruvian pollo a la brasa uses ají panca paste, a Peruvian pepper with smoky, fruity flavor and mild heat. Smoked paprika is the accessible substitute that provides similar color and smoke notes. It’s available in most grocery stores while ají panca requires specialty sourcing.
The smoke flavor in the paprika layers with the smoke from charcoal grilling. You get double smoke character. The chicken tastes more intensely smoky than you’d expect from just grilling alone. This depth is characteristic of authentic Peruvian roasted chicken.
Acid Balance from Multiple Sources
The marinade includes lime juice and red wine vinegar. This dual acid approach creates complexity. Lime juice provides bright, citrus-forward acidity. Red wine vinegar contributes deeper, more subtle tang. Together they create layered acid profile that’s more interesting than either alone.
The acids also serve different tenderizing functions. Citric acid from lime works quickly on surface proteins. Acetic acid from vinegar penetrates slightly deeper over time. The combination tenderizes more effectively than single-acid marinades.
Most grilled chicken recipes use one acid source. Mexican uses lime. Italian uses lemon or balsamic. The Peruvian approach of combining citrus and vinegar is less common. It creates brightness and depth simultaneously.
Garlic and Cumin Define the Flavor Profile
The heavy garlic presence is non-negotiable in Peruvian chicken. The marinade uses garlic paste or 8 cloves for just 2 chickens. This creates aggressive garlic flavor that permeates every bite. Most chicken marinades use 2 to 4 cloves for the same amount of meat. Peruvian chicken doubles or triples the garlic.
Cumin provides earthy, warm undertones. It’s a background note rather than a dominant flavor. The cumin bridges the garlicky, smoky, tangy elements. It creates cohesion among disparate flavors. Without cumin, the marinade would taste disjointed.
The garlic-cumin combination is specifically Peruvian. Mexican cooking uses cumin differently, often with chili powder and oregano in taco or fajita seasoning. Middle Eastern cooking uses cumin with coriander and other spices. The Peruvian balance with heavy garlic, smoked paprika, and soy sauce is distinctive.
Should You Marinate Under the Skin or Just on the Surface
Direct Meat Contact for Maximum Flavor Penetration
Marinating under the skin places the marinade directly against the meat. The skin acts as a barrier when marinade is only applied on top. Loosening the skin and rubbing marinade underneath ensures direct contact between flavoring ingredients and chicken tissue.
The meat absorbs marinade more effectively with direct contact. The salt, acids, and aromatics penetrate into the muscle fibers. Surface-only marinating leaves most flavoring sitting on the skin. The skin itself absorbs some flavor but the meat underneath stays relatively bland.
The garlic paste is particularly important to get under the skin. Garlic compounds are oil-soluble. They need direct contact with the chicken fat and meat to transfer flavor properly. Garlic sitting on top of skin doesn’t infuse the meat as thoroughly.
Skin Protection During Long Marinades
Applying marinade both under and over the skin protects the skin during extended marinating. The marinade under the skin focuses on the meat. The marinade over the skin keeps the skin from drying out in the refrigerator.
Uncovered chicken skin dries out during marination. It becomes leathery and less able to crisp properly during cooking. The thin coating of marinade on the skin surface maintains moisture. When you grill, this moisture evaporates quickly and the skin crisps normally.
The marinade over the skin also contributes to color development. The sugars and proteins in the marinade on the skin surface caramelize during grilling. They create the mahogany color characteristic of well-grilled chicken. Under-skin marinade doesn’t contribute to surface color directly.
Even Distribution Across All Meat Sections
Loosening the skin allows you to spread marinade across the breast, thighs, and legs. You can work the marinade into all the pockets and crevices. This creates even seasoning throughout the chicken rather than concentrated in some areas.
Surface-only marinating creates inconsistent flavor. The top surfaces get heavily marinated. The undersides and areas protected by skin folds get minimal exposure. The eating experience varies bite to bite based on which part you’re eating.
With under-skin marinating, every piece of meat has been touched by the marinade. When you cut the grilled chicken into portions, each serving has consistent flavor. The breast tastes as well-seasoned as the thighs. No one gets a bland piece.
Moisture Retention During Grilling
The marinade under the skin creates a moisture barrier during grilling. As the chicken cooks, this marinade layer bastes the meat from underneath. It prevents direct heat from drying out the surface of the meat.
The layer also traps steam between the skin and meat. This steam cooks the meat gently while the skin crisps from direct heat. The result is meat that stays juicy while skin becomes crispy. This is difficult to achieve with only surface seasoning.
Professional rotisserie chicken operations inject marinade into the meat for similar reasons. The internal moisture and flavor create superior results. Home cooks can achieve similar effects by loosening skin and marinating underneath. It’s more accessible than injection and nearly as effective.
The Best Charcoal Temperature for Crispy Skin Without Burning
300°F Balances Rendering and Crisping
300°F is hot enough to render chicken fat and crisp skin but not so hot that it burns before the meat cooks through. At this temperature, the skin gradually releases fat. The fat drips away leaving crispy skin behind. The process takes 60 to 75 minutes, giving the meat time to reach proper internal temperature.
Higher temperatures like 400°F or above would crisp the skin very quickly. But the meat wouldn’t have time to cook through. You’d end up with black skin and raw meat near the bones. This defeats the purpose. Chicken needs time for the thickest parts to reach safe temperature.
Lower temperatures like 225°F would cook the meat through gently. But the skin wouldn’t crisp properly. At low temperatures, fat renders slowly and skin can steam rather than crisp. The texture becomes rubbery instead of crunchy. The color stays pale instead of developing deep brown.
The 300°F range is the sweet spot where skin has time to render and crisp while meat cooks evenly to safe temperature. This temperature is standard for rotisserie chicken operations that produce consistently crispy skin.
Charcoal Provides Radiant Heat From Below
Charcoal grilling differs from gas grilling or oven roasting in heat distribution. This radiant heat comes primarily from below when chicken is placed on grates above coals.
The radiant heat from charcoal is more intense than the convective heat from ovens. The infrared radiation from glowing coals penetrates meat more effectively. This creates faster, more aggressive cooking on the skin side facing the coals.
Gas grills produce heat through flame and hot metal flavorizer bars. The heat is more evenly distributed and less radiant. Charcoal’s focused radiant heat creates better crust and char. This is why charcoal-grilled chicken has distinctive flavor that gas grilling doesn’t fully replicate.
Direct vs Indirect Heat Management
Setting up mostly direct heat means placing coals across most of the grill bottom. The chickens sit directly over coals for the majority of cooking. This maximizes exposure to radiant heat for browning and crisping.
A small indirect zone provides safety. If certain parts of the chicken start browning too fast, you can move them to the indirect area. This prevents burning while other parts catch up. The indirect zone acts as insurance against hot spots.
Cooking 85% of the time skin-side up over direct heat cooks the meat through while protecting the skin. The meat side faces the intense coal heat. The skin side faces up toward cooler air. This prevents premature skin burning while thoroughly cooking the meat.
The final flip to skin-side down over direct heat is strategic. The meat is already cooked through. Now you’re just crisping and charring the skin. You can use maximum heat without worrying about raw meat. This aggressive finish creates the characteristic char and crispiness.
Adjusting for Temperature Fluctuations
Charcoal temperature isn’t perfectly stable like gas or ovens. As coals burn, temperature gradually drops. Starting at 325°F might mean ending at 275°F 60 minutes later. This gradual decline works well for chicken.
The higher initial temperature sears the meat side and starts rendering skin fat quickly. As temperature drops, the cooking becomes gentler. This prevents overcooking or drying out during the long cook. The declining heat curve naturally matches the chicken’s needs.
You can manage temperature through air vents. Opening vents increases oxygen flow and raises temperature. Closing vents reduces oxygen and lowers temperature. Adjusting vents during cooking helps maintain the 300°F target. Check temperature every 15 to 20 minutes and adjust as needed.
How Dark Meat Needs Higher Temperature Than White Meat
Collagen Content Requires Extended Cooking
Dark meat from thighs and legs contains more connective tissue than white meat from breasts. This connective tissue is primarily collagen. Collagen needs to convert to gelatin for tender texture. This conversion happens between 160°F and 180°F. Below 160°F, the collagen stays tough.
White meat has minimal collagen. The breast meat is tender at 165°F because there’s little connective tissue to break down. The muscle fibers themselves are cooked and safe. Further cooking just dries them out without improving texture.
Dark meat at 165°F is technically safe to eat. But it’s not at optimal texture. The collagen hasn’t fully broken down. The meat feels slightly rubbery or chewy. Another 10 degrees of cooking transforms the texture. At 175°F, the collagen has converted to gelatin. The meat becomes tender and succulent.
This is why whole roasted chickens often have perfect breast meat but tough thighs. Recipes target 165°F throughout to ensure breast safety. But this leaves thighs undercooked in texture terms. Spatchcocking allows you to pull at different temperatures for each section.
Fat Content Affects Moisture Retention
Dark meat contains significantly more intramuscular fat than white meat. This fat lubricates the meat and maintains moisture at higher temperatures. Dark meat can withstand cooking to 175 to 180°F without becoming dry. The fat renders and bastes the meat from inside.
White meat is very lean. At temperatures above 165°F, the lean breast meat begins drying out noticeably. The proteins tighten. Moisture is expelled. Without fat to compensate, the texture becomes dry and stringy. This is why overcooked chicken breast is such a common problem.
The fat in dark meat also carries flavor. As it renders during cooking, it creates rich, savory taste. This flavor intensifies at higher temperatures as more fat renders. Dark meat cooked to 175°F tastes more chicken-like than dark meat pulled at 165°F.
Bone Proximity Affects Heat Distribution
Thighs and drumsticks have bones running through the center of the meat. These bones conduct heat into the surrounding meat. But they also create temperature gradients. Meat closest to bone cooks faster than meat farther away.
The complex bone structure in thighs means some meat is always near bone while other meat is farther away. To ensure all parts of the thigh reach safe temperature, the average temperature needs to be higher. Pulling at 165°F might leave some pockets near 155°F. Pulling at 175°F ensures all parts are thoroughly cooked.
Chicken breasts have simpler structure. The meat is relatively uniform thickness. There’s a bone, but it’s on one side. Temperature distribution is more predictable. When the thickest part of the breast reads 165°F, you can be confident the entire breast is at or above that temperature.
Texture Preference Justifies Higher Target
Beyond food safety, there’s texture preference. Many people find dark meat at 165°F slightly unpleasant. It’s cooked but not delicious. The meat tears rather than bites cleanly. The texture is tough rather than tender.
At 175°F, dark meat has completely different character. It’s tender. It pulls apart easily. The bite is clean rather than requiring chewing. This texture is what most people expect from properly cooked chicken thighs and drumsticks.
Some recipes push dark meat even higher, to 180°F or even 185°F. This creates fall-off-the-bone texture. For grilled chicken where you want the meat to stay on the bone for presentation, 175°F is the better target. It’s tender without being mushy.
The spatchcocked position allows you to monitor both breast and thigh temperatures independently. Pull the chicken when breast reaches 165°F and thighs reach 175°F. If using two thermometers, you can track both simultaneously. This ensures every part of the chicken is cooked to its optimal temperature.
Peruvian Grilled Chicken
Spatchcocked, charcoal-grilled, ají verde sauce
Ingredients
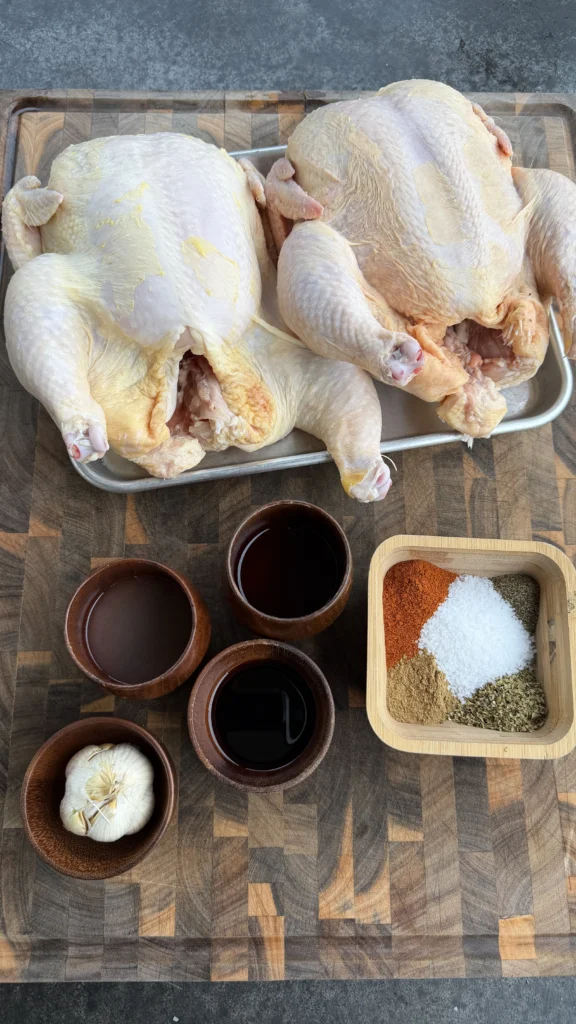
Chicken
- 2 whole chickens (4-5 lbs each)
- 4 tablespoons olive oil
Peruvian Marinade
- 2 tablespoons kosher salt
- 2 tablespoons garlic paste (or 8 cloves minced)
- 4 teaspoons smoked paprika
- 2 teaspoons cumin
- 2 teaspoons dried oregano
- 2 tablespoons soy sauce
- 2 tablespoons lime juice
- 2 tablespoons red wine vinegar
- 1 teaspoon black pepper
Ají Verde Sauce
- 2 cups mayonnaise
- 2 cups packed fresh cilantro
- 2-3 jalapeños
- 4 garlic cloves
- Juice of 2 limes
- ¼ cup olive oil
- ¼ cup grated parmesan (optional but recommended)
- Salt to taste
Loosen the skin carefully over breasts and thighs before applying marinade. Spread marinade both under and over the skin. This direct meat contact creates maximum flavor penetration while the surface marinade protects skin from drying during refrigeration.
Step-by-Step Instructions
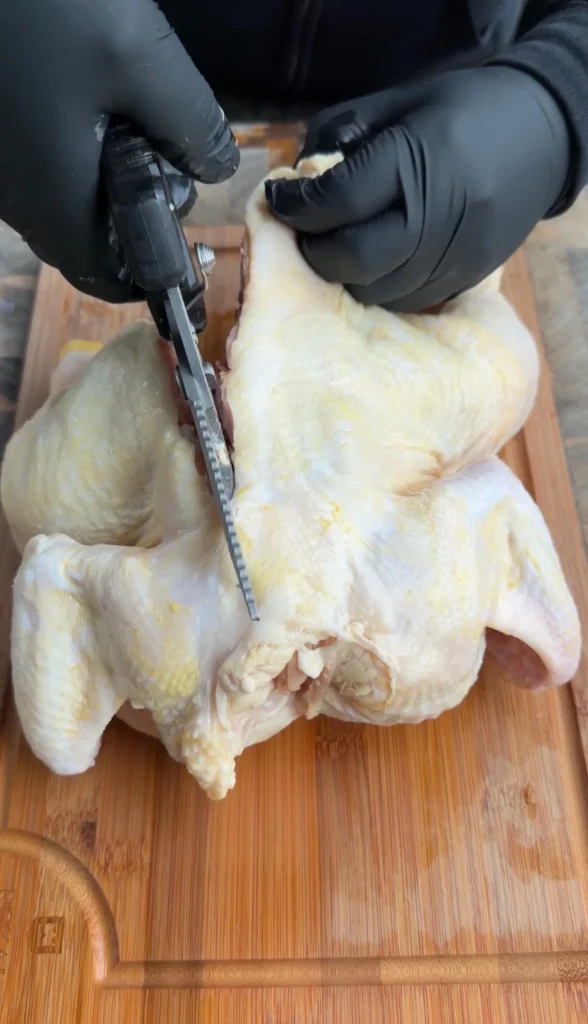
Step 1: Spatchcock the Chickens
Place one whole chicken breast-side down on a large cutting board. The backbone should be facing up. Locate the backbone running down the center from neck to tail.
Using heavy-duty kitchen shears, cut along one side of the backbone. Start at the tail end and cut toward the neck. The shears should cut through the rib bones attached to the backbone. Apply firm, steady pressure. Don’t saw back and forth.
Repeat the cut on the other side of the backbone. Remove the backbone completely and save it for stock if desired.
Flip the chicken over so the breast side faces up. Place both hands on the breast and press down firmly. You’ll feel and hear the breastbone crack. The chicken should flatten significantly. It should now lay flat with both legs and both breasts at roughly the same height.
Pat the chicken completely dry on both sides with paper towels. Moisture prevents marinade adhesion and interferes with crisping during grilling.
Repeat the entire process with the second chicken. You should now have two spatchcocked chickens ready for marinating.
Step 2: Prepare the Marinade
In a medium bowl, combine 2 tablespoons kosher salt, 2 tablespoons garlic paste (or 8 minced garlic cloves), 4 teaspoons smoked paprika, 2 teaspoons cumin, and 2 teaspoons dried oregano. Mix the dry ingredients together.
Add 2 tablespoons soy sauce, 2 tablespoons fresh lime juice, 2 tablespoons red wine vinegar, 1 teaspoon black pepper, and 4 tablespoons olive oil. Stir everything together until you have a thick, paste-like marinade. The consistency should be spreadable but not watery.
Taste the marinade. It should be very salty, garlicky, and tangy. This intense flavor will mellow during marinating and grilling. Don’t worry if it tastes too strong raw.
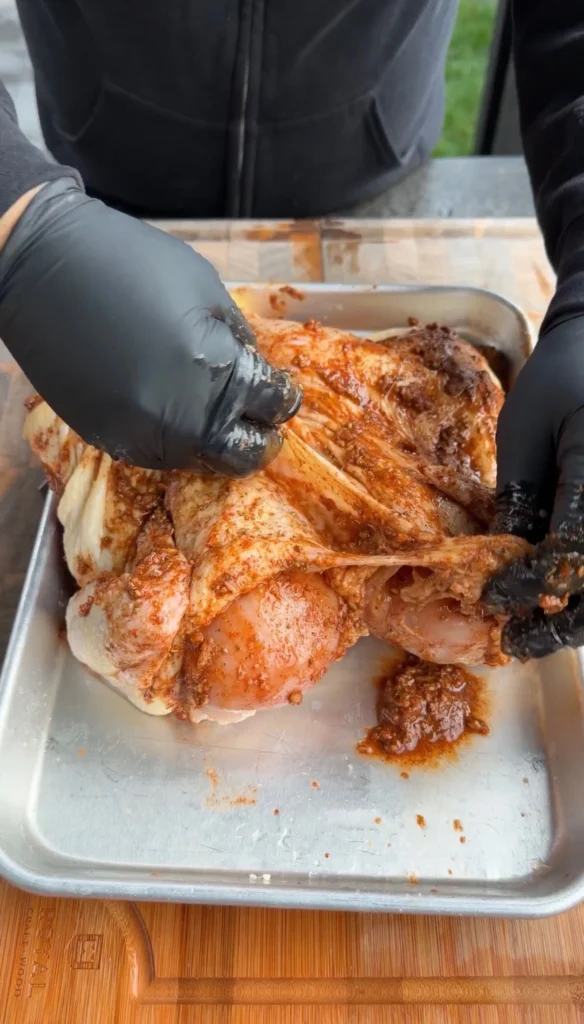
Step 3: Apply Marinade Under and Over the Skin
Working with one chicken at a time, carefully loosen the skin over the breasts. Slide your fingers gently between the skin and meat. Work slowly to avoid tearing the skin. Create pockets over both breast halves.
Repeat for the thighs and legs. Loosen the skin as much as possible without detaching it completely. The skin should stay connected at the edges but be loose over the meat.
Using your hands or a spoon, spread approximately half of the marinade under the loosened skin. Work it into all the pockets you created. Massage from the outside to distribute the marinade evenly across the meat.
Spread the remaining marinade over the skin side of the chicken. Make sure all skin surfaces are coated. The marinade should cover the chicken completely on both sides.
Repeat with the second chicken, using the remaining marinade.
Place both marinated chickens in a large zip-top bag or covered container. Refrigerate for at least 4 hours. Overnight marinating (12 to 24 hours) produces significantly better flavor.
Step 4: Prepare the Charcoal Grill
About 30 minutes before grilling, remove the chickens from refrigeration. Let them come closer to room temperature. This promotes more even cooking.
Light a full chimney of charcoal. When the coals are ashed over and glowing, pour them into the grill. Spread the coals to cover most of the grill bottom but leave a small area clear for an indirect zone.
Position the cooking grate and close the lid. Let the grill preheat for 10 minutes. Adjust the bottom and top vents to achieve approximately 300°F. You want steady, moderate heat rather than blazing hot.
Clean the grill grates with a grill brush. The chickens will stick if the grates aren’t clean. Oil the grates lightly if desired, though it’s not critical for chicken with skin.
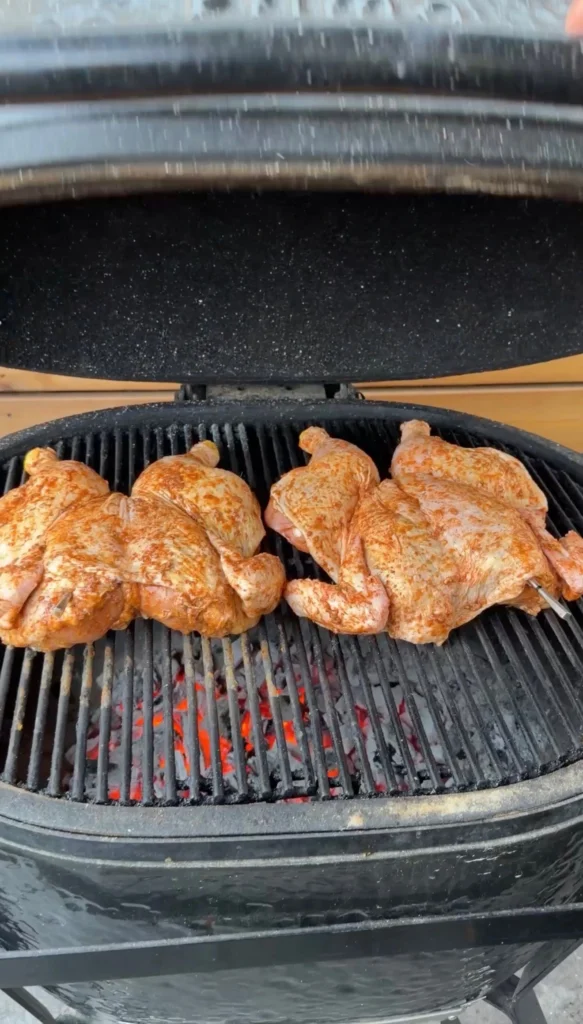
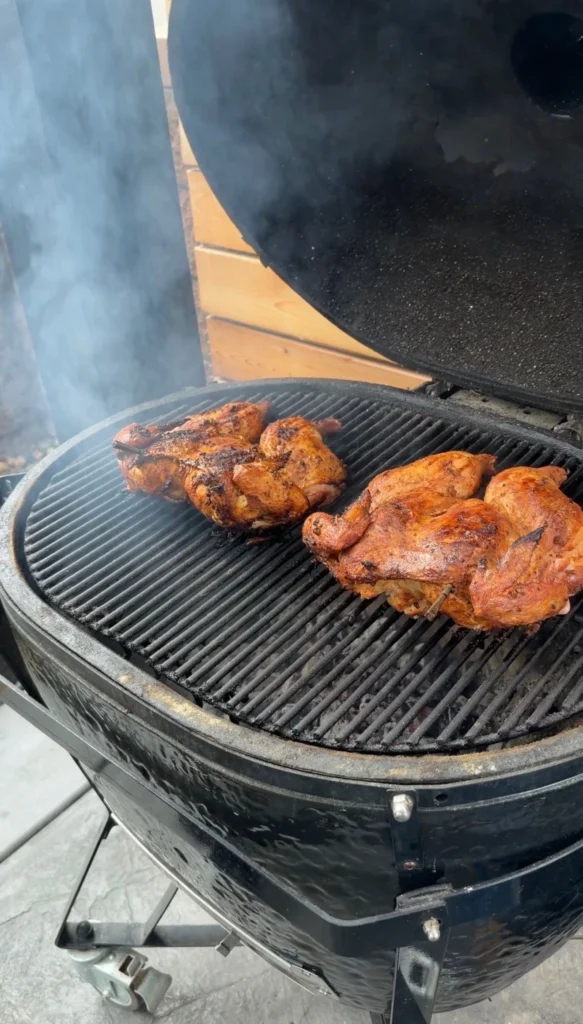
Step 5: Grill Skin-Side Up
Place both spatchcocked chickens on the grill skin-side up over the direct heat zone. Position them so they fit without overlapping. The meat side should face the hot coals. The skin side faces up toward the cooler air.
Close the lid. Cook for approximately 50 to 60 minutes without flipping. The chickens will cook from the bottom primarily. The skin side cooks gently from radiant heat and rising hot air.
Check the grill temperature every 15 to 20 minutes. Adjust vents as needed to maintain 300°F. If temperature drops too low, open vents. If it climbs too high, close vents slightly.
After 45 minutes, start checking internal temperature. Insert an instant-read thermometer into the thickest part of one breast, avoiding bone. You’re looking for 140°F. The thighs should be around 160°F at this point.
When the breast reaches 140°F, it’s time to flip for the final crisping phase.
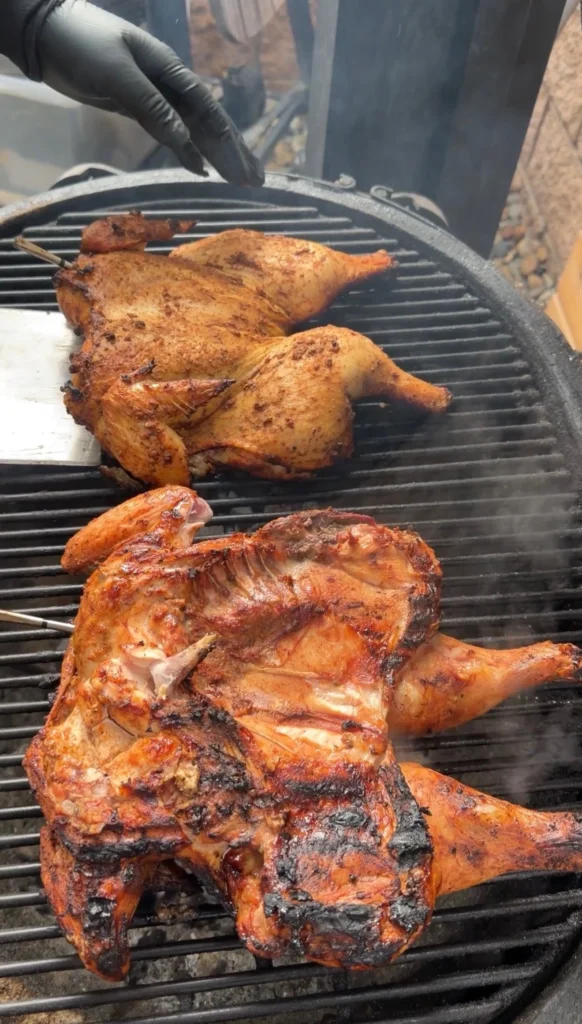
Step 6: Flip for Skin Crisping
Carefully flip both chickens skin-side down directly over the coals. The skin should now be in direct contact with the intense heat from below. You should hear immediate sizzling.
Watch the chickens closely. The skin will char and crisp quickly. You want deep brown to black char in spots but not complete burning. Check underneath after 5 minutes by lifting one edge.
Continue cooking skin-side down for 10 to 15 minutes total. Check internal temperature frequently. The breast should reach 165°F. The thighs should reach 175°F.
If any areas of skin are charring too quickly, shift the chickens slightly to cooler zones. You want aggressive browning and crisping but not burnt, bitter char.
When the breast hits 165°F and thighs hit 175°F, remove the chickens from the grill.
Step 7: Make the Ají Verde
While the chickens grill, make the ají verde sauce. In a blender or food processor, combine 2 cups mayonnaise, 2 cups packed fresh cilantro (leaves and thin stems), 2 to 3 jalapeños (seeded for less heat, left whole for more heat), 4 garlic cloves, juice of 2 limes, and ¼ cup olive oil.
Add ¼ cup grated parmesan if using. The parmesan adds umami and helps thicken the sauce. It’s optional but recommended.
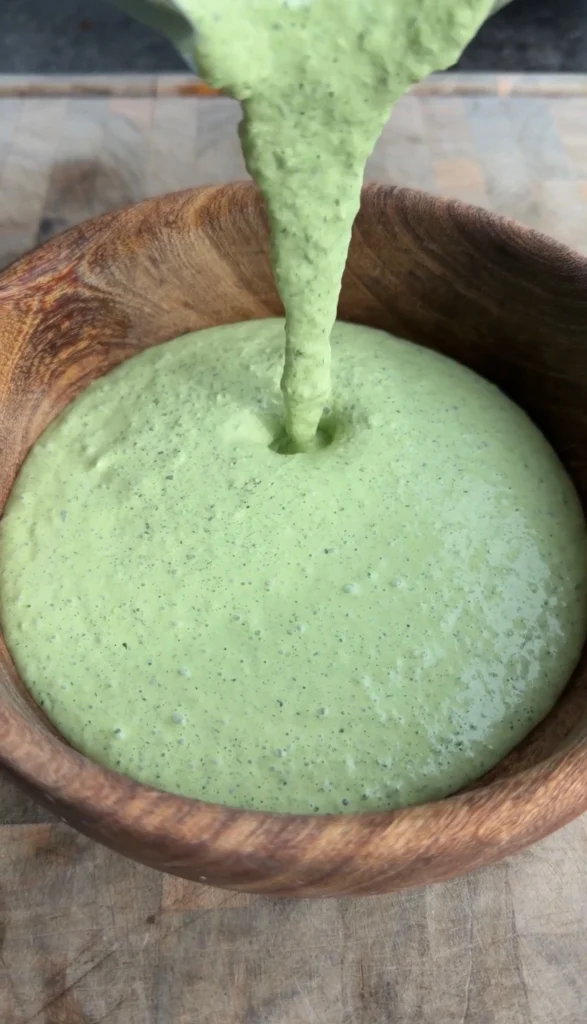
Blend on high speed until completely smooth and bright green. The sauce should be creamy and pourable but not thin. If too thick, add a tablespoon of water or lime juice.
Taste and add salt as needed. Start with ½ teaspoon and adjust. The sauce should be bright, tangy, garlicky, and slightly spicy.
Transfer the ají verde to a serving bowl and refrigerate until serving. The sauce will thicken slightly as it chills.
Step 8: Rest and Serve
Transfer the grilled chickens to a large cutting board. Tent loosely with aluminum foil if desired but it’s not necessary. Let them rest for at least 10 minutes. This allows juices to redistribute.
After resting, cut each chicken into quarters or halves. For quarters, cut down the center of the breast, then separate each half into breast-wing quarter and thigh-leg quarter.
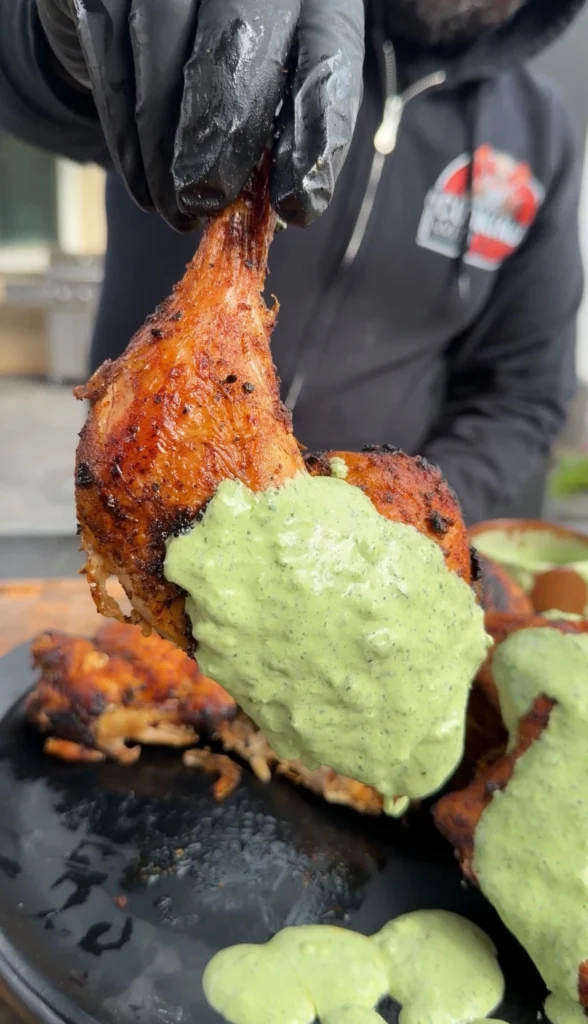
Arrange the chicken pieces on a serving platter. The charred skin should be visible on top. Drizzle some ají verde over the chicken or serve the sauce in a bowl on the side.
Serve immediately while the chicken is hot and the skin is at its crispiest. Provide extra ají verde for those who want more sauce.
Peruvian-Style Grilled Spatchcock Chicken
Ingredients
Equipment
Method
- Spatchcock chickens: Place breast-side down. Cut along both sides of backbone with kitchen shears and remove spine. Flip over and press firmly on breastbone until chicken lays flat. Pat completely dry.
- Make marinade: Combine salt, garlic paste, smoked paprika, cumin, oregano, soy sauce, lime juice, red wine vinegar, black pepper, and olive oil in bowl. Mix until paste forms.
- Loosen skin over breasts, thighs, and legs. Spread half the marinade under the skin directly on meat. Spread remaining marinade over the skin. Refrigerate 4 to 24 hours.
- Preheat charcoal grill to 300°F with mostly direct heat setup.
- Place chickens skin-side up over direct heat. Close lid. Cook 50 to 60 minutes until breast reaches 140°F and thighs reach 160°F.
- Flip chickens skin-side down directly over coals. Cook 10 to 15 minutes until breast reaches 165°F, thighs reach 175°F, and skin is charred and crispy.
- While chickens cook, blend mayo, cilantro, jalapeños, garlic, lime juice, olive oil, and parmesan until smooth. Season with salt. Refrigerate until serving.
- Rest chickens 10 minutes. Cut into quarters or halves. Serve with ají verde sauce.
Nutrition
Notes
Tried this recipe?
Let us know how it was!Frequently Asked Questions
Can You Cook This Chicken on a Gas Grill Instead of Charcoal?
You can cook Peruvian chicken on a gas grill. Preheat to 350°F with all burners on medium-high. Place chickens skin-side up over direct heat. Close the lid and cook following the same timing as charcoal.
The main difference is flavor. Charcoal creates smoke and char that gas grills can’t fully replicate. The chicken will still taste good on gas but won’t have the same smoky, charred character. Gas grills produce cleaner, less complex flavor.
For better results on gas, add wood chips in a smoker box or foil packet. Soak chips for 30 minutes, drain, and place directly on flavorizer bars or in a smoker box. The wood smoke approximates some of the charcoal flavor.
Temperature control is easier on gas. You can maintain steady 300°F throughout cooking without the fluctuations that charcoal creates. This makes gas more beginner-friendly even if the results aren’t quite as authentic.
How Do You Store and Reheat Leftover Chicken?
Store leftover chicken in an airtight container in the refrigerator for up to 4 days. Separate the skin from the meat before storing if possible. The skin stays crisper when stored separately.
For best reheating, use the oven rather than microwave. Preheat oven to 350°F. Place chicken pieces on a baking sheet. Heat for 12 to 15 minutes until warmed through. The skin won’t be as crispy as fresh but acceptable.
For crispier skin when reheating, place chicken under the broiler for the last 2 to 3 minutes. Watch carefully to prevent burning. The broiler re-crisps the skin nicely.
Microwave reheating works in a pinch but creates rubbery skin and can dry out the meat. Use 50% power and heat in 1-minute intervals. Add a damp paper towel over the chicken to maintain moisture.
Freeze leftover chicken for up to 3 months. Wrap tightly in plastic wrap, then foil. Thaw in refrigerator overnight before reheating.
Can You Make Ají Verde Without a Blender?
You can make a chunkier version of ají verde without a blender. Finely chop the cilantro, jalapeños, and garlic by hand. Mix with mayo, lime juice, olive oil, and parmesan in a bowl.
The texture will be different. Blended ají verde is smooth and creamy. Hand-chopped version is chunky like relish. Both taste good but the mouthfeel differs. Traditional ají verde is smooth.
A food processor works if you don’t have a blender. Pulse the ingredients until finely chopped and combined. It won’t be as smooth as a blender but smoother than hand-chopping.
An immersion blender also works. Combine all ingredients in a tall container. Blend with the immersion blender until smooth. This method is actually easier for cleanup than a regular blender.
For emergency situations, you can buy jarred green jalapeño sauce or chimichurri and mix it with mayo. It’s not authentic ají verde but provides similar flavor profile in a pinch.
What Other Chicken Parts Work with This Marinade?
Bone-in, skin-on chicken thighs work excellently with this marinade. Grill them at 350°F for 35 to 40 minutes, flipping once, until they reach 175°F internal temperature. The marinade penetrates thighs deeply due to their smaller size.
Chicken quarters (leg-thigh attached) are traditional for Peruvian chicken. They cook similarly to spatchcocked whole chicken but in slightly less time, about 50 to 60 minutes total at 300°F.
Chicken drumsticks work well. Marinate them the same way. Grill at 350°F for 30 to 35 minutes, turning occasionally, until they reach 175°F. The small size means faster cooking.
Avoid boneless, skinless chicken breasts with this method. The marinade is designed for dark meat and skin-on chicken. Boneless breasts would dry out with the long grilling time and high temperatures. If you must use breasts, reduce grill time significantly and pull at 160°F.
Whole chickens not spatchcocked can use this marinade. Roast at 375°F for 75 to 90 minutes until breast reaches 165°F. The flavor will be authentic but the cooking time increases without spatchcocking.
Why Does the Chicken Cook Skin-Side Up First?
Cooking skin-side up first protects the skin from burning during the long cook. The meat side faces the intense heat of the coals. It can withstand direct heat without burning. Meat doesn’t char the way skin does.
If you cooked skin-side down first, the skin would char and burn before the meat cooked through. You’d have black, bitter skin and undercooked meat. This sequence doesn’t work.
The skin-side up position also allows fat to render gradually. The fat drips down through the meat rather than pooling on top of the skin. This keeps the skin from steaming in its own fat.
The final flip to skin-side down is strategic. At that point, the meat is fully cooked. You’re only crisping and charring the skin. You can use maximum heat without worrying about raw meat. This aggressive finish creates the crispy, charred skin that defines the dish.
Some cooks try to flip multiple times throughout cooking. This creates inconsistent results. The one-flip method is simpler and more reliable for achieving properly cooked meat and perfectly charred skin simultaneously.
Ready to Level Up?
Take your backyard cooking from good to legendary.
This is where I keep all my most-used smokers, knives, and favorite cooking tools.
Shop My Gear CollectionExplore More Recipes
Find more diverse flavors at CWFeats.com