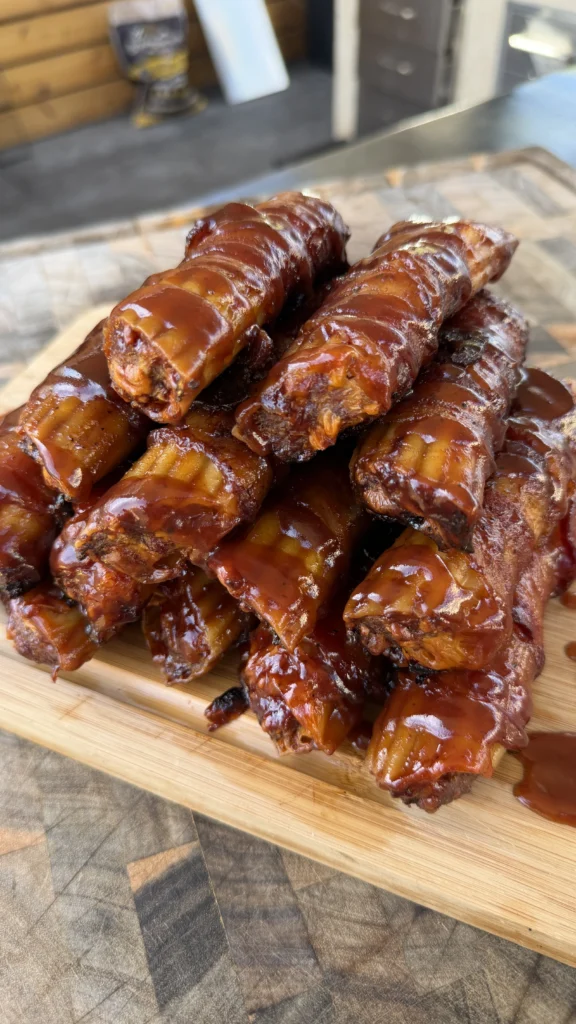
Smoked shotgun shells are uncooked manicotti pasta shells stuffed tightly with a mixture of ground beef, pork chorizo, softened cream cheese, shredded cheddar cheese, and seasonings (salt, pepper, garlic powder, paprika), then wrapped with a single slice of thin bacon in a slightly overlapping spiral and smoked at 250°F for 90 to 120 minutes until the bacon is crispy, the shells are tender and soft, and the internal temperature reaches 165°F. During the last 10 minutes of smoking, you brush the bacon-wrapped shells with BBQ sauce to create a caramelized glaze, then rest them for 5 to 10 minutes before slicing so the cheese sets slightly and doesn’t run out.
The entire process takes about 2½ to 3 hours from start to finish. This includes 20 to 25 minutes to make the filling and stuff the shells. Wrapping all 18 to 20 shells in bacon takes another 15 to 20 minutes. The smoking phase takes 90 to 120 minutes depending on bacon thickness and desired crispiness. You can optionally increase temperature to 275 to 300°F for the final 10 to 15 minutes if the bacon needs additional crisping. Resting adds 5 to 10 minutes. You can prepare the filling, stuff the shells, and wrap them in bacon the night before, then refrigerate until ready to smoke.
These bacon-wrapped shotgun shells make 18 to 20 pieces serving 6 to 10 people as appetizers or 4 to 6 as a main course. Each shell is substantial with approximately 1½ to 2 ounces of filling plus bacon. As appetizers, most people eat 2 to 3 shells. As a main course with sides, 3 to 4 shells per person is typical. The shells are rich and filling due to the cream cheese, cheddar, and bacon fat. They pair well with simple sides like coleslaw, potato salad, or green salad.
Jump to RecipeWhy Uncooked Manicotti Shells Work Better Than Pre-Cooked
Smoke Absorption During Cooking
Uncooked pasta is porous and absorbent. As the shells cook in the smoker, they absorb smoke flavor directly into the pasta structure. The starches are expanding and hydrating, creating pathways for smoke compounds to penetrate.
Pre-cooked pasta has already undergone starch gelatinization. The structure is set. The pasta won’t absorb smoke the same way. Pre-cooked shells would taste like regular pasta with smoked filling rather than smoked pasta shells.
The 90 to 120-minute smoke time at 250°F is sufficient for the raw shells to cook through while absorbing substantial smoke. You get smoke flavor in both the pasta and the filling. This creates more complex, integrated taste.
The smoke penetration is particularly noticeable at the ends of the shells where pasta is exposed. These areas develop slightly darker color and concentrated smoke flavor. Pre-cooked shells wouldn’t show this same smoke integration.
Moisture Management and Texture
Raw manicotti shells cook from moisture released by the meat and cheese filling. As the ground beef and chorizo heat, they release liquid. The cream cheese melts. This moisture has nowhere to go because the bacon wrapping seals everything.
The trapped moisture hydrates the dry pasta. The shells soften and cook from the inside out. The texture becomes tender but not mushy. The shells maintain structure because they’re cooking gradually in a controlled moisture environment.
Pre-cooked shells would become soggy in this environment. They’re already hydrated. Additional moisture would make them fall apart. The texture would be unpleasant, almost like overcooked pasta salad.
The gradual cooking also means the shells don’t burst or split. Raw shells expand slowly as they hydrate. Pre-cooked shells can’t expand. They might crack under pressure from the filling as cheese melts and meat releases juices.
Structural Integrity During Smoking
Uncooked manicotti shells are rigid and strong. They hold their shape while you stuff them with filling and wrap them with bacon. The shells provide structure that supports the filling.
As the shells cook, they soften gradually. But by the time they’re tender, the bacon has crisped and formed a supportive shell around the pasta. The bacon takes over the structural role. The pasta can soften without everything falling apart.
Pre-cooked manicotti shells are already soft. They’re difficult to stuff without breaking. They can collapse or tear during the stuffing process. The bacon wrapping helps but doesn’t completely compensate for weak pasta structure.
The cooking process also helps seal the shells. As the pasta cooks, the ends partially seal from the starches gelling. This helps keep filling inside. Pre-cooked shells have gaps at the ends where filling can leak during cooking.
Timing and Convenience
Using uncooked shells simplifies the process. You don’t need to boil pasta, drain it, cool it, and handle slippery cooked shells. You go straight from dry pasta to stuffing to smoking.
The elimination of the boiling step saves time and reduces mess. Boiling manicotti is tedious. The shells can tear or stick together. Using them uncooked avoids all these problems.
You can also stuff uncooked shells the day before and refrigerate overnight. The shells won’t absorb moisture from the filling during refrigeration the way pre-cooked shells would. They stay rigid until they hit the smoker.
Why Chorizo and Ground Beef Create Better Flavor Than Beef Alone
Fat Content Balance
Ground beef at 80/20 provides good fat content but not excessive. The 20% fat creates juiciness without being greasy. Alone, 80/20 beef might be slightly lean for this application where moisture is critical.
Chorizo is typically 30 to 40% fat. The high fat content ensures the filling stays moist during the 90 to 120-minute smoke. Chorizo fat also carries the spices and seasonings throughout the filling.
Combining beef and chorizo creates a blended fat content of approximately 25 to 30%. This is ideal for smoked applications. There’s enough fat to prevent drying but not so much that the filling becomes greasy or the bacon fat can’t render properly.
If you used all beef, even 80/20, the filling could become slightly dry toward the end of smoking. If you used all chorizo, the filling might be too rich and fatty. The combination balances perfectly.
Spice Distribution from Chorizo
Chorizo is pre-seasoned with paprika, chili powder, garlic, cumin, and other spices. When you mix chorizo with ground beef, these spices distribute throughout the entire filling. Every bite has chorizo flavor even in the beef portions.
The spices in chorizo are already integrated into the fat. As the chorizo fat renders during smoking, it carries those spices with it. The spiced fat bastes the beef portions from inside the filling. This creates more uniform flavor than if you just seasoned ground beef externally.
Chorizo also adds salt through its seasoning. This helps season the beef without requiring excessive additional salt. The built-in seasoning reduces the amount of salt, pepper, and garlic powder you need to add separately.
The paprika in chorizo contributes to color as well. The filling has appealing reddish tint from the chorizo rather than the grey color of plain cooked ground beef. This makes the cross-section more visually appealing when you slice the shells.
Texture Variation
Ground beef has a crumbly texture when cooked. Chorizo has a similar texture but slightly different due to its higher fat content and how it’s ground. Combining them creates textural complexity.
The beef provides firm, meaty bites. The chorizo adds softer, almost creamy pockets where the fat has rendered. Together they create filling that’s interesting to eat rather than monotonous.
All-beef filling can be dense and heavy. All-chorizo filling can be greasy and one-note. The combination creates lighter, more balanced texture that’s easier to eat in the rich, bacon-wrapped context.
Cost Effectiveness
Chorizo is more expensive per pound than ground beef, typically $5 to $7 per pound versus $4 to $5 for 80/20 beef. Using half chorizo and half beef keeps cost reasonable while still getting chorizo’s flavor benefits.
For 1½ pounds of filling total, you’re only buying ½ pound of chorizo. This might cost $2.50 to $3.50 instead of $7.50 to $10.50 if you used all chorizo. The beef stretches the chorizo without diluting its impact.
The cost savings allow you to invest in quality bacon. The bacon wrapping is critical to the dish. Using good thick-cut bacon matters more than using all-chorizo filling. The beef-chorizo blend lets you allocate budget wisely.
Why 250°F Creates Perfect Balance of Pasta Cooking and Bacon Crisping
Pasta Hydration Speed
Uncooked manicotti shells need time to hydrate and cook through. At 250°F, the shells cook gradually over 90 to 120 minutes. The slow cooking allows moisture from the filling to penetrate the pasta evenly.
Higher temperatures like 300°F or 350°F cook the bacon faster but the pasta might not have time to fully hydrate. You could end up with crispy bacon and crunchy pasta. The filling would be hot but the shells would still be hard in spots.
Lower temperatures like 225°F hydrate the pasta gently but take too long. The bacon might not crisp adequately. After 2 to 3 hours at 225°F, the bacon could still be flabby. The long cook time also risks drying out the filling.
The 250°F temperature creates the right pace. The pasta has 90 to 120 minutes to absorb moisture and soften completely. The bacon has time to render fat and crisp. Everything finishes simultaneously.
Bacon Fat Rendering
Bacon needs to render its fat to become crispy. This rendering happens most efficiently between 250°F and 300°F. At 250°F, the fat melts and drips away gradually. The bacon contracts and crisps over the 90 to 120-minute cook.
The slow rendering at 250°F also means the bacon fat bastes the pasta shells continuously during the first hour. As fat renders, it coats the outside of the pasta before dripping away. This adds flavor and helps prevent the exposed pasta from drying.
Higher temperatures render bacon fat too quickly. The fat drips away before it can baste the shells. The bacon can also burn on the outside before the inside fully cooks. Burnt bacon tastes bitter and has unpleasant texture.
Lower temperatures render fat inefficiently. The bacon stays soft and rubbery. Even after 2 hours at 225°F, bacon wrapped around shotgun shells might not be fully crisp. The fat stays partially solid instead of rendering away.
Smoke Absorption Timing
At 250°F, the shotgun shells spend sufficient time in the smoke zone for good flavor absorption. The 90 to 120-minute cook means 1½ to 2 hours of smoke exposure. This creates substantial smoke flavor in both pasta and filling.
The moderate temperature also keeps the smoke clean. Pellet smokers and other smokers burn more efficiently at 250°F than at very low temperatures. Clean blue smoke develops rather than thick white smoke. The shells get sweet wood smoke flavor.
Higher temperatures reduce smoke time. If you cooked at 350°F and finished in 45 minutes, the smoke flavor would be minimal. The shells would taste like oven-baked rather than smoked.
Lower temperatures extend smoke time but can lead to over-smoking. Three hours of smoke at 225°F might create bitter, acrid flavor. The 90 to 120 minutes at 250°F provides balanced smoke that enhances without overwhelming.
Temperature Bump for Final Crisping
The recipe suggests optional temperature increase to 275 to 300°F for the last 10 to 15 minutes if bacon needs extra crisping. This works because the pasta is already cooked by that point.
Once the shells have hydrated and softened, you can increase heat safely. The pasta won’t burn or dry out in just 10 to 15 minutes at higher temperature. But the bacon will crisp more aggressively from the increased heat.
This two-stage temperature approach gives you control. If the bacon is already crispy after 90 minutes at 250°F, you’re done. If it needs help, you boost temperature briefly. The 250°F base temperature ensures the pasta cooks correctly regardless.
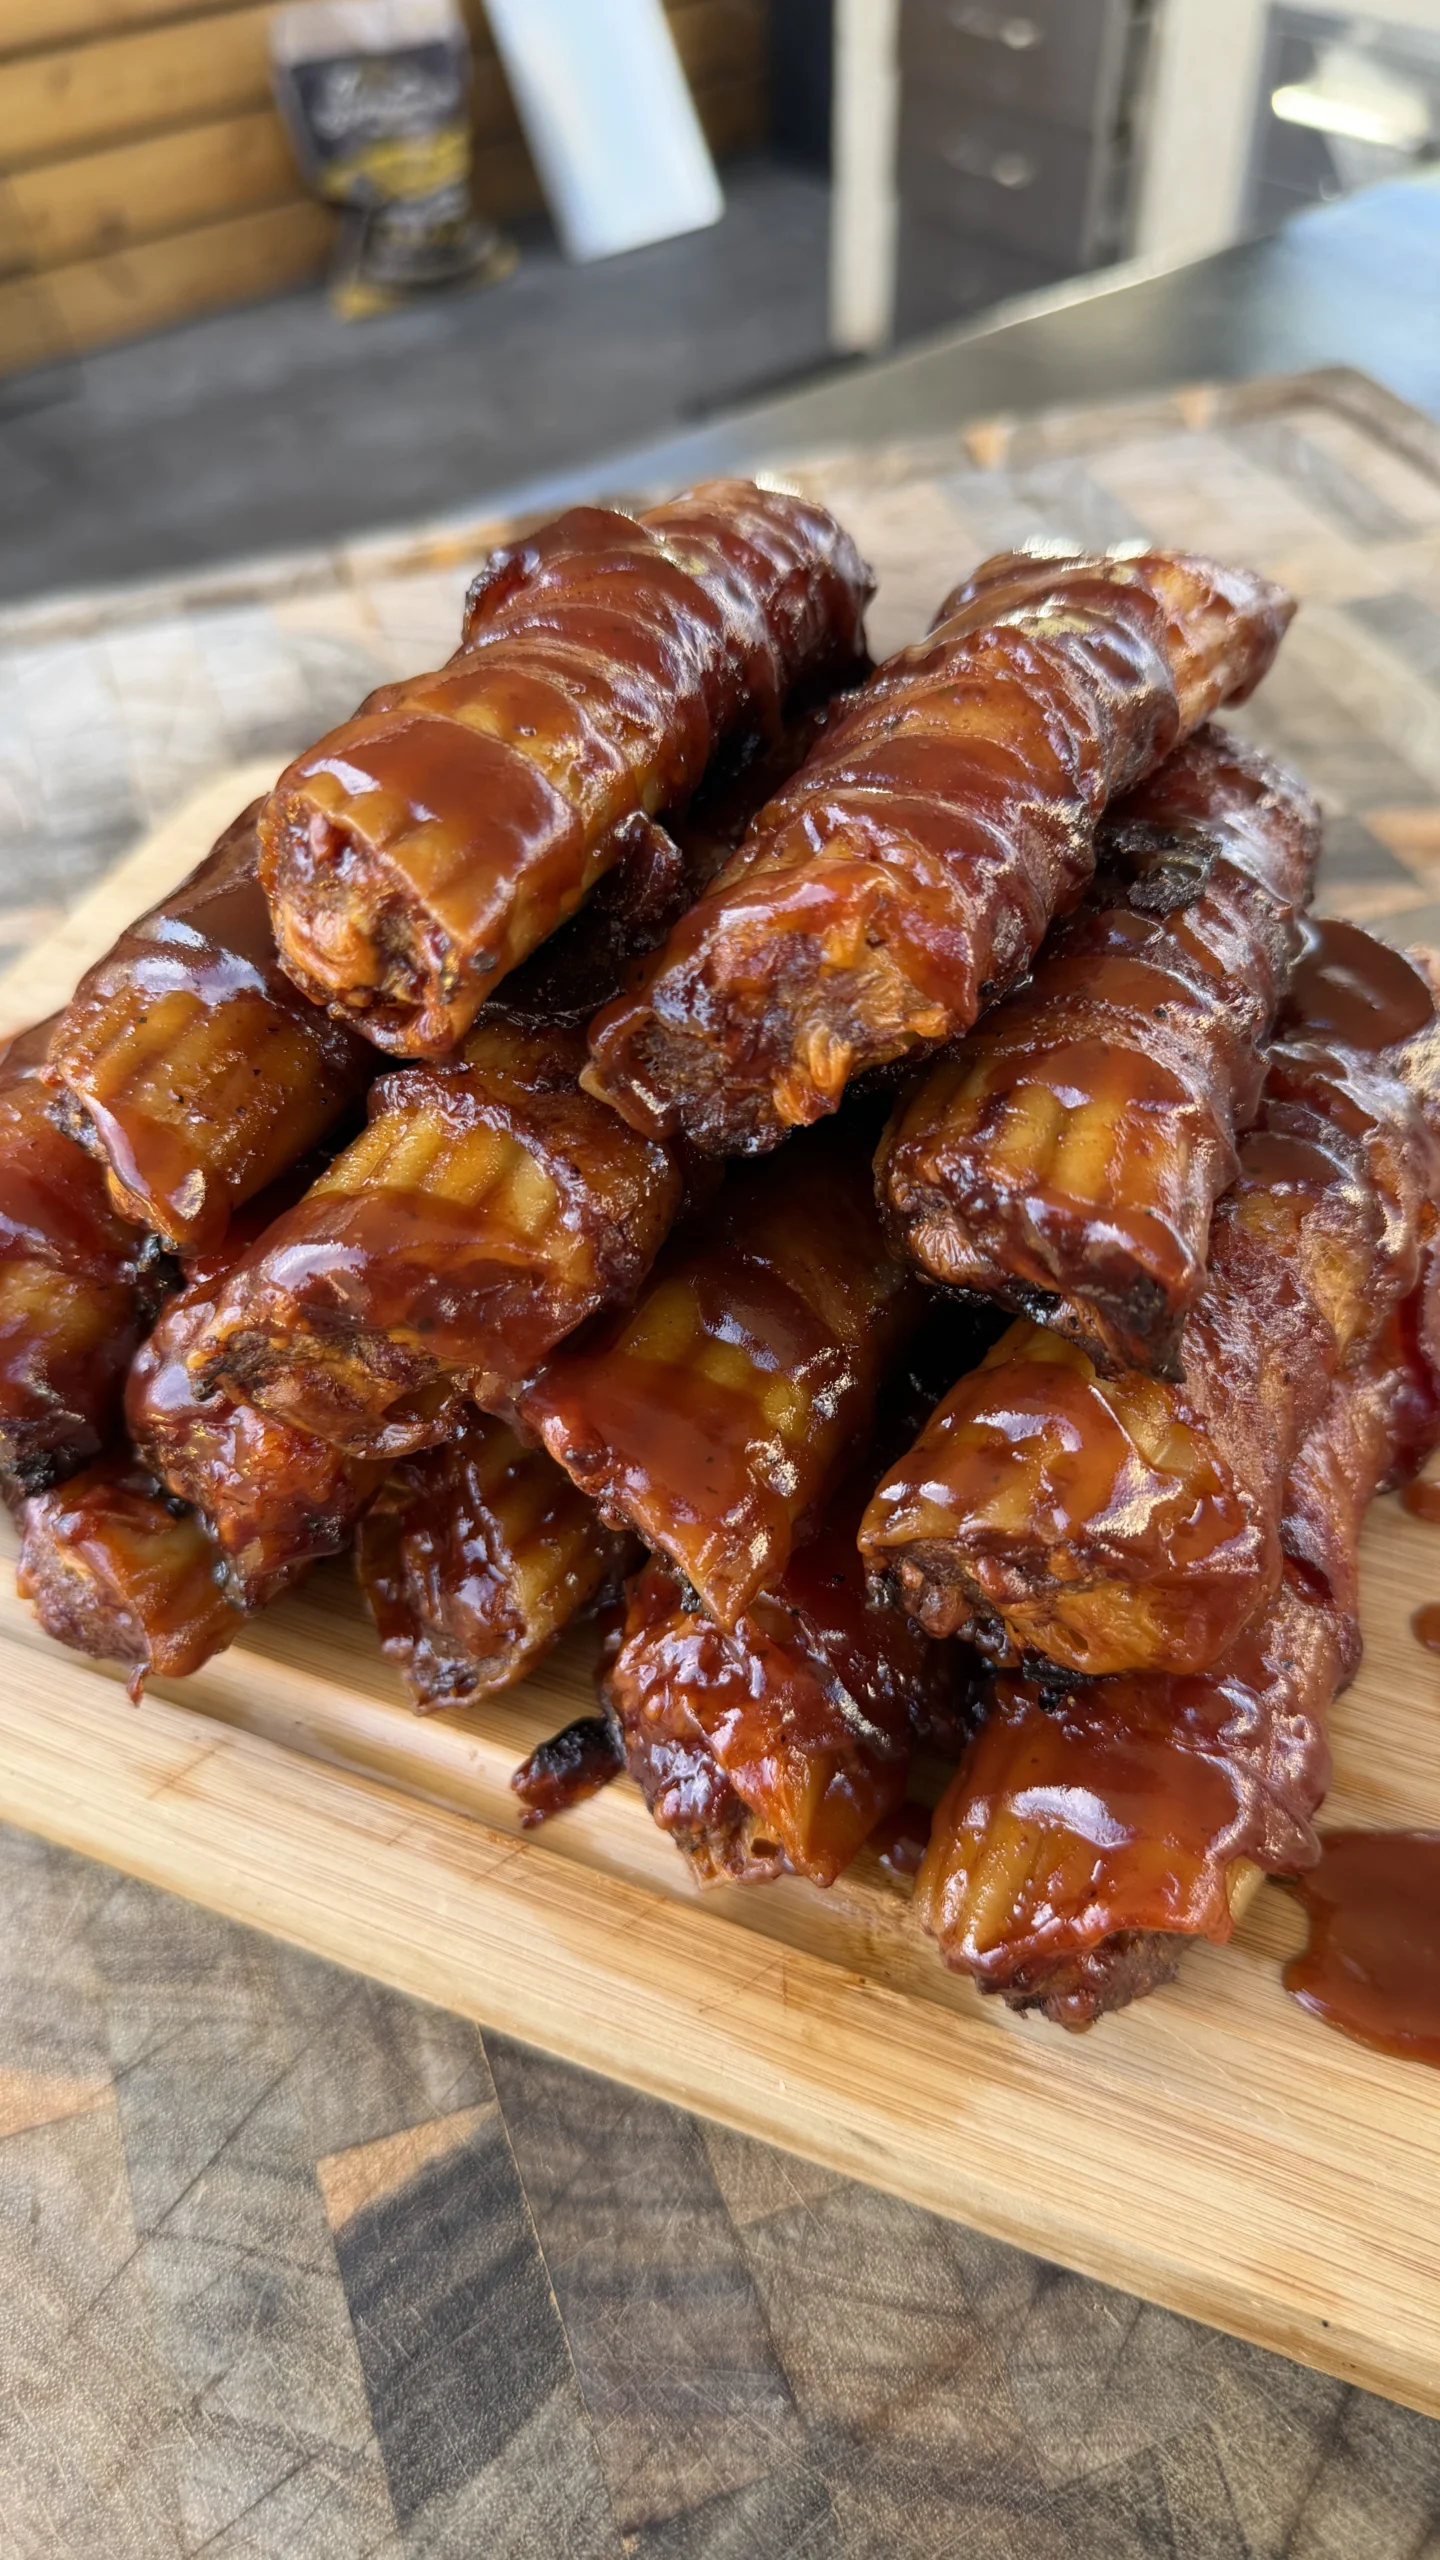
Smoked Shotgun Shells
Bacon-wrapped manicotti, beef & chorizo, 250°F smoke
Ingredients
Filling
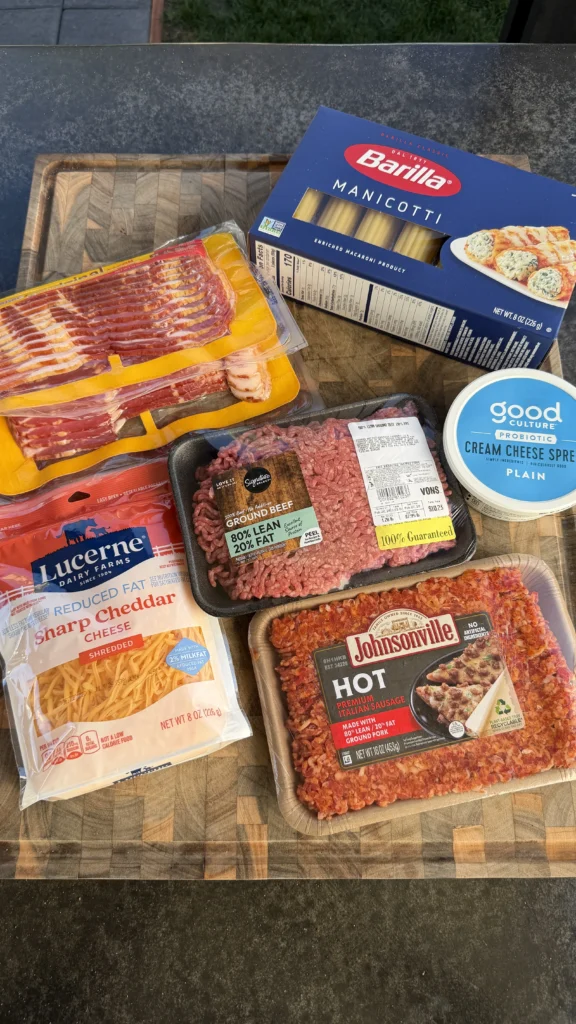
- 1 lb ground beef (80/20)
- ½ lb pork chorizo
- 8 oz cream cheese (softened)
- 1½ cups shredded cheddar cheese
- 1 teaspoon salt
- 1 teaspoon coarse black pepper
- 1 teaspoon garlic powder
- ½ teaspoon paprika
Assembly
- 1 box manicotti shells (uncooked, 18-20 shells)
- 18-20 slices thin bacon
- ½ cup BBQ sauce (for glaze)
Use uncooked manicotti shells straight from the box. They cook perfectly in the smoker as moisture from the filling hydrates the pasta. Pre-cooked shells become mushy. Pack the filling tightly with no air gaps. This prevents the shells from collapsing during cooking.
Step-by-Step Instructions
Step 1: Make the Filling
In a large mixing bowl, combine 1 pound of ground beef (80/20) and ½ pound of pork chorizo. Break up any large chunks with your hands or a spoon. The meat should be evenly distributed.
Add 8 ounces of softened cream cheese. Make sure the cream cheese is at room temperature. Cold cream cheese won’t mix properly. Cut it into smaller chunks to make mixing easier.
Add 1½ cups of shredded cheddar cheese, 1 teaspoon salt, 1 teaspoon coarse black pepper, 1 teaspoon garlic powder, and ½ teaspoon paprika.
Mix everything together thoroughly with your hands. This is messy but effective. Squeeze and knead the mixture until all ingredients are completely integrated. You shouldn’t see separate streaks of cream cheese or pockets of seasoning. The mixture should be uniform throughout.
The filling should be pliable and hold together when squeezed. If it seems too dry, the cream cheese wasn’t soft enough. If too wet, you might have added extra moisture somehow. It should be the consistency of meatloaf mixture.
Step 2: Stuff the Manicotti Shells
Remove uncooked manicotti shells from the box. Count out 18 to 20 shells. Examine each shell for cracks or breaks. Discard any damaged shells. They’ll leak during cooking.
The best way to stuff manicotti is with a piping bag or a zip-top bag with the corner cut off. Fill the bag with about 1 cup of filling at a time. This makes it easier to control than trying to fill from a spoon.
Insert the piping tip or cut corner into one end of a manicotti shell. Squeeze gently but firmly. Push the filling into the shell. You should feel resistance as the shell fills. Continue until filling comes out the other end.
Pack each shell completely full. There should be no air pockets. Air pockets cause the shells to collapse during cooking. The filling should be visible at both ends of the shell.
If you don’t have a piping bag, you can use a small spoon or your fingers. It’s slower and messier but works. Push filling into one end, then flip and fill from the other end until you meet in the middle.
Place stuffed shells on a baking sheet or large plate as you work. Don’t stack them. They’ll stick together.
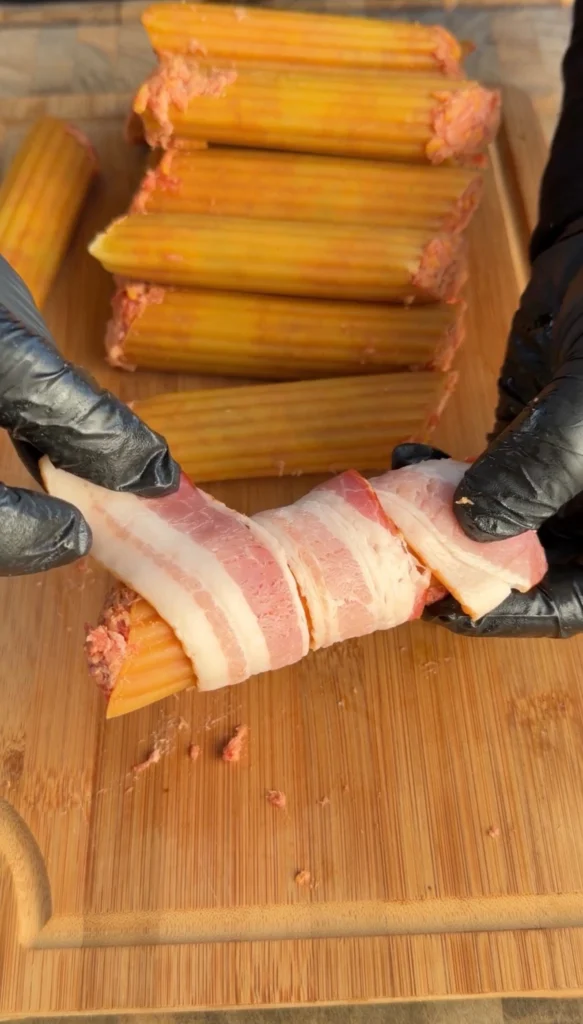
Step 3: Wrap Each Shell in Bacon
Take one slice of thin bacon. Place a stuffed manicotti shell at one end of the bacon slice. The shell should be perpendicular to the length of the bacon.
Begin wrapping the bacon around the shell in a spiral. Each wrap should overlap the previous wrap by about ¼ to ½ inch. This ensures complete coverage with no gaps.
Continue wrapping until you reach the end of the bacon slice. The bacon should cover the entire length of the shell. Tuck the end of the bacon underneath so it stays in place. The bacon will shrink during cooking and seal itself.
Repeat with all remaining shells and bacon slices. This part is time-consuming but straightforward. Work steadily through all 18 to 20 shells.
After wrapping, you can lightly season the outside of the bacon with additional salt, pepper, or your favorite BBQ rub. This is optional. The bacon and filling are already well-seasoned.
Place the wrapped shells on a clean baking sheet. You can refrigerate them at this point if making ahead. Cover with plastic wrap and refrigerate up to 24 hours. Bring to room temperature for 30 minutes before smoking.
Step 4: Preheat the Smoker
Preheat your smoker to 250°F. Use your preferred pellets or wood. The recipe suggests Bear Mountain Gourmet BBQ pellets for balanced smoke. Oak, hickory, or competition blend pellets also work well.
Let the smoker stabilize at temperature for at least 10 minutes. You want steady heat, not fluctuating temperature. Check that you’re seeing clean, thin blue smoke rather than thick white smoke.
Clean the grill grates if needed. The bacon will stick slightly as it cooks. Clean grates minimize sticking.
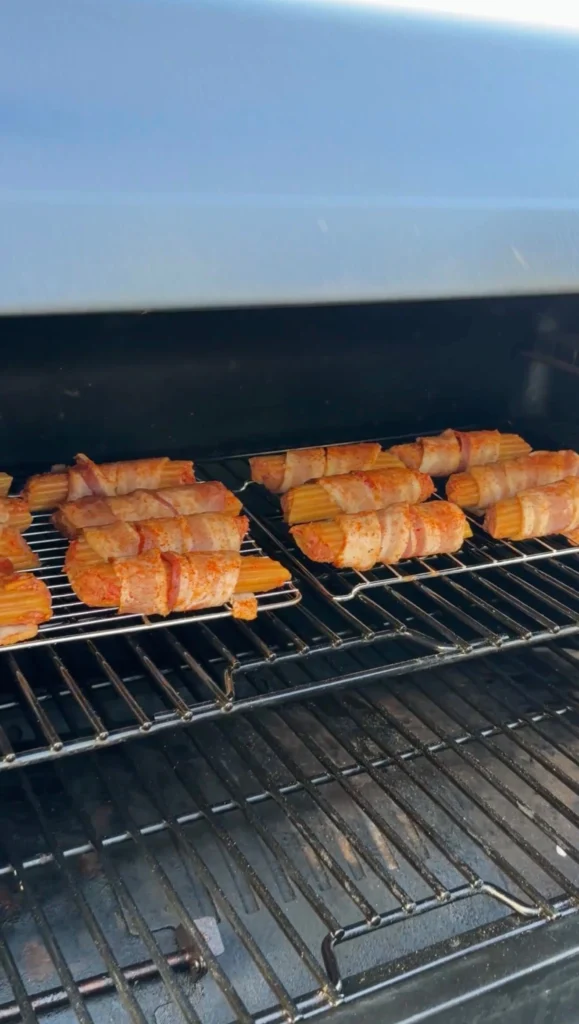
Step 5: Smoke the Shotgun Shells
Place the bacon-wrapped shells directly on the smoker grates. You can position them lying flat or standing upright if you have a rack that holds them vertical. Flat is easier and more stable.
Space the shells so they’re not touching. Air should circulate around each one. Depending on your smoker size, you might need to cook in batches.
Close the smoker lid. Don’t open it for the first 45 minutes. Each time you open, heat escapes and cooking time extends.
Smoke for 90 to 120 minutes total. The exact time depends on bacon thickness, smoker temperature consistency, and shell size.
After 60 minutes, check one shell. The bacon should be starting to brown. The shells should be softening. If the bacon looks pale, continue smoking.
After 90 minutes, check again. Look for these signs of doneness: bacon is crispy and browned, shells are tender when poked with a fork, and internal temperature reads 165°F when probed with an instant-read thermometer.
If the bacon is crispy but hasn’t browned enough, increase smoker temperature to 275 to 300°F for the last 10 to 15 minutes. This creates additional browning and crisping without overcooking the filling.
Step 6: Apply BBQ Sauce Glaze
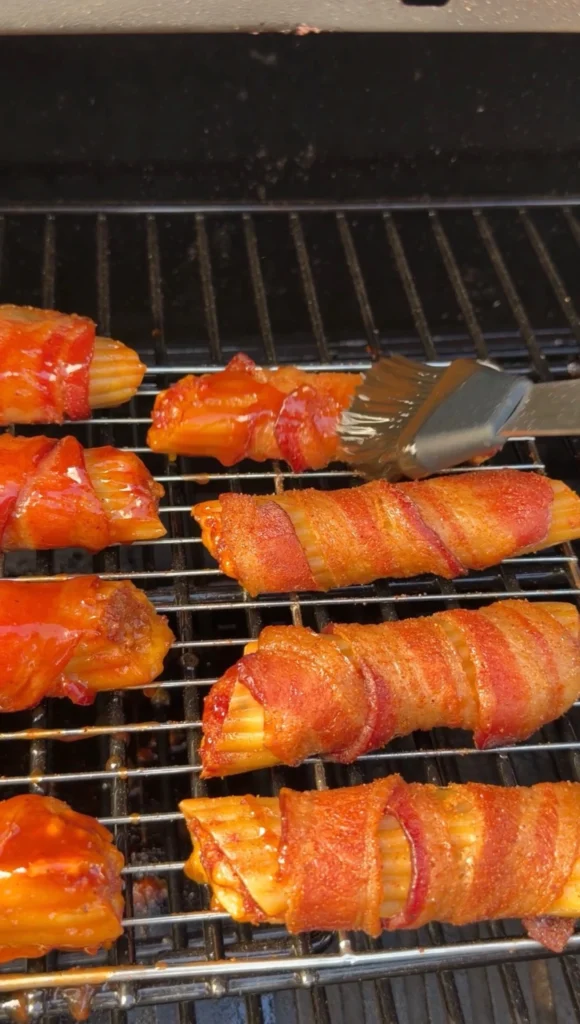
During the last 10 minutes of cooking, brush each shell with BBQ sauce. Use a silicone brush. Apply a thin, even coating. Don’t drench them. You want a glaze, not a sauce coating.
Close the lid and let the BBQ sauce cook for the final 10 minutes. The sauce will caramelize and become sticky. It should look glossy and slightly darker.
The sugars in the BBQ sauce will toast at this temperature. You want caramelization, not burning. Watch carefully during this phase. If the sauce starts to blacken, remove the shells immediately.
Step 7: Rest and Serve
When the shells reach 165°F internal temperature, the bacon is crispy, and the sauce is glazed, remove them from the smoker. Use tongs or a spatula. Be careful as they’re hot and can be delicate.
Place the shells on a serving platter or baking sheet. Let them rest for 5 to 10 minutes. This resting period allows the cheese to firm up slightly. If you cut into them immediately, the cheese will run out.
After resting, the shells are ready to serve. You can serve them whole or slice them in half on the diagonal to show the cross-section. Slicing reveals the layers of bacon, pasta, and filling.
Serve immediately while hot. The bacon will lose crispiness as they cool. The cheese will continue to firm up but the shells are best eaten fresh.
Smoked Shotgun Shells
Ingredients
Equipment
Method
- In large bowl, combine ground beef, chorizo, softened cream cheese, cheddar cheese, salt, pepper, garlic powder, and paprika. Mix thoroughly with hands until completely integrated and uniform.
- Stuff uncooked manicotti shells with filling using piping bag or zip-top bag with corner cut. Pack tightly with no air gaps. Filling should be visible at both ends.
- Wrap each stuffed shell with one slice of bacon in overlapping spiral pattern. Tuck end underneath. Optionally season outside with salt, pepper, or BBQ rub.
- Preheat smoker to 250°F with preferred wood or pellets.
- Place bacon-wrapped shells on smoker grates. Close lid. Smoke 90 to 120 minutes until bacon is crispy, shells are tender, and internal temperature reaches 165°F. If bacon needs more crisping, increase temperature to 275 to 300°F last 10 to 15 minutes.
- During last 10 minutes, brush shells with BBQ sauce. Let sauce caramelize and become glossy.
- Remove from smoker. Rest 5 to 10 minutes. Serve whole or sliced in half diagonally.
Nutrition
Notes
Tried this recipe?
Let us know how it was!Frequently Asked Questions
Can You Use Pre-Cooked Manicotti Shells?
Pre-cooked shells don’t work well for shotgun shells. They become mushy during the 90 to 120-minute smoke. Pre-cooked pasta has already absorbed water. Additional moisture from the filling makes them fall apart.
Raw shells are specifically designed to cook in moisture. They need liquid to hydrate and soften. The moisture from the ground beef, chorizo, and cream cheese provides exactly what raw shells need.
If you only have pre-cooked shells, reduce cooking time significantly to 45 to 60 minutes. The goal becomes just cooking the filling and crisping the bacon, not cooking the pasta. The results won’t be as good but acceptable in a pinch.
What Other Cheeses Work Besides Cheddar?
Monterey Jack provides mild, creamy flavor that melts smoothly. It’s less tangy than cheddar. For Mexican-inspired shotgun shells with chorizo, Monterey Jack or pepper jack works well.
Mozzarella is very stretchy when melted. It creates pull-apart texture when you bite the shells. Use low-moisture mozzarella, not fresh. Fresh mozzarella releases too much water.
Smoked gouda adds smoky flavor that enhances the smoked cooking method. The smokiness is complementary rather than competing. Gouda also melts beautifully.
You can use cheese blends. A Mexican blend or Italian blend provides complexity. Avoid pre-shredded cheese with cellulose coating if possible. Freshly shredded melts better.
Don’t use hard cheeses like parmesan alone. They don’t melt properly. But you can add ¼ cup parmesan to cheddar for extra flavor.
Can You Make Shotgun Shells Ahead of Time?
You can stuff the shells, wrap them in bacon, and refrigerate up to 24 hours before smoking. This makes them perfect for entertaining. Prep the day before, smoke the day of the event.
Place wrapped shells on a baking sheet. Cover tightly with plastic wrap. Refrigerate. The cold won’t affect the raw pasta. The filling stays fresh. The bacon doesn’t dry out.
Before smoking, let the shells come to room temperature for 30 minutes. Cold shells from the refrigerator take longer to cook. Room temperature ensures even cooking.
You can also freeze prepared but uncooked shells for up to 1 month. Wrap individually in plastic wrap, then place in a freezer bag. Thaw in refrigerator overnight before smoking. Bring to room temperature before cooking.
Don’t make them completely ahead and reheat. Freshly smoked is always best. The bacon loses crispiness during reheating.
How Do You Reheat Leftover Shotgun Shells?
Reheat leftover shells in a 350°F oven. Place them on a baking sheet. Heat for 15 to 20 minutes until warmed through. The bacon won’t be as crispy as fresh but acceptable.
Broil for the last 2 to 3 minutes if you want crisper bacon. Watch carefully. The bacon can burn quickly under the broiler.
Microwave reheating works but affects texture. Use 50% power and heat in 1-minute intervals. The bacon will be soft and rubbery. The cheese might separate.
Air fryer reheating creates the best texture for leftovers. Set to 350°F and heat for 8 to 10 minutes. The circulating hot air crisps the bacon nicely.
Store leftovers in an airtight container in the refrigerator for up to 3 days. The bacon will soften during storage. Reheating helps restore some texture.
What’s the Best Way to Stuff Manicotti Shells?
A piping bag with a large round tip is ideal. Fill the bag with 1 cup of filling. Insert the tip into one end of the shell. Squeeze steadily until filling comes out the other end. This method is fast and creates evenly filled shells.
A zip-top bag with the corner cut off works almost as well. Cut a ¾-inch opening. The larger opening prevents clogging. Fill, seal, and pipe like a piping bag.
A small spoon or demitasse spoon can work for patient cooks. Push filling into one end, compacting as you go. It’s slow but requires no special equipment.
Some people use a sausage stuffer if they make shotgun shells frequently. The sausage stuffer attachment on a stand mixer fills shells very quickly.
Whatever method you choose, pack the filling tightly. Push out air pockets. The shell should feel firm and full along its entire length.
Ready to Level Up?
Take your backyard cooking from good to legendary.
This is where I keep all my most-used smokers, knives, and favorite cooking tools.
Shop My Gear CollectionExplore More Recipes
Find more diverse flavors at CWFeats.com