Chili Cheese Dog Sliders
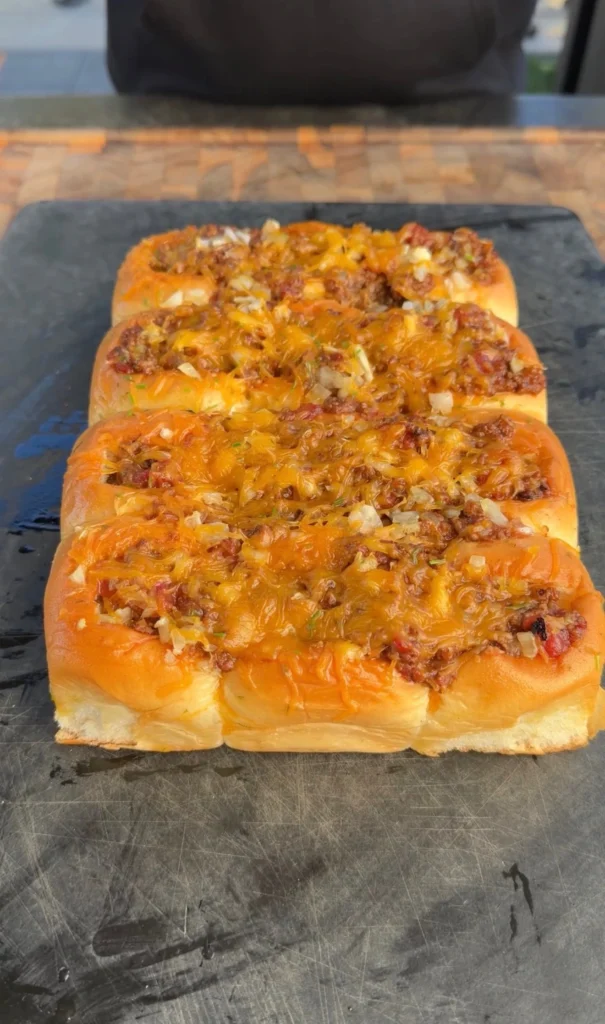
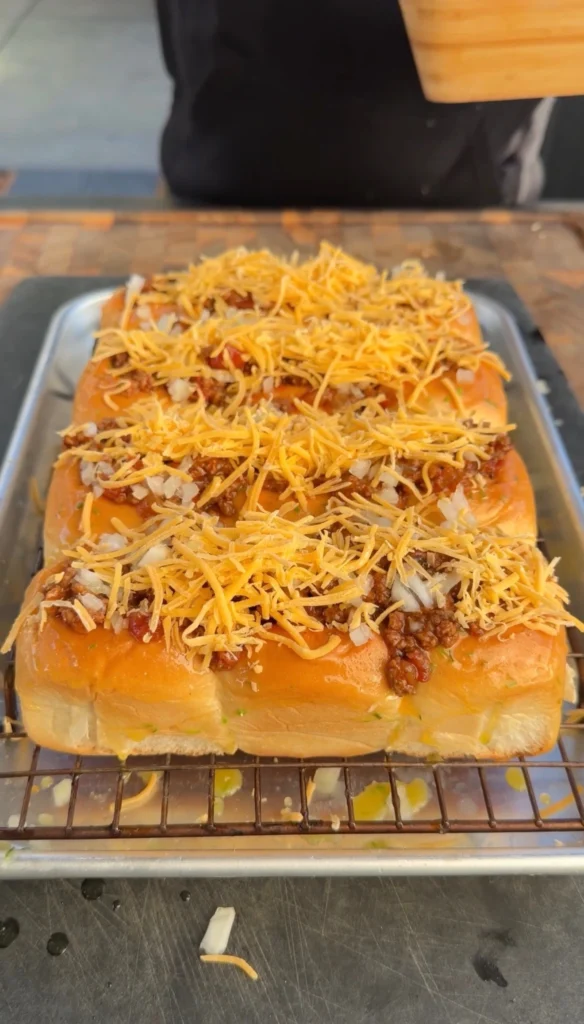
Chili cheese dog sliders with chive butter rolls are thin all-beef hot dogs scored crosswise on both sides, grilled until the cuts open up, then placed in lightly sliced King’s Hawaiian sweet slider rolls that have been brushed inside and out with melted butter mixed with fresh chopped chives. You top each hot dog with homemade chili made from ground beef, McCormick chili seasoning, diced onions, garlic, and tomatoes that’s been simmered until thick, then add shredded cheddar or cheddar-jack cheese and optional diced raw onion. The assembled sliders go back on the grill over indirect heat with the lid closed for 5 to 7 minutes until the cheese melts completely. The chive butter adds richness and creates a moisture barrier that prevents the rolls from getting soggy from the chili.
The entire process takes about 1 hour from start to finish. This includes 25 to 30 minutes to make the chili from scratch and let it simmer to proper thickness. You spend 5 minutes making the chive butter and prepping the rolls. Grilling the scored hot dogs takes 10 to 12 minutes. Assembly takes another 5 minutes. The final melting phase on the grill is 5 to 7 minutes. Everything comes together hot and fresh for serving.
These chili dog sliders serve a crowd efficiently. One 12-count pack of King’s Hawaiian rolls with 8 to 10 hot dogs feeds 10 to 12 people as appetizers or 6 to 8 as a main course. The slider format makes them easy to eat at parties and tailgates. No plates required. Guests can hold them in one hand. The sweet rolls contain the messy chili without falling apart.
The scoring technique on the hot dogs is critical. The crosswise cuts on both sides allow the hot dogs to open like a book when they heat. This creates a trough that holds more chili. Un-scored hot dogs are round. The chili slides off. Scored hot dogs have a valley down the center. The chili nestles in and stays put. This prevents the chili from squeezing out when you bite.
Jump to RecipeWhat Makes King’s Hawaiian Rolls Perfect for Chili Cheese Dog Sliders
Sweet and Savory Balance
King’s Hawaiian rolls have a subtle sweetness from honey and pineapple juice in the dough. This sweetness balances the savory, salty chili and cheese. The combination creates complexity. Your palate experiences sweet bread, meaty chili, sharp cheese, and tangy onion all at once.
Standard white slider buns taste neutral. They’re just a vehicle for the filling. King’s Hawaiian rolls contribute flavor. The bread is part of the taste experience, not just structure. This makes the sliders more interesting to eat. Each bite has layers instead of flatness.
The sweetness also helps with crowd appeal. Some people find plain chili dogs too heavy or salty. The sweet rolls lighten the overall impression. Kids especially respond well to the sweet bread paired with familiar hot dog and chili flavors.
Soft Texture and Moisture Content
King’s Hawaiian rolls are extremely soft and slightly moist. The texture comes from eggs and butter in the enriched dough. These ingredients create tender crumb structure. The rolls compress easily when you bite without being mushy.
This softness matters when you’re adding wet toppings like chili. A crusty roll would create too much textural contrast. You’d bite through a hard exterior into soft filling. King’s Hawaiian rolls have consistent softness throughout. The bread, hot dog, and chili all have similar tender textures.
The slight moisture in the rolls also helps them tolerate the chili better. Completely dry bread absorbs liquid too quickly. It gets soggy and falls apart. King’s Hawaiian rolls have enough internal moisture that they don’t desperately absorb chili juice. They stay structurally sound longer.
Connected Roll Format
King’s Hawaiian slider rolls come connected in a sheet. The individual rolls are still attached at their sides. This makes assembly easier. You can butter and fill multiple rolls at once. You don’t need to handle each roll individually.
The connected format also helps during the final melting phase on the grill. You can move all 12 sliders as one unit. They don’t roll around or tip over. Everything stays in formation. This is especially helpful when you’re managing other dishes at the same time.
Some people separate the rolls before filling. This works fine. But keeping them connected creates a pull-apart presentation. Guests tear off individual sliders from the sheet. This feels more casual and fun than plated individual portions.
Size Match for Thin Hot Dogs
Standard King’s Hawaiian slider rolls are about 2 inches in diameter. This matches perfectly with thin all-beef hot dogs. The hot dog fits the roll with minimal overhang. A regular-sized hot dog would be too thick and long. It would dwarf the roll.
The proportions matter for balanced bites. Each mouthful should contain bread, hot dog, chili, and cheese in roughly equal amounts. If the hot dog is too large, you taste mostly hot dog. If it’s too small, you taste mostly bread. Thin hot dogs in slider rolls create the ideal ratio.
The size also affects how many sliders you get per pack. With 12 rolls and 8 to 10 hot dogs, you might need to cut some hot dogs in half length-wise or use 2 hot dogs per slider depending on exact sizing. The flexibility works because the rolls are small enough to accommodate different approaches.
How to Score Hot Dogs for Maximum Chili Holding Capacity
The Crosswise Cutting Technique
Scoring means making shallow cuts across the hot dog’s surface. For chili dogs, you cut perpendicular to the length. The cuts should be about ¼ to ½ inch apart. They should penetrate about one-third of the way through the hot dog. Not just surface scratches. Not cutting all the way through.
You score both sides of each hot dog. Turn it over after finishing the first side. Make the same pattern of cuts on the opposite side. This creates maximum surface area for opening. When the hot dog heats on the grill, both sets of cuts expand.
The cuts open during grilling because the hot dog casing contracts. As the casing tightens, the scored areas spread apart. The hot dog transforms from a smooth cylinder into a textured surface with valleys. These valleys run across the hot dog’s width. They’re perpendicular to the length.
Why Crosswise Beats Spiral or Lengthwise
Some people spiral-cut hot dogs. This creates a curly appearance. It looks impressive but doesn’t help with chili holding. The spiral creates one continuous cut. The hot dog can curl and twist. But it doesn’t create the trough shape you need for chili.
Lengthwise scoring also fails for chili dogs. A single cut down the center makes the hot dog open like a book. This works for hot dog buns where the dog sits in a hinged bread. But for slider rolls where the hot dog sits horizontally, the lengthwise cut doesn’t create a stable chili channel.
Crosswise cuts create multiple small valleys across the hot dog’s surface. The chili settles into these grooves. Surface tension and the valley shapes hold the chili in place. When you bite, the chili compresses into the valleys instead of squirting out.
How Deep to Cut Without Splitting
The depth is critical. Too shallow and the cuts barely open. Too deep and the hot dog splits completely. You want one-third to one-half depth. For a standard thin hot dog that’s about ¾ inch in diameter, cut roughly ¼ inch deep.
Use a sharp paring knife. Dull knives tear the casing instead of cutting cleanly. Torn casings can split wider than intended during cooking. Clean cuts expand predictably. Ragged tears become unpredictable.
Hold the hot dog firmly on a cutting board. Make each cut in one smooth motion. Don’t saw back and forth. Sawing motion can slip and cut too deep. A single slice gives you better control. Work methodically down the length. Keep the spacing consistent.
Grilling Temperature and Opening Action
The scored hot dogs need proper grilling temperature to open nicely. Medium to medium-high heat works best. Around 350 to 400°F. At this temperature, the casing heats and contracts within 8 to 10 minutes.
Too low heat and the hot dogs warm through without the casing contracting enough. The scores stay relatively closed. Too high heat and the casing can burst before the cuts open properly. You get split hot dogs instead of scored hot dogs.
Watch the hot dogs as they grill. You’ll see the cuts start to spread apart after 5 to 6 minutes. They’ll continue opening until you remove them from heat. The fully opened scores should look like little valleys running across the hot dog. This is when they’re ready for assembly.
Should You Make Homemade Chili or Use Canned for Sliders
Texture Control with Homemade
Homemade chili lets you control thickness precisely. For sliders, you need thick chili that doesn’t run. You simmer it uncovered until moisture evaporates. The ground beef, tomatoes, and seasonings reduce to a nearly paste-like consistency. This thick chili stays on the hot dog instead of soaking into the bread.
Canned chili varies in thickness by brand. Some brands are soup-like. Others are thicker. But you can’t adjust them easily. If you try to reduce canned chili on the stove, it can become grainy or separated. The pre-cooked meat and beans (if included) don’t respond well to extended reheating.
The texture also affects how the chili clings to the scored hot dog. Thick homemade chili settles into the grooves and stays. Thin canned chili runs off and pools in the bottom of the roll. Even with chive butter protection, very thin chili can eventually soak through.
Seasoning Flexibility
Making chili from scratch with McCormick seasoning packet gives you a consistent flavor baseline. But you can adjust it. Want more heat? Add extra cayenne or red pepper flakes. Prefer less salt? Use low-sodium diced tomatoes. Need sweetness to balance? Add a pinch of sugar.
Canned chili flavor is fixed. The seasoning blend is what it is. You can doctor it with additional spices. But you’re building on top of existing flavors. Sometimes this works. Often it creates muddled taste where you detect layers that don’t quite integrate.
The onion and garlic in homemade chili also provide fresher, brighter flavor. Canned chili contains dehydrated or powdered aromatics. These taste flat compared to fresh. The difference is noticeable when eating the sliders. Fresh aromatics create more complexity.
Bean vs No-Bean Consideration
Traditional chili dogs don’t include beans. The homemade version uses just ground beef, tomatoes, and seasonings. This creates smooth, meaty chili. Beans add texture that doesn’t work well for sliders. They’re chunky and can make the filling unstable.
Most canned chili contains beans. Finding canned no-bean chili is possible but less common. If you use canned chili with beans, you might need to roughly mash some beans to create smoother consistency. Whole beans roll out of the slider when you bite.
The no-bean approach also makes the chili more concentrated in flavor. Without beans diluting the beef and spice, you get more intense taste in each spoonful. This matters for sliders where you’re using relatively small amounts of chili per hot dog.
Time Investment vs Convenience
Homemade chili takes about 30 minutes total. You spend 10 minutes browning beef and aromatics. Another 15 to 20 minutes simmering. Plus 5 minutes of prep and cleanup. This is manageable for most cooks. It’s not an all-day project like some chili recipes.
Canned chili takes 5 minutes. Open, heat, done. For time-crunched situations or large batches where you’d need multiple pounds of beef, canned makes sense. The quality difference isn’t massive. It’s noticeable but not ruinous.
For 12 sliders, one pound of ground beef makes plenty of chili. The volume is small enough that homemade is worth the effort. For 50 or 100 sliders at a party, canned chili becomes more practical. You’d need 4 to 5 pounds of ground beef for homemade. That’s when convenience outweighs quality.
The Best Cheese for Melting Over Chili Dogs
Cheddar vs Cheddar-Jack Blend
Sharp cheddar cheese provides bold, tangy flavor that stands up to meaty chili. The sharpness cuts through richness. Cheddar also melts smoothly at moderate heat. It doesn’t separate into oil and solids easily. The cheese stays creamy instead of greasy.
Cheddar-jack is a pre-shredded blend of cheddar and Monterey Jack. The Jack cheese melts even more smoothly than straight cheddar. It has milder flavor. The combination gives you cheddar’s flavor with Jack’s superior melt. This blend is convenient and performs well.
For chili cheese dog sliders, either works. Straight cheddar creates stronger cheese flavor. Cheddar-jack creates creamier texture. Your preference depends on whether you prioritize flavor intensity or melt quality. Both options are better than mild cheddar or American cheese.
Shredded vs Sliced
Shredded cheese melts faster and more evenly than sliced cheese. The small pieces have more surface area. They’re also distributed across the chili instead of sitting as a single layer. This means every bite gets cheese instead of some bites being all cheese and others having none.
Pre-shredded cheese contains anti-caking agents like cellulose or potato starch. These prevent clumping in the bag. They also slightly inhibit melting. The cheese still melts but takes a minute or two longer than freshly shredded cheese. For sliders where you’re melting for 5 to 7 minutes, this delay doesn’t matter.
Sliced cheese like American or cheddar slices creates a uniform cheese layer. This looks appealing before melting. But during melting, the edges can overcook while the center is still firm. You get uneven coverage. Shredded eliminates this problem through even distribution.
Mild vs Sharp Cheddar
Mild cheddar has subtle, creamy flavor. It melts beautifully but doesn’t add much taste complexity. When combined with bold chili and seasoned hot dogs, mild cheddar disappears. You know there’s cheese because of the texture. But you don’t taste distinct cheese flavor.
Sharp or extra-sharp cheddar has aged longer. This aging concentrates flavor. Sharp cheddar tastes noticeably cheesy even when mixed with strong flavors. The tanginess provides counterpoint to the chili’s savory depth. Your palate registers cheese as a distinct element.
For sliders where portions are small, flavor concentration matters. You want to taste all the components clearly. Sharp cheddar ensures cheese flavor isn’t lost. If you’re feeding people who dislike strong cheese, mild works. For maximum flavor impact, choose sharp.
Fresh Grated vs Pre-Shredded
Freshly grated cheese from a block melts more smoothly than pre-shredded. It lacks anti-caking agents. The cheese pieces are more uniform in size. You control the shred thickness. All of this creates superior melt quality.
The trade-off is time and effort. Grating cheese adds 5 to 10 minutes to prep. For 12 sliders, you need about 1½ to 2 cups shredded cheese. That’s a decent amount of grating. You need a box grater or food processor.
Pre-shredded cheese is grab-and-go convenient. The quality difference for sliders is minimal. You’re melting the cheese and mixing it with chili. The anti-caking agents don’t noticeably affect the final texture. Unless you’re very particular about cheese quality, pre-shredded is the practical choice.
How Chive Butter Prevents Soggy Slider Rolls
Fat Barrier Against Liquid Absorption
Butter is pure fat. When you brush melted butter on the inside of the rolls, you coat the bread with a hydrophobic layer. Water-based liquids like chili juice can’t penetrate fat easily. The butter creates a moisture barrier between the bread and the wet toppings.
Without butter, the bread directly contacts chili liquid. Bread is porous and absorbent. The liquid wicks into the crumb structure through capillary action. This happens quickly. Within 5 to 10 minutes, un-buttered rolls become soggy. The bottom gets mushy. The structural integrity fails.
The butter doesn’t make the rolls completely waterproof. Extended contact with wet chili will eventually saturate even buttered bread. But the butter buys you time. Buttered rolls stay firm for 15 to 20 minutes instead of 5 to 10 minutes. This is enough time for serving and eating.
Flavor Enhancement from Chives
Fresh chives add mild onion flavor to the butter. This complements the chili without competing. Chives taste fresher and more delicate than raw onion. They integrate into the butter completely. Every bite of bread carries subtle herb notes.
The chive butter also makes the rolls taste more premium. Plain rolls are basic. Herb butter rolls feel like something you’d get at a nice restaurant. The small effort of chopping chives and mixing them into butter elevates the entire dish.
You could use plain butter without chives. The moisture barrier effect works the same. But the flavor benefit from chives is significant. For minimal extra work, you add another layer of taste. The chives visibly fleck the butter with green. This looks appealing too.
Browning and Texture Development
When you brush butter on the roll exteriors and heat them on the grill, the butter browns slightly. Browned butter tastes nutty and rich. This browning happens on the grill during the final melting phase. The buttered roll surfaces crisp slightly while the interiors stay soft.
This textural contrast improves the eating experience. The slightly crispy exterior gives way to soft interior. You get crunch and tenderness in the same bite. Un-buttered rolls stay uniformly soft. They’re pleasant but less interesting texturally.
The browning also creates visual appeal. The golden-brown butter coating looks appetizing. It signals that the sliders are freshly made and properly prepared. Pale, unbuttered rolls look plain and unfinished by comparison.
Application Technique Matters
How you apply the butter affects coverage. Using a brush gives you control. You can coat all the interior surfaces evenly. Pay attention to the corners and edges. These areas dry out first. They need good butter coverage.
Brushing the tops of the rolls matters too. The chive butter adds flavor to the part people bite first. It also helps the tops brown during the final heating. If you only butter the interiors, the tops stay pale and taste plain.
Use melted butter, not softened butter. Melted butter flows into all the bread’s nooks and crannies. Softened butter is too thick. It sits on the surface instead of penetrating slightly. Melted butter creates better barrier protection and more even flavor distribution.
Chili Cheese Dog Sliders
Chive butter rolls, scored hot dogs, homemade chili
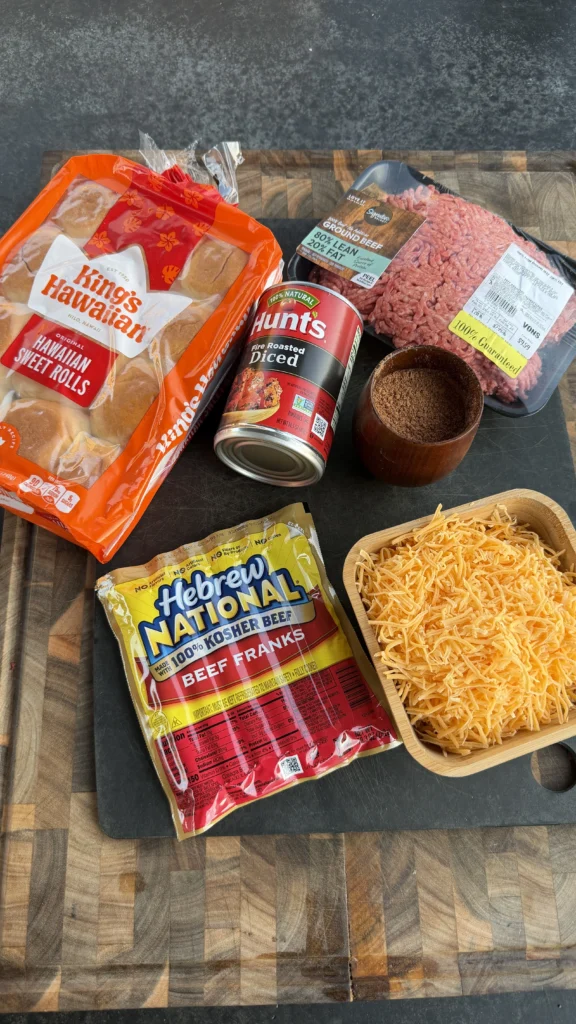
Ingredients
Chili
- 1 lb ground beef
- 1 packet McCormick Chili Seasoning
- 1 whole onion, diced
- 2 garlic cloves, minced
- 1 can (14.5 oz) diced tomatoes, no beans
- ½ cup water
Sliders
- 1 pack King’s Hawaiian Sweet Slider Rolls (12-count)
- 8-10 thin all-beef hot dogs
Chive Butter
- ½ stick (4 tablespoons) unsalted butter
- 2 teaspoons fresh chives, finely chopped
Toppings
- 1½-2 cups shredded cheese (cheddar or cheddar-jack)
- Diced onion, for garnish (optional)
Score the hot dogs before grilling. Make shallow crosswise cuts about ¼ inch apart on both sides. The cuts open during grilling and create valleys that hold the chili. Unscored hot dogs are round and the chili slides right off.
Step-by-Step Instructions
Step 1: Make the Chili
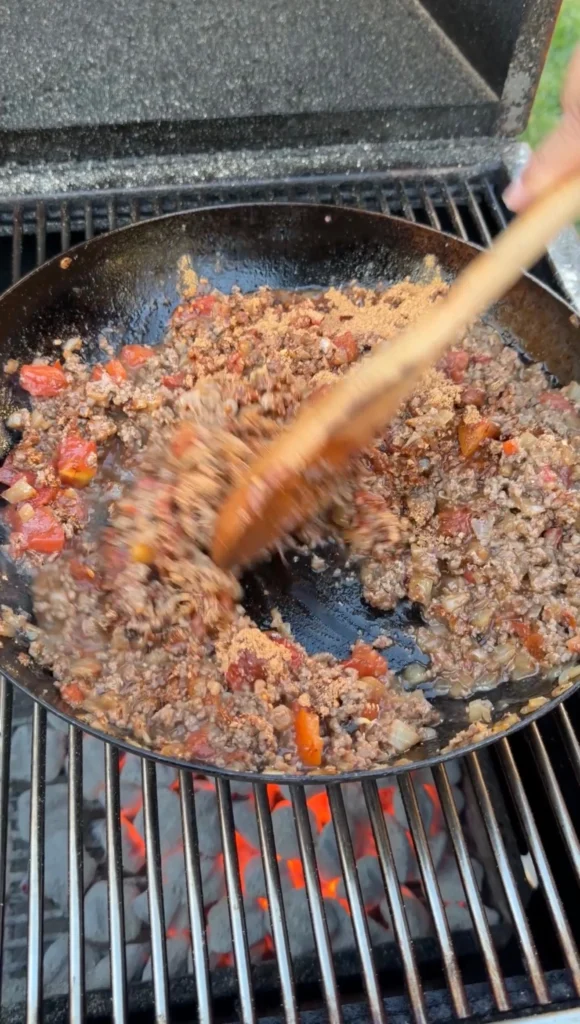
Heat a large skillet or sauté pan over medium heat. Add 1 pound of ground beef. Break it up with a wooden spoon or spatula as it cooks. Continue breaking and stirring until the beef is fully browned with no pink remaining. This takes 8 to 10 minutes.
Add the diced onion to the browned beef. Stir to combine. Cook for 2 to 3 minutes until the onion softens and becomes translucent. The onion should smell sweet and aromatic.
Add the minced garlic. Stir and cook for 30 seconds only. Garlic burns quickly. You just want it fragrant, not browned. Overcooked garlic tastes bitter.
Pour in the entire can of diced tomatoes including the juice. Add the McCormick chili seasoning packet and ½ cup of water. Stir everything together thoroughly. Make sure the seasoning distributes evenly throughout the beef and tomatoes.
Reduce the heat to low. Let the chili simmer uncovered for 15 to 20 minutes. Stir occasionally to prevent sticking. The chili should reduce and thicken significantly. You’re looking for a thick, almost paste-like consistency. Very little liquid should remain. If it’s still soupy after 20 minutes, continue simmering until it thickens.
Remove from heat and set aside. The chili will thicken slightly more as it cools.
Step 2: Prepare the Chive Butter
In a small saucepan, melt ½ stick (4 tablespoons) of unsalted butter over low heat. Don’t let it brown. You just want it completely melted and liquid.
Add 2 teaspoons of finely chopped fresh chives to the melted butter. Stir to combine. The chives should distribute evenly through the butter. You’ll see green flecks throughout.
Remove from heat and set aside. Keep the butter in a warm place so it stays liquid for easy brushing. If it solidifies, reheat it gently before using.
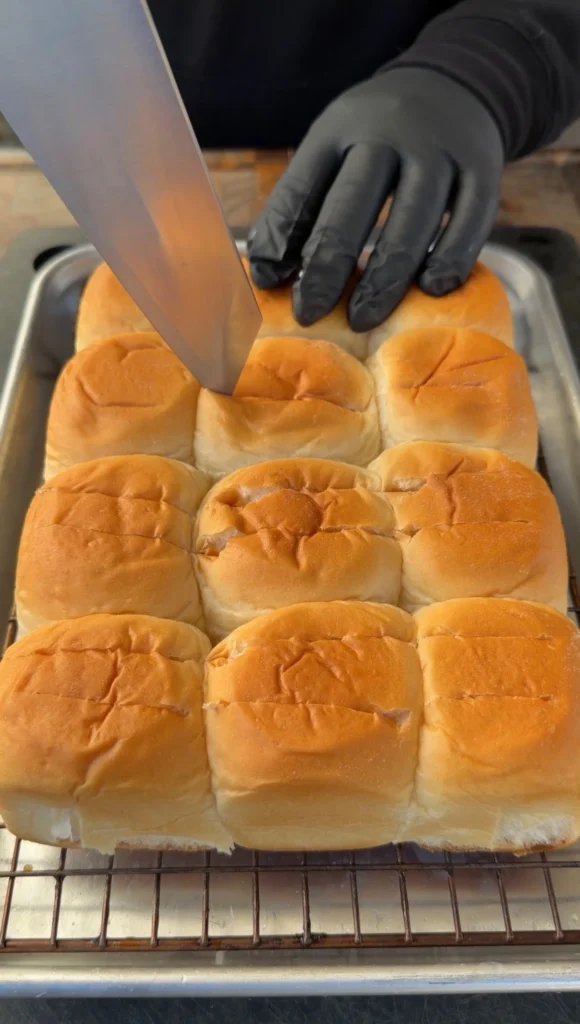
Step 3: Prep the King’s Hawaiian Rolls
Remove the connected sheet of rolls from the package. You can keep them connected or separate them. Keeping them connected makes assembly easier and creates a pull-apart presentation.
Using a sharp serrated knife, make a light slice across the top of each roll. Don’t cut all the way through. You’re creating a pocket, not halving the roll. The cut should go about two-thirds of the way down.
Gently press down inside each roll with your fingers or thumbs. This creates more space for the hot dog and toppings. The rolls are very soft. They compress easily without tearing.
Using a pastry brush or silicone brush, generously brush the inside of each roll with the chive butter. Make sure you coat all the interior surfaces. Pay attention to the bottom and sides where the chili will make contact.
Brush the tops of the rolls with the remaining chive butter. This adds flavor and helps them brown during the final heating phase.
Set the buttered rolls aside while you grill the hot dogs.
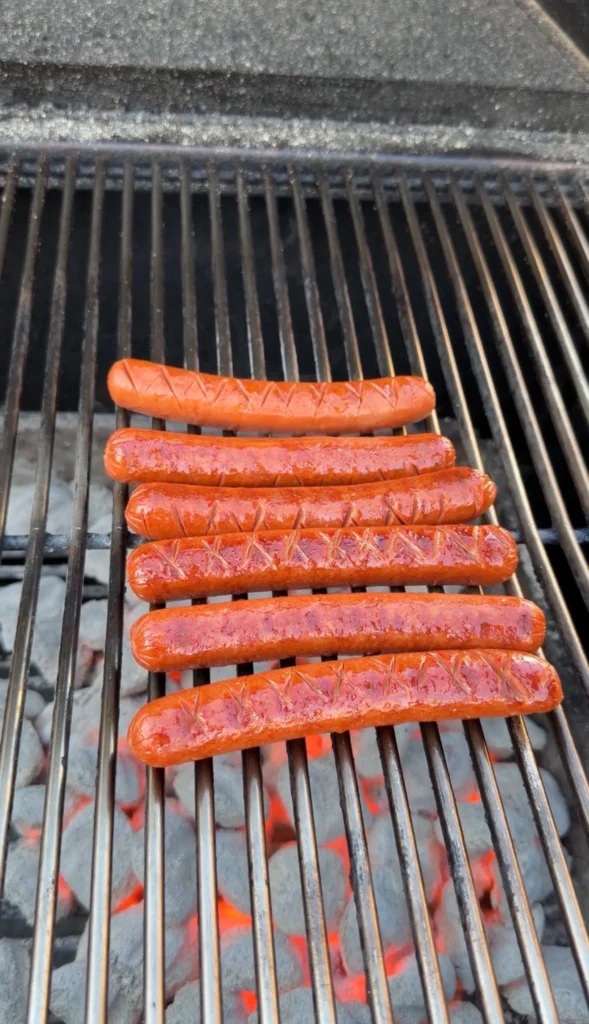
Step 4: Score and Grill the Hot Dogs
Lay the hot dogs on a cutting board. Using a sharp knife, make shallow crosswise cuts about ¼ inch apart down the length of each hot dog. The cuts should penetrate about one-third of the way through. Not too deep or the hot dog will split completely.
Turn each hot dog over and repeat the scoring on the opposite side. Both sides should have the crosswise cut pattern.
Preheat your grill to medium heat, around 350 to 375°F. Clean the grates.
Place the scored hot dogs directly on the grill grates. Close the lid. Grill for 8 to 12 minutes, turning every 2 to 3 minutes to ensure even heating.
Watch for the scored cuts to open up. As the hot dogs heat, the cuts will spread apart and create valleys across the surface. When the hot dogs are fully heated through and the cuts have opened nicely, remove them from the grill.
Step 5: Assemble the Sliders
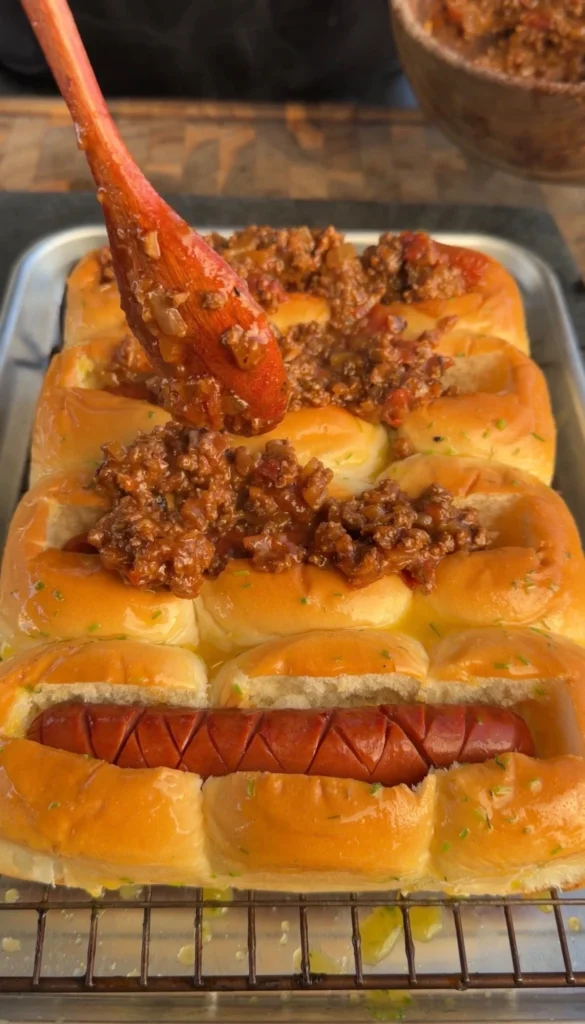
Place one grilled hot dog into each chive butter-brushed roll. The hot dog should nestle into the pressed-down space. The scored side should face up so the valleys are accessible.
Spoon homemade chili over each hot dog. Use about 2 to 3 tablespoons per slider. Focus the chili on the hot dog itself. Don’t let too much spill onto the bare bread. The chili should settle into the scored valleys and coat the hot dog.
Sprinkle shredded cheese generously over the chili. Use about 2 tablespoons of shredded cheese per slider. The cheese should cover the chili completely. Some will spill onto the rolls. That’s fine.
If using diced raw onion as garnish, sprinkle a small amount over the cheese. Don’t overdo it. A light sprinkle adds flavor and texture without overpowering. Too much raw onion can be harsh.
Step 6: Melt the Cheese on the Grill
Set up your grill for indirect heat. If using a gas grill, turn burners on one side to medium and leave the other side off. If using charcoal, push coals to one side.
Place the assembled sliders on a baking sheet or directly on the grates over the cool zone. If the rolls are still connected, you can move them all as one sheet. If separated, space them slightly apart.
Close the grill lid. The ambient heat will warm the sliders and melt the cheese. This takes 5 to 7 minutes. Don’t place them over direct heat. Direct heat will burn the bottoms before the cheese melts.
Check after 5 minutes. The cheese should be fully melted and starting to bubble slightly. The rolls should be warm throughout. If the cheese needs more time, close the lid for another 2 minutes.
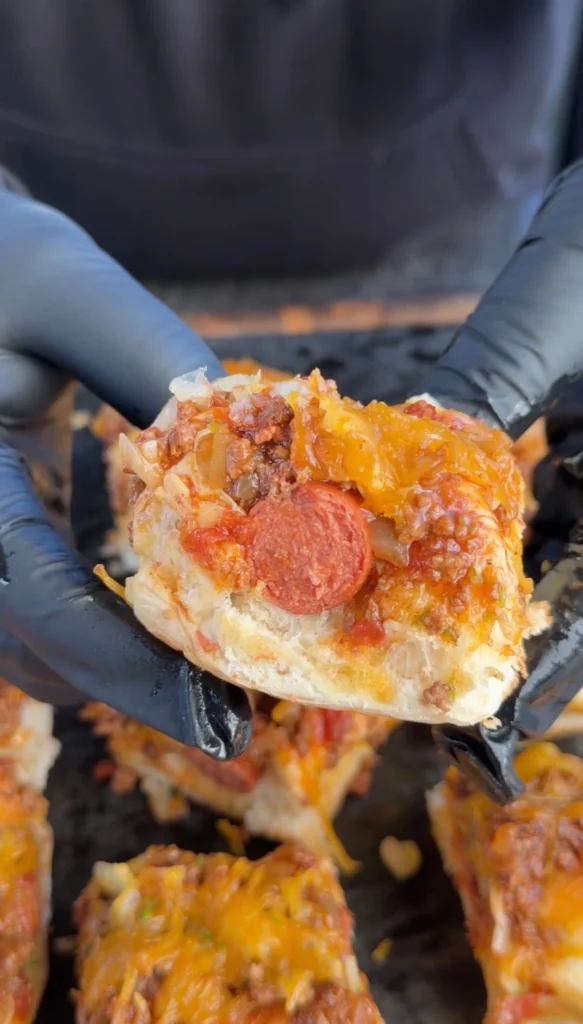
Remove from the grill when the cheese is completely melted. The sliders are ready to serve immediately.
Step 7: Serve Hot
Transfer the sliders to a serving platter if they’re on a baking sheet. If they’re still connected as a sheet, you can serve them that way. Guests can pull off individual sliders.
Serve immediately while the cheese is melted and gooey. The chive butter keeps the rolls from getting soggy for about 15 to 20 minutes. After that, the chili can start soaking through.
Provide napkins. These sliders are messy. The chili and melted cheese create a delicious mess. Embrace it.
Store any leftovers in an airtight container in the refrigerator. The rolls will get soggy from the chili during storage. These are best eaten fresh.

Chili Cheese Dog Sliders with Chive Butter Rolls
Ingredients
Equipment
Method
- Heat a skillet over medium heat. Brown ground beef, breaking it up as it cooks. Add diced onion and cook 2 to 3 minutes until softened. Add minced garlic and cook 30 seconds until fragrant.
- Add diced tomatoes, chili seasoning packet, and water. Stir to combine. Reduce heat to low and simmer uncovered 15 to 20 minutes until thick. Stir occasionally. Remove from heat.
- Melt butter in a small saucepan over low heat. Stir in chopped chives. Remove from heat and set aside.
- Lightly slice the tops of King’s Hawaiian rolls without cutting all the way through. Press down inside each roll to create space. Brush insides and tops generously with chive butter.
- Score hot dogs crosswise on both sides with shallow cuts about ¼ inch apart. Grill over medium heat, turning occasionally, for 8 to 12 minutes until heated through and cuts open up.
- Place one hot dog in each buttered roll. Top with 2 to 3 tablespoons chili, then shredded cheese, then optional diced onion.
- Place assembled sliders on grill over indirect heat. Close lid and cook 5 to 7 minutes until cheese is fully melted. Serve immediately.
Nutrition
Notes
Tried this recipe?
Let us know how it was!Frequently Asked Questions
Can You Make These Sliders Ahead of Time?
You can prep the components ahead. Make the chili up to 2 days in advance. Store it in an airtight container in the refrigerator. Reheat gently on the stovetop before using. Add a splash of water if it’s too thick after refrigeration.
The chive butter also makes ahead well. Prepare it up to 3 days in advance. Store covered in the refrigerator. Melt it again before brushing on the rolls. Cold butter is too firm to brush smoothly.
Don’t assemble the sliders more than 30 minutes before serving. Once you add wet chili to the rolls, the clock starts ticking. Even with chive butter protection, the rolls will eventually get soggy. Assemble right before the final melting phase on the grill.
If you’re hosting a party, set up an assembly station. Keep the components separate. Grill the hot dogs and warm the chili right before guests arrive. Let people assemble their own sliders. Or assemble them all at once and immediately melt the cheese. Serve within 15 minutes for best quality.
What If You Don’t Have a Grill?
You can make these sliders entirely indoors. Cook the hot dogs in a skillet on the stovetop. Heat the skillet over medium heat. Add the scored hot dogs and cook for 8 to 10 minutes, turning frequently. They should heat through and the scores should open.
For melting the cheese, use your oven. Preheat to 375°F. Place the assembled sliders on a baking sheet. Bake for 5 to 7 minutes until the cheese melts completely. The rolls will brown slightly on the bottoms.
A toaster oven also works. Place assembled sliders on the tray. Use the bake setting at 375°F. Check after 5 minutes. The cheese should be melted and bubbly.
The indoor methods work fine. You miss the subtle smoky flavor from the grill. But the chili and cheese provide plenty of flavor. Most people won’t notice the difference.
Can You Use Regular Hot Dog Buns Instead of Slider Rolls?
Regular hot dog buns work but they change the eating experience significantly. Standard buns are much larger. You’ll need one hot dog per bun instead of splitting hot dogs across multiple sliders. The bun-to-filling ratio changes. You get more bread relative to hot dog and chili.
Regular buns also don’t have the sweetness of King’s Hawaiian rolls. The flavor balance shifts. The chili and cheese taste more dominant. The bread becomes just a holder rather than a flavor contributor.
If using regular buns, adjust your quantities. For 8 buns, you’ll need 8 full-size hot dogs. Make 1½ to 2 times the chili recipe. You’ll need more to fill the larger buns adequately.
The chive butter technique still works. Brush it on the interior surfaces of the buns. This prevents sogginess regardless of bun size.
How Spicy Is the Chili with McCormick Seasoning?
McCormick chili seasoning is mild to medium heat. Most people find it pleasantly spicy without being overwhelming. The heat comes primarily from chili powder and a small amount of cayenne. It’s not aggressive.
Kids can usually handle it. The sweetness from the King’s Hawaiian rolls helps balance any heat. The cheese also tempers spice. If you’re serving young children or heat-sensitive people, you can reduce the seasoning packet to half. Add the remaining half to taste.
For spicier chili, add extra cayenne pepper or red pepper flakes. Start with ¼ teaspoon. Taste and add more if needed. You can also use jalapeños. Add one diced jalapeño with the onions. This creates fresh pepper heat instead of dried spice heat.
For completely mild chili, make it from scratch without a seasoning packet. Use just salt, pepper, and a small amount of cumin. This creates savory chili without heat. The flavor is blander but safe for anyone who can’t tolerate spice.
How Do You Store and Reheat Leftover Sliders?
Store leftover sliders in an airtight container in the refrigerator. They’ll keep for 2 to 3 days. But understand that the quality degrades significantly. The rolls absorb chili and become very soggy. The cheese hardens.
For reheating, the oven works better than the microwave. Preheat to 350°F. Place sliders on a baking sheet. Heat uncovered for 10 to 12 minutes until warmed through. The rolls will crisp slightly on the outside. But the interior will still be soft and chili-soaked.
Microwaving makes the bread rubbery. The hot dog can also get tough. If you must microwave, use 50% power. Heat in 30-second intervals. This reduces the rubbery texture somewhat.
For best quality with leftovers, store the components separately. Keep chili in one container. Store the hot dogs separately. Keep the rolls in a bread bag. When ready to eat, reheat the chili and hot dogs. Assemble fresh sliders with the leftover chili on fresh or lightly toasted rolls. This produces much better results than reheating assembled sliders.
Ready to Level Up?
Take your backyard cooking from good to legendary.
This is where I keep all my most-used smokers, knives, and favorite cooking tools.
Shop My Gear CollectionExplore More Recipes
Find more diverse flavors at CWFeats.com
