Crispy Fried Pork Chop Sandwiches
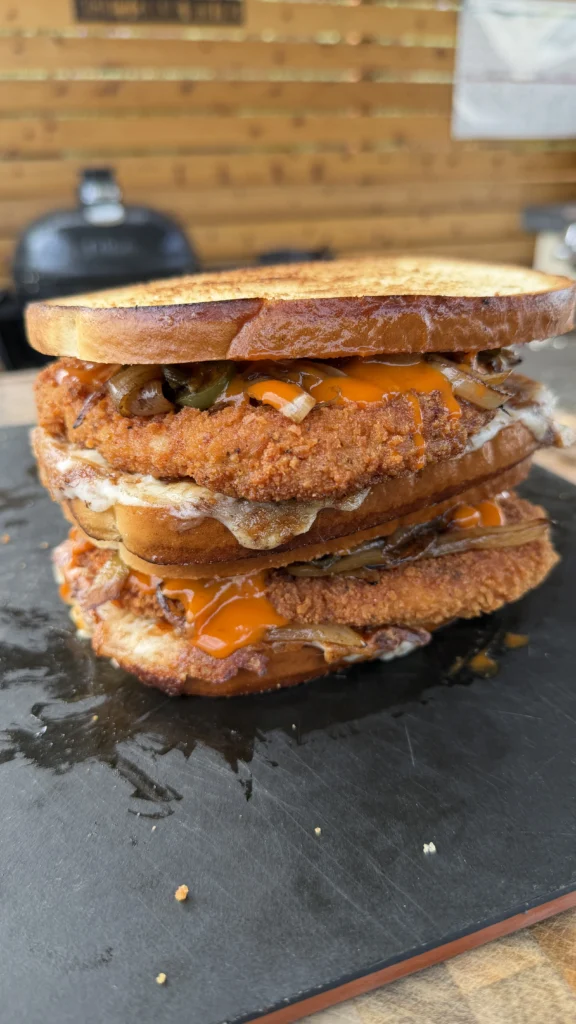
Crispy fried pork chop sandwiches are golden, crunchy, indulgent sandwiches where you pound boneless pork chops thin, bread them in seasoned panko, shallow fry them until they’re crispy and golden, then stack them on crispy mozzarella cheese bread with sautéed jalapeños, onions, and hot sauce. The pork chops are pounded to about ¼ inch thick before breading, which gives you maximum surface area for that panko crust and helps them cook evenly so the meat stays juicy. The crispy cheese bread is made by melting shredded mozzarella directly on the griddle until it gets golden and crispy, then pressing sourdough bread on top so it sticks. The result is a sandwich with layers of crunch, gooey cheese, spicy jalapeños, and juicy pork. These breaded pork chop sandwiches are perfect for lunch, dinner, or any time you want comfort food that hits hard.
The whole process takes about 35-40 minutes from start to finish. You pound the chops thin, bread them in a three-step flour-egg-panko setup, shallow fry them for 3-4 minutes per side until they hit 145°F internal, then sauté jalapeños and onions in the drippings, make crispy cheese bread on the griddle, and stack everything together. These panko pork chop sandwiches are messy, over-the-top, and absolutely worth every bite.
Crispy Pork Chop Sandwiches
Panko-breaded, jalapeños, onions, crispy cheese bread — pure indulgence
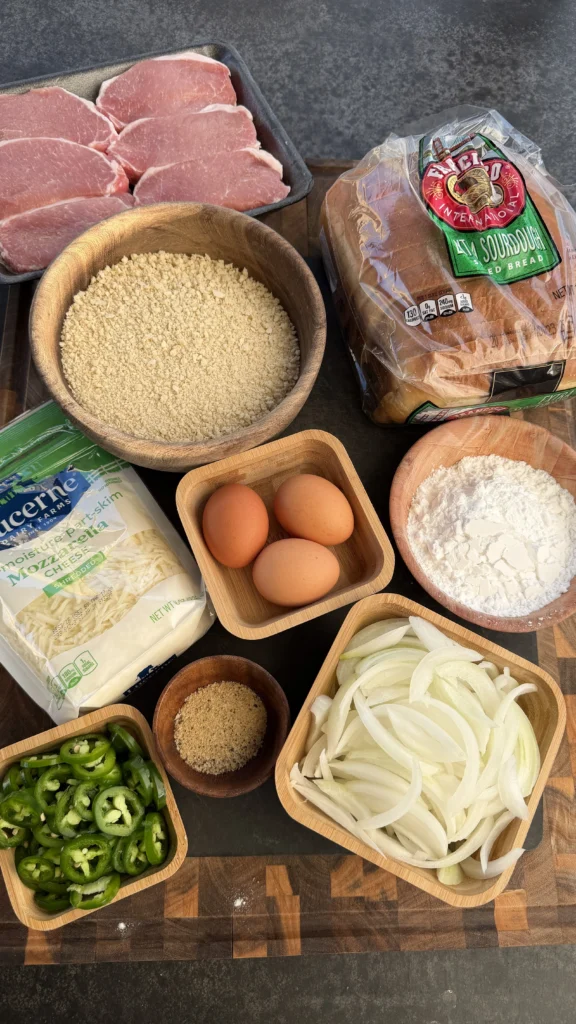
Ingredients
For the Pork Chops
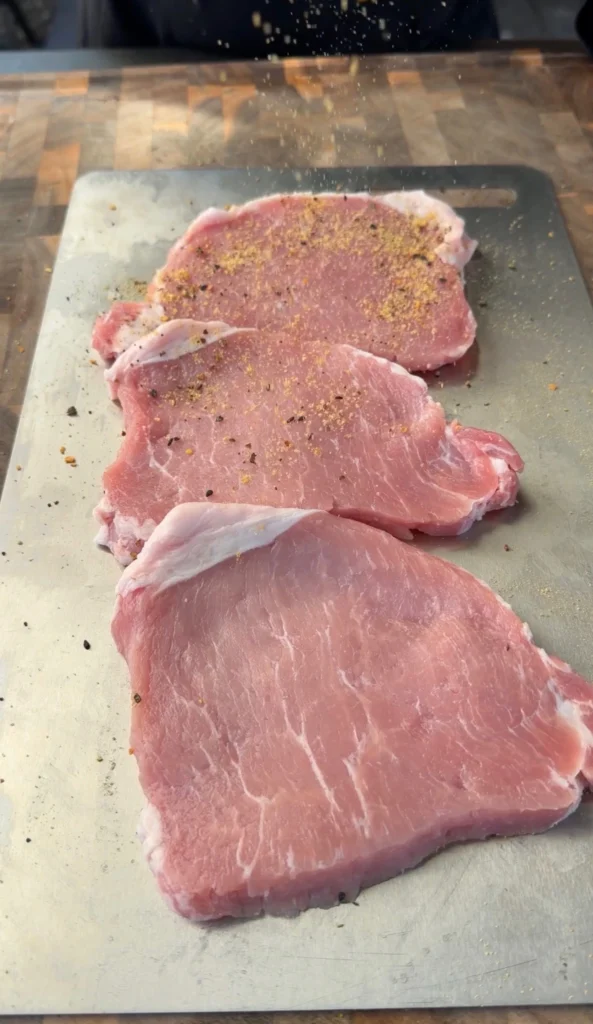
- 4 boneless pork chops (about ½ inch thick)
- Salt & black pepper to taste
- 1 cup all-purpose flour
- 3 large eggs, beaten
- 2½ cups panko breadcrumbs
- 1 tsp garlic powder
- 1 tsp paprika
- ½ tsp black pepper
- ½ tsp salt
- Oil for shallow frying (about ½ inch deep)
For the Sandwich Build
- 8 slices sourdough bread
- 2 cups shredded mozzarella cheese
- 2 fresh jalapeños, sliced
- 1 medium onion, sliced
- Your favorite hot sauce
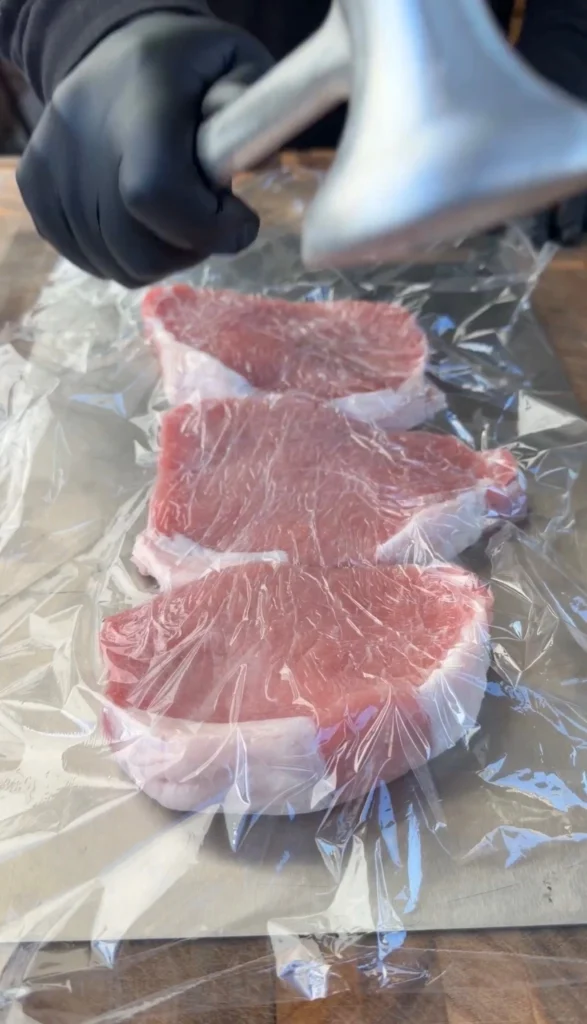
Pounding the pork chops thin is THE most important step—don’t skip it. You want them about ¼ inch thick. This gives you way more surface area for crispy breading, helps them cook evenly without drying out, and makes them fit better on the sandwich. Thin chops = maximum crunch and juicy meat.
Why Pounding the Pork Chops Thin Is Critical
Most boneless pork chops you buy at the grocery store are about ½ inch thick. That’s too thick for this sandwich. When you bread and fry a thick pork chop, the outside gets done way before the inside, which means you either end up with burnt breading and raw pork, or you have to cook it longer and the meat dries out.
When you pound the pork chops down to about ¼ inch thick, you increase the surface area dramatically. More surface area means more crispy breading. The thin chop also cooks faster and more evenly—by the time the breading is golden and crispy, the inside is cooked through to 145°F without drying out.
Pounding also tenderizes the meat slightly by breaking down some of the muscle fibers. And it makes the pork chop fit better on the bread. A thick pork chop sticks out past the edges of the sandwich and is awkward to eat. A thin, pounded chop matches the bread size perfectly.
Use a meat mallet or the bottom of a heavy skillet. Place the pork chop between two pieces of plastic wrap or in a zip-top bag so it doesn’t splatter. Pound from the center outward until the chop is about ¼ inch thick all over.
Why Panko Breadcrumbs Give You the Best Crunch
Panko breadcrumbs are Japanese-style breadcrumbs made from crustless white bread. They’re larger, flakier, and lighter than regular breadcrumbs. When you fry panko, it creates an incredibly crispy, crunchy coating that stays crispy even after the sandwich sits for a few minutes.
Regular breadcrumbs are fine, but they’re smaller and denser. They don’t create the same level of crunch. Panko has more surface area and air pockets, so it crisps up better and absorbs less oil.
Seasoning the panko with garlic powder, paprika, salt, and pepper adds flavor to the breading. You’re not just getting crunch—you’re getting seasoned crunch. The paprika also adds color and makes the fried pork chops look more golden and appetizing.
How to Make Crispy Cheese Bread on the Griddle
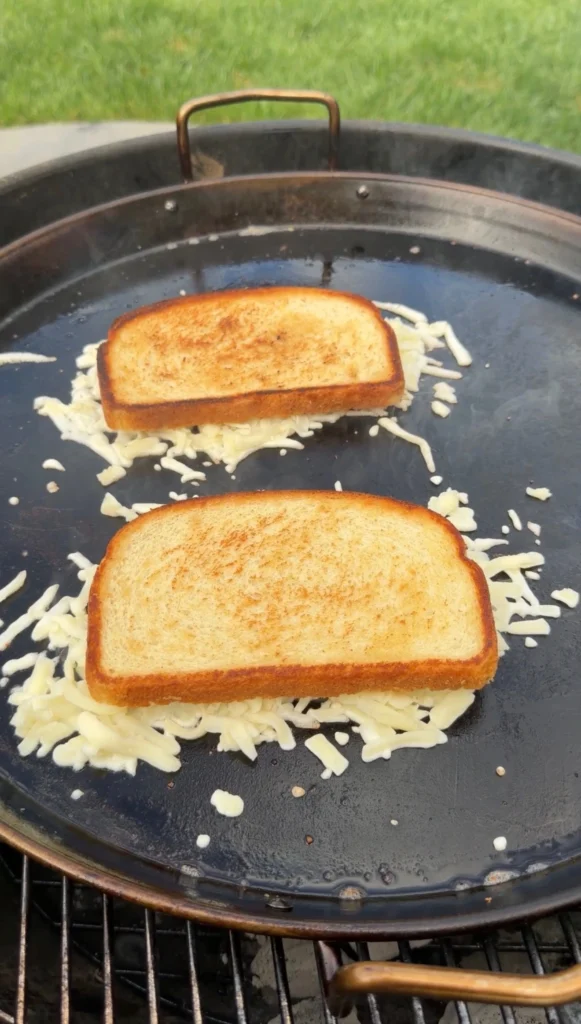
The crispy cheese bread technique is simple but game-changing. Instead of just putting cheese inside the sandwich, you’re creating a crispy cheese crust directly on the outside of the bread.
Here’s how it works: You sprinkle about ¼ cup of shredded mozzarella in a circle on the hot griddle. The cheese melts and starts to bubble. As it continues cooking, the edges get golden and crispy like a cheese crisp. Once the cheese is bubbling and starting to turn golden, you press a slice of sourdough bread directly on top. The bread sticks to the melted cheese, and when you lift it off the griddle, you have a slice of bread with a crispy cheese crust attached to one side.
This adds another layer of texture and flavor to the sandwich. You get the soft bread, the crispy fried pork chop, and the crispy cheese crust all in one bite. It’s similar to the technique used in birria tacos, where you dip tortillas in fat and crisp them with cheese on a griddle.
Step-by-Step Instructions
Step 1: Pound the Pork Chops Thin
Take your 4 boneless pork chops and place them on a cutting board. If they’re about ½ inch thick, you need to pound them thinner.
Place one pork chop between two pieces of plastic wrap or inside a large zip-top bag. This prevents the meat from splattering everywhere.
Use a meat mallet or the bottom of a heavy skillet to pound the pork chop. Start from the center and work your way outward, pounding evenly so the entire chop ends up about ¼ inch thick. Don’t pound too hard or you’ll tear the meat. Steady, firm pressure is all you need.
Repeat with the remaining 3 pork chops. They should all be about ¼ inch thick and roughly the same size for even cooking.
Once pounded, season both sides of each pork chop with salt and black pepper. Set them aside while you set up the breading station.
Step 2: Set Up the Breading Station
Get three shallow bowls or plates and set them up in a row.
First Bowl: Add 1 cup of all-purpose flour.
Second Bowl: Beat 3 large eggs until they’re well mixed and slightly frothy.
Third Bowl : Combine 2½ cups of panko breadcrumbs with 1 teaspoon of garlic powder, 1 teaspoon of paprika, ½ teaspoon of black pepper, and ½ teaspoon of salt. Mix the seasonings into the panko so they’re evenly distributed.
Have a clean plate or wire rack ready to hold the breaded pork chops before frying.
Step 3: Bread the Pork Chops
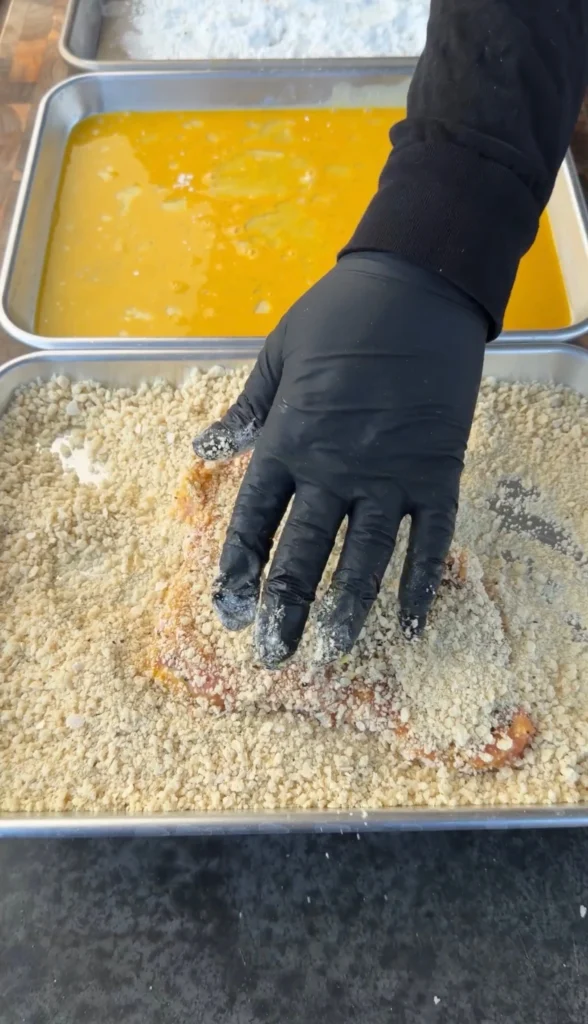
Take one pounded pork chop and coat it completely in the flour. Shake off any excess.
Dip the floured pork chop into the beaten eggs, making sure both sides are coated. Let any excess egg drip off.
Press the pork chop into the seasoned panko breadcrumbs. Press firmly so the panko sticks to both sides. You want a thick, even coating. Flip the chop and press the other side into the panko.
Place the breaded pork chop on the clean plate or wire rack. Repeat the process with the remaining 3 pork chops.
Let the breaded pork chops sit for about 5 minutes before frying. This helps the breading set and stick better during frying.
Step 4: Fry the Pork Chops

Heat a large griddle or cast iron skillet over medium-high heat. Add enough oil to create about ½ inch depth in the pan. You’re shallow frying, not deep frying.
Let the oil heat up until it reaches about 350°F. If you don’t have a thermometer, test it by dropping a pinch of panko into the oil—it should sizzle immediately.
Carefully place the breaded pork chops into the hot oil. Don’t crowd them. If your pan isn’t big enough for all 4 at once, fry them in batches.
Fry for 3-4 minutes on the first side without moving them. You want the breading to turn deep golden brown and crispy. Don’t flip too early or the breading will fall off.
After 3-4 minutes, carefully flip the pork chops with a spatula or tongs. Fry for another 3-4 minutes on the second side until golden brown and crispy.
Use a meat thermometer to check the internal temperature. The pork chops should hit 145°F in the thickest part. Because they’re pounded thin, they cook fast—usually 6-8 minutes total.
Once done, remove the pork chops from the oil and place them on a wire rack or paper towel-lined plate to drain. Let them rest for a few minutes while you prepare the jalapeños and onions.
Step 5: Sauté the Jalapeños and Onions
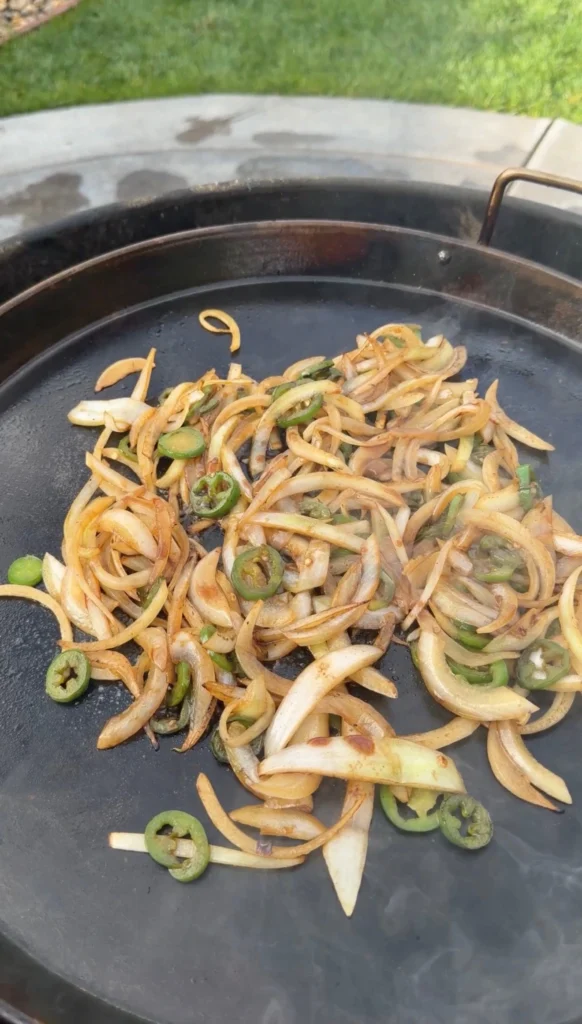
If there’s too much oil left on the griddle after frying the pork chops, carefully pour some off. Leave just a light layer of oil plus any crispy bits and drippings from the pork.
Add the sliced jalapeños and sliced onion to the hot griddle. The jalapeños should still have their seeds if you want more heat. Remove the seeds if you want them milder.
Sauté for 3-4 minutes, stirring occasionally, until the onions are softened and slightly charred on the edges. The jalapeños should be tender but still have a little bite.
The drippings from the fried pork chops will flavor the jalapeños and onions. This is part of what makes them so good.
Once done, push the jalapeños and onions to the side or transfer them to a bowl to keep warm.
Step 6: Make the Crispy Cheese Bread
Wipe the griddle clean or use a clean section if there’s room. You want a clean, hot surface for the cheese.
Turn the heat to medium. Sprinkle about ¼ cup of shredded mozzarella cheese in a circle roughly the size of your bread slice. The cheese should be in a fairly even layer, not just a pile in the center.
Let the cheese melt and bubble. After about 1-2 minutes, the cheese will start turning golden brown on the edges and underneath. You want it to crisp up like a cheese crisp, but not burn.
Once the cheese is bubbling and the bottom is golden, press a slice of sourdough bread directly on top of the melted cheese. Press down firmly so the bread sticks to the cheese.
Let it sit for about 30 seconds so the cheese adheres to the bread, then use a spatula to lift the bread off the griddle. The crispy cheese should be stuck to the bottom of the bread.
Repeat this process with the remaining 7 slices of sourdough so you have 8 slices total with crispy cheese on one side.
Step 7: Assemble the Sandwiches
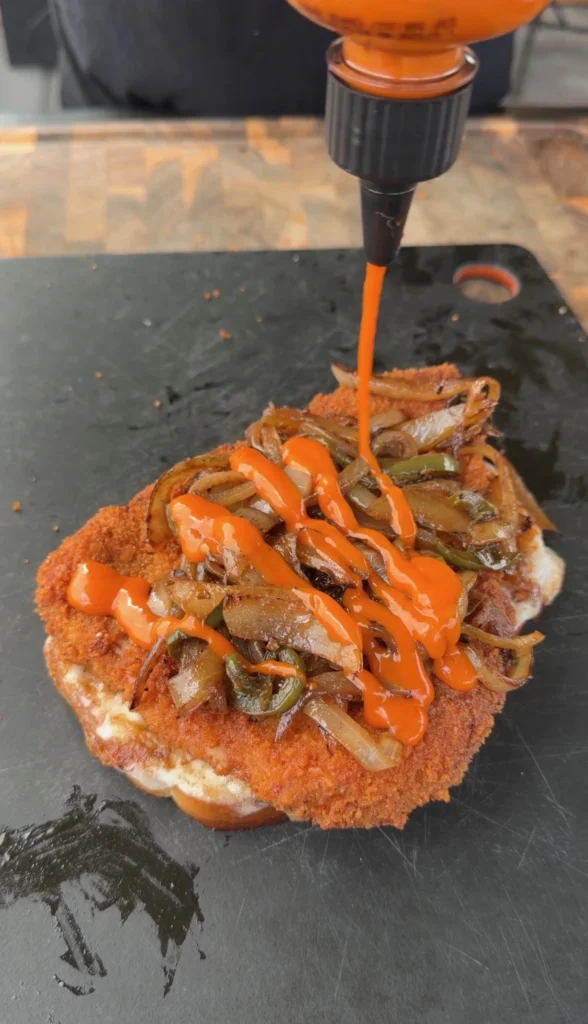
Now it’s time to build. Start with one slice of crispy cheese bread, cheese side facing up.
Place one fried pork chop on top of the crispy cheese.
Spoon a generous amount of the sautéed jalapeños and onions over the pork chop. Don’t be shy—pile them on.
Drizzle your favorite hot sauce over the jalapeños and onions. Use as much or as little as you want depending on your heat tolerance.
Top with another slice of crispy cheese bread, cheese side facing down so it’s touching the toppings.
Repeat with the remaining pork chops and bread to make 4 sandwiches total.
Step 8: Serve Immediately
These sandwiches are best eaten right away while the pork chops are still hot and crispy and the cheese bread is still crunchy.
Cut each sandwich in half diagonally if you want. This makes them easier to handle and shows off all the layers inside.
Serve with extra hot sauce on the side for dipping or drizzling.
Frequently Asked Questions
Can I use bone-in pork chops instead of boneless?
Boneless works better for this recipe because they’re easier to pound thin and easier to eat in a sandwich. Bone-in chops are harder to pound evenly and the bone makes the sandwich awkward. Stick with boneless.
What if I don’t have a meat mallet?
Use the bottom of a heavy skillet or a rolling pin. Anything flat and heavy works. Just put the pork chop between plastic wrap or in a zip-top bag first so it doesn’t splatter.
Can I bake these instead of frying?
You can bake them at 400°F for about 15-20 minutes, flipping halfway. The breading won’t be quite as crispy as frying, but it still works. Spray the breaded chops with cooking spray before baking for better browning.
What cheese works best for the crispy cheese bread?
Mozzarella is best because it melts smooth and crisps up nicely. Cheddar works too but doesn’t crisp as well. Avoid soft cheeses like brie—they don’t crisp.
Can I make the pork chops ahead of time?
You can bread them ahead and keep them in the fridge for a few hours before frying. But once fried, they’re best eaten immediately. Fried pork chops don’t reheat well—the breading gets soggy.
Ready to Take Your Cooking to the Next Level?
This is where I keep all my most-used products, gear, and favorite cooking tools — check it out:
🔥 View My Cooking Gear & ToolsRecipe Categories
If you loved this recipe, you’ll find more to savor across our diverse categories. From beef to pork, chicken to turkey, seafood to appetizers, there’s a wealth of flavors waiting for you. Explore them all at CWFeats.
