Crying tiger tri-tip sub fuses traditional Thai street food flavors with American BBQ techniques to create a sandwich that’s simultaneously familiar and exotic. This recipe starts with two tri-tips marinated in a savory-sweet Thai-inspired blend of soy sauce, fish sauce, oyster sauce, and aromatics that penetrate the meat with umami depth. The tri-tips get seared over high heat to develop a crusty, caramelized exterior, then finished over indirect heat to a perfect medium-rare. Thinly sliced against the grain, the tender beef gets piled onto soft French bread spread with creamy mayo and topped with traditional crying tiger sauce – a bold, complex Thai condiment made from fish sauce, lime juice, tamarind, sugar, chili flakes, and toasted rice powder.
What makes this Thai beef sandwich special is how the crying tiger sauce transforms familiar grilled tri-tip into something completely new and exciting. The sauce’s name comes from the Thai belief that its intense spicy-sour-salty flavor is so powerful it could make a tiger cry. The combination of fish sauce umami, lime acidity, tamarind tang, palm sugar sweetness, and fiery Thai chili creates a sauce that hits every taste receptor simultaneously. The toasted rice powder adds nutty crunch and authentic texture that ties everything to traditional Thai grilled beef dishes like nam tok. Grated Parmesan might seem like an odd addition, but its salty, nutty character complements the Thai flavors surprisingly well while adding richness that balances the sauce’s intensity.
Crying Tiger Tri-Tip Sub
Two tri-tips marinated in soy sauce, fish sauce, oyster sauce, and Thai aromatics, seared over high heat then finished to medium-rare, sliced thin and piled on French bread with mayo, traditional crying tiger sauce made from fish sauce, lime, tamarind, and toasted rice powder, topped with Parmesan
Ingredients
For the Tri-Tip Marinade (for 2 tri-tips):
- 2 tri-tips (about 2-2.5 lbs each)
- 3 tbsp soy sauce
- 2 tbsp fish sauce
- 2 tbsp oyster sauce
- 1 tbsp brown sugar
- 1 tbsp lime juice
- 1 tbsp neutral oil (canola or avocado)
- 1 tbsp minced garlic
- 1 tsp black pepper
For the Crying Tiger Sauce:
- 2 tbsp fish sauce
- 2 tbsp lime juice
- 1 tbsp tamarind paste (or 1 tsp tamarind concentrate)
- 1 tbsp palm sugar or brown sugar
- 1-2 tsp Thai chili flakes (to taste)
- 2 tbsp toasted rice powder (optional but traditional)
- 1 tbsp finely chopped shallot
- 1 tbsp chopped cilantro
For the Sandwich:
- 1 large soft French loaf
- Mayonnaise
- Freshly grated Parmesan cheese
Understanding Crying Tiger and Its Origins
Crying tiger (seua rong hai in Thai) is a traditional Northeastern Thai grilled beef dish where thin slices of marinated beef are grilled over charcoal and served with a spicy, tangy dipping sauce. The name’s origin is debated – some say the sauce is so spicy it would make even a fierce tiger cry, while others claim it refers to the sizzling sound the meat makes on the grill that resembles a tiger’s roar. Regardless of the etymology, crying tiger has become one of Thailand’s most beloved street foods, sold at roadside stalls and night markets throughout the country.
Traditional crying tiger uses relatively tough cuts of beef like flank or skirt steak that benefit from the tenderizing marinade and quick, high-heat grilling. The meat is typically sliced very thin and grilled briefly, then served immediately with the spicy sauce and sticky rice. This adaptation using tri-tip maintains the spirit of the dish while using a more substantial cut that’s familiar to American grilling traditions. Tri-tip’s moderate tenderness and robust beef flavor make it perfect for this application – it’s tender enough to stay juicy when cooked to medium-rare but has enough structure to stand up to the bold Thai flavors.
Building an Authentic Thai Marinade
The tri-tip marinade combines three essential Thai sauce ingredients that each contribute distinct character. Soy sauce provides salty depth and dark color while helping develop better crust during searing. Fish sauce – fermented anchovies – adds powerful umami with a funky, savory complexity that’s essential to authentic Thai flavor. Many Western cooks are intimidated by fish sauce’s pungent smell straight from the bottle, but when cooked, it mellows into deep savory richness without any fishiness. Oyster sauce contributes sweet-savory thickness with subtle brininess that rounds out the marinade’s flavor profile.
Brown sugar balances the marinade’s saltiness while promoting better caramelization during searing through the Maillard reaction between sugars and proteins. Lime juice provides acidity that both brightens the flavors and helps tenderize the meat’s surface proteins, though the thirty-minute to overnight marination period isn’t long enough to significantly affect texture throughout. Fresh garlic adds pungent aromatics that permeate the meat, while black pepper provides gentle heat and earthiness. The neutral oil helps the marinade coat the meat evenly while preventing surface drying during grilling. Together, these ingredients create a marinade that’s savory, slightly sweet, and deeply aromatic – unmistakably Thai in character.
The Science of Toasted Rice Powder
Toasted rice powder (khao khua) is a crucial ingredient in authentic crying tiger sauce that provides nutty flavor and subtle crunch while helping thicken the sauce. To make it, uncooked sticky rice is toasted in a dry pan until golden brown and fragrant, then ground into coarse powder using a mortar and pestle or spice grinder. The toasting process transforms the rice’s starch through partial caramelization, creating hundreds of new flavor compounds that taste nutty, toasted, and slightly sweet. The ground rice particles absorb some of the sauce’s liquid, creating body and texture rather than a thin, watery consistency.
While optional in this recipe, toasted rice powder adds authentic character that’s difficult to replicate with substitutes. If unavailable, the sauce will still be delicious but will lack that distinctive nutty crunch that marks traditional Thai dishes. Making toasted rice powder at home is simple and the result keeps for months in an airtight container, making it worthwhile for anyone who enjoys Thai cooking. The powder is also used in larb (Thai minced meat salad) and other Isaan dishes, so it’s a versatile ingredient to have on hand. Some Asian markets sell pre-made toasted rice powder, though freshly made always has better flavor and aroma.
Balancing Sweet, Sour, Salty, and Spicy
Crying tiger sauce exemplifies the Thai culinary principle of balancing four fundamental flavors – sweet, sour, salty, and spicy – in every dish. Fish sauce provides the salty element with its concentrated fermented anchovy character. Fresh lime juice delivers bright, acidic sourness that cuts through richness and awakens the palate. Palm sugar or brown sugar contributes sweetness that tempers the sauce’s aggressive salty and sour notes. Thai chili flakes provide heat that builds gradually rather than hitting immediately like fresh chilies would.
Tamarind paste adds another layer of sourness with more complex character than lime alone – tamarind has fruity, almost date-like undertones with subtle sweetness alongside its pronounced acidity. The combination of lime and tamarind creates more interesting, multi-dimensional sourness than either ingredient could alone. The proportions in this recipe create balanced sauce, but Thai cooking encourages tasting and adjusting to personal preference. If the sauce tastes too salty, add more lime juice and sugar. If too sour, add more sugar. If too sweet, add fish sauce or lime. The goal is harmony where no single flavor dominates but all work together to create complex, crave-worthy taste.
Two-Zone Grilling for Perfect Doneness
The two-stage cooking method – initial high-heat sear followed by indirect heat finishing – is essential for achieving perfect tri-tip with crusty exterior and juicy, evenly cooked interior. Searing over direct high heat (450-500°F) for just a few minutes per side develops deep brown crust through Maillard reaction and caramelization of the marinade’s sugars. This crust provides both flavor and textural contrast to the tender interior. However, if you tried to cook the entire tri-tip over direct heat, the exterior would char and burn before the interior reached proper doneness.
Moving the seared tri-tips to indirect heat (250-275°F) allows gentle cooking to the target internal temperature without further darkening the exterior. The ambient heat circulating around the meat cooks it evenly from all sides, reducing the temperature gradient between exterior and interior. This results in more of the tri-tip being at your target doneness rather than having a thin perfect layer surrounded by over and undercooked sections. The indirect cooking takes twenty to thirty minutes depending on tri-tip thickness and your grill’s efficiency, so use an instant-read thermometer rather than relying on timing alone.
Ingredients
For the Tri-Tip Marinade (for 2 tri-tips):
- 2 tri-tips (about 2-2.5 lbs each)
- 3 tbsp soy sauce
- 2 tbsp fish sauce
- 2 tbsp oyster sauce
- 1 tbsp brown sugar
- 1 tbsp lime juice
- 1 tbsp neutral oil (canola or avocado)
- 1 tbsp minced garlic
- 1 tsp black pepper
For the Crying Tiger Sauce:
- 2 tbsp fish sauce
- 2 tbsp lime juice
- 1 tbsp tamarind paste (or 1 tsp tamarind concentrate)
- 1 tbsp palm sugar or brown sugar
- 1-2 tsp Thai chili flakes (to taste)
- 2 tbsp toasted rice powder (optional but traditional)
- 1 tbsp finely chopped shallot
- 1 tbsp chopped cilantro
For the Sandwich:
- 1 large soft French loaf
- Mayonnaise
- Freshly grated Parmesan cheese
Step-by-Step Instructions
Marinate the Tri-Tip
In a medium mixing bowl, combine three tablespoons of soy sauce, two tablespoons of fish sauce, and two tablespoons of oyster sauce. Add one tablespoon of brown sugar and stir until the sugar dissolves completely into the liquid. The sugar will take a minute or two of stirring to fully incorporate. Add one tablespoon of fresh lime juice, one tablespoon of neutral oil (canola or avocado), one tablespoon of minced fresh garlic, and one teaspoon of coarsely ground black pepper. Whisk everything together until well combined into a uniform marinade.
Place both tri-tips in a large resealable plastic bag or shallow dish large enough to hold them in a relatively single layer. Pour the marinade over the tri-tips, using your hands to massage it into all surfaces of the meat. If using a bag, squeeze out excess air and seal it tightly. If using a dish, turn the tri-tips several times to ensure even coating, then cover tightly with plastic wrap. Refrigerate for at minimum thirty minutes, but overnight is preferred for deeper flavor penetration. The longer marination allows the soy sauce, fish sauce, and garlic to work their way into the meat. Turn the tri-tips once or twice during marination to ensure even exposure to the marinade.
Sear the Marinated Tri-Tip
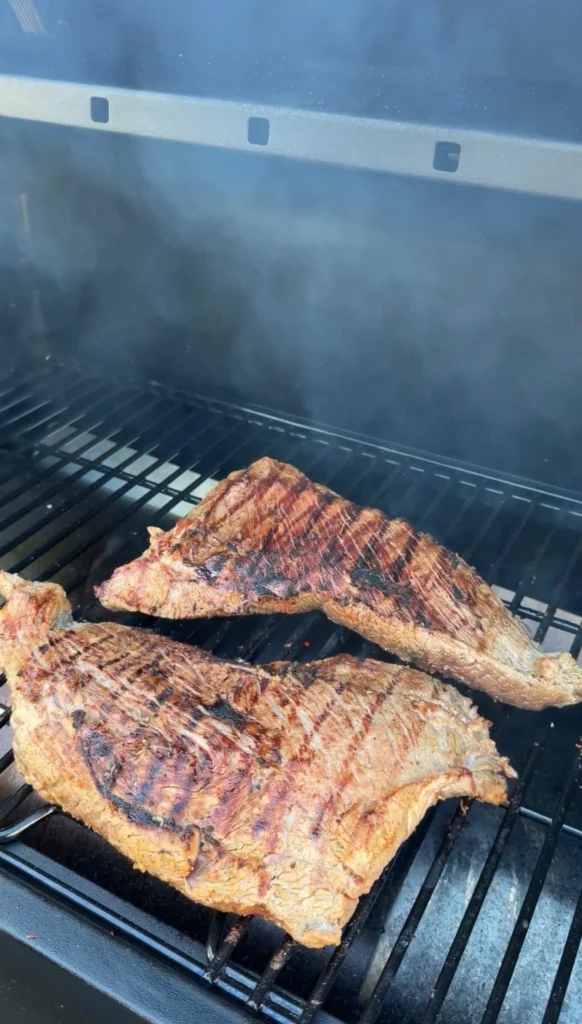
Remove the tri-tips from the refrigerator thirty minutes before cooking to take the chill off – this promotes more even cooking. Preheat your grill to high heat (450-500°F) with all burners on if using gas, or with a full chimney of hot coals spread evenly if using charcoal. You want intense, direct heat for the searing stage. Clean the grill grates thoroughly with a wire brush and oil them well using a paper towel dipped in high-heat oil and held with tongs.
Remove the tri-tips from the marinade, letting excess drip off but don’t wipe them completely dry – you want some marinade clinging to the surface. Place both tri-tips directly over the hottest part of the grill. They should sizzle immediately and aggressively when they hit the grates. Close the lid and sear for three to four minutes without moving them. When you open the lid, the bottoms should show deep brown crust with some charred spots where the marinade caramelized. Use tongs to flip the tri-tips to the next side and sear for another three to four minutes. Continue rotating to sear all surfaces – including the ends – until every side has developed dark, caramelized crust. The total searing time should be twelve to fifteen minutes for all surfaces.
Finish Cooking Over Indirect Heat
Once all surfaces are properly seared, move both tri-tips to the indirect heat side of your grill – the area with no direct flames or coals underneath. If using a gas grill, turn off the burners on one side and place the tri-tips there. If using charcoal, push the coals to one side and place the tri-tips on the cool side. Close the lid and adjust vents or burners to maintain a temperature of 250-275°F inside the grill.
Cook over indirect heat, monitoring the internal temperature with an instant-read thermometer inserted into the thickest part of each tri-tip. For medium-rare, remove at 130-135°F internal temperature. For medium, remove at 140-145°F. The indirect cooking time will vary based on tri-tip thickness and your grill’s ambient temperature, but expect twenty to thirty minutes. Check the temperature every five to seven minutes once you’re past fifteen minutes of indirect cooking. The tri-tips will continue cooking slightly through carryover heat after removal, potentially rising another five degrees. When they reach your target temperature, transfer to a cutting board and tent loosely with aluminum foil. Let rest for ten to fifteen minutes before slicing.
Make the Crying Tiger Sauce
While the tri-tips rest, prepare the crying tiger sauce. In a small bowl, combine two tablespoons of fish sauce with two tablespoons of fresh lime juice. Add one tablespoon of tamarind paste – if using concentrated tamarind, use only one teaspoon as it’s much more potent. Stir vigorously to dissolve the tamarind paste into the liquid. It may not completely dissolve, which is fine – small bits of tamarind add texture.
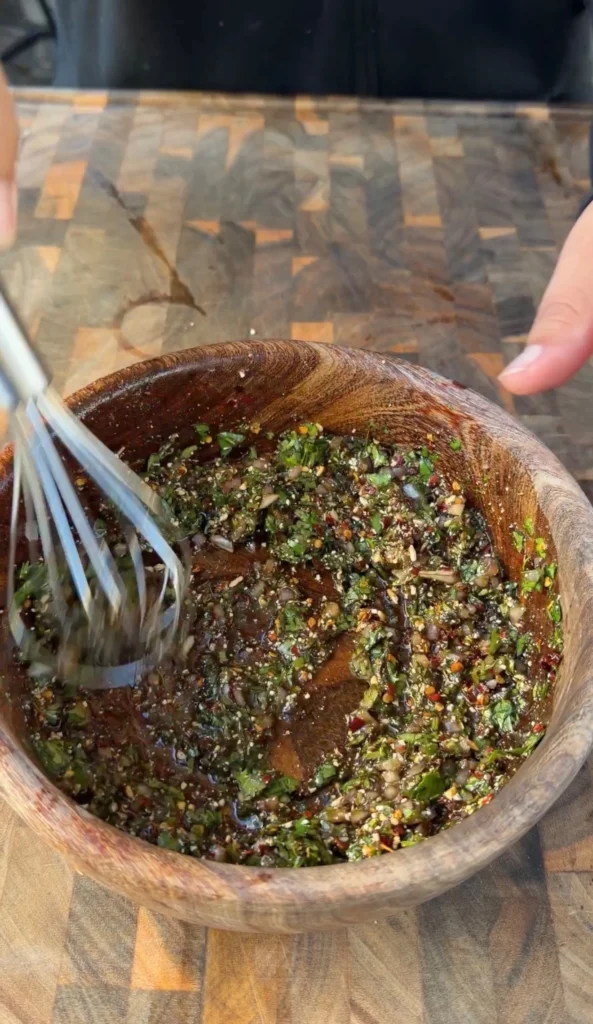
Add one tablespoon of palm sugar or brown sugar and stir until dissolved. The sugar will take longer to dissolve than you expect – keep stirring for two to three minutes. Add one to two teaspoons of Thai chili flakes depending on your heat tolerance – start with one teaspoon, taste, and add more if desired. If using toasted rice powder, add two tablespoons now and stir to incorporate. Add one tablespoon of finely chopped shallot and one tablespoon of chopped fresh cilantro, stirring to combine everything.
Taste the sauce carefully – it should be intensely flavored with balanced sweet, sour, salty, and spicy notes. Adjust as needed: more fish sauce if too sweet, more sugar if too salty or sour, more lime if too sweet or flat. The sauce should taste quite bold and powerful on its own – remember it will be diluted by the mild beef and bread. Let the sauce sit at room temperature while the tri-tips rest, which allows the flavors to meld and the toasted rice powder to soften slightly.
Slice the Tri-Tip
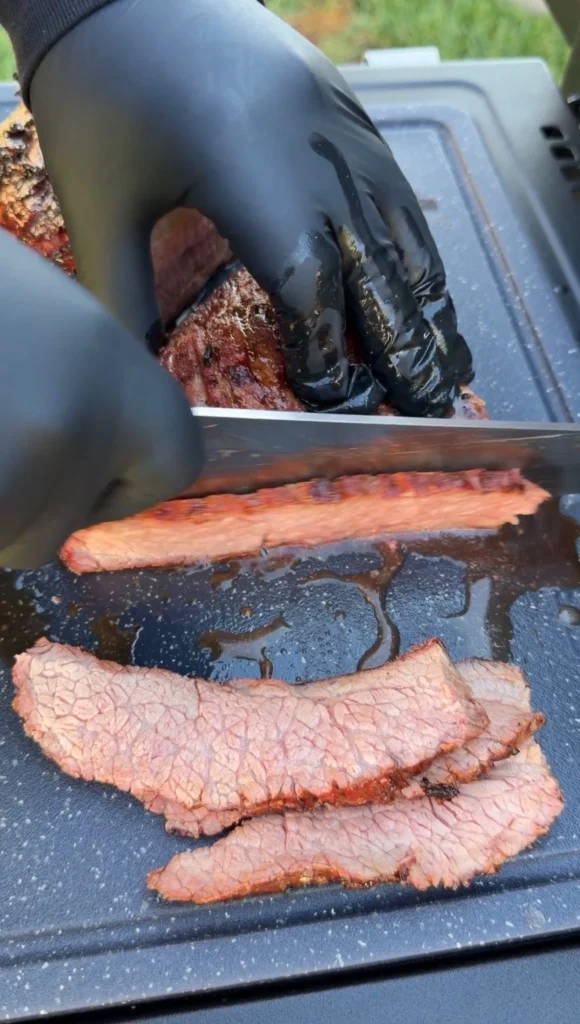
After the ten to fifteen minute rest, unwrap the tri-tips and place them on a clean cutting board. Identify the grain direction – the lines running through the meat that indicate muscle fiber direction. Tri-tip has two different grain directions that meet roughly in the middle, forming a V-shape. Start slicing at one end, cutting perpendicular to the grain in thin slices approximately quarter-inch thick or slightly thinner. Use a sharp slicing knife or chef’s knife and cut in smooth, confident strokes.
When you reach the point where the grain changes direction, rotate your cutting angle to continue slicing perpendicular to the new grain direction. This ensures every slice has shortened muscle fibers that make the meat tender and easy to chew. Slicing with the grain instead of across it would create tough, stringy texture. As you slice, the tri-tip’s beautiful pink interior should be visible with a dark, caramelized crust on the edges. Arrange the sliced tri-tip on a platter and cover loosely to keep warm while you assemble the sandwiches.
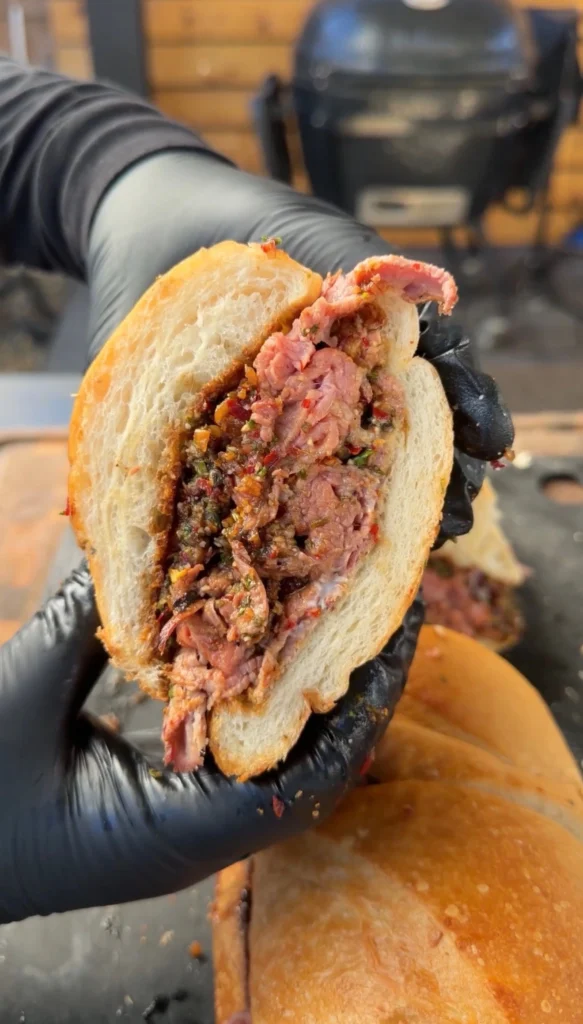
Assemble the Crying Tiger Sub

Slice the large French loaf lengthwise through the middle, creating a top and bottom half. If your loaf is particularly thick with a lot of interior bread, you can remove some of the soft interior (the crumb) to create more room for filling, though this is optional. Spread a generous layer of mayonnaise on both the top and bottom interior surfaces of the bread. The mayo provides creamy richness that balances the sauce’s intensity while creating a slight moisture barrier that prevents the bread from getting soggy.
Pile the sliced tri-tip generously onto the bottom half of the bread, overlapping the slices and using all the meat. Drizzle the crying tiger sauce liberally over the tri-tip – don’t be shy with it. You want enough sauce that every bite contains that bold Thai flavor. The sauce will soak into the meat slightly and drip down into the bread, which is exactly what you want. Sprinkle freshly grated Parmesan cheese generously over the sauced beef. The Parmesan adds salty, nutty richness that complements the Thai flavors surprisingly well.
Place the top half of the bread over the filled bottom, pressing down gently to compress everything slightly. Use a sharp serrated knife to cut the long sub into individual portions – six to eight pieces depending on how large you want each serving. Wipe the knife blade between cuts if sauce or cheese builds up. Serve immediately while the tri-tip is still warm and the bread is fresh and soft. Have extra crying tiger sauce on the side for those who want more heat and intensity.
FAQ
Can I substitute regular steak for tri-tip?
Yes, flank steak or skirt steak are traditional for crying tiger and work beautifully with this marinade and sauce. These thinner cuts need less cooking time – sear for two to three minutes per side then finish over indirect heat for just five to ten minutes. They’re also typically more tender than tri-tip, so they’re actually closer to authentic crying tiger texture. Sirloin steak or flat iron steak also work well. Avoid very tender cuts like ribeye or filet mignon which don’t benefit from the tenderizing marinade and can become too soft.
What if I can’t find tamarind paste?
Tamarind paste is available in most Asian markets and many regular grocery stores in the international aisle, usually in jars or blocks. If unavailable, substitute one tablespoon of lime juice mixed with half a teaspoon of Worcestershire sauce to approximate tamarind’s sweet-sour complexity. This won’t replicate the exact fruity character of tamarind but provides functional acidity and depth. Some recipes use rice vinegar as a substitute, though this lacks tamarind’s sweetness. If you find tamarind concentrate (a thicker, more potent form), use only one teaspoon instead of one tablespoon of paste.
Is fish sauce really necessary?
Fish sauce is essential to authentic Thai flavor and can’t be omitted without significantly changing the dish’s character. Its fermented umami provides depth that soy sauce alone can’t replicate. If you’re concerned about the smell, know that it mellows completely when cooked and doesn’t taste “fishy” in the finished dish – it just tastes deeply savory and complex. If you absolutely cannot use fish sauce due to allergy or dietary restriction, substitute additional soy sauce mixed with a teaspoon of anchovy paste, though the flavor won’t be identical. There’s no vegetarian substitute that provides the same character.
How do I make toasted rice powder?
Toast a quarter cup of uncooked sticky rice (also called glutinous rice or sweet rice) in a dry skillet over medium heat, stirring constantly, until the grains turn golden brown and smell nutty – about eight to ten minutes. Let cool completely, then grind in a spice grinder or mortar and pestle to coarse powder consistency. Don’t grind too fine or it becomes flour-like; you want slightly gritty texture. Store in an airtight container at room temperature for up to three months. Use in crying tiger sauce, larb, and other Thai dishes for authentic nutty crunch.
Can I make this sandwich less spicy?
Absolutely – adjust the heat level by reducing or omitting the Thai chili flakes in the crying tiger sauce. Start with half a teaspoon and taste before adding more. The fish sauce, lime, and tamarind will still provide bold, complex flavor without aggressive heat. You can also serve the crying tiger sauce on the side rather than drizzling it directly on the sandwich, allowing each person to control their spice level. The marinade itself isn’t spicy, so reducing sauce heat makes the overall dish quite mild while maintaining Thai character.
Why add Parmesan to a Thai sandwich?
While not traditional, Parmesan’s salty, nutty, umami-rich character complements Thai flavors surprisingly well. It adds richness that balances the crying tiger sauce’s intensity and provides familiar comfort that makes the exotic flavors more approachable. The combination of Parmesan and fish sauce creates layered umami that’s deeply satisfying. That said, you can certainly omit the Parmesan for a more authentically Thai sandwich. Some people substitute fried shallots or crushed peanuts for crunch and richness instead of cheese.
Can I cook the tri-tip in the oven instead of grilling?
Yes, though you’ll miss the smoke flavor and char from outdoor grilling. Preheat oven to 450°F. Sear the marinated tri-tips in a cast iron skillet or heavy oven-safe pan over high heat on the stovetop, about three minutes per side. Transfer the pan directly to the preheated oven and roast until internal temperature reaches 130-135°F for medium-rare, about fifteen to twenty minutes. Let rest as directed before slicing. Alternatively, reverse sear by roasting at 250°F until 120°F internal, then searing in a hot skillet to finish.
How do I store and reheat leftovers?
Store leftover sliced tri-tip separately from the bread and sauce. Wrap the tri-tip tightly and refrigerate for up to four days. The crying tiger sauce keeps refrigerated for up to one week. To reheat, bring tri-tip to room temperature, then warm gently in a covered pan over low heat with a splash of water or beef broth to prevent drying. Don’t microwave as it makes the meat tough. Assemble fresh sandwiches with the reheated tri-tip, fresh bread, and sauce. Leftover tri-tip is also excellent cold in salads or fried rice.
What sides pair well with this sandwich?
Thai-inspired sides complement the sandwich’s flavors beautifully. Som tam (green papaya salad) provides crunchy, refreshing contrast to the rich beef. Thai cucumber salad offers cool, vinegary relief from the spice. Sticky rice is traditional with crying tiger and works well on the side. For more substantial options, pad Thai or drunken noodles (pad kee mao) make excellent accompaniments. Western sides like coleslaw, pickled vegetables, or simple green salad also work well. For drinks, Thai iced tea, beer, or lime soda cut through the richness nicely.
Can I make the marinade and sauce ahead of time?
Yes, both can be prepared in advance. The marinade keeps refrigerated for up to three days before using, though make it fresh if possible as the lime juice loses brightness over time. The tri-tip should marinate for at least thirty minutes or up to twenty-four hours – beyond that, the texture can become too soft. The crying tiger sauce can be made up to one week ahead and refrigerated, though it tastes best when freshly made. If making ahead, add the fresh shallot and cilantro just before serving rather than storing them in the sauce where they’ll wilt and lose flavor.
Ready to Take Your Cooking to the Next Level?
This is where I keep all my most-used products, gear, and favorite cooking tools — check it out:
🔥 View My Cooking Gear & ToolsRecipe Categories
If you loved this recipe, you’ll find more to savor across our diverse categories. From beef to pork, chicken to turkey, seafood to appetizers, there’s a wealth of flavors waiting for you. Explore them all at CWFeats.