Dr Pepper Party Ribs Recipe
Dr Pepper party ribs use 2 racks baby back ribs with membrane optionally removed, cut between every bone into individual ribs before cooking, then seasoned generously on all sides with sweet BBQ seasoning and rested at room temperature for 15-20 minutes. Smoke at 275°F for 2 hours to build bark on all surfaces. While ribs smoke, make Dr Pepper sauce by combining 2 cups Dr Pepper, 3/4 cup BBQ sauce, 1/4 cup brown sugar, 2 tablespoons honey, and 2 tablespoons butter in a saucepan, simmering for 10-15 minutes until slightly reduced and thickened. Transfer smoked ribs to foil pan, pour Dr Pepper sauce over and toss to coat, cover tightly with foil, and return to 275°F smoker for 2 hours until tender. Remove foil, toss ribs in pan sauce, and cook uncovered for final 10 minutes to set the glaze. These Dr Pepper ribs deliver tender meat with maximum bark coverage on every surface, sweet-tangy sauce with subtle Dr Pepper spice notes, and individual rib portions perfect for parties where bark-to-meat ratio and easy serving matter more than traditional presentation.
The whole process takes about 4.5 hours from start to finish. Spend 20 minutes removing membrane, cutting ribs, and seasoning. Smoke for 2 hours to develop bark. Make the sauce in 10-15 minutes during the smoke. Braise covered for 2 hours until tender. Glaze uncovered for final 10 minutes. The cut-first method creates more surface area for smoke and seasoning while the two-stage cooking ensures both crispy bark and fall-off-the-bone tenderness. The Dr Pepper sauce provides sweet-spicy complexity that complements the pork without overpowering smoke flavor.
Why Cut Ribs Into Individual Bones Before Smoking?
Cutting ribs into individual bones before smoking creates exponentially more surface area for bark development compared to cooking racks whole. A whole rack has bark only on the top, bottom, and two ends. Individual ribs have bark on all four long sides plus both ends of each bone. This means every bite includes crispy, seasoned bark instead of some bites being just tender meat with no crust.
The increased surface area also means more smoke penetration. Smoke hits every surface of every rib rather than just the exterior of the rack. The spaces between individual ribs allow smoke to circulate completely around each piece. This creates more pronounced smoke flavor throughout. Whole racks have areas that never see direct smoke – the meat between bones stays protected. Cut ribs eliminate these smoke-free zones.
Individual ribs also cook more evenly and faster than full racks. Heat circulates around each piece uniformly. Whole racks have hot spots (ends and edges) and cool spots (center and between bones). The uneven cooking means some ribs are perfect while others are over or undercooked. Individual ribs all reach the same doneness at the same time. The smaller mass also cooks faster, reducing total time by 30-60 minutes compared to whole racks.
The “party rib” style is also incredibly practical for serving. Guests grab individual ribs without needing knives or cutting boards. No awkward sawing through racks while trying to balance a paper plate. Everyone gets equal access to end pieces and middle ribs. The individual portions also make it easy to see when you’ve eaten 3 ribs versus 6 – whole racks make portion control harder since you lose count.
What Does Dr Pepper Do in BBQ Sauce?
Dr Pepper adds complex sweet-spicy flavor that straight sugar or soda alternatives can’t replicate. The soda contains 23 flavors including cherry, vanilla, caramel, and various spices. When reduced in the sauce, these flavors concentrate and caramelize, creating depth beyond simple sweetness. The result tastes like BBQ sauce but with mysterious background notes that people can’t quite identify but enjoy.
The carbonation in Dr Pepper also helps tenderize the meat during braising. The carbonic acid and citric acid in soda have mild tenderizing properties. During the 2-hour covered braise, these acids work on the pork’s proteins, helping break down connective tissue. The effect is subtle but noticeable – ribs braised in Dr Pepper sauce are slightly more tender than those braised in non-carbonated liquid.
Dr Pepper’s sugar content caramelizes beautifully during the final uncovered glazing phase. The soda contains high fructose corn syrup that browns and develops caramel flavor when exposed to heat. This creates sticky, glossy coating on the ribs. The caramelized sugars also add slight bitterness that balances the sweetness, preventing the sauce from being cloying.
The liquid component of Dr Pepper provides moisture for braising while the flavors infuse the meat. The ribs essentially braise in flavored liquid that becomes more concentrated as it reduces. By the end of cooking, the sauce has thickened through evaporation while the pork has absorbed Dr Pepper’s distinctive taste. The combination of BBQ sauce and Dr Pepper creates more interesting flavor than either ingredient alone.
Why Smoke First, Then Braise, Then Glaze?
The three-stage cooking method ensures ribs develop proper bark, become tender, and finish with glossy glaze. Smoking first for 2 hours at 275°F creates dry surface that develops crusty bark. The initial smoke phase happens on naked, seasoned ribs with no sauce. Wet sauce during initial cooking would prevent bark formation and create steamed ribs with pale, soft exterior instead of crusty, mahogany bark.
Braising covered for 2 hours tenderizes the ribs through moist heat while the bark stays mostly intact. The covered foil pan creates steam that breaks down collagen and connective tissue. The moisture prevents ribs from drying out during the long cook. If you continued smoking uncovered for 4 hours total, the ribs would develop too much bark (nearly black and bitter) while potentially drying out. The covered braise provides the tenderness while the initial smoke provides the bark.
The final 10-minute uncovered glaze sets the sauce and creates sticky coating. After braising, the ribs are tender but the sauce is thin and liquidy from dilution with rendered fat and pork juices. The uncovered finish reduces and thickens the sauce while caramelizing the sugars. The sauce transforms from watery to syrupy, coating the ribs in glossy layer. This brief uncovered period also re-crisps the bark slightly after the steam from braising.
Should You Remove the Membrane from Baby Back Ribs?
Removing the membrane from baby back ribs is optional for this recipe since cutting into individual bones makes the membrane less problematic. The membrane is a thin, silvery layer on the bone side of ribs. When left on whole racks, it prevents smoke and seasoning from penetrating the bone side and creates chewy texture that some dislike. However, when ribs are cut into individual bones, the membrane becomes less significant.
Cut ribs have exposed meat on all sides regardless of membrane. The membrane only covers one face of each rib. Since three other sides are bare meat, smoke and seasoning penetrate effectively even with membrane intact. The membrane side still gets bark from being exposed to heat, just less smoke penetration. For people who don’t mind slightly less bark on the bone side, leaving membrane saves prep time.
Removing membrane does create more uniform bark if you want maximum crust on all surfaces. To remove, slide a butter knife or spoon handle under the membrane at one corner of the rack. Grip the loosened membrane with a paper towel (for better grip) and peel it away from the bones in one sheet. This takes 2-3 minutes per rack. The bone side can then absorb smoke and develop bark just like the meat side.
The braising phase also makes membrane less noticeable. The 2-hour covered braise in Dr Pepper sauce softens the membrane significantly. It becomes tender rather than chewy, almost dissolving into the meat. People who hate membrane on smoked ribs often don’t mind it on braised ribs. The moisture and heat break it down. For this recipe specifically, removing membrane is nice but not critical like it is for unwrapped smoked ribs.
Why Use 275°F Instead of Lower Temperatures?
Smoking at 275°F provides ideal balance between bark development and reasonable cook time for party ribs. This moderate-high temperature creates crusty bark in the 2-hour initial smoke without burning. Lower temps like 225°F would take 3-4 hours to develop comparable bark. Higher temps like 325°F would rush the bark development and risk drying out the ribs before they finish tenderizing.
The 275°F temperature also renders fat effectively from baby back ribs without excessive shrinkage. Baby backs are leaner than spare ribs and need moderate heat to render what fat they have without drying out the meat. At 225°F, the fat renders slowly and ribs can cook too long, becoming dry. At 275°F, fat renders at proper pace while meat stays juicy through the initial 2-hour smoke.
This temperature works particularly well for cut ribs which have more exposed surface area. The increased exposure to heat means cut ribs cook faster than whole racks at the same temperature. If you tried cooking cut ribs at 225°F, you’d wait forever for bark development. At 275°F, the smaller individual pieces develop bark quickly and efficiently. The temperature compensates for the increased surface area.
The 275°F also maintains efficiency during the braise phase. The covered foil pan at 275°F creates enough steam and heat to tenderize ribs in 2 hours. Lower temps would extend braising time to 3-4 hours. Higher temps might make ribs mushy or cause the sauce to reduce too much and burn. The 275°F provides steady, reliable braising temperature that works consistently.
Step-by-Step Instructions
Step 1: Remove Membrane and Cut Ribs
Remove 2 racks of baby back ribs from packaging and place them bone-side up on a large cutting board. If removing the membrane, locate the silvery membrane on the bone side. Slide a butter knife or spoon handle under the membrane at one corner to loosen it. Once you have a flap lifted, grab it with a paper towel for better grip and peel the membrane away in one sheet. Repeat for the second rack.
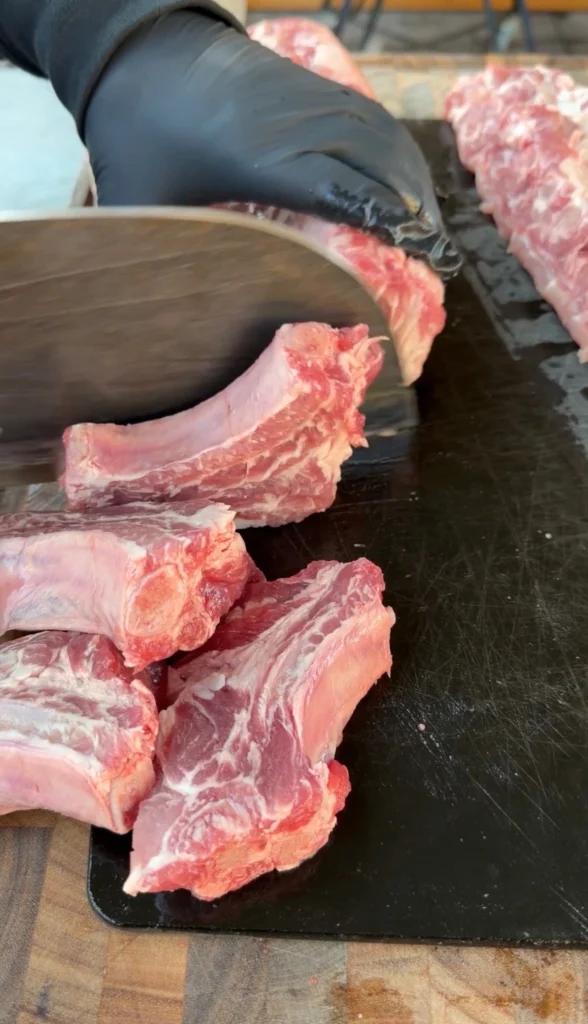
Using a sharp knife, cut between each bone to separate the racks into individual ribs. Cut straight down through the meat between bones, severing the connecting tissue. Each rack of baby back ribs typically has 10-13 bones, so you’ll end up with 20-26 individual ribs total. Try to cut cleanly without leaving shredded edges – clean cuts create better bark.
Inspect each individual rib and trim any excess fat or loose pieces of meat that might burn during smoking. You want relatively clean ribs without hanging flaps. However, don’t trim too aggressively – baby backs are already lean and need their fat for moisture. Just remove anything that looks like it would char quickly.
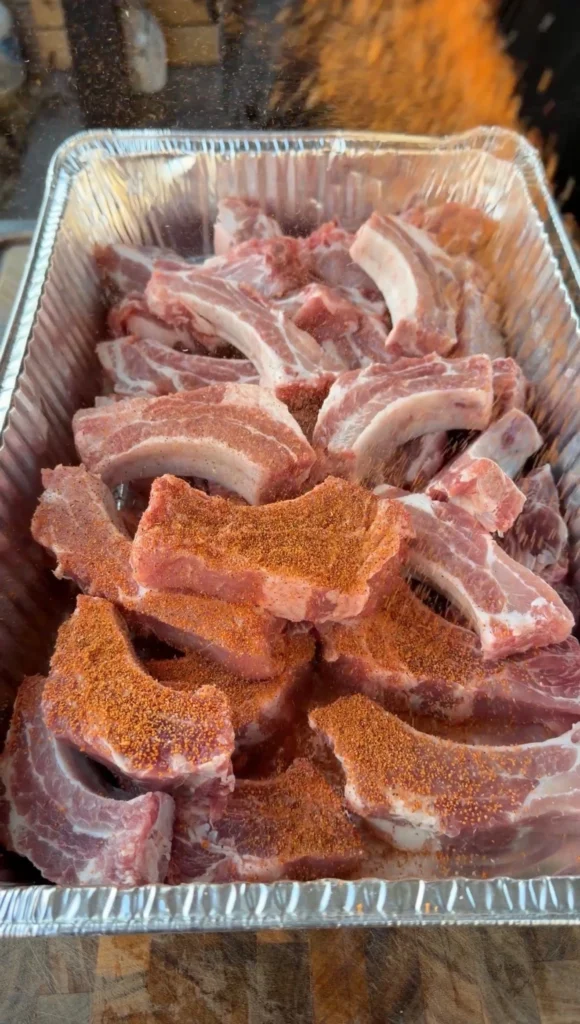
Arrange all the individual ribs on a large tray or cutting board. Season them generously on all sides with your favorite sweet BBQ seasoning. Since ribs are cut into individual pieces, you can season all surfaces easily – just pick up each rib and sprinkle seasoning on all four sides. Use approximately 1/4 cup total seasoning for 2 racks. Let the seasoned ribs rest at room temperature for 15-20 minutes while you preheat the smoker.
Step 2: Smoke Ribs for 2 Hours
Preheat your smoker to 275°F using your preferred wood – apple, cherry, pecan, or oak all work excellently with pork. Avoid mesquite which can be too intense for the sweet Dr Pepper sauce profile. Let the smoker stabilize at temperature with thin blue smoke before adding ribs.
Place the individual seasoned ribs directly on the smoker grates. Space them so they’re not touching – they need air circulation for even smoking and bark development on all sides. You may need to use multiple grate levels or work in batches if your smoker isn’t large enough. The individual pieces allow flexible arrangement.
Close the smoker lid and smoke undisturbed for the first hour. Don’t open the smoker frequently or you’ll lose heat and extend cooking time. The ribs need steady 275°F temperature for proper bark development. After 1 hour, you can check them briefly – they should be developing color and firming up.
Continue smoking for another hour (2 hours total). The ribs should develop deep mahogany color with visible bark on all surfaces. The meat should have pulled back from the bones slightly, exposing 1/4 inch of bone. The bark should be crusty and dry to the touch. When you pick up a rib, it should feel firm and dry, not wet or floppy.
Step 3: Make Dr Pepper Sauce
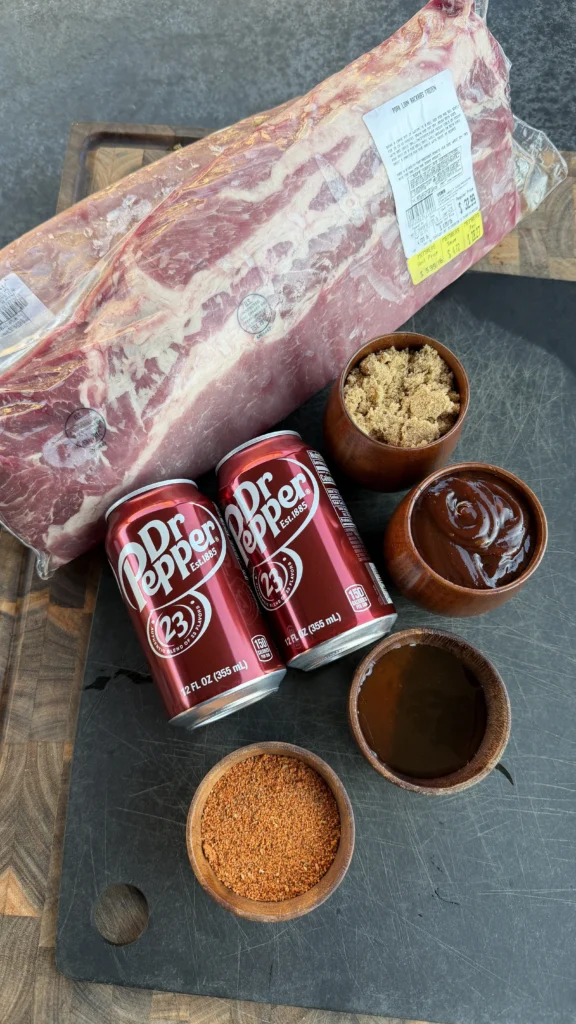
While the ribs smoke during the second hour, make the Dr Pepper sauce. In a medium saucepan over medium heat, combine 2 cups Dr Pepper, 3/4 cup BBQ sauce, 1/4 cup brown sugar, 2 tablespoons honey, and 2 tablespoons butter. Stir everything together until the brown sugar starts dissolving and butter melts.
Bring the mixture to a simmer and reduce heat slightly to maintain gentle bubbling. Cook for 10-15 minutes, stirring occasionally. The sauce will reduce and thicken noticeably as the Dr Pepper’s water content evaporates. The bubbles will become larger and slower as it thickens. The color will deepen to rich mahogany.
The sauce is ready when it coats the back of a spoon and has reduced by about one-third. It should be thinner than ketchup but thicker than water – syrup consistency. If it’s too thin, continue simmering. If it reduces too much and becomes very thick, add a splash of Dr Pepper or water to thin it.
Remove the sauce from heat and set aside. It will thicken slightly more as it cools. You’ll use this sauce for both the braising phase and the final glaze. Make sure you make enough – the ribs will absorb quite a bit during braising. If you’re doubling the recipe, double the sauce proportionally.
Step 4: Braise Ribs in Dr Pepper Sauce
When ribs reach the 2-hour mark and have developed good bark, carefully remove them from the smoker. Transfer all the individual ribs to a large disposable aluminum foil pan. A 9×13 inch pan works for 2 racks worth of cut ribs. Arrange them in a single layer if possible, though slight overlapping is fine.
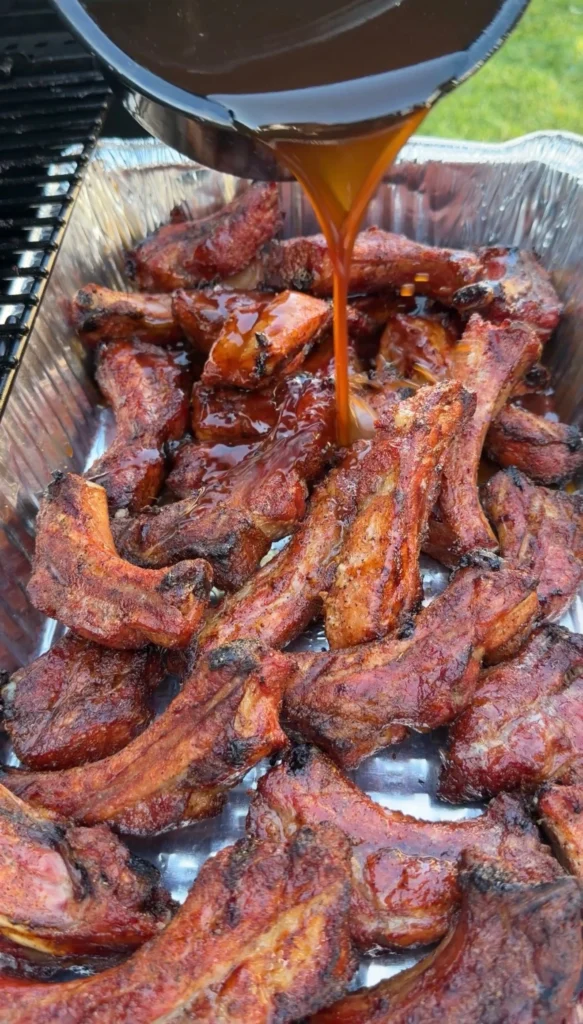
Pour the Dr Pepper sauce over the ribs. Use a spoon or tongs to toss the ribs gently in the sauce, ensuring every piece gets coated. The sauce should pool around the ribs, coming about 1/4 to 1/2 inch up the sides. If it seems thin, that’s fine – it will reduce during cooking and the ribs will release juices that add to the liquid.
Cover the pan tightly with heavy-duty aluminum foil. Press the edges firmly against the pan rim to create a good seal. This seal is important – it traps steam that tenderizes the ribs. If the seal isn’t tight, steam escapes and the ribs won’t braise properly. Make sure the foil doesn’t touch the ribs much – you want space for steam circulation.
Return the covered pan to the 275°F smoker. The smoker acts as an oven at this point since the covered pan prevents additional smoke penetration. Close the smoker lid and braise for 2 hours without opening. Don’t peek – opening releases steam and extends cooking time. The ribs need uninterrupted moist heat to become tender.
Step 5: Glaze and Finish
After 2 hours of braising, carefully remove the pan from the smoker using heavy oven mitts – it will be very hot and full of liquid. Remove the foil cover carefully as hot steam will escape. The ribs should be extremely tender, nearly falling apart. The sauce will have reduced somewhat but should still be liquid, not dry.
Using tongs or a large spoon, gently toss the ribs in the pan sauce to re-coat them. The sauce has thickened during braising from evaporation and concentration. The ribs have also released fat and juices that blended with the sauce. Everything should look glossy and cohesive.
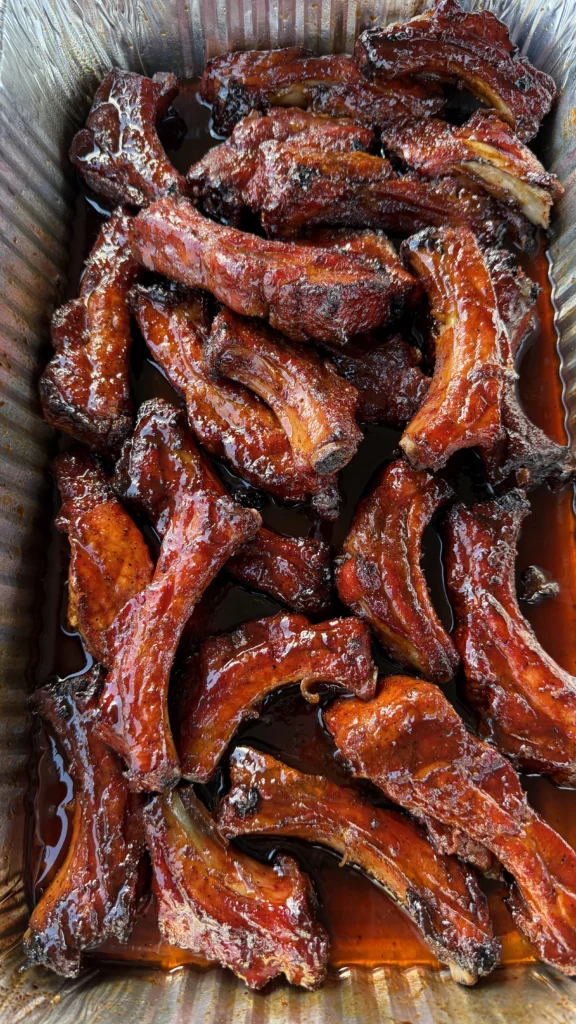
Return the uncovered pan to the 275°F smoker for the final 10 minutes. This uncovered period allows the sauce to reduce further and caramelize on the ribs. The sugars in the Dr Pepper and BBQ sauce will caramelize, creating sticky glaze. The sauce will thicken from syrup to coating consistency. Watch during this phase – if the sauce starts burning (turning black instead of just darkening), remove immediately.
After 10 minutes, remove the glazed ribs from smoker. The sauce should be thick and sticky, coating the ribs in glossy layer. Let them rest in the pan for 5-10 minutes before serving. The glaze will set slightly during rest. Transfer ribs to a serving platter, leaving excess sauce in the pan or straining it to serve alongside as dipping sauce. Serve hot while the glaze is still sticky.

Dr Pepper Party Ribs
Ingredients
Equipment
Method
- Remove membrane from bone side of 2 racks baby back ribs if desired. Cut between each bone to create individual ribs. Season all sides generously with sweet BBQ seasoning. Rest at room temperature 15-20 minutes.
- Preheat smoker to 275°F with apple, cherry, or oak wood. Place individual ribs directly on grates, spacing so they don’t touch. Smoke 2 hours until deep bark develops on all surfaces.
- While ribs smoke, make Dr Pepper sauce: Combine 2 cups Dr Pepper, 3/4 cup BBQ sauce, 1/4 cup brown sugar, 2 tbsp honey, and 2 tbsp butter in saucepan. Simmer over medium heat 10-15 minutes, stirring occasionally, until reduced and thickened. Remove from heat.
- Transfer smoked ribs to foil pan. Pour Dr Pepper sauce over ribs and toss to coat. Cover pan tightly with foil. Return to 275°F smoker and braise 2 hours until tender.
- Remove foil. Toss ribs in pan sauce. Return uncovered to smoker for 10 minutes to set glaze and caramelize sauce.
- Remove from smoker and rest 5-10 minutes. Serve hot with extra sauce on side if desired.
Nutrition
Notes
Tried this recipe?
Let us know how it was!Frequently Asked Questions
Can I use spare ribs instead of baby back ribs?
Yes, spare ribs work with the same method but need longer cook times. Spare ribs are larger and meatier than baby backs. Smoke for 2.5-3 hours instead of 2 hours to develop proper bark. Braise for 2.5-3 hours instead of 2 hours for tenderness. The sauce recipe and technique remain identical.
St. Louis style ribs (trimmed spare ribs) also work excellently with slightly shorter times than full spare ribs. The cut-first method works for any rib style – the increased surface area creates better bark regardless of which ribs you use.
What if I don’t want to cut the ribs before smoking?
Cook whole racks using the same temperature and technique but adjust times. Smoke whole racks for 3 hours instead of 2 hours since they have less exposed surface area. Braise for 2-2.5 hours until tender. The whole racks won’t have bark on all sides like cut ribs, but the method still produces excellent results.
After smoking and braising, you can cut the ribs into individual bones before serving if desired. This gives you traditional presentation during cooking but easy serving at the table.
Can I use a different soda instead of Dr Pepper?
Coca-Cola, Pepsi, root beer, or cream soda all work as substitutes for Dr Pepper. Each provides different flavor profile. Coke/Pepsi are straightforward sweet. Root beer adds vanilla notes. Cream soda is very sweet with vanilla. Dr Pepper’s 23 flavors create the most complex result, but other sodas work if that’s what you have.
Avoid diet sodas which don’t caramelize properly due to artificial sweeteners. The sugar content in regular soda is essential for both flavor and glaze development.
How do I know when the ribs are done?
Ribs are done after the 2-hour braise when they’re probe tender and nearly falling apart. Insert a toothpick or probe into the meat between bones – it should slide in and out with minimal resistance. The meat should have pulled back from the bones by 1/4 to 1/2 inch. When you pick up a rib, it should bend significantly and the meat should start cracking on top.
Don’t rely on temperature alone for ribs. While safe at 145°F, ribs need to reach 195-203°F for proper tenderness. The covered braise at 275°F for 2 hours gets them there reliably.
Can I make these in the oven without a smoker?
Yes, use the same method at 275°F in the oven. Season and arrange cut ribs on a wire rack over a baking sheet. Bake uncovered for 1.5-2 hours to develop crust. Transfer to foil pan with Dr Pepper sauce, cover, and braise 2 hours. Finish uncovered 10 minutes.
Add 1 teaspoon liquid smoke to the Dr Pepper sauce for smoky flavor. The ribs won’t have authentic smoke ring but will taste similar. The bark won’t be as dark without smoke but will still be flavorful crust.
Ready to Level Up?
Take your backyard cooking from good to legendary.
This is where I keep all my most-used smokers, knives, and favorite cooking tools.
Shop My Gear CollectionExplore More Recipes
Find more diverse flavors at CWFeats.com
