Garlic Butter Scallops Recipe – Restaurant Quality Pan Seared Perfection
These garlic butter scallops have become my go-to when I want to impress without spending all day in the kitchen. There’s something magical about that perfect golden crust paired with the rich, garlicky butter sauce that makes people think you’re some kind of culinary wizard. The first time I nailed this recipe, my wife literally asked if I ordered takeout from somewhere fancy.
![]()
What makes this garlic butter scallops recipe so special is how simple it actually is. Four ingredients for the sauce, proper technique for the sear, and you’ve got restaurant-quality results in under 10 minutes. I’ve served these at dinner parties where people spent the whole night asking for the recipe, not believing how easy it really was.
Mastering the Perfect Scallop Sear for Golden Crust
The secret to incredible garlic butter scallops isn’t just the sauce – it’s all about nailing that sear. I’ve ruined way too many expensive scallops by not getting the pan hot enough or moving them too early. The perfect sear creates that beautiful golden crust you see in restaurants, and it’s easier than you think once you know the technique.
Temperature is everything with this garlic butter scallops recipe. Your pan needs to be smoking hot before the scallops even think about going in. I’m talking about medium-high to high heat for at least 3-4 minutes. If you drop a scallop in and don’t hear an immediate aggressive sizzle, the pan isn’t ready.
The Side Muscle and Moisture Control
Before you even think about cooking, you need to prep your scallops properly. Remove that side muscle – it’s tough and chewy. Pat them completely dry with paper towels. I actually let them sit on paper towels for 10-15 minutes to draw out excess moisture. Wet scallops steam instead of sear, and you’ll never get that golden crust.
Season them right before they go in the pan, not earlier. Salt draws out moisture, which is the enemy of good searing. A light sprinkle of salt and pepper just before cooking is all you need.
The biggest mistake I see people make is crowding the pan. Give each scallop space – they should never touch each other. Better to cook in batches than to steam a whole pan of expensive seafood.
Ingredient Quality and Smart Shopping Tips
Quality matters more with scallops than almost any other ingredient. Fresh is obviously best, but good frozen scallops work great too. The key is knowing what to look for and what to avoid when shopping for this garlic butter scallops recipe.
Avoid “wet” scallops that have been treated with sodium tripolyphosphate. They’ll never sear properly because of all the added moisture. Look for “dry” scallops – they cost more but they’re worth every penny. They should smell like the ocean, not fishy at all.
Size matters too. I prefer U-10 or U-12 scallops (under 10 or 12 per pound). They’re big enough to get a good sear without overcooking the center. Smaller scallops cook too fast and you miss that contrast between the caramelized outside and tender inside.
Building the Perfect Garlic Butter Sauce
The sauce in this garlic butter scallops recipe is deceptively simple but incredibly flavorful. Real butter is non-negotiable – none of that margarine nonsense. The butter should be cold when you add it to the pan because it helps create an emulsion with the pan juices.
Fresh garlic is crucial. I mince it fine so it cooks evenly and doesn’t burn. Four cloves might seem like a lot, but the butter mellows it out perfectly. Don’t use pre-minced garlic from a jar – it doesn’t have the same punch.
The lemon juice adds brightness that cuts through the richness. Fresh lemon only – bottled stuff tastes artificial and won’t give you the same results. I usually squeeze it right into the pan so I can control the amount.
Fresh parsley isn’t just for looks. It adds this bright, herbaceous note that complements the garlic and makes the whole dish feel more complete. Dried parsley just doesn’t give you the same pop of freshness.
Pro Tips for Restaurant-Quality Results Every Time
After making this garlic butter scallops recipe dozens of times, I’ve figured out all the little tricks that separate good scallops from absolutely perfect ones. The details matter when you’re working with expensive ingredients.
Don’t move the scallops once they hit the pan. Let them cook undisturbed for 2-3 minutes depending on size. They’ll release naturally when they’re ready to flip. If you try to move them too early, you’ll tear that beautiful crust.
Timing and Temperature Control
Use a timer and trust the process. Most people flip too early because they get nervous. You want that deep golden color before you even think about flipping. The second side cooks faster, usually just 1-2 minutes.
Watch the sides of the scallops – when they’re about 80% opaque, they’re done. Overcooked scallops turn rubbery fast. Better to slightly undercook them since they’ll continue cooking in the residual heat.
The sauce timing is crucial. Make it in the same pan right after cooking the scallops. All those browned bits add incredible flavor to the butter. Don’t clean the pan – those fond bits are liquid gold.
Serving and Presentation Ideas
These scallops are elegant enough for special occasions but easy enough for weeknight dinners. I like serving them over risotto, pasta, or even just with some crusty bread to soak up that sauce.
The sauce should be glossy and coat the scallops nicely. If it looks greasy or broken, you probably got it too hot. Keep the heat low when making the sauce and swirl the pan gently instead of stirring aggressively.
Serve immediately while the scallops are still hot and the sauce is glossy. This isn’t a dish that holds well – it’s best enjoyed right off the stove.
Ingredients
For the Scallops:
- 1.5-2 lbs large sea scallops (U-10 or U-12)
- 2 tbsp olive oil or vegetable oil
- Salt and black pepper to taste
For the Garlic Butter Sauce:
- 4 tbsp unsalted butter, cold
- 4 cloves garlic, minced
- Juice of 1/2 lemon (about 1-2 tbsp)
- 2 tbsp fresh parsley, chopped
Detailed Step-by-Step Instructions
Step 1: Prep Your Scallops
Remove scallops from packaging and look for the side muscle – a small, tough piece attached to the side. Remove it and discard. Pat each scallop completely dry with paper towels, then place them on a clean paper towel-lined plate. Let them sit for 10-15 minutes to draw out excess moisture.
Just before cooking, season both sides lightly with salt and pepper. Don’t do this too far ahead because salt will draw out moisture, which prevents proper searing. The scallops should look dry and feel slightly tacky to the touch.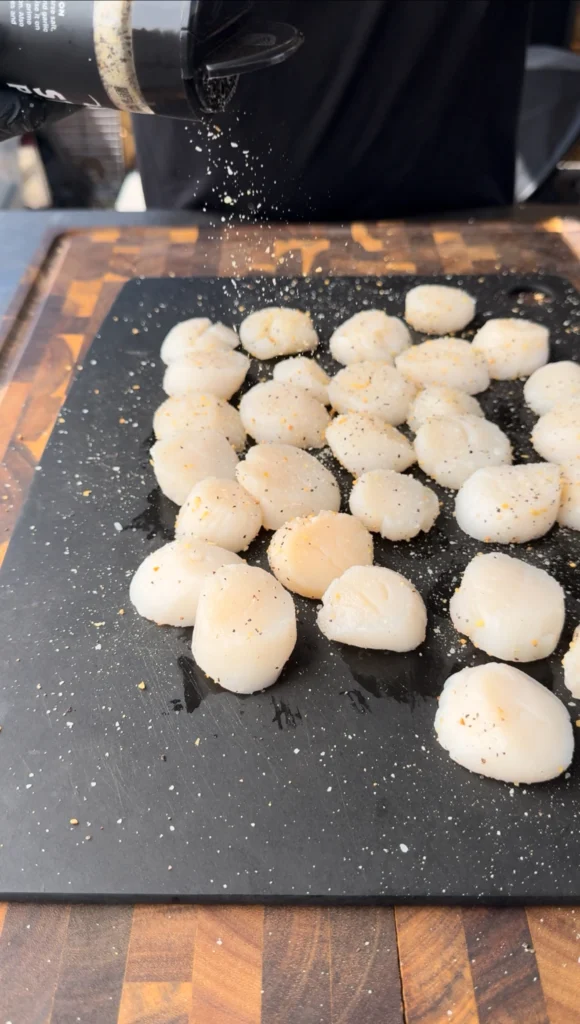
Step 2: Heat Your Pan to the Perfect Temperature
Heat a large stainless steel or cast iron skillet over medium-high to high heat for 3-4 minutes. Add the oil and let it heat until it shimmers and just starts to smoke slightly. The pan should be hot enough that a drop of water sizzles aggressively.
Don’t use a non-stick pan for this – you won’t get the same caramelization. Stainless steel or cast iron are your best options for achieving that restaurant-quality sear.
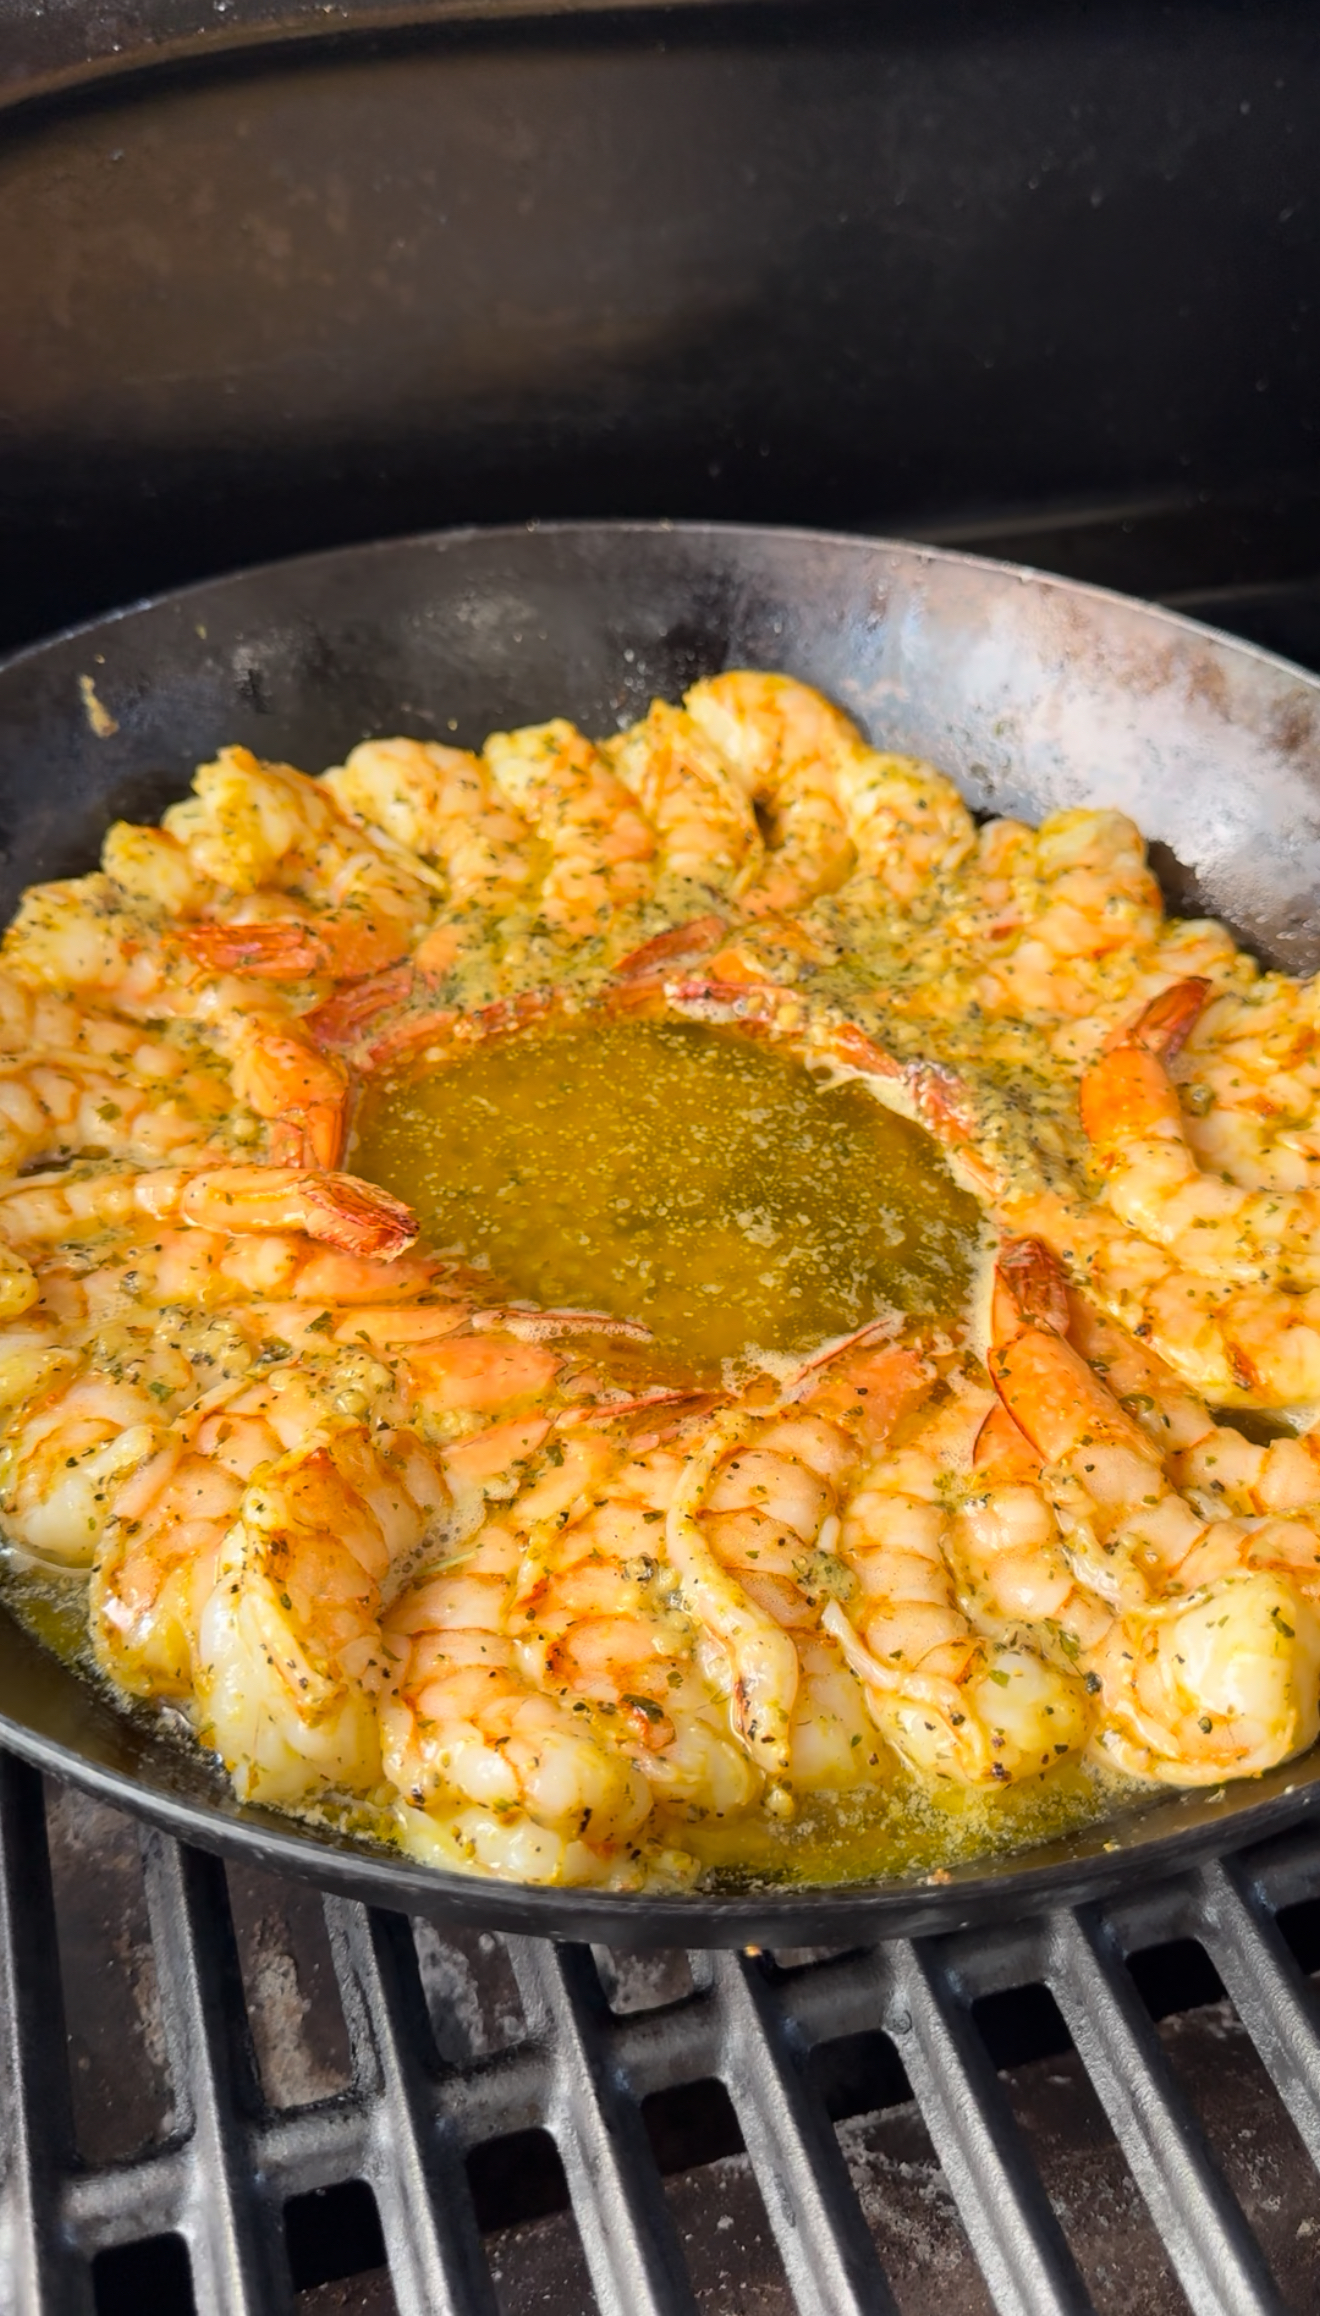
Step 3: Sear the Scallops to Golden Perfection
Carefully place the scallops in the hot pan, making sure they don’t touch each other. You should hear an immediate, aggressive sizzle. Don’t move them for 2-3 minutes – let them develop that golden crust you see in the photos.
The scallops will release naturally when they’re ready to flip. If they’re sticking, give them another 30 seconds. When you flip them, they should have a beautiful golden-brown crust. Cook the second side for 1-2 minutes until just cooked through.
![]()
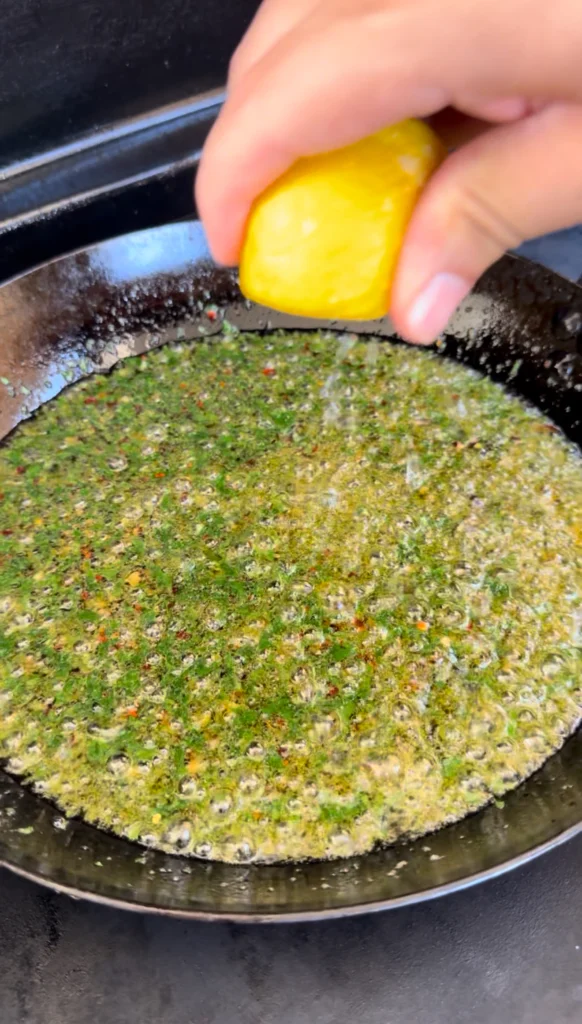
Step 4: Create the Garlic Butter Sauce
Remove the scallops to a plate and reduce heat to medium-low. In the same pan with all those browned bits, add the minced garlic and cook for 30 seconds until fragrant. Don’t let it brown too much or it’ll turn bitter.
Add the cold butter and swirl the pan gently to melt it. The cold butter helps create a smooth emulsion with the pan juices. Once melted, add the lemon juice and fresh parsley, swirling to combine.
Step 5: Combine and Serve Immediately
Return the scallops to the pan and gently spoon the sauce over them, just like you see in the photos where the green herb sauce is coating the golden scallops. The sauce should be glossy and coat each scallop nicely.
Serve immediately while everything is hot. The contrast between the caramelized scallops and the bright, garlicky sauce is what makes this dish special. Don’t let them sit around – they’re best enjoyed right off the stove.
Here is a printable recipe card!

Garlic Butter Scallops Recipe - Restaurant Quality Pan Seared Perfection
Ingredients
Method
- Remove side muscle from scallops and pat completely dry. Let sit on paper towels 10-15 minutes. Season with salt and pepper just before cooking.
- Heat large skillet over medium-high to high heat for 3-4 minutes. Add oil and heat until shimmering.
- Sear scallops without moving for 2-3 minutes until golden brown. Flip and cook 1-2 minutes more until just done.
- Remove scallops and reduce heat to medium-low. Add garlic and cook 30 seconds until fragrant.
- Add cold butter and swirl to melt. Add lemon juice and parsley, swirling to combine.
- Return scallops to pan and spoon sauce over. Serve immediately while hot.
Notes
Tried this recipe?
Let us know how it was!
Conclusion
This garlic butter scallops recipe has become my secret weapon for impressing guests with minimal effort. The combination of that perfect golden sear with the rich, bright sauce creates something that looks and tastes like it came from a high-end restaurant. But the best part is how quick and straightforward it actually is.
If you loved this recipe, you’ll find more to savor across our diverse categories. From beef to pork, chicken to turkey, seafood to appetizers, there’s a wealth of flavors waiting for you. Explore them all at CWFeats. Dive into our delicious collections!
Recipe Categories: