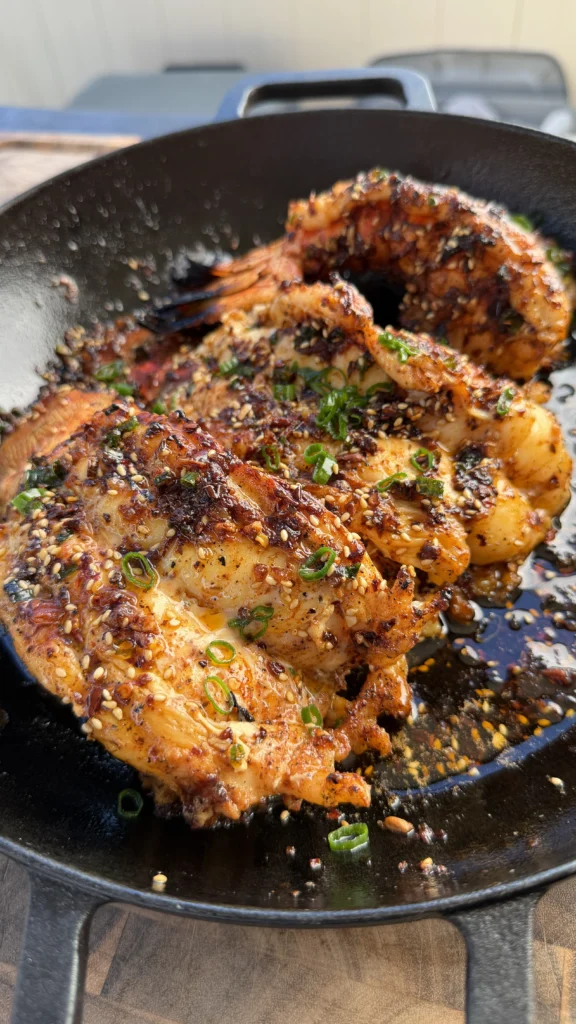
Grilled chili crisp lobster tails are 8 to 10-ounce lobster tails butterflied with kitchen shears, meat removed from the shell but left attached at the tail fan for presentation, patted completely dry, lightly salted, then grilled over medium-high heat at 400 to 450°F for 3 to 4 minutes per side until they reach 135°F internal temperature and develop char on both sides. After grilling, you place the lobster in a cast iron skillet with melted butter, minced garlic, chili crisp, soy sauce, honey, and lime juice, then baste continuously for 2 to 3 minutes until the lobster is glossy and coated in the bubbling garlic chili butter. You finish with chopped green onions and extra lime juice.
The entire process takes about 25 to 30 minutes from start to finish. This includes 10 minutes to butterfly the lobster tails and prepare them for grilling. Making the garlic chili crisp butter takes 5 minutes. Grilling the lobster takes 6 to 8 minutes total. The final butter basting phase takes 2 to 3 minutes. Everything comes together quickly for an impressive dish.
These chili crisp lobster tails serve 3 to 4 people with one large tail per person. The 8 to 10-ounce size provides substantial meat without being wasteful. Each tail yields about 6 to 7 ounces of actual lobster meat. This is enough for a generous main course serving or a luxurious appetizer for two people sharing.
The presentation is stunning. Leaving the tail fan attached makes the lobster look like jumbo shrimp. The butterflied meat sits on top of the shell. The char marks from the grill create visual contrast. The glossy red chili butter coating photographs beautifully. This is a dish designed to look as good as it tastes.
Jump to RecipeWhy 8 to 10-Ounce Lobster Tails Are the Sweet Spot for Grilling
Meat Thickness Matches Grill Timing
8 to 10-ounce lobster tails have meat that’s about 1 to 1½ inches thick at the thickest point. This thickness is ideal for grilling. The meat cooks through in 6 to 8 minutes without drying out. Thinner tails cook too fast. They can overcook before developing char. Thicker tails take too long. The exterior can burn before the interior reaches temperature.
The uniform thickness in this size range also creates even cooking. Smaller tails taper dramatically from thick to thin. The thin end overcooks while waiting for the thick end. Larger tails can have very thick centers that stay cold while edges cook. The 8 to 10-ounce range provides the most consistent thickness from one end to the other.
This size also works well for the butterflying technique. There’s enough meat to create an impressive presentation when spread out. But it’s not so much meat that it becomes unwieldy. Smaller tails don’t have enough meat to butterfly attractively. Larger tails can be difficult to handle and flip on the grill.
Cost Efficiency and Portion Control
Lobster tails in the 8 to 10-ounce range typically cost $15 to $25 each depending on season and source. This is expensive but not prohibitive for special occasions. Smaller 4 to 6-ounce tails are cheaper per tail but provide less meat. You might need two small tails per person. That eliminates the cost savings.
Larger 12 to 16-ounce tails can cost $35 to $50 each. They provide impressive portions. But they’re harder to source. Many grocery stores don’t stock them. You’d need to special order from a seafood market. The 8 to 10-ounce size is widely available at most seafood counters and higher-end grocery stores.
For portion control, one 8 to 10-ounce tail per person is perfect for a main course. The meat is substantial enough to feel like a full meal. You’re not left wanting more. But you’re not overwhelmed by too much rich lobster. The portion size feels elegant rather than excessive.
Visual Impact for Presentation
The 8 to 10-ounce tail creates dramatic presentation when butterflied and grilled. The meat fans out beautifully over the shell. The size is large enough to be impressive on the plate. But not so large that it looks comical or difficult to eat.
Leaving the tail fan attached at this size mimics the appearance of jumbo shrimp. The fan provides a handle for eating with fingers if desired. It also signals “this is lobster” immediately. Guests recognize what they’re eating at first glance. Smaller tails don’t have the same visual punch. Larger tails can look awkward or hard to manage.
This size also photographs exceptionally well. Food photographers and content creators prefer 8 to 10-ounce tails. They fill the frame nicely. The proportions look natural rather than either skimpy or oversized. Combined with the glossy chili butter and char marks, these tails are camera-ready for social media.
Availability and Sourcing Consistency
Frozen lobster tails in the 8 to 10-ounce range are consistently available year-round. They’re a standard size that suppliers stock. You can find them at Costco, Sam’s Club, higher-end grocery stores, and online seafood retailers. The supply is reliable. You’re not hunting for specialty sizes.
These tails typically come from cold-water sources like Maine, Canada, or Australia. Cold-water lobster has firmer, sweeter meat than warm-water lobster. The meat quality at this size is excellent. The lobsters are mature enough to have developed full flavor. But not so old that the meat becomes tough.
Fresh live lobster at this tail weight would be a 1½ to 2-pound lobster. This is a common size for live lobster. If you prefer to buy live and remove the tails yourself, 1½ to 2-pound lobsters are easy to find. The tail yield from this size lobster matches the frozen tail weight perfectly.
How to Butterfly Lobster Tails While Keeping the Tail Fan Attached
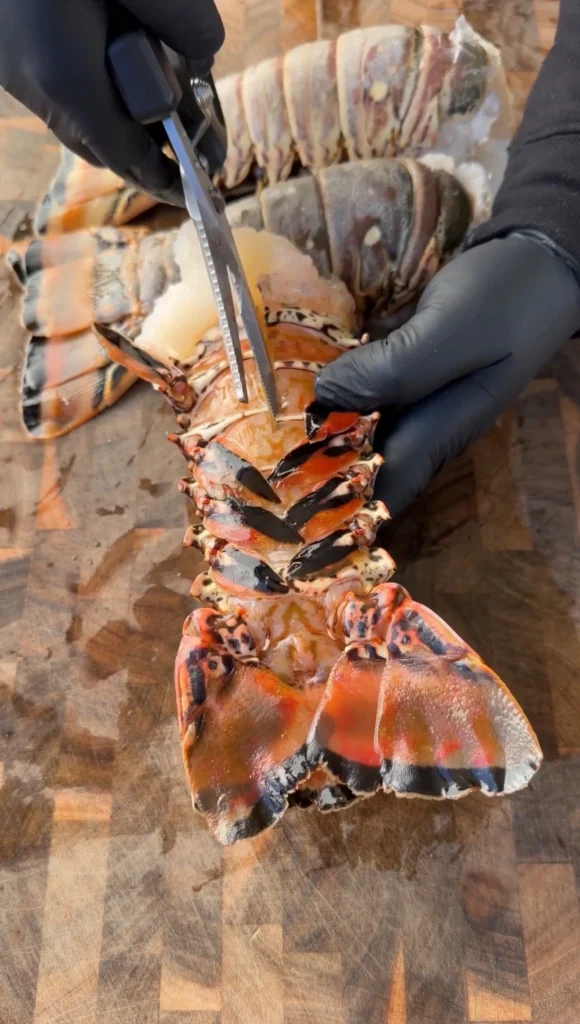
Using Kitchen Shears for Clean Cuts
Kitchen shears are the best tool for butterflying lobster tails. They cut through the shell cleanly without cracking it. Use heavy-duty kitchen shears, not delicate herb scissors. The lobster shell is thick. You need strong blades with good leverage.
Start at the wide end of the tail where it was separated from the body. Position the shears so the blades are centered on top of the shell. Cut straight down the center of the top shell. Follow the natural ridge that runs down the middle. This is the easiest path through the shell.
Cut all the way down to the tail fan but stop before cutting through it. The tail fan should remain intact. This is critical for presentation. The fan acts as an anchor point. It keeps the meat attached to the shell in one piece.
As you cut, the shell will want to spread apart. This is normal. Don’t worry if the sides separate slightly. You’re creating space to access the meat. Just focus on making a clean cut down the center without veering off to one side.
Removing the Meat Without Detaching the Tail
After cutting the top shell, gently spread the shell halves apart. The lobster meat is attached to the shell at multiple points. You need to separate it carefully. Use your fingers to work the meat loose from the inside of the shell.
Start at the wide end and work toward the tail fan. Slide your fingers underneath the meat. Gently pull it away from the shell. There are thin membranes connecting the meat to the shell. These break easily with gentle pressure.
As you reach the tail fan, you’ll feel the meat is firmly attached. This attachment point is what you want to preserve. Stop separating the meat about 1 inch before the tail fan. The meat should stay connected at the very end.
Lift the meat up and rest it on top of the open shell. It should sit like a butterflied shrimp. The meat is exposed on top. The shell acts as a presentation base. The tail fan remains at the end as a visual anchor and handle.
Creating an Even Thickness for Cooking
Once the meat sits on top of the shell, you might notice it’s not uniformly thick. The top side might be rounded and bulbous. For even cooking, you want relatively flat meat. Use a sharp knife to butterfly the meat itself if needed.
Make a horizontal cut through the thickest part of the meat. Don’t cut all the way through. Cut about 80% of the way. Then open the meat like a book. This creates a thinner, flatter profile. The increased surface area helps with char development and even cooking.
Some people skip this step if the meat is already relatively flat after removing from the shell. It depends on the specific lobster tail. Check the thickness. If the center is more than 1½ inches thick, butterfly the meat. If it’s already around 1 inch, leave it as-is.
Removing the Digestive Vein
The lobster’s digestive tract runs through the tail. It appears as a dark line or vein running down the center of the meat. This should be removed before cooking. It’s not harmful but can taste gritty or bitter.
After butterflying the tail, the vein is visible on top. Use the tip of your knife to lift it out. It pulls away easily in most cases. Sometimes it comes out as one piece. Other times it breaks and you need to remove it in sections.
Rinse the butterflied tail under cold water after removing the vein. This washes away any debris. Pat the meat completely dry with paper towels. This step is critical. Dry meat sears and caramelizes. Wet meat steams. You want aggressive searing for char and flavor.
Why Chili Crisp Creates Perfect Flavor Balance with Sweet Lobster
Fat Content Carries Flavor and Creates Gloss
Chili crisp is oil-based with chili flakes, fried garlic, fried shallots, and other aromatics suspended in the oil. The oil content is significant. This fat combines with butter to create an extremely rich basting medium. The oil doesn’t just add flavor. It creates the glossy, lacquered appearance on the finished lobster.
Fat also adheres to lobster meat better than water-based sauces. Lobster meat is slightly oily itself from natural fats. The chili crisp oil bonds with these fats. The sauce clings instead of sliding off. Every bite carries the chili flavor rather than just the surface being coated.
The fat also moderates heat perception. Pure chili powder or hot sauce can be aggressively spicy. The oil in chili crisp carries the same capsaicin compounds. But the fat coats your tongue. This reduces the burn sensation. You taste heat without overwhelming pain. The flavor complexity comes through instead of just fire.
Umami Layering from Multiple Sources
Quality chili crisp contains soy sauce, MSG, or fermented bean paste. These ingredients provide umami depth. Lobster already has natural umami from glutamates in the meat. The chili crisp amplifies this savory quality.
The fried garlic and shallots in chili crisp add another umami layer. When garlic and shallots fry, they caramelize. The sugars brown. Amino acids react. This creates savory, almost meaty flavors despite being vegetable-based. Combined with fresh garlic in the butter, you get double garlic flavor with different characters.
The soy sauce in the butter recipe adds yet another umami source. Soy sauce contributes fermented, salty depth. It makes the lobster taste more lobster-like. The savory notes become more pronounced. This layering of umami sources creates complexity that single-ingredient seasonings can’t match.
Heat That Complements Rather Than Competes
Lobster is inherently sweet and delicate. The wrong spicy element can overpower it. Aggressive hot sauce or raw cayenne masks the lobster flavor. You end up tasting mostly heat. Chili crisp provides heat that enhances rather than drowns out the sweetness.
The heat level in most chili crisp brands is moderate. It’s noticeable but not overwhelming. You feel warmth building over several bites rather than immediate fire. This gradual heat allows you to taste the lobster throughout the meal. Not just on the first bite before your palate gets numbed.
The crispy bits in chili crisp also add textural contrast. Lobster meat is smooth and tender. The fried garlic and chili flakes create crunch. This textural variation makes each bite more interesting. You’re not just experiencing one consistent texture. You get smooth lobster punctuated by crispy, spicy bits.
Sweet and Spicy Balance with Honey
The optional honey in the butter sauce creates classic sweet-spicy balance. Lobster provides natural sweetness. The honey amplifies it slightly. Against the chili heat, this sweetness becomes more pronounced. Your palate recognizes both elements distinctly.
The honey also helps the butter sauce caramelize on the lobster during basting. Sugar browns at high heat. The thin layer of honey-enriched butter on the lobster surface caramelizes as it bubbles. This creates deeper color and flavor. The lobster takes on slight caramel notes that complement the char from the grill.
Without the honey, the dish is more purely savory with heat. With honey, it becomes more complex. Neither version is wrong. It’s preference-based. Some people prefer the pure savory-spicy profile. Others appreciate the sweet element rounding out the heat.
What Internal Temperature Creates Perfect Lobster Texture
The 135°F Sweet Spot for Tenderness
Lobster meat transforms dramatically as it cooks. Raw lobster is translucent and gelatinous. At 130°F, it begins firming up but still appears slightly translucent in the center. At 135°F, the meat is opaque throughout and tender. This is the target temperature for grilled lobster tails.
At 135°F, the proteins have coagulated enough to create firm structure. But they haven’t tightened so much that moisture gets squeezed out. The meat feels substantial when you bite into it. But it’s not rubbery or chewy. There’s still spring and give to the texture.
Many recipes call for 145°F for lobster. This is considered “fully cooked” by traditional standards. But at 145°F, lobster starts becoming tough. The proteins have contracted significantly. Moisture has been expelled. The texture is denser and less pleasant. For premium lobster tails, 135°F provides better eating experience.
The carryover cooking also matters. When you pull lobster at 135°F and let it rest even briefly, the internal temperature climbs to 138 to 140°F. This is still in the ideal range. If you cooked to 145°F on the grill, carryover would push it to 148 to 150°F. That’s overcooked territory for tender lobster.
Visual Cues for Doneness Without a Thermometer
If you don’t have an instant-read thermometer, you can judge doneness visually. Raw lobster meat is translucent with a gray-blue tint. As it cooks, the meat becomes opaque white. When fully opaque throughout with no translucent spots, it’s at approximately 135 to 140°F.
The meat also firms up as it cooks. Press it gently with your finger. Raw or undercooked lobster feels soft and squishy. Properly cooked lobster feels firm but springy. Overcooked lobster feels hard and dense with no give. The firm-but-springy texture indicates proper doneness.
The shell color also changes. Raw lobster shells are greenish or mottled. Cooked shells turn bright red-orange. This color change happens at around 130°F. By the time the shell is fully red, the meat is close to proper doneness. Check the meat opacity at this point.
Juices also provide clues. When you cut into properly cooked lobster, clear juices run out. Undercooked lobster releases slightly cloudy, viscous liquid. Overcooked lobster is dry with minimal juice. Clear juice flow indicates the proteins have set properly without over-tightening.
Why Lobster Overcooks Faster Than Other Seafood
Lobster tail meat is very lean. There’s minimal fat to buffer against overcooking. When the proteins tighten from heat, there’s no fat to maintain moisture. The meat goes from perfect to tough within 5 degrees of temperature change.
The thin profile of butterflied lobster also creates rapid cooking. Heat penetrates from both top and bottom quickly. There’s little thermal mass to slow the temperature rise. You can go from 130°F to 140°F in under a minute on a hot grill. This demands constant attention.
Carry-over cooking is also significant with lobster. The meat is so lean that residual heat continues cooking even off the heat source. Pull the lobster 3 to 5 degrees before your target temperature. By the time you’ve moved it to the butter pan, it will have reached the target.
This is why butter basting after grilling works so well. The butter pan is medium-low heat. Much gentler than the grill. You can bring the lobster to perfect final temperature slowly. The gentle butter basting warms it through without overcooking. You have more control than leaving it on the aggressive heat of the grill.
Chili Crisp Lobster Tails
Grilled, garlic butter basted, spicy-sweet glaze
Ingredients
Lobster
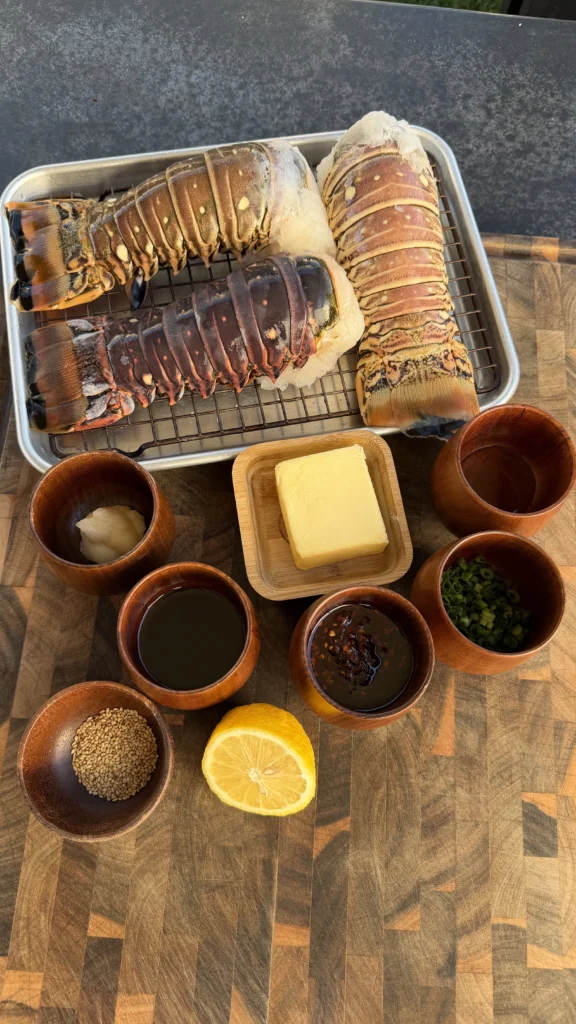
- 3 large lobster tails (8-10 oz each)
- Kosher salt, to taste
Garlic Chili Crisp Butter
- 1 stick (½ cup) unsalted butter
- 4 cloves garlic, finely minced
- 2-3 tablespoons chili crisp
- 1 teaspoon soy sauce
- 1 teaspoon honey (optional)
- 1 tablespoon fresh lime juice
- 2 tablespoons chopped green onions (for garnish)
Pat the lobster meat completely dry after butterflying. Moisture prevents caramelization and char development. Dry lobster sears beautifully and develops the char marks that create flavor. Wet lobster steams instead of searing.
Step-by-Step Instructions
Step 1: Butterfly the Lobster Tails
Using heavy-duty kitchen shears, cut down the center of the top shell from the wide end toward the tail fan. Cut through the shell but stop just before reaching the fan. Don’t cut through the fan itself. The fan should remain intact.
Spread the shell halves apart gently. Using your fingers, work the lobster meat loose from the inside of the shell. Start at the wide end and slide your fingers under the meat. Work toward the tail fan. The meat should separate from the shell but stay attached at the tail fan.
Lift the meat up and rest it on top of the opened shell. The meat should sit on top with the shell acting as a base. The tail fan remains at the end.
Look for the dark digestive vein running down the center of the meat. Use the tip of a knife to lift it out and discard it. Rinse the lobster under cold water and pat completely dry with paper towels.
If the meat is very thick (over 1½ inches), make a horizontal cut through the thickest part about 80% of the way through. Open it like a book to create a flatter profile.
Step 2: Season and Prep the Lobster
Pat the lobster meat dry one more time. Any remaining moisture will prevent proper char development.
Lightly season the meat with kosher salt. Don’t over-salt. The chili crisp butter will add additional seasoning later. You just want a base layer of salt on the meat itself.
Let the lobster sit at room temperature for 10 to 15 minutes while you preheat the grill. Cold lobster straight from the refrigerator can shock when it hits high heat. Room temperature lobster cooks more evenly.
Step 3: Preheat the Grill
Preheat your grill to medium-high heat, about 400 to 450°F. Clean the grates thoroughly with a grill brush. Lobster is expensive. You don’t want it sticking to dirty grates.
Oil the grates lightly with a high smoke point oil. Use tongs to hold a paper towel soaked in oil. Wipe it across the grates. This creates a nonstick surface.
Make sure all burners are heating evenly. You want consistent temperature across the cooking surface. Hot spots can overcook portions of the lobster while other areas stay undercooked.
Step 4: Grill the Lobster Tails
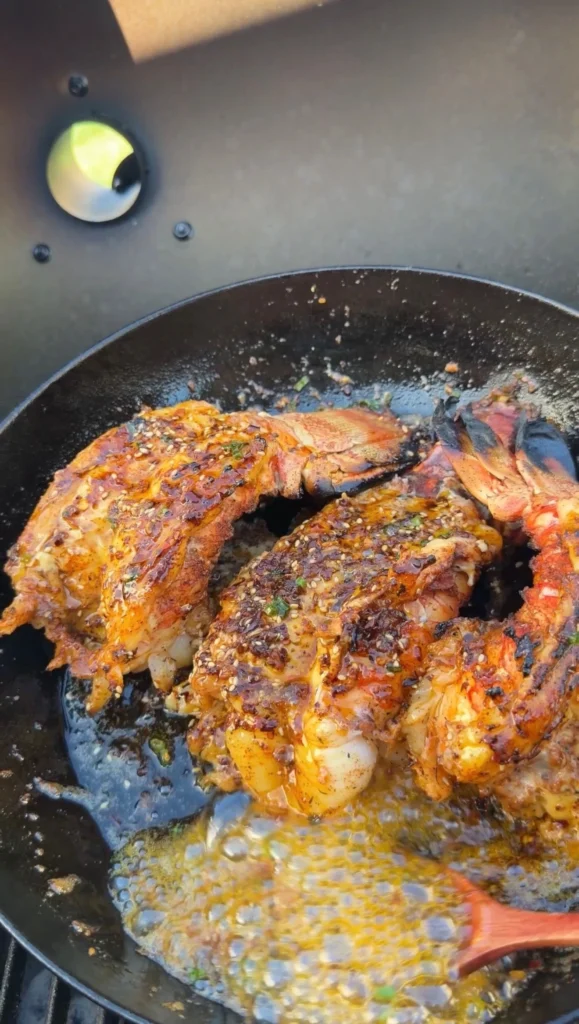
Place the lobster tails on the grill meat-side down first. The meat should make direct contact with the grates. This develops char marks and caramelization.
Grill for 3 to 4 minutes without moving them. Don’t press down or fiddle with them. Let them develop grill marks. The meat will release from the grates when it’s ready to flip. If it sticks, give it another 30 seconds.
Using tongs, carefully flip the lobster tails shell-side down. The meat now faces up. Grill for another 3 to 4 minutes. Check the internal temperature with an instant-read thermometer. Insert it into the thickest part of the meat.
Pull the lobster when it reaches 135°F. Don’t wait for it to hit 140°F on the grill. Carryover cooking will bring it up to 138 to 140°F during the butter basting phase.
Remove the lobster tails from the grill and set them aside on a plate while you make the butter sauce.
Step 5: Make the Garlic Chili Crisp Butter
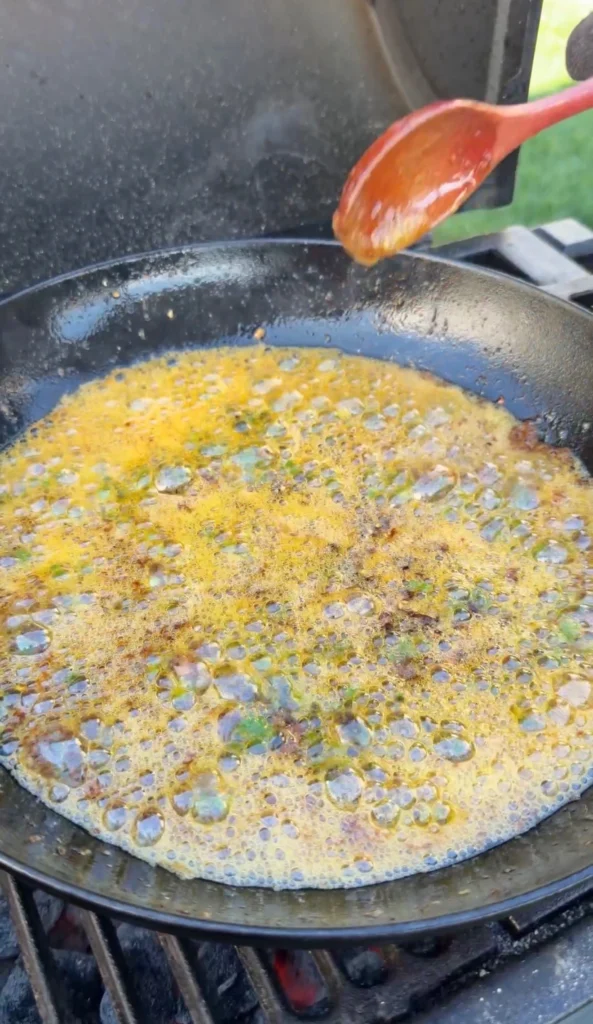
Place a cast iron skillet or grill-safe pan over medium-low heat. You can do this on the grill’s side burner or on a stovetop. The temperature should be much lower than the grilling temperature.
Add 1 stick of unsalted butter to the pan. Let it melt completely. Don’t rush this by using high heat. Slow melting prevents the butter from separating.
Once melted, add 4 cloves of finely minced garlic. Cook for 30 to 45 seconds, stirring constantly. The garlic should become fragrant but not brown. Browned garlic tastes bitter. You want sweet, aromatic garlic.
Add 2 to 3 tablespoons of chili crisp. Start with 2 tablespoons if you’re heat-sensitive. Use 3 tablespoons for more aggressive spice. Stir to combine.
Add 1 teaspoon of soy sauce and 1 teaspoon of honey if using. Stir well. The sauce should be a deep red color from the chili oil. It should smell spicy, garlicky, and slightly sweet.
Finish with 1 tablespoon of fresh lime juice. Stir one final time. The sauce is ready for basting.
Step 6: Butter Baste the Lobster
Place the grilled lobster tails into the pan with the butter sauce. The meat should be facing up. The shell bottom sits in the butter.
Using a spoon, continuously baste the lobster with the hot butter. Spoon the butter over the meat. Make sure all surfaces get coated. The butter should be gently bubbling but not violently boiling.
Baste for 2 to 3 minutes total. The lobster meat should become glossy and deeply colored from the chili oil. The internal temperature will climb from 135°F to approximately 138 to 140°F during this time.
Watch for the meat to firm up slightly. It should feel springy when you press it gently. If it feels hard, you’ve overcooked it. Pull it immediately.
Step 7: Garnish and Serve
Remove the lobster tails from the pan using tongs. Place them on a serving platter. The glossy red butter should be dripping off the meat.
Spoon additional butter sauce from the pan over each tail. Don’t be shy. The butter is a major component of the dish’s flavor.
Sprinkle 2 tablespoons of chopped green onions over the lobster tails. The fresh green color contrasts beautifully with the red butter.
Optionally, add an extra squeeze of fresh lime juice over the top. The acid brightens all the flavors and cuts through the richness.
Serve immediately while the butter is hot and the lobster is at peak temperature. Provide extra lime wedges and the remaining butter sauce on the side for those who want more.

Grilled Chili Crisp Lobster Tails with Garlic Butter
Ingredients
Equipment
Method
- Using kitchen shears, cut down the center of the top shell from wide end to tail fan. Stop before cutting through the fan. Spread shell apart and work meat loose from inside. Lift meat to sit on top of shell while staying attached at tail fan. Remove digestive vein. Rinse and pat completely dry.
- Season lobster meat lightly with kosher salt. Let sit at room temperature 10 to 15 minutes.
- Preheat grill to medium-high heat, 400 to 450°F. Clean and oil grates.
- Place lobster tails meat-side down on grill. Cook 3 to 4 minutes until grill marks form. Flip shell-side down and cook another 3 to 4 minutes until internal temperature reaches 135°F. Remove from grill.
- In cast iron skillet over medium-low heat, melt butter. Add minced garlic and cook 30 to 45 seconds until fragrant. Add chili crisp, soy sauce, and honey if using. Stir to combine. Finish with lime juice.
- Place grilled lobster in pan with butter sauce. Baste continuously for 2 to 3 minutes until meat is glossy and internal temperature reaches 138 to 140°F.
- Remove lobster to serving platter. Spoon extra butter sauce over top. Garnish with chopped green onions and extra lime juice. Serve immediately.
Nutrition
Notes
Tried this recipe?
Let us know how it was!Frequently Asked Questions
Can You Use Frozen Lobster Tails?
Frozen lobster tails work perfectly for this recipe. Most lobster tails sold in grocery stores are frozen. They’re flash-frozen on the boat immediately after harvest. This preserves quality better than “fresh” lobster that’s been sitting on ice for days.
Thaw frozen lobster tails in the refrigerator overnight. Place them in a bowl to catch any water as they thaw. Never thaw at room temperature. This creates food safety issues. Slow refrigerator thawing maintains the best texture.
If you’re in a rush, you can thaw lobster tails in cold water. Keep them in their packaging. Submerge in a bowl of cold water. Change the water every 30 minutes. They should thaw in 1 to 2 hours depending on size.
Once thawed, treat them exactly like fresh lobster. Pat them dry thoroughly. Frozen lobster often releases more liquid than fresh. Extra drying is critical for proper char development on the grill.
What Chili Crisp Brand Works Best?
Lao Gan Ma is the classic choice. It’s widely available in Asian markets and many regular grocery stores. The original spicy chili crisp in the black jar with the woman’s face is excellent. It has good heat level and crispy bits.
Fly By Jing Sichuan Chili Crisp is premium option. It’s more expensive but has complex flavor. The heat is slightly more aggressive. The fried aromatics are very crispy. If you want to impress, this is the brand to use.
Trader Joe’s Crunchy Chili Onion is a more accessible option. It’s milder than traditional chili crisp. Good for people who are heat-sensitive. It has excellent crunch from the fried onions. The flavor leans more toward sweet than spicy.
Any chili crisp brand works as long as it contains oil, chili flakes, and fried aromatics. Avoid chili pastes or sauces. You need the oil component for the glossy coating. Paste-style chili products don’t create the same effect.
Can You Broil Instead of Grill?
You can broil lobster tails if you don’t have a grill. Preheat your broiler to high. Place butterflied lobster tails on a baking sheet meat-side up. Position the rack 4 to 6 inches from the broiler element.
Broil for 5 to 7 minutes without flipping. Watch carefully. Lobster can go from perfect to overcooked in 60 seconds under a broiler. Pull when the meat reaches 135°F internal temperature.
The broiler won’t create the same char marks as a grill. But you’ll get browning and caramelization. The final butter basting step is the same. The texture will be very similar to grilled lobster even without the grill marks.
For extra color, you can brush the lobster with a thin layer of butter before broiling. This promotes browning. But don’t use the full chili butter mixture. Save that for the final basting phase. The chili oil can smoke excessively under the broiler.
How Do You Know If Lobster Is Overcooked?
Overcooked lobster becomes rubbery and tough. The meat shrinks significantly. When you bite it, it resists your teeth. The texture is dense and dry instead of tender and succulent.
Visual cues include very firm meat that doesn’t spring back when pressed. The meat might also curl tightly. Properly cooked lobster curls slightly. Overcooked lobster curls into a tight spiral.
The color can also indicate overcooking. Properly cooked lobster is opaque white throughout. Overcooked lobster can develop a grayish tint. The edges might look dried out or shriveled.
Internal temperature is the best indicator. Lobster cooked to 145°F or higher is overcooked. It’s still safe to eat. But the texture suffers significantly. Always pull at 135°F and let carryover cooking bring it to 138 to 140°F maximum.
What Sides Pair Well with Chili Crisp Lobster?
Simple sides work best. The lobster is rich and spicy. You want sides that provide contrast rather than competing. Steamed rice or coconut rice absorbs the chili butter beautifully. The neutral rice balances the bold lobster.
Grilled asparagus or broccolini provide green vegetables. Light char on the vegetables echoes the char on the lobster. A squeeze of lime ties everything together. The vegetables add freshness without heaviness.
A simple cucumber salad with rice vinegar dressing offers cool, crisp contrast. The acidity cuts through the rich butter. The crunchy texture plays against the tender lobster. This is especially nice if the chili crisp heat is aggressive.
Garlic bread or crusty baguette is perfect for soaking up extra chili butter. Don’t let that flavorful butter go to waste. Bread captures every drop. This is less refined but extremely satisfying.
For a complete Asian-inspired meal, serve with stir-fried bok choy or Chinese broccoli. The slight bitterness of these greens complements the sweet lobster. Garlic sauce on the vegetables creates flavor cohesion with the garlic butter on the lobster.
Ready to Level Up?
Take your backyard cooking from good to legendary.
This is where I keep all my most-used smokers, knives, and favorite cooking tools.
Shop My Gear CollectionExplore More Recipes
Find more diverse flavors at CWFeats.com