Grilled strip steaks with garlic herb compound butter represent the pinnacle of simple steakhouse cooking at home. Thick New York strip steaks seasoned with just salt and pepper, seared over high heat until perfectly charred, then finished with a melting pat of homemade garlic herb butter that creates an instant pan sauce. This compound butter steak recipe proves that the best steaks don’t need complicated preparations – just quality beef, proper technique, and a flavor-packed finishing butter.
Grilled Strip Steaks with Garlic Herb Compound Butter
Perfectly grilled New York strip steaks finished with homemade garlic herb compound butter for restaurant-quality results
Ingredients
For the Steaks:
- 2 New York strip steaks (about 12 oz each)
- Kosher salt
- Freshly cracked black pepper
For the Garlic Herb Compound Butter:
- 1 block (8 oz) unsalted butter, room temperature
- 4 garlic cloves, finely grated
- 1 tsp fresh thyme, chopped
- 1 tsp fresh rosemary, chopped
- 1 tsp fresh chives, chopped
- 1 tsp fresh parsley, chopped
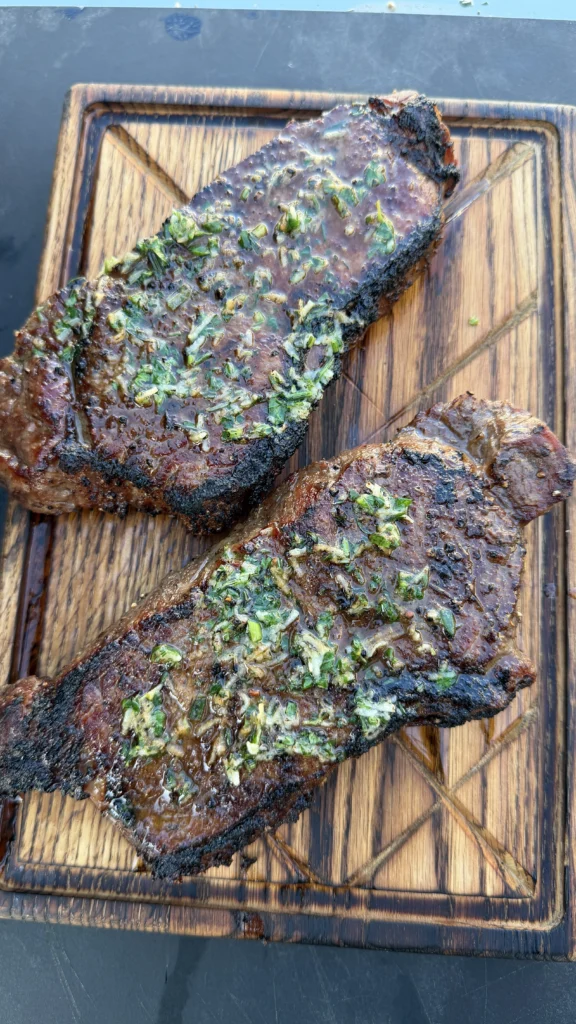
What makes this garlic butter grilled steak special is how the compound butter transforms a simple grilled steak into something extraordinary. As the butter melts over the hot meat, the garlic, thyme, rosemary, chives, and parsley release their aromatics, creating a rich, herby sauce that pools around the steak. Each bite delivers perfectly cooked beef enhanced by the nutty, garlicky, herb-infused butter. The contrast between the charred exterior and butter-enriched interior creates restaurant-quality results.
This best grilled steak recipe with compound butter is deceptively simple but delivers impressive results. The compound butter can be made days ahead and stored in the freezer, making it perfect for both weeknight dinners and special occasions. Once you have the butter prepared, the actual cooking takes less than 15 minutes. The technique works beautifully on infrared grills, which provide intense, even heat perfect for developing a proper crust while keeping the interior juicy.
Understanding New York Strip Steaks
New York strip steaks, also called Kansas City strips or top loin steaks, come from the short loin section of the cow. This area doesn’t get much exercise, resulting in tender meat with excellent marbling. Strip steaks have a distinctive strip of fat along one edge that renders during cooking, basting the meat and adding flavor. The meat itself has a firm texture with good beefy flavor that’s less intense than ribeye but more pronounced than tenderloin.
The ideal thickness for grilled strip steaks is 1 to 1.5 inches. Thinner steaks cook too quickly, making it difficult to develop a proper crust before overcooking the interior. Thicker steaks allow for better temperature control and create that perfect contrast between charred exterior and pink, juicy center. For 12-ounce steaks, you’re typically looking at cuts around 1.25 inches thick, which is perfect for high-heat grilling.
Look for strip steaks with good marbling throughout – those thin white lines of fat running through the meat. Marbling melts during cooking, keeping the steak moist and adding flavor. The exterior fat cap should be intact but not excessively thick. Some people trim the fat cap before cooking, but leaving it on adds flavor and helps keep the steak juicy. It can always be trimmed after cooking if desired.
Choice grade strip steaks work well for this recipe, offering good marbling at reasonable prices. Prime grade has more marbling and will be more tender and flavorful, but costs significantly more. Avoid Select grade for grilling – it lacks sufficient marbling and tends to cook up dry and tough. Dry-aged steaks offer even more concentrated beef flavor but require special sourcing and command premium prices.
The Power of Compound Butter
Compound butter is simply softened butter mixed with flavorings, then reformed and chilled. For steaks, compound butter serves multiple purposes – it adds richness, creates an instant pan sauce, and infuses every bite with aromatic herbs and garlic. As the butter melts over hot steak, it carries those flavors into the meat while the milk solids create a glossy, restaurant-quality finish.
The herb combination of thyme, rosemary, chives, and parsley creates a balanced, savory profile that complements beef without overwhelming it. Thyme and rosemary provide earthy, slightly piney notes that enhance meat’s natural flavors. Chives add mild onion flavor and bright green color. Parsley contributes freshness and helps balance the stronger herbs. Together, they create a complex, layered flavor that tastes like something from a high-end steakhouse.
Freshly grated garlic is crucial for compound butter that tastes fresh and vibrant rather than harsh and overpowering. Using a microplane to grate garlic creates a paste-like consistency that distributes evenly throughout the butter. Minced or pressed garlic creates larger pieces that don’t incorporate as smoothly. The butter mellows the garlic’s sharpness while carrying its flavor throughout every bite.
Making compound butter ahead is one of the best meal prep strategies for impressive dinners. Once mixed, the butter can be rolled into a log in parchment paper and refrigerated for up to a week or frozen for up to three months. Having flavored butter ready means you can turn any grilled steak, chicken breast, or fish fillet into something special with minimal effort. Simply slice off medallions and place on hot food just before serving.
Why Infrared Grills Excel for Steaks
Infrared grills use radiant heat rather than convection, delivering intense, even heat directly to food. Traditional gas and charcoal grills heat the air around food, which then transfers heat to the surface. Infrared technology generates temperatures above 700°F and directs that heat straight at the meat, creating superior searing and crust development in less time. This intense heat locks in juices while creating the Maillard reaction that develops complex, savory flavors.
The even heat distribution of infrared burners eliminates hot and cold spots common on traditional grills. Every inch of your steak receives consistent heat, resulting in even cooking and uniform crust development. You don’t need to rotate steaks or move them around to avoid flare-ups or uneven cooking. This consistency makes it easier to achieve perfect doneness, especially for less experienced grill cooks.
Infrared grills also preheat faster than traditional grills, often reaching cooking temperature in 5-7 minutes rather than 15-20. The intense heat means shorter cooking times, which translates to more moisture retention and juicier steaks. A 1.25-inch strip steak that might take 12-14 minutes on a traditional grill cooks in 6-8 minutes on infrared, spending less time losing moisture.
If you don’t have an infrared grill, you can still make excellent strip steaks on a traditional gas grill, charcoal grill, or cast iron skillet. The key is getting your cooking surface as hot as possible and not moving the steaks until they’ve developed a proper crust. Cast iron skillets work particularly well indoors, as they retain heat effectively and create beautiful searing. Preheat the skillet until it’s smoking hot before adding steaks.
The Importance of Simple Seasoning
High-quality strip steaks need nothing more than kosher salt and freshly cracked black pepper to shine. Over-seasoning or using complex spice rubs masks the natural beef flavor that you paid good money for. Salt and pepper enhance and amplify the meat’s inherent taste rather than covering it up. This simple approach lets the quality of the beef and the garlic herb butter be the stars.
Kosher salt has larger, flakier crystals than table salt, which makes it easier to control application and creates better texture in the finished crust. The larger crystals also dissolve more slowly, allowing time for the salt to penetrate the meat before fully dissolving. This creates even seasoning throughout rather than just on the surface. Diamond Crystal and Morton kosher salt are both excellent choices, though Diamond Crystal is less salty by volume due to its flakier structure.
Freshly cracked black pepper provides more complex, aromatic flavor than pre-ground pepper. Whole peppercorns contain volatile oils that dissipate quickly once ground. Cracking peppercorns just before seasoning preserves these oils, giving you brighter, more vibrant pepper flavor. Use a pepper mill or mortar and pestle to crack peppercorns coarsely – you want pieces of various sizes for textural interest and varying intensity.
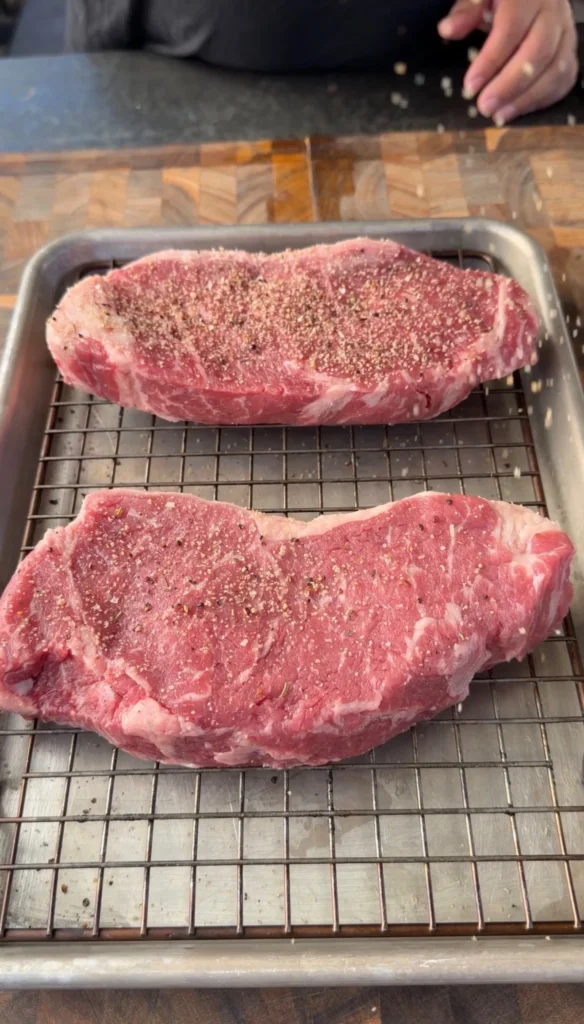
Pat steaks completely dry before seasoning. Surface moisture prevents proper crust formation and interferes with seasoning adhesion. Use paper towels to thoroughly dry both sides of each steak. Season generously – the salt should be visible on the surface but not piled on thick. A 12-ounce steak needs about 1 teaspoon of salt per side. Season just before grilling rather than hours ahead, which can draw out moisture and affect texture.
Ingredients
For the Steaks:
- 2 New York strip steaks (about 12 oz each)
- Kosher salt
- Freshly cracked black pepper
For the Garlic Herb Compound Butter:
- 1 block (8 oz) unsalted butter, room temperature
- 4 garlic cloves, finely grated
- 1 tsp fresh thyme, chopped
- 1 tsp fresh rosemary, chopped
- 1 tsp fresh chives, chopped
- 1 tsp fresh parsley, chopped
Step-by-Step Instructions
Prepare the Garlic Herb Compound Butter
Remove the butter from refrigeration about 30-45 minutes before you plan to start, allowing it to come to room temperature. The butter should be soft enough that your finger leaves an indentation when pressed, but not melting or greasy. Room temperature butter is essential for proper mixing – cold butter won’t incorporate the herbs evenly, while overly soft butter becomes greasy and difficult to work with.
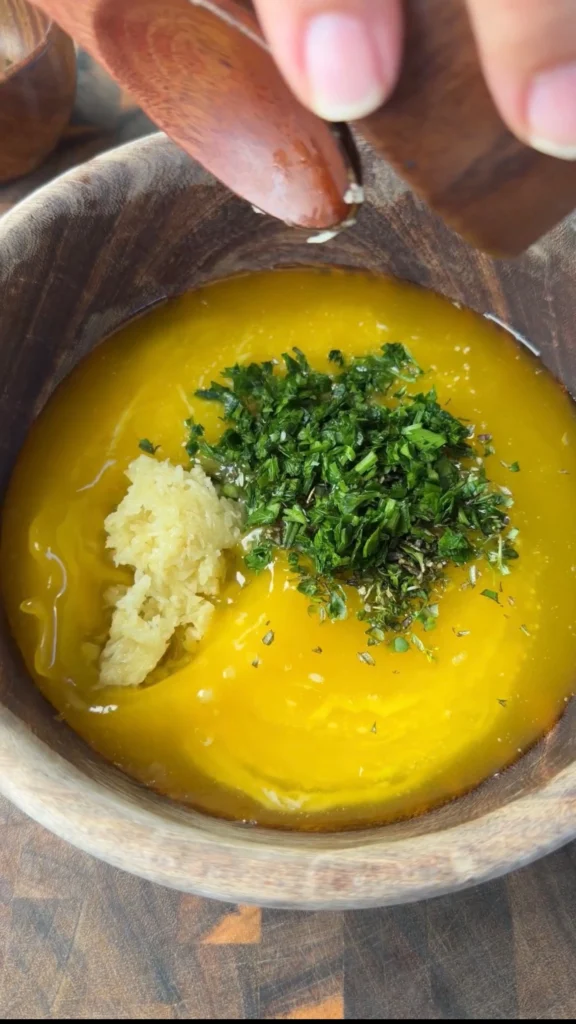
Peel your garlic cloves and use a microplane or fine grater to grate them into a paste. Grating rather than mincing creates a smoother texture that distributes more evenly throughout the butter. The garlic should form a paste-like consistency without any chunks. Finely chop your fresh herbs – thyme, rosemary, chives, and parsley – making sure they’re completely dry before chopping. Wet herbs dilute the butter and affect its texture. Remove any tough stems from thyme and rosemary, using only the tender leaves. In a medium bowl, combine the softened butter with grated garlic and all chopped herbs. Use a fork or silicone spatula to mix thoroughly until the herbs and garlic are evenly distributed throughout the butter with no white streaks remaining. The butter should be uniformly green-flecked with a strong garlic aroma. Set aside at room temperature if using immediately, or transfer to parchment paper, roll into a log, twist the ends, and refrigerate for later use.
Season the Strip Steaks
Remove the steaks from refrigeration and unwrap them. Pat both sides completely dry with paper towels, pressing firmly to absorb all surface moisture. Any dampness will prevent proper searing and interfere with crust formation. Let the steaks sit at room temperature for 15-20 minutes – this takes the chill off and promotes more even cooking. Cold steaks straight from the fridge cook unevenly, with the exterior overcooking before the interior comes up to temperature.
Season both sides of each steak generously with kosher salt. Hold the salt about 8-10 inches above the steaks and sprinkle evenly, allowing the salt to distribute across the entire surface. You should be able to see the salt crystals clearly without them piling up in spots. Use approximately 1 teaspoon of kosher salt per side per 12-ounce steak – this seems like a lot, but much of it will fall off during handling and cooking. Crack fresh black pepper over both sides using a pepper mill or mortar and pestle. The pepper should coat the surface but not be so heavy that you can’t see the meat. Press the seasonings gently into the meat with your hands to ensure good adhesion. The steaks are now ready for the grill.
Preheat Your Infrared Grill
Turn your infrared grill to high heat and close the lid. Allow the grill to preheat for 10-15 minutes until it reaches maximum temperature. Infrared grills can reach 700°F or higher, creating the intense heat needed for perfect searing. If your grill has a temperature gauge, wait until it reaches the highest reading. You can also test by holding your hand about 6 inches above the grate – if you can only hold it there for 1 second before pulling away, it’s ready.
The grill grates should be clean and dry before cooking. Use a grill brush to remove any debris from previous cooking sessions. For extra insurance against sticking, you can lightly oil the hot grates just before adding the steaks, but this isn’t necessary on properly preheated infrared grills. The intense heat creates an immediate sear that naturally releases the meat once a crust forms. Have your tongs ready and positioned nearby – you’ll need to act quickly once the steaks hit the heat.
Grill the Strip Steaks to Perfection
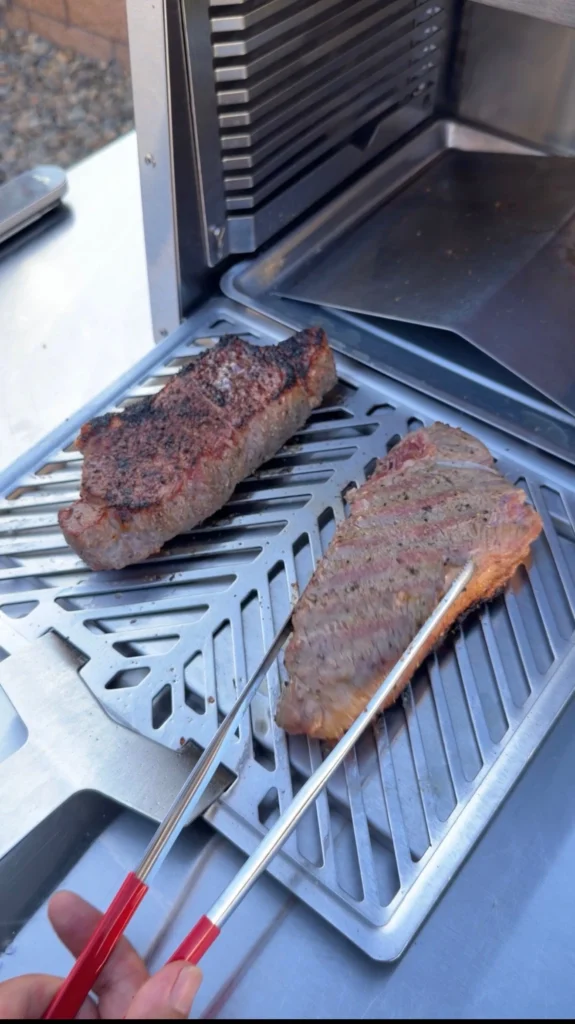
Place the seasoned steaks directly on the hottest part of the grill grates. You should hear an immediate, loud sizzle – this is the sound of proper searing. Don’t move the steaks once they’re down. Resist the urge to peek, lift, or shift them. Let them cook undisturbed for 3 minutes, allowing a proper crust to develop on the first side. The intense infrared heat will create beautiful grill marks and caramelization.
After 3 minutes, use tongs to flip each steak. The first side should be deeply browned with defined grill marks and a slightly charred crust around the edges. If the steaks are sticking, they’re not ready to flip – give them another 30 seconds and try again. A proper crust releases naturally from the grates. Cook the second side for another 3 minutes for medium-rare (internal temperature around 130°F). For medium, cook 3.5-4 minutes per side (140°F internal). Use an instant-read thermometer inserted horizontally into the thickest part of the steak to check temperature. Remember the steak will continue cooking during rest, so pull it about 5 degrees before your target temperature.
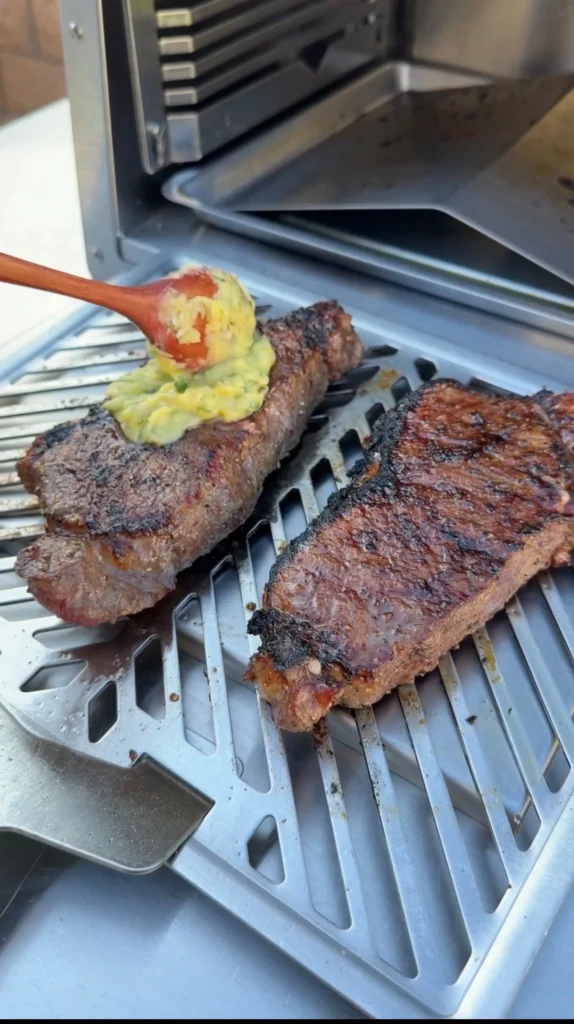
Baste with Garlic Herb Butter
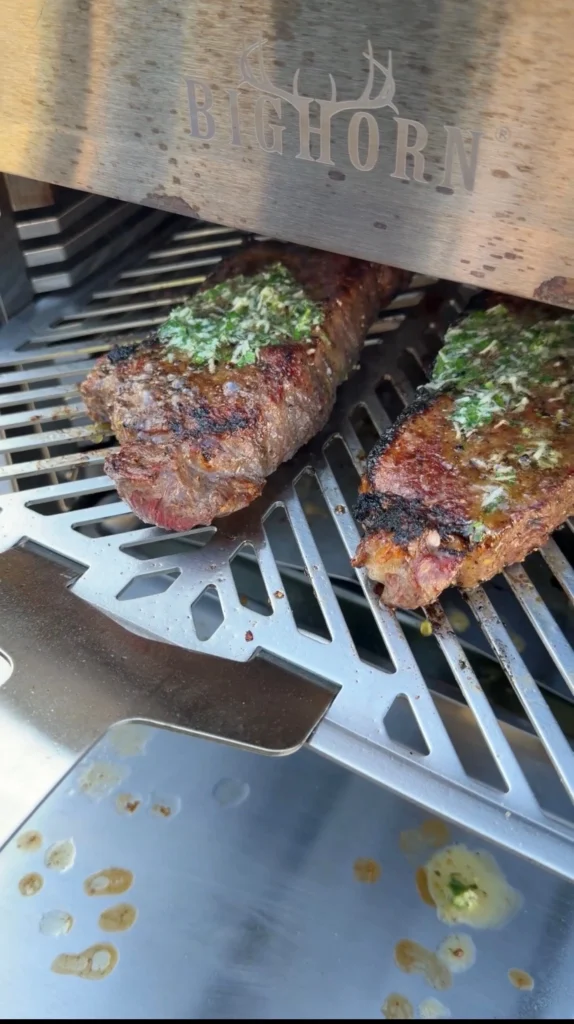
When the steaks are about 30 seconds from your target temperature, it’s time for the butter basting. This step transforms good steaks into extraordinary ones. Using a spoon, place a generous dollop of the garlic herb compound butter on top of each steak while they’re still on the grill. The butter will immediately begin melting from the heat of the meat and the grill. Close the grill lid briefly to help the butter melt evenly across the surface.
After 30 seconds, flip the steaks one final time so the buttered side is now facing down against the hot grates. This allows the butter to sizzle into the meat while the herbs make contact with the hot surface, releasing their aromatic oils. Add another dollop of compound butter to the now-upward-facing side. Let the steaks cook for a final 30 seconds – the butter will foam and sizzle, creating an incredible aroma while infusing every bite with garlic and herb flavor. The milk solids in the butter will brown slightly, adding nutty notes to complement the herbs.
Rest the Steaks Properly
Transfer the butter-topped steaks to a clean cutting board or plate. Don’t skip this rest – it’s crucial for juicy steaks. During cooking, the muscle fibers contract and push juices toward the center. Resting allows the meat to relax and juices to redistribute throughout. If you cut immediately, all those juices run out onto the plate instead of staying in the meat, resulting in dry steaks.
Let the steaks rest for 5-7 minutes loosely tented with aluminum foil. The foil holds in some heat while allowing excess steam to escape – tightly wrapping would steam the crust you worked hard to develop. During this rest, the internal temperature will continue to rise about 5 degrees (carryover cooking), which is why you pulled them slightly before target temperature. The steaks will stay plenty hot for serving even after resting.
Slice and Serve
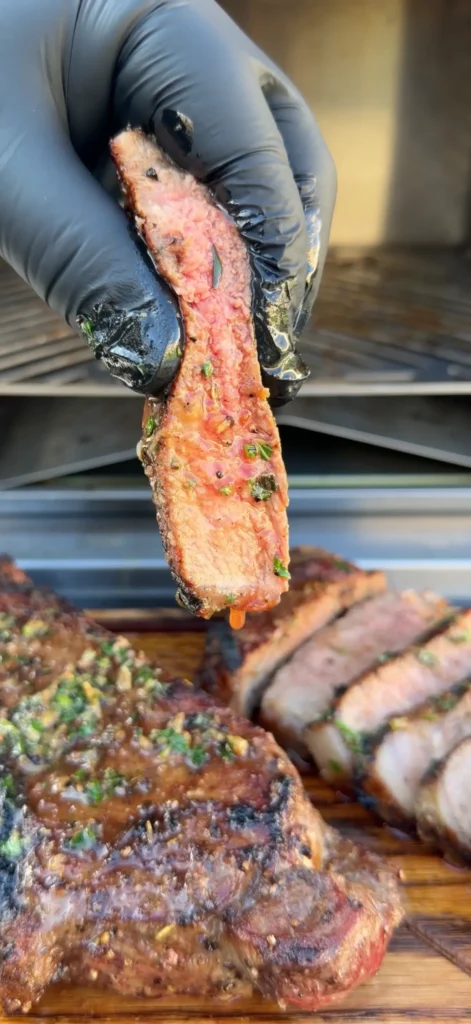
After resting, you can serve the steaks whole or slice them for presentation. To slice, position your knife at a 45-degree angle to the cutting board and cut against the grain in 1/2-inch thick slices. Cutting at an angle creates larger slices that look more impressive on the plate. Arrange the sliced steak fanned out on serving plates, showing off the pink interior and charred exterior.
Top the sliced or whole steaks with additional garlic herb compound butter – at least a tablespoon per steak. The butter will melt into any accumulated juices on the cutting board or plate, creating an instant pan sauce. Spoon this butter-juice mixture over the meat for maximum flavor. Any remaining compound butter can be served on the side for guests to add as desired. Serve immediately while hot with your favorite steakhouse sides.

Grilled Strip Steaks with Garlic Herb Compound Butter
Ingredients
Method
- Make compound butter: In bowl, mix softened butter with grated garlic, thyme, rosemary, chives, and parsley until evenly combined. Set aside or roll in parchment and refrigerate for later use.
- Remove steaks from refrigeration and pat completely dry with paper towels. Let sit at room temperature for 15-20 minutes.
- Season both sides of steaks generously with kosher salt (about 1 tsp per side) and freshly cracked black pepper. Press seasoning into meat.
- Preheat infrared grill to high heat for 10-15 minutes until it reaches maximum temperature (700°F+).
- Place steaks on hot grill grates. Cook undisturbed for 3 minutes to develop crust on first side.
- Flip steaks and cook second side for 3 minutes for medium-rare (130°F internal) or 3.5-4 minutes for medium (140°F internal).
- When steaks are 30 seconds from target temp, place generous dollop of compound butter on top of each steak while on grill.
- Flip steaks so buttered side faces down against grates. Add another dollop of butter to top. Cook final 30 seconds.
- Transfer steaks to cutting board and rest 5-7 minutes loosely tented with foil. Internal temp will rise about 5 degrees during rest.
- Serve whole or slice against grain. Top with additional compound butter and any accumulated juices. Serve immediately.
Notes
Compound butter can be made ahead and frozen for up to 3 months
Works on traditional grills too – just preheat as hot as possible
Use instant-read thermometer for accuracy
Tried this recipe?
Let us know how it was!Ready to Take Your Cooking to the Next Level?
This is where I keep all my most-used products, gear, and favorite cooking tools — check it out:
View My Cooking Gear & ToolsRecipe Categories
If you loved this recipe, you’ll find more to savor across our diverse categories. From beef to pork, chicken to turkey, seafood to appetizers, there’s a wealth of flavors waiting for you. Explore them all at CWFeats.