Grilled Tri-Tip with Uruguayan Marinade
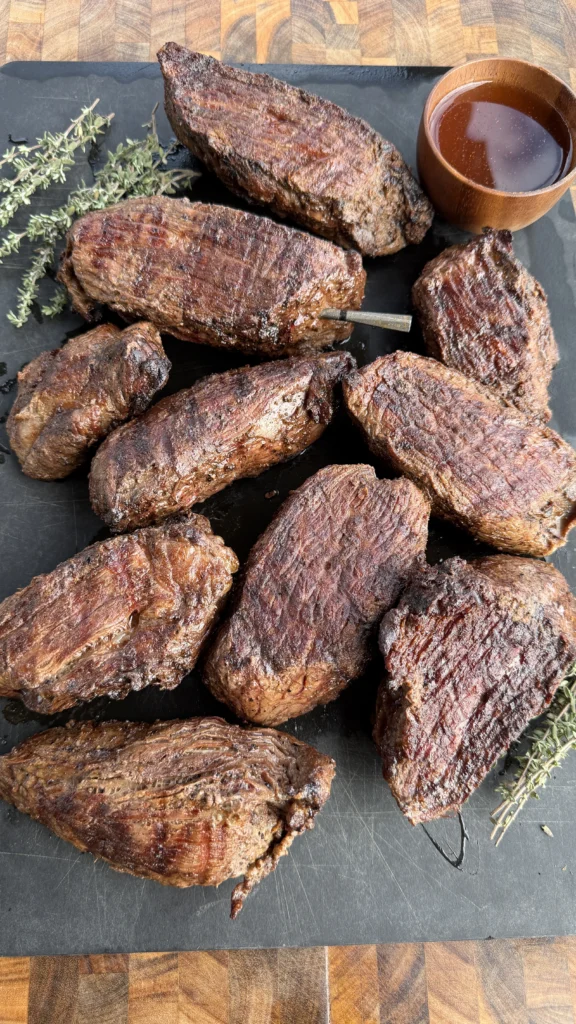
Grilled tri tip with Uruguayan marinade is two tri-tip steaks seasoned with beef rub, seared over high direct heat for 3 minutes per side to build a crust, then sliced with the grain into 1-inch thick strips and basted with a bold Uruguayan-style marinade made from coarse salt, black peppercorns, smashed garlic, bay leaves, oregano, rosemary, and parsley dissolved in hot water. The sliced meat goes back on the grill for 2 minutes per side, getting basted multiple times as it finishes cooking to your desired doneness. This technique infuses the beef with herbaceous, garlicky flavor while keeping the interior tender and juicy. The salt brine acts as both seasoning and tenderizer, penetrating the meat during those final minutes over the flame.
The whole process takes about 50 minutes from start to finish. You make the marinade in a sterilized bottle by combining all the dry ingredients with hot water and shaking until the salt dissolves. Season the tri-tips and sear them hard to develop crust. Slice them with the grain while they’re still rare. Baste with the marinade and return to the grill for a quick finish. This tri tip steak recipe gives you the bold flavors of South American asado with the convenience of faster-cooking sliced steaks instead of whole roasts.
Why Do You Slice Tri-Tip With the Grain Before Finishing on the Grill?
Slicing grilled tri tip with the grain before the final cook is a technique borrowed from Uruguayan and Argentine grilling traditions. It creates individual steak-like pieces that absorb marinade better than a whole roast. When you slice with the grain at this stage, you’re creating long muscle fibers that stay intact during the second grilling. This gives you tender bites when you later slice against the grain to serve.
The science behind this is surface area and marinade penetration. A whole tri-tip has limited surface area for the salt brine to contact. When you slice it into 1-inch thick strips, you multiply the surface area dramatically. Every piece gets coated with the Uruguayan marinade on multiple sides. The salt can penetrate the meat fibers during those final 4 minutes of cooking instead of just seasoning the exterior.
Slicing with the grain also prevents the meat from falling apart during the second grilling. Grilled Tri-tip has a distinctive grain pattern that runs in different directions depending on which part of the cut you’re looking at. When you slice with the grain, you’re keeping those muscle fibers long and intact. This means the pieces hold together when you flip them on the grill. If you sliced against the grain at this point, the short muscle fibers would contract and the pieces would become tough or fall apart.
This technique also addresses tri-tip’s biggest challenge, which is uneven cooking. Tri-tip is triangular and thick on one end, thin on the other. When you cook it whole, you inevitably get some pieces that are overcooked and some that are undercooked. By searing first to build crust, then slicing and finishing each piece individually, you can pull them at different times based on thickness. The thick pieces stay on longer while the thin pieces come off earlier. Everyone gets their preferred doneness.
How Does the Salt Brine Tenderize Meat During the Final Grilling?
The Uruguayan marinade functions as a wet brine that tenderizes meat through osmosis and protein breakdown. When you apply the salt-heavy marinade to the sliced tri-tip and return it to the grill, the salt penetrates the muscle fibers. This causes the proteins to denature slightly, which makes them more tender. At the same time, the salt helps the meat retain moisture during cooking by changing the protein structure so it holds onto water molecules better.
The process works because salt disrupts the protein bonds in muscle tissue. Muscle fibers are made of proteins called actin and myosin that are tightly bound together. When salt comes into contact with these proteins, it causes them to unwind and relax. This creates space between the muscle fibers where moisture can be trapped. The result is meat that’s both more tender and more juicy than unseasoned meat cooked the same way.
The timing matters here. You’re not brining the tri-tip for hours like you would with a turkey. You’re applying the marinade right before the final cook, which gives you 4-6 minutes of contact time between the salt and the meat. This is enough for surface-level tenderizing without making the meat mushy. The high heat of the grill also drives the salt into the meat faster than if you were just letting it sit at room temperature.
The other ingredients in the Uruguayan marinade support the salt’s work. The garlic contains enzymes that help break down proteins. The vinegar-like acidity from the herbs helps tenderize the surface. The peppercorns add aromatics that complement the beef without overpowering it. Together, these ingredients create a complex flavor profile that’s salty, garlicky, herbaceous, and slightly pungent from the black pepper and oregano.
What’s the Difference Between Slicing With vs Against the Grain?
Understanding grain direction is critical for achieving tender tri tip steak. The grain refers to the direction of the muscle fibers in the meat. When you slice with the grain, you’re cutting parallel to these fibers, which keeps them long. When you slice against the grain, you’re cutting perpendicular to the fibers, which makes them short.
The reason this matters is chewing. Long muscle fibers are harder to chew through because your teeth have to break down the entire length of the fiber. Short muscle fibers are easier to chew because they’re already broken into small segments. When you eat a steak that was sliced with the grain, it feels chewy and stringy. When you eat a steak that was sliced against the grain, it feels tender and melts in your mouth.
For this recipe, you slice with the grain before the final grilling to create structural integrity. The long fibers hold the meat together during flipping and basting. Then, when you’re ready to serve, you slice those thick strips against the grain into individual portions. This gives you the best of both worlds: pieces that stay intact during cooking but are tender when you eat them.
Tri-tip is particularly challenging because the grain direction changes. On one end of the tri-tip, the grain runs one way. On the other end, it runs perpendicular. In the middle, it curves. This means you can’t just slice the whole thing in one direction. You need to identify where the grain changes and adjust your knife angle accordingly. The easiest way to see the grain is to look at the surface of the meat and find the lines running through it. Those lines are the muscle fibers. Slice perpendicular to those lines when serving.
See How It’s Done
Tri-Tip with Uruguayan Marinade
Seared hard, sliced thick, basted with salt-garlic-oregano marinade, finished over flame
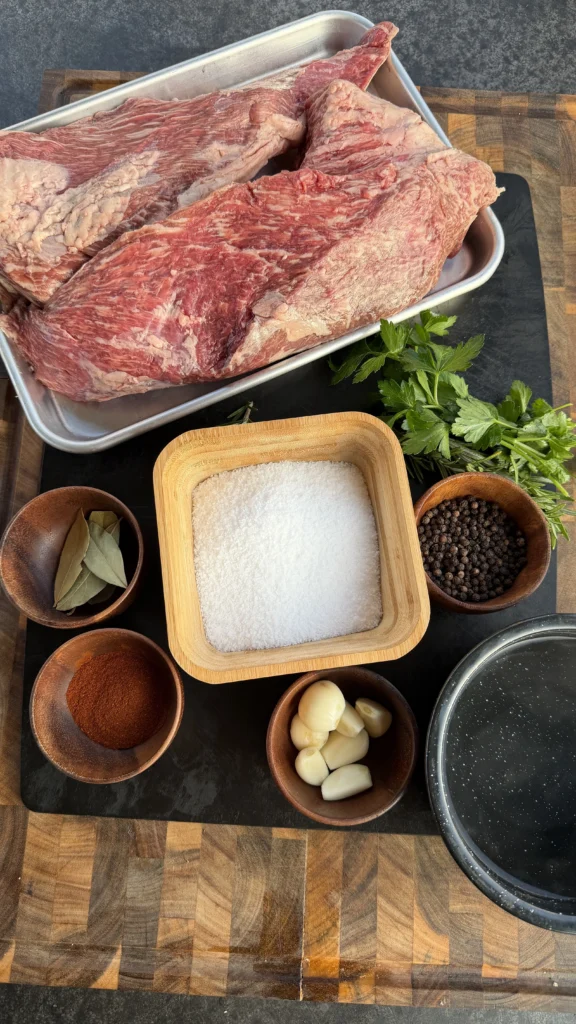
Ingredients
For The Tri-Tip Steaks
- 2 tri-tip steaks (about 3 lbs each)
- ¼ cup steak seasoning (SPG, Dano’s, or your favorite beef rub)
For The Uruguayan-Style Marinade
- 1½ cups coarse salt
- 3 tablespoons whole black peppercorns
- 6 garlic cloves, smashed
- 5 bay leaves
- 1 tablespoon smoked paprika
- 2 tablespoons dried oregano
- 4 fresh rosemary sprigs
- 1 small bunch fresh parsley
- 3 cups hot water
Slicing tri-tip with the grain before the final grill creates steak-like pieces that soak up the Uruguayan marinade better than whole roasts. The salt brine penetrates the meat fibers during those final minutes on the grill, giving you bold flavor in every bite instead of just on the surface.
Step-by-Step Instructions For Grilled Tri-Tip
Step 1: Prepare the Uruguayan-Style Marinade
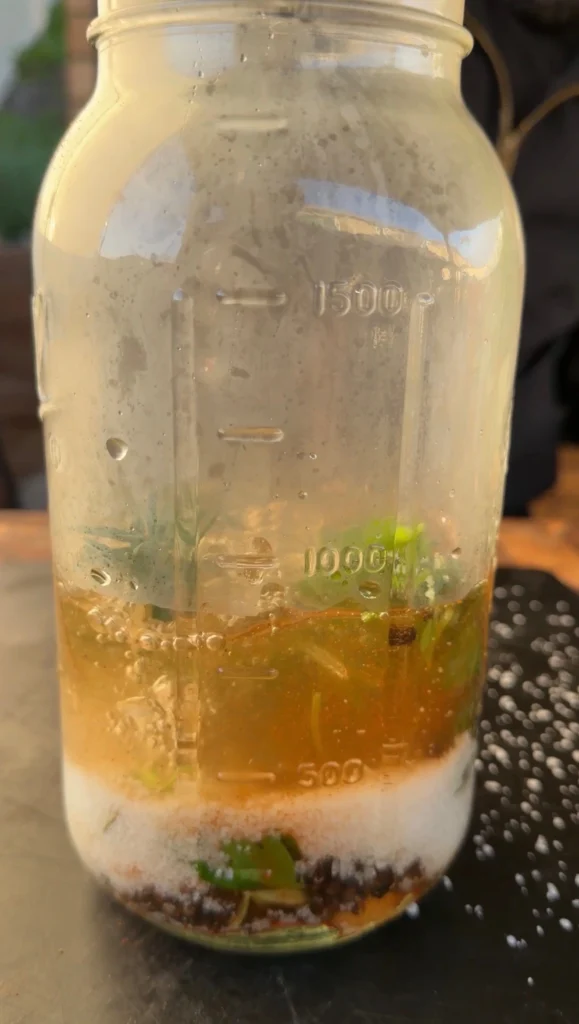
Sterilize a large glass bottle or jar by rinsing it with boiling water. Let it drain completely. Using a funnel, add 1½ cups coarse salt, 3 tablespoons whole black peppercorns, 6 smashed garlic cloves, 5 bay leaves, 1 tablespoon smoked paprika, and 2 tablespoons dried oregano to the bottle. Add 4 fresh rosemary sprigs and 1 small bunch of fresh parsley, tearing the herbs slightly to release their oils.
Pour 3 cups of hot water into the bottle. The water should be very hot but not boiling, around 180-200°F. Cap the bottle tightly and shake vigorously for 30-60 seconds until the salt is completely dissolved. You’ll see the water turn cloudy and the herbs swirling. Set the marinade aside at room temperature. It will stay usable for the duration of your cook and can be stored in the refrigerator for up to 1 week if you want to make it ahead.
Step 2: Season and Prepare the Tri-Tips
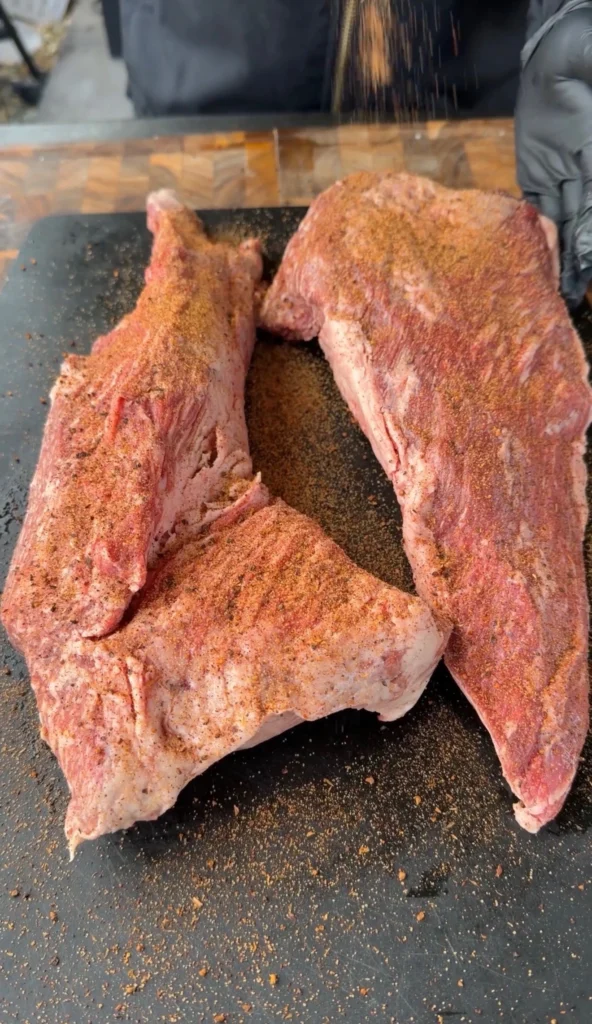
Remove the tri-tips from the refrigerator 30-45 minutes before grilling to bring them to room temperature. Pat them completely dry with paper towels. Moisture on the surface prevents proper searing and crust development. Season both tri-tips generously on all sides with your favorite steak seasoning, using about ¼ cup total. Press the seasoning into the meat so it adheres.
If your tri-tips have a thick fat cap on one side, you can trim it down to about ¼ inch thickness. You don’t want to remove it completely because that fat adds flavor, but you don’t want it so thick that it won’t render during the quick sear. Tri-tip usually comes with minimal external fat, so you may not need to trim at all.
Step 3: Preheat the Grill for High-Heat Searing
Set up your grill for direct high-heat cooking. If you’re using charcoal, bank a full chimney of lit coals in the center of the grill for maximum heat. You want the grill temperature around 500-600°F. If you’re using a gas grill, preheat all burners to high. Clean the grates with a wire brush and oil them lightly with a high smoke-point oil like vegetable or canola.
The grill is ready when you can hold your hand 6 inches above the grates for only 1-2 seconds before it’s too hot. This aggressive heat is what creates the deep, crusty sear on the tri-tip. Without this intense heat, you won’t get proper caramelization in the short sear time.
Step 4: Sear the Tri-Tips
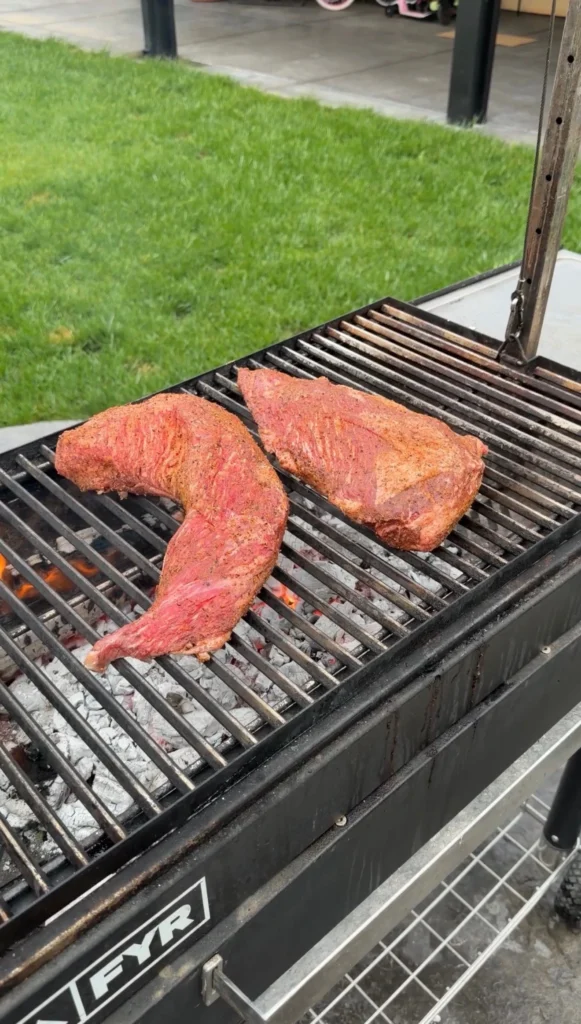
Place both tri-tips directly over the hottest part of the grill. You should hear an immediate sizzle. Don’t move them. Let them sear for exactly 3 minutes. You want a deep brown crust forming on the bottom. After 3 minutes, flip the tri-tips using tongs and sear the other side for another 3 minutes.
During this searing phase, you’re not cooking the tri-tips through. You’re only building flavor and crust on the exterior. The internal temperature will only rise to around 80-100°F depending on how thick your tri-tips are. If you’re getting excessive flaring from fat dripping onto the coals, move the tri-tips slightly to the side but keep them over direct heat. You want char, not black carbon.
After 6 minutes total of searing (3 minutes per side), remove both tri-tips from the grill and place them on a large cutting board. They’ll be charred on the outside but still very rare inside. This is exactly what you want.
Step 5: Slice the Grilled Tri-Tips With the Grain
Identify the direction of the grain on each tri-tip. You’ll see lines running through the meat indicating the muscle fiber direction. Using a sharp knife, slice each tri-tip with the grain into long strips. Cut them about 1 inch thick. You should get 8-12 strips per tri-tip depending on its size.
The meat will still be quite rare inside, which makes it easier to slice. Work quickly so the meat doesn’t cool down too much. Arrange all the sliced pieces on a large platter or baking sheet. You’re about to baste them and return them to the grill immediately.
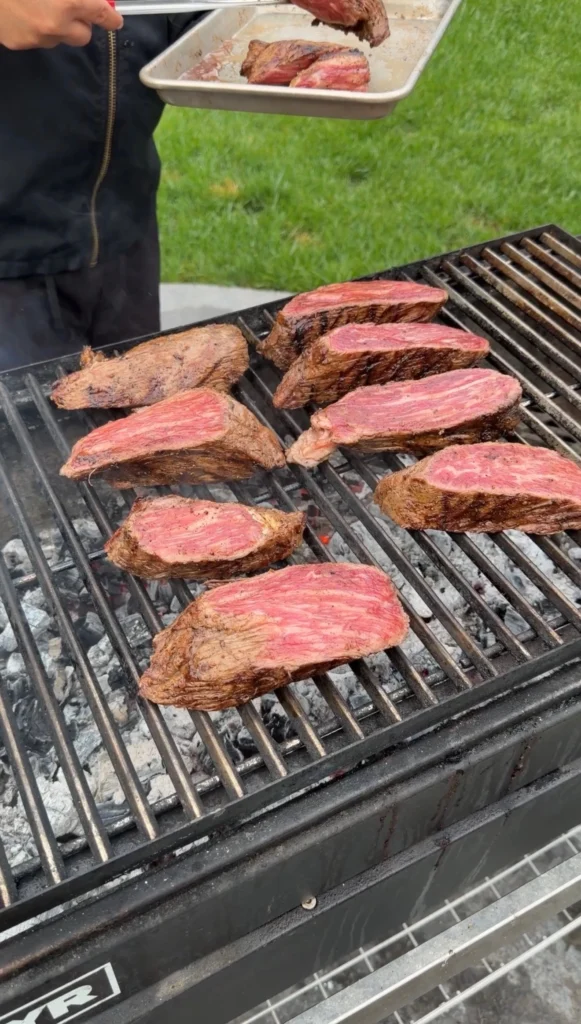
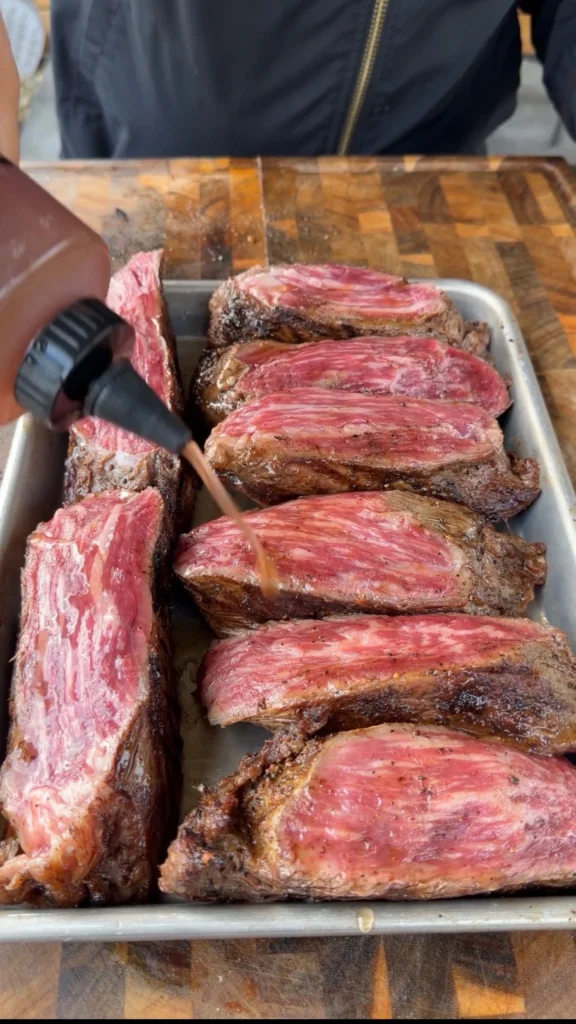
Step 6: First Marinade Application and Return to Grill
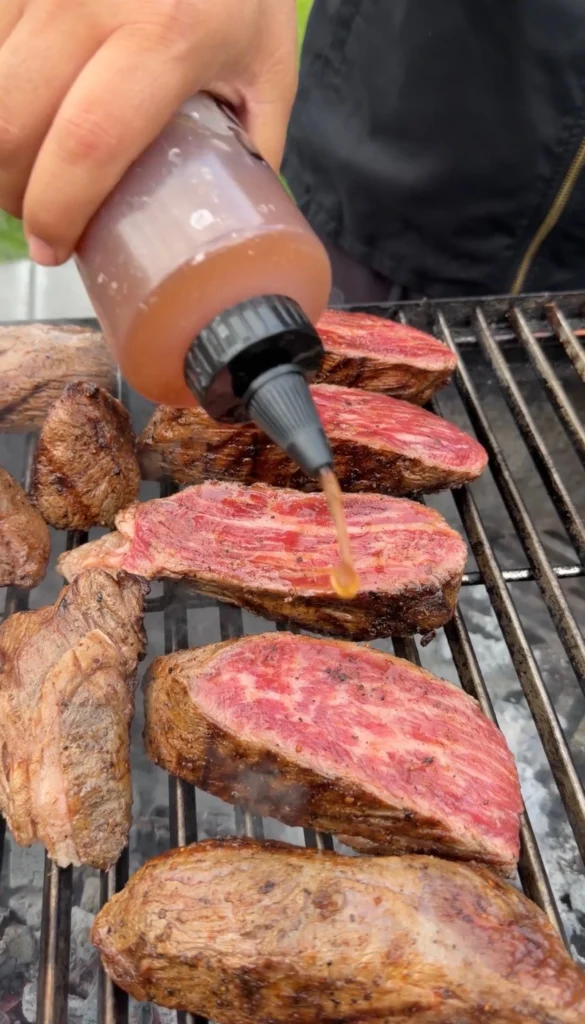
Shake the bottle of Uruguayan marinade vigorously to redistribute the herbs and garlic. Pour or brush the marinade generously over all the sliced tri-tip pieces. Make sure every piece is well-coated on both sides. Don’t be shy with the marinade. You want the meat visibly wet.
Return all the sliced pieces to the grill over direct high heat. Arrange them so they’re not overlapping. The meat will sizzle aggressively from the wet marinade hitting the hot grates. Let them cook for 2 minutes on the first side. During this time, the marinade will evaporate and concentrate, and the herbs will start to char and create aromatic smoke.
Step 7: Flip, Baste, and Continue Cooking
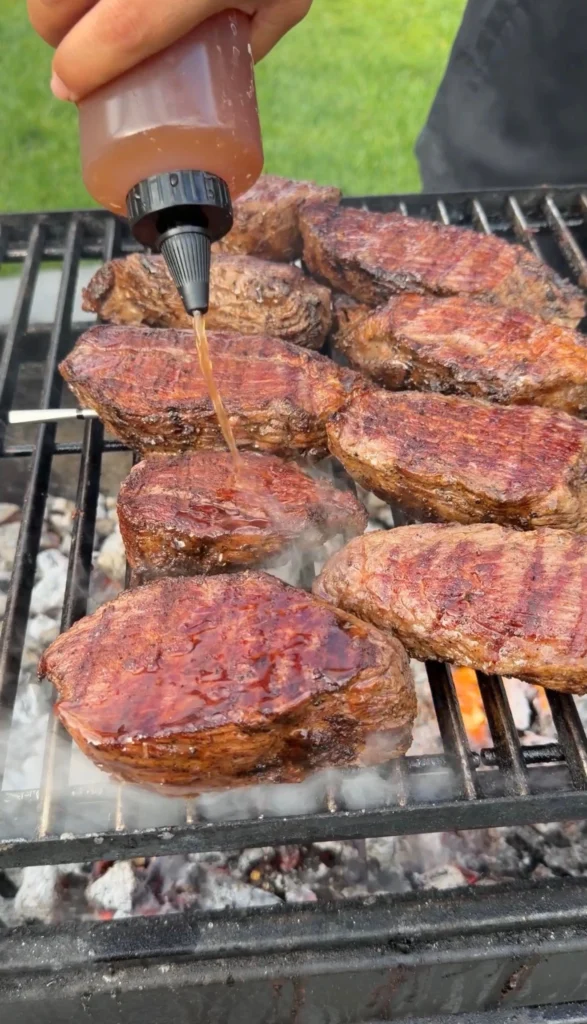
After 2 minutes, flip each piece using tongs. Immediately baste the cooked side with more Uruguayan marinade. The hot surface will cause the marinade to sizzle and steam. Let the second side cook for 2 minutes. Baste the top again with more marinade, then flip the pieces one more time if needed to reach your desired doneness.
Check the internal temperature of several pieces, targeting the thickest parts. Pull pieces as they reach your preferred temperature: 120-125°F for rare, 130-135°F for medium-rare, 140-145°F for medium. Use tongs to move finished pieces to a clean platter. Baste them one final time with fresh marinade as they come off the grill.
The total cooking time for this second grilling phase will be 4-6 minutes depending on thickness and desired doneness. The thin pieces will finish first and the thick pieces will need the full time. This is the beauty of the sliced technique. You can customize doneness for different preferences.
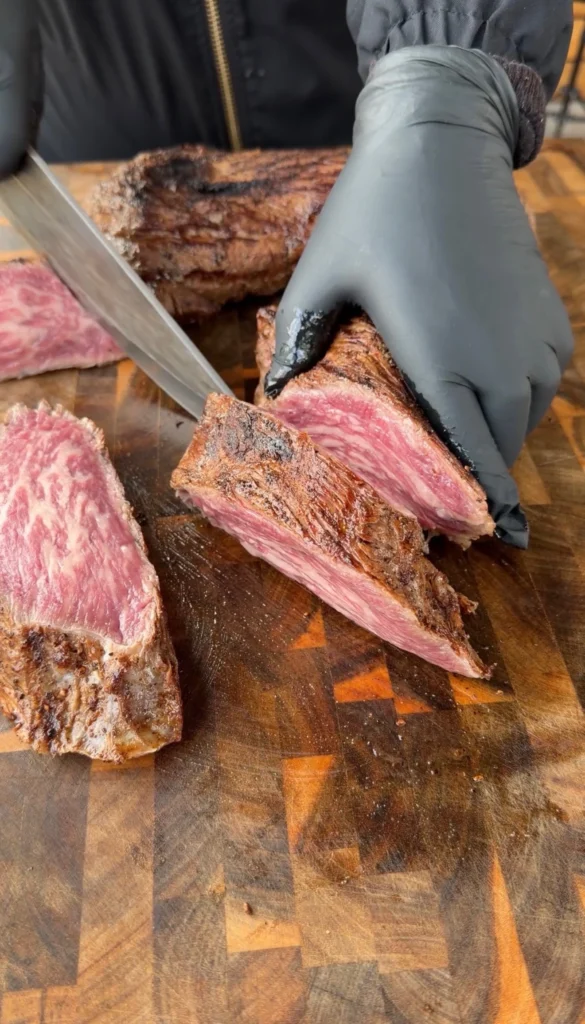
Step 8: Rest and Slice Against the Grain
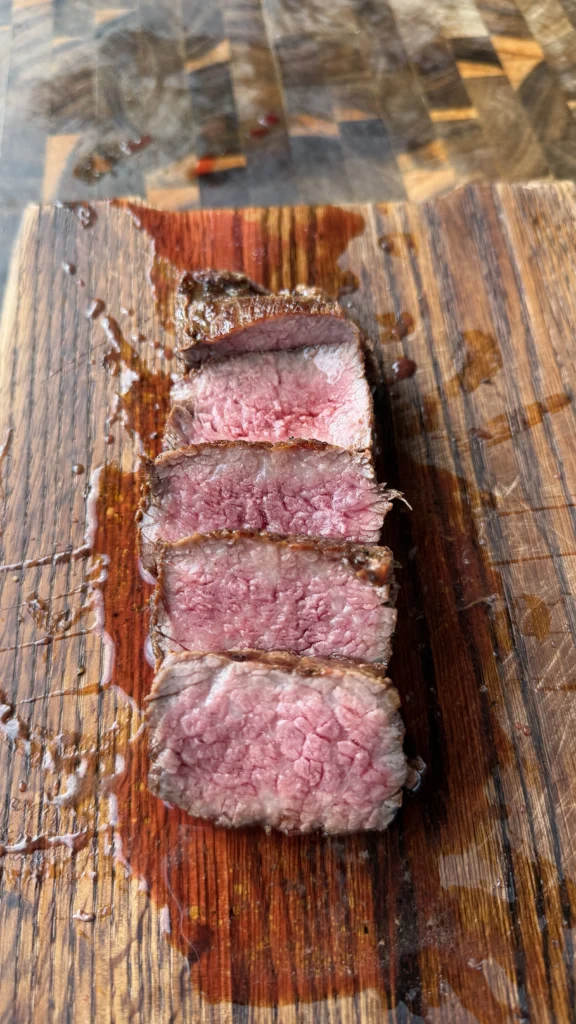
Let the finished tri-tip pieces rest on the platter for 5-10 minutes. During this rest, the juices redistribute through the meat and the internal temperature will rise another 5 degrees from carryover cooking. The pieces should be glistening with marinade and have visible herbs and garlic clinging to the surface.
When you’re ready to serve, take each thick strip and identify the grain direction. Using a sharp knife, slice each strip against the grain into individual portions about ½ inch thick. This final cut shortens the muscle fibers and ensures every bite is tender. Arrange the sliced meat on a serving platter and pour any accumulated juices over the top.
Serve immediately while the meat is still warm. The combination of the charred crust, herbaceous marinade, and tender pink interior makes this uruguayan style steak unforgettable.

Grilled Tri-Tip with Uruguayan Marinade
Ingredients
Method
- Sterilize a large glass bottle or jar with boiling water. Using a funnel, add coarse salt, peppercorns, garlic, bay leaves, paprika, oregano, rosemary, and parsley. Pour 3 cups hot water into the bottle, cap tightly, and shake vigorously for 30-60 seconds until salt dissolves completely. Set aside.
- Remove tri-tips from refrigerator 30-45 minutes before cooking. Pat completely dry with paper towels and season generously on all sides with steak seasoning, using about ¼ cup total.
- Preheat grill to high heat (500-600°F). Bank a full chimney of charcoal for maximum heat, or set all gas burners to high. Clean and oil the grates.
- Place tri-tips directly over the hottest part of the grill and sear for 3 minutes per side without moving them. You’re only building crust, not cooking through. Remove from grill when internal temperature reaches 80-100°F.
- Place tri-tips on a cutting board and identify the grain direction. Slice with the grain into 1-inch thick strips. You should get 8-12 strips per tri-tip.
- Shake the marinade bottle to redistribute herbs. Pour or brush marinade generously over all sliced pieces, coating both sides thoroughly. Return all pieces to the grill over direct high heat.
- Cook sliced pieces for 2 minutes on the first side. Flip, baste with more marinade, and cook for 2 more minutes. Flip and baste again if needed. Pull pieces as they reach your target temperature: 120-125°F for rare, 130-135°F for medium-rare, 140-145°F for medium. Total cook time for this phase is 4-6 minutes.
- Rest the finished pieces for 5-10 minutes. Slice each strip against the grain into ½-inch thick portions. Arrange on a serving platter and pour any accumulated juices over the top. Serve immediately.
Notes
Tried this recipe?
Let us know how it was!Frequently Asked Questions
Can I Use This Technique With Other Beef Cuts?
You can adapt this technique to other beef cuts, but tri-tip works best. Sirloin flap (bavette), flank steak, and skirt steak all have similar grain patterns and would work with the slice-and-finish method. These cuts are thin enough to sear quickly and thick enough to slice into substantial pieces.
Ribeye and strip steaks don’t work as well because their grain runs in multiple directions. Tenderloin is too delicate and would fall apart. Chuck roast and brisket are too tough and would need hours of low-and-slow cooking. If you’re using flank or skirt steak, reduce the initial sear to 2 minutes per side since they’re thinner than tri-tip.
What If I Don’t Have Coarse Salt Can I Use Table Salt?
You can use table salt, but reduce the amount significantly. Use only ¾ cup of table salt instead of 1½ cups coarse salt. Table salt is much finer and more concentrated. Kosher salt is a good middle ground. Use 1 cup of kosher salt as a substitute for 1½ cups coarse salt.
The type of salt affects the final flavor. Coarse sea salt has trace minerals that add subtle complexity. Table salt with iodine can taste slightly metallic in a brine this concentrated. If you must use table salt, look for non-iodized varieties.
How Far Ahead Can I Make the Uruguayan Marinade?
You can make the Uruguayan marinade up to 1 week ahead and store it in the refrigerator. The flavors actually improve after sitting for a day because the herbs fully infuse into the brine. Keep it in a sealed bottle and shake well before each use since the herbs and garlic settle to the bottom.
If you’re making it more than a day ahead, consider adding the fresh parsley right before grilling. Dried herbs hold up well, but fresh parsley can turn brown and slimy after several days. Don’t make it more than a week ahead since the fresh garlic will start to ferment and develop off flavors.
Should I Use Grass-Fed or Grain-Fed Tri-Tip for This Recipe?
Both work, but they give slightly different results. Grain-fed tri-tip has more marbling, which keeps the meat juicier during double cooking and creates a richer, beefier flavor. The fat also helps carry the flavors from the Uruguayan marinade through the meat.
Grass-fed tri-tip is leaner and has a more mineral, grassy flavor that pairs beautifully with the herbaceous marinade. However, it can dry out more easily during high-heat cooking. If you’re using grass-fed, pull the meat at the lower end of your target temperature range to prevent dryness. Choice or Prime grade from grain-fed cattle is the most forgiving.
Can I Finish the Meat in the Oven Instead of Going Back to the Grill?
You can finish the sliced tri-tip in a hot oven, though you’ll miss the charred, smoky flavor from the grill. Preheat your oven to 500°F with a rack in the upper third. Arrange the basted tri-tip on a wire rack set over a foil-lined baking sheet. Roast for 3-4 minutes per side, basting once after flipping.
Check the internal temperature frequently since ovens cook more evenly than grills. The meat will develop some caramelization but won’t have the same charred crust. Consider adding ½ teaspoon of liquid smoke to the marinade to replicate some grill flavor. You can also briefly broil for the final 1-2 minutes to get more char, but watch carefully since the marinade can burn quickly.
Ready to Take Your Cooking to the Next Level?
This is where I keep all my most-used products, gear, and favorite cooking tools — check it out:
🔥 View My Cooking Gear & ToolsRecipe Categories
If you loved this recipe, you’ll find more to savor across our diverse categories. From beef to pork, chicken to turkey, seafood to appetizers, there’s a wealth of flavors waiting for you. Explore them all at CWFeats.
