No-trim smoked brisket is a whole Prime brisket (12 to 16 pounds) taken straight from the package with only loose or hanging pieces removed, leaving the fat cap and deckle completely intact, patted dry, optionally coated with mustard or oil as a binder, then seasoned heavily on all sides with coarse salt, coarse black pepper, and granulated garlic. You smoke the brisket on the second shelf of a pellet smoker at 250°F with the fat side up and a drip tray positioned underneath to catch rendered fat, cooking for approximately 18 to 20 hours without wrapping until the internal temperature reaches 200 to 205°F and a probe slides through the flat like warm butter. The brisket rests wrapped in butcher paper or foil for a minimum of 1 to 2 hours before slicing.
The entire process takes 20 to 23 hours from start to finish. This includes 10 to 15 minutes for minimal prep since you’re not trimming. The smoking phase takes 18 to 20 hours depending on brisket size and smoker consistency. Resting adds another 1 to 2 hours, though longer rests up to 4 hours improve slicing quality. You can season the brisket the night before and refrigerate, though it should come to room temperature for 1 hour before smoking.
This Prime brisket serves 16 to 24 people depending on the final cooked weight and serving portions. A 14-pound raw brisket typically yields 8 to 10 pounds of cooked meat after fat and moisture loss. Each person gets approximately ½ to ¾ pound of cooked brisket for a main course serving. The no-trim method means you’ll have more fat to trim when slicing, but the meat underneath is exceptionally moist and flavorful from the fat basting during the long cook.
Why No-Trim Brisket Works Despite Longer Cook Times
Fat Cap as Natural Moisture Barrier
The untrimmed fat cap on a Prime brisket is typically 1 to 2 inches thick at its deepest point. This thick layer of fat acts as insulation during the long smoke. It prevents direct heat from drying out the meat underneath.
When you trim a brisket to ¼ inch fat cap as traditional methods suggest, you’re removing this protective layer. The exposed meat receives more direct heat. While this speeds cooking, it also increases risk of surface drying.
The no-trim approach accepts slower cooking in exchange for superior moisture protection. The thick fat takes longer to render. But as it renders over 18 to 20 hours, it continuously bastes the meat below. This self-basting creates exceptionally juicy brisket.
The fat cap also prevents bark from forming too quickly. With trimmed brisket, bark can set in 4 to 6 hours. With thick fat cap, the bark develops more gradually over 8 to 10 hours. This slower development creates thicker, more substantial bark.
Deckle Fat Distribution
The deckle is the fatty layer between the point and flat. Many trimming methods remove significant deckle fat to create better separation between muscles. No-trim brisket keeps all deckle fat intact.
This deckle fat renders during cooking and distributes between the point and flat. It creates natural moisture pockets throughout the brisket. When you slice, you see marbling and fat streaks rather than lean, dry meat.
The deckle also helps hold the brisket together during the long cook. Heavily trimmed briskets can separate at the point-flat junction. The intact deckle provides structural support that keeps everything connected.
Extended Cook Time Benefits
The 18 to 20-hour cook time seems excessive compared to traditional 12 to 14-hour cooks for trimmed brisket. But this extended time allows complete collagen breakdown without aggressive heat.
Collagen converts to gelatin between 160°F and 205°F. The longer the meat stays in this range at moderate temperature, the more thoroughly collagen breaks down. The no-trim method keeps brisket in the conversion zone for many hours.
This thorough breakdown creates butter-tender texture throughout. Even the flat, which is typically leaner and tougher, becomes incredibly tender. The extended low-temperature cooking prevents protein tightening that causes toughness.
The long cook also allows smoke flavor to penetrate deeply. Smoke absorption is best when meat is cool, below 140°F. But some absorption continues throughout cooking. Twenty hours of smoke exposure creates more pronounced smoke character than 12 hours.
Prime Grade Marbling Requirement
This method only works reliably with Prime grade brisket. Prime has heavy intramuscular marbling throughout the meat. This marbling is separate from the external fat cap.
The internal marbling provides additional moisture insurance during the long cook. Even if some surface drying occurs, the marbled fat within the meat keeps it juicy. Choice or Select grade briskets lack this internal protection.
Prime brisket also has thicker, more consistent fat cap. The fat quality is better. Prime fat renders more cleanly at lower temperatures. This makes it ideal for the slow 250°F cook without needing higher heat to render fat.
The cost of Prime is higher, typically $6 to $9 per pound versus $4 to $6 for Choice. But for no-trim method, Prime is essential. The extra marbling and fat quality justify the premium for this specific technique.
Why Wrapping Is Skipped in This No-Trim Method
Bark Development Priority
The Texas Crutch involves wrapping brisket in foil or butcher paper at 165 to 175°F to push through the stall. Wrapping speeds cooking but softens bark. The steam in the wrap rehydrates the crusty exterior.
No-trim, no-wrap method prioritizes bark above speed. The thick fat cap and extended cook time mean you can afford the extra hours. The trade-off is worth it for exceptionally thick, dark bark.
After 18 to 20 hours unwrapped at 250°F, the bark is almost black in spots. It’s thick and crusty. This bark provides textural contrast against the tender, juicy meat. Wrapped brisket never achieves this bark quality.
The bark also seals the meat surface. It prevents moisture loss better than wrapping. Once bark sets after 6 to 8 hours, it creates a natural barrier. Additional cooking time with good bark doesn’t dry the meat.
Natural Rendering Timeline
The thick untrimmed fat cap takes 12 to 15 hours to render significantly at 250°F. Wrapping would trap steam and moisture around the fat. This interferes with proper rendering.
Unwrapped fat cap renders cleanly. The rendered fat drips away or flows down over the meat. What remains is thin layer of tender fat rather than thick, unrendered cap. Wrapped brisket can have sections of unrendered, rubbery fat.
The slow rendering also allows the fat time to flavor the meat. As fat renders over many hours, it carries spices and smoke into the meat. Quick rendering from wrapping doesn’t provide this same flavor development.
Moisture Management Without Wrap
Traditional wrapped brisket relies on the wrap to trap moisture. The brisket essentially braises in its own juices in the foil or paper. This creates tender meat but can make it too soft or steamed.
No-wrap brisket with thick fat cap manages moisture differently. The fat basting provides external moisture. The Prime grade marbling provides internal moisture. The slow, gentle cook at 250°F prevents excessive moisture loss from protein contraction.
The result is tender meat that still has structure. It’s not mushy or falling apart. The texture is firm enough to slice cleanly but tender enough to pull apart easily when eating. Wrapped brisket can be so soft it’s difficult to slice.
Smoke Penetration Throughout
Wrapping stops smoke absorption. Once wrapped, the meat only receives heat, not smoke. For competition BBQ where presentation and tenderness matter most, this is acceptable.
For backyard BBQ where smoke flavor is primary goal, wrapping sacrifices a key element. The no-wrap method allows smoke to penetrate for the entire 18 to 20 hours.
While most smoke absorption happens in the first 4 to 6 hours when meat is below 140°F, some continues throughout. The bark continues darkening from smoke exposure. The flavor compounds accumulate on the surface and in the fat.
The final product has deep, intense smoke flavor throughout. Every bite tastes smoky. This is what many BBQ enthusiasts prefer over the milder smoke character of wrapped brisket.
How to Tell When No-Trim Brisket Is Done
The Probe Test Is More Reliable Than Temperature
Insert a probe thermometer or skewer into the thickest part of the flat. It should slide through with no resistance. The feel is like pushing through room-temperature butter. Smooth, continuous glide with no tough spots.
If you encounter resistance, the brisket isn’t done. The collagen hasn’t fully converted. Continue cooking and test every 30 minutes. Temperature might read 203°F but if the probe meets resistance, it needs more time.
Test multiple spots in the flat. The flat cooks unevenly due to varying thickness. The thickest area takes longest. If the thick spots are probe tender, the thinner areas are definitely done.
Also test the point. The point is fattier and cooks differently. It should also be probe tender but will feel slightly different due to higher fat content. The probe should slide through easily but you might feel slight graininess from fat pockets.
Visual Cues for Doneness
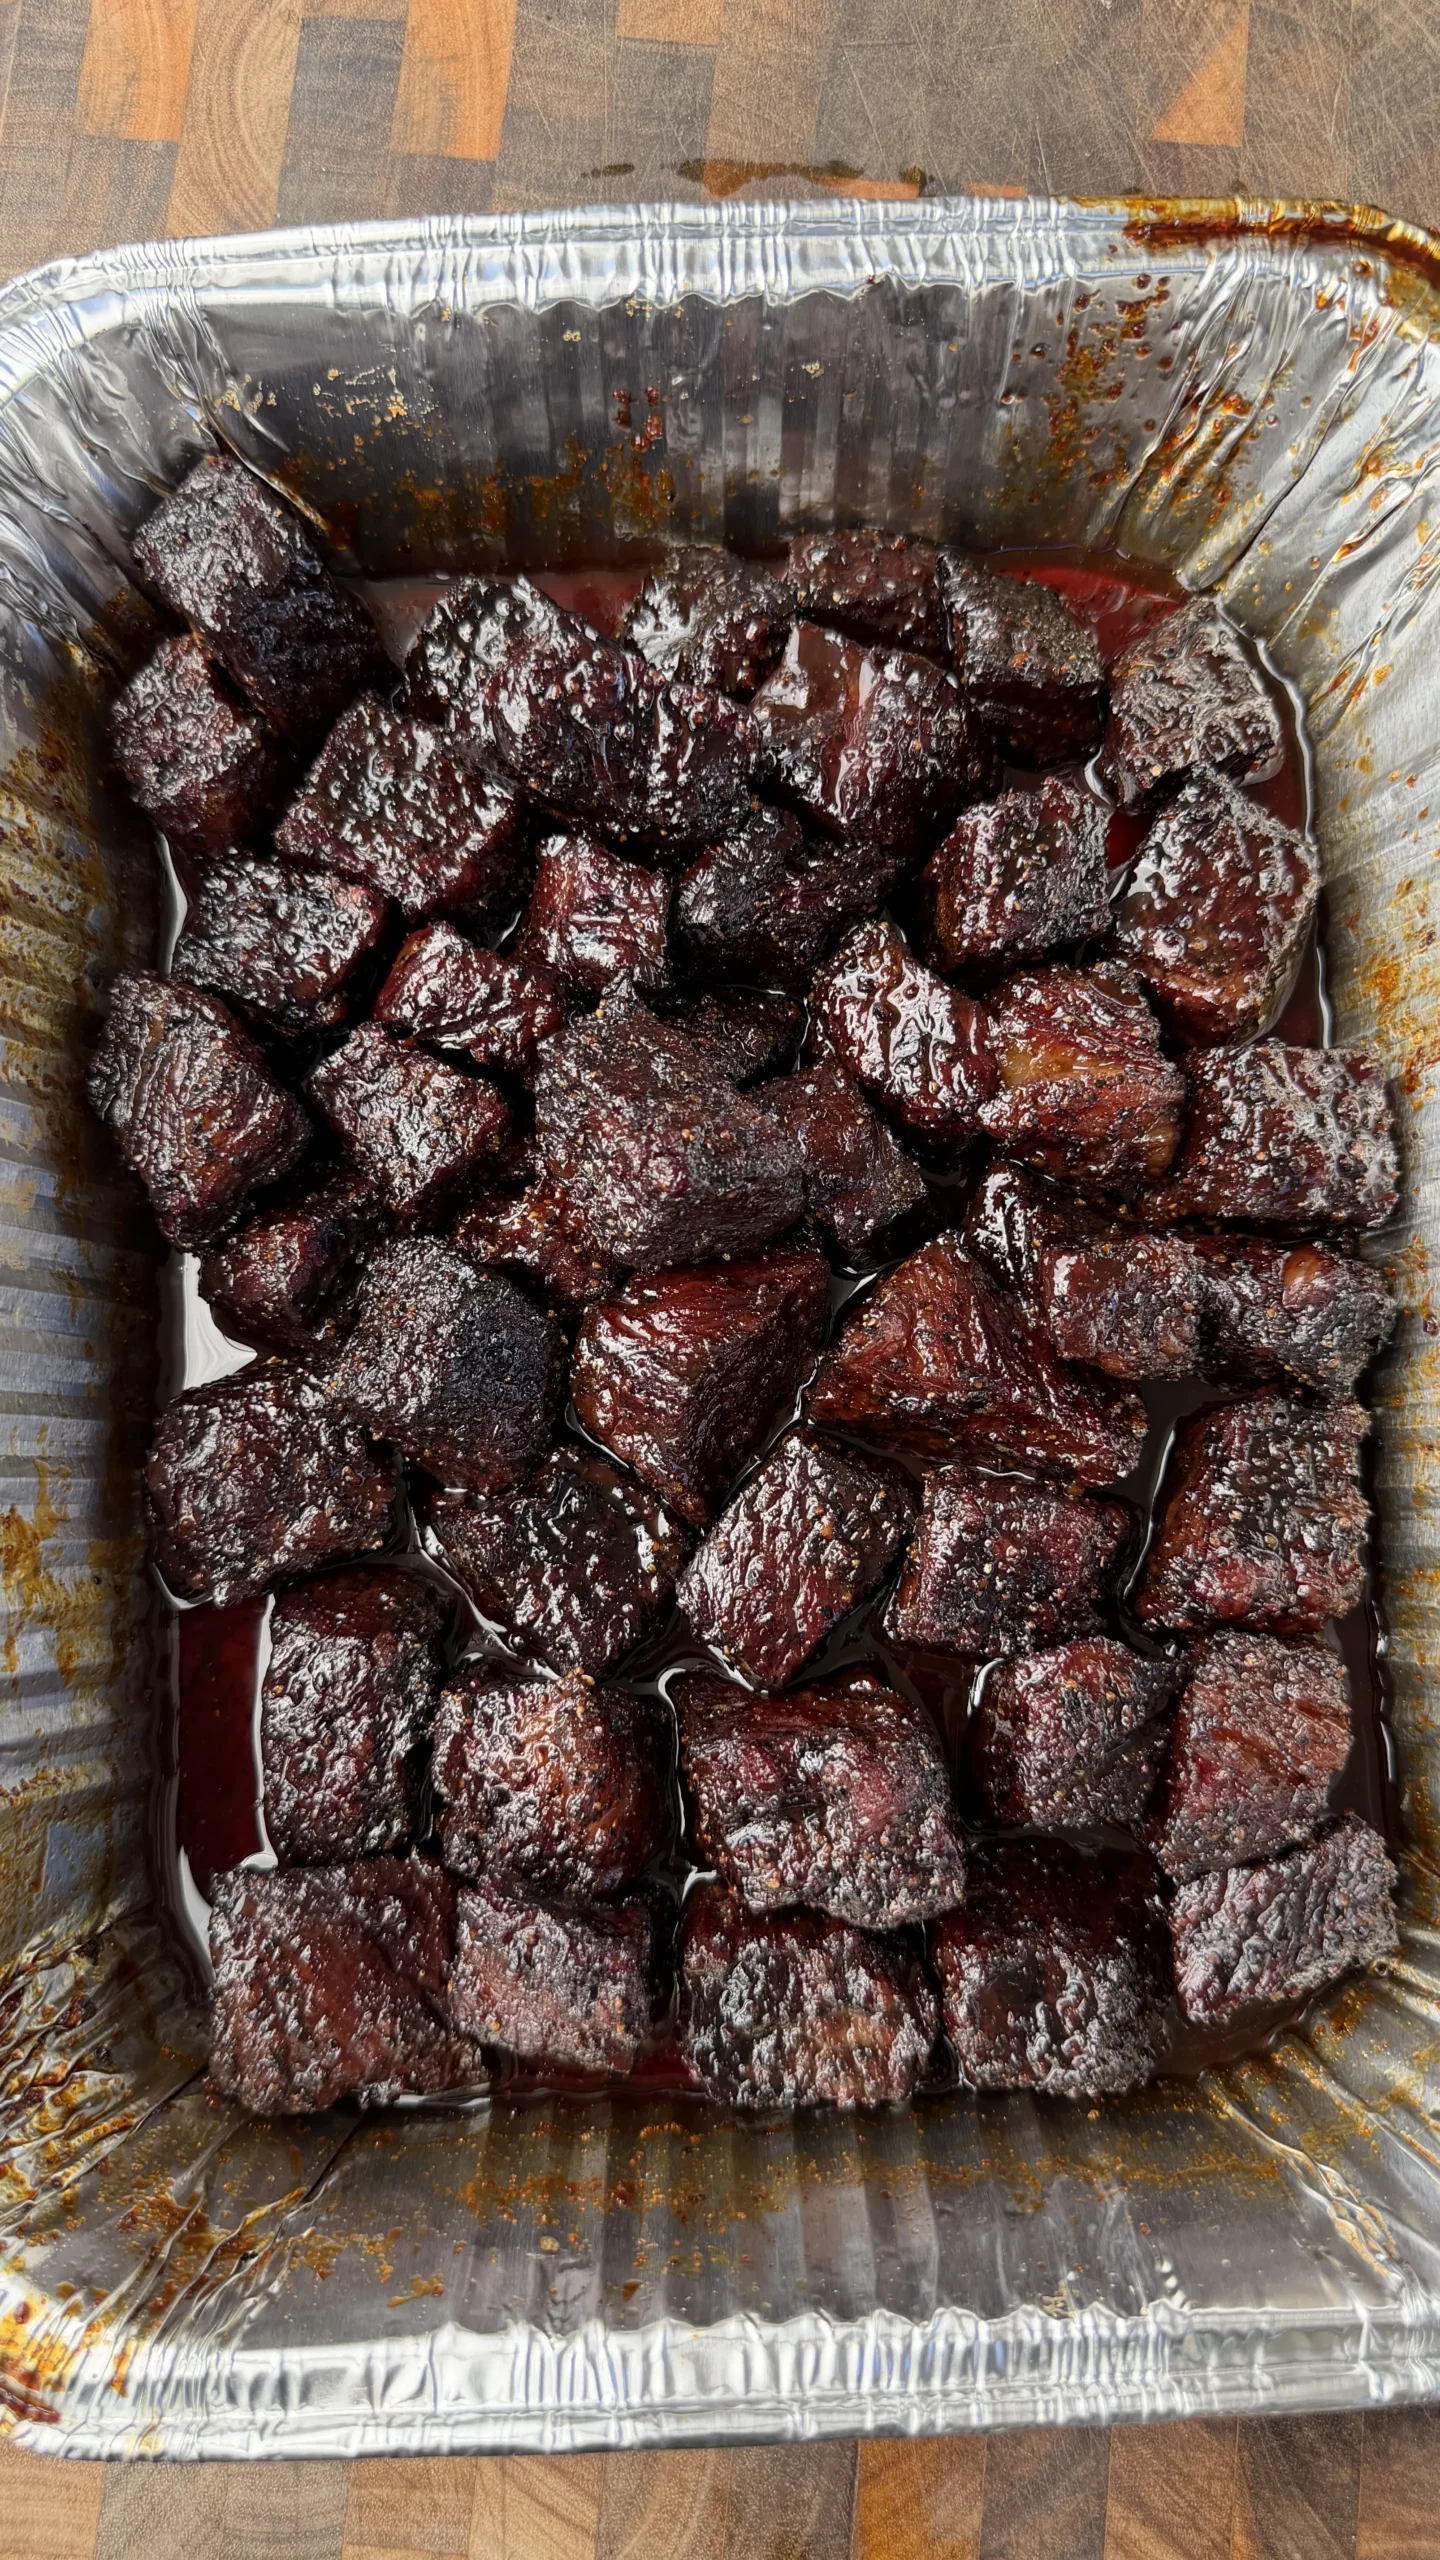
Look at the fat cap. It should be significantly reduced from the original thickness. What was 1 to 2 inches should be ¼ to ½ inch. Most of the fat has rendered. What remains should jiggle when you shake the brisket gently.
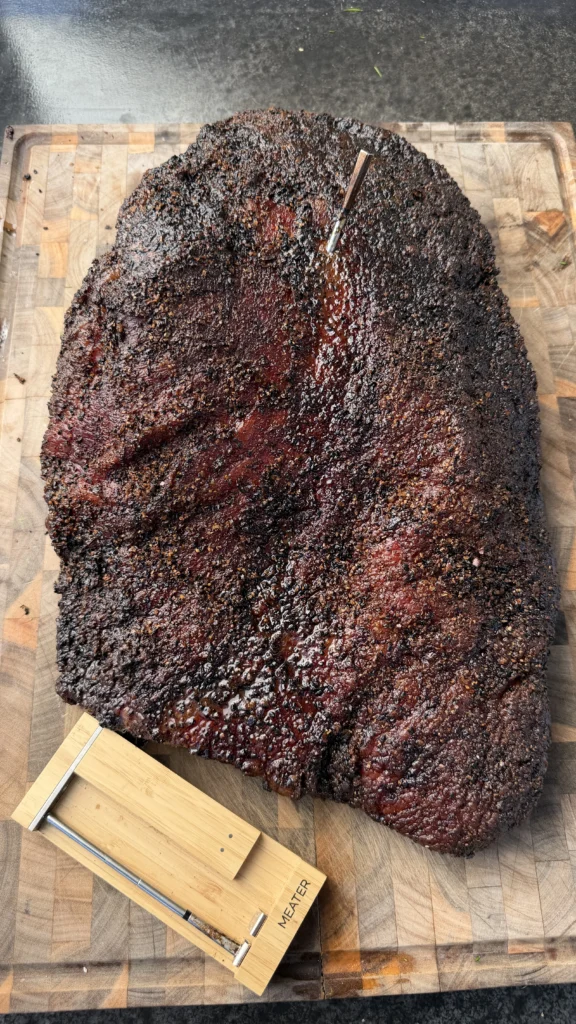
Check the bark. It should be very dark, almost black in areas. The bark should look dry and crusty. If it still looks wet or shiny, the brisket needs more time. Well-developed bark indicates sufficient cooking time.
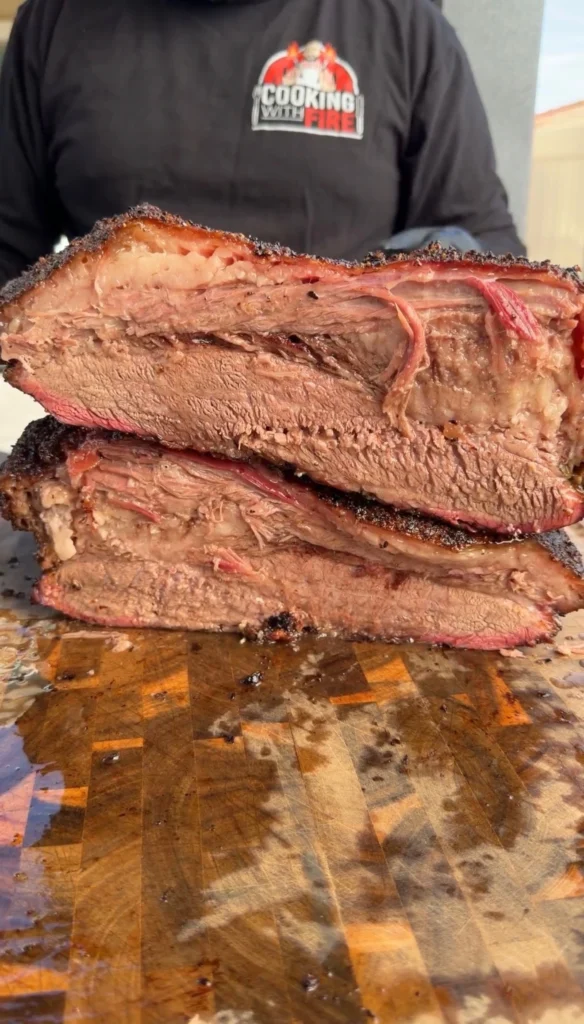
Examine the flat edges. The meat should have pulled back from the flat slightly, creating slight cupping at the edges. The surface should look slightly cracked or crazed from the long cook. These visual cues confirm tenderness.
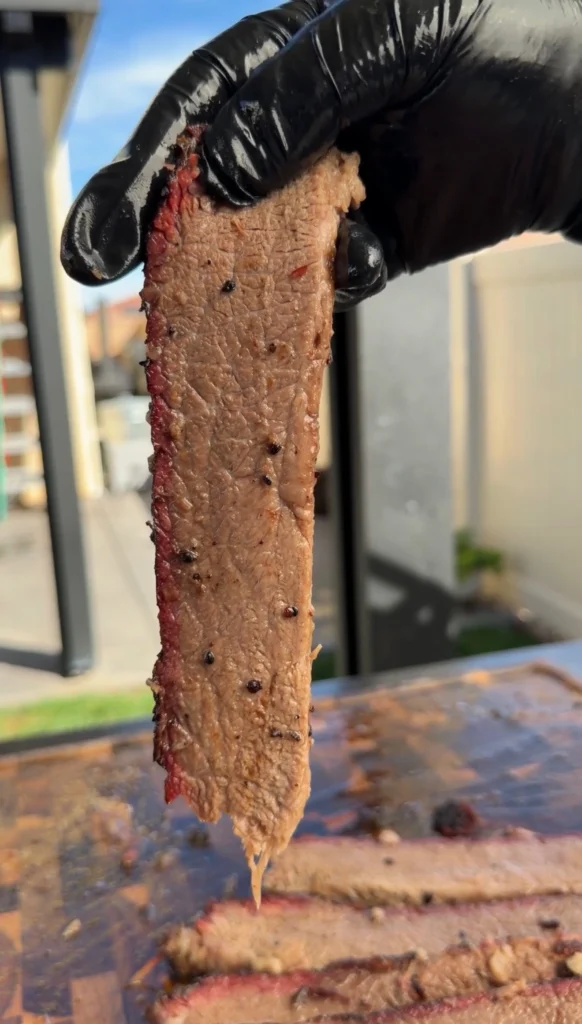
The brisket should bend significantly when you pick it up with tongs at one end. Hold the flat end and lift. The brisket should bow under its own weight, creating a deep U-shape. Stiff brisket isn’t done. Floppy, falling-apart brisket is overdone. Good bow without breaking is ideal.
Temperature Range Is a Guideline
Internal temperature of 200 to 205°F is where most briskets reach probe-tender texture. But this isn’t absolute. Some briskets are done at 198°F. Others need 208°F.
Temperature depends on the specific brisket’s collagen content, marbling, and thickness. Grass-fed beef might have tougher collagen requiring higher temp. Grain-fed Prime might be tender at lower temp.
The thick fat cap in no-trim method can also affect temperature reading. Make sure your probe is in the meat, not in fat pockets. Fat reads differently than meat. Probe through fat into meat for accurate reading.
Use temperature as a signal to start testing. Once you hit 195°F, begin checking with the probe test every 20 to 30 minutes. When the probe glides through smoothly, the brisket is done regardless of whether it’s 200°F or 205°F.
The Jiggle Test
Pick up the brisket with tongs. Shake it gently. The meat should jiggle and move independently from the fat cap. You should see waves moving through the meat. Undercooked brisket moves rigidly.
The fat cap should also jiggle loosely. It shouldn’t be firmly attached to the meat. The rendered fat creates separation between cap and meat. Solid, non-jiggly fat indicates insufficient rendering and likely undercooking.
This test works particularly well with no-trim brisket because there’s substantial fat cap to observe. Trimmed brisket with thin fat layer doesn’t provide the same visual feedback. The thick cap makes the jiggle obvious.
No-Trim Smoked Brisket
Prime grade, fat up, 250°F, 18-20 hours unwrapped
Ingredients
Brisket
- 1 whole Prime brisket (12-16 lbs)
- 2-3 tablespoons coarse salt
- 2-3 tablespoons coarse black pepper
- 1 tablespoon granulated garlic
- Light mustard or oil (optional binder)
Prime grade is essential for this method. The intramuscular marbling provides moisture insurance during the 18 to 20-hour unwrapped cook. Choice or Select will dry out. The thick fat cap renders slowly and continuously bastes the meat. Trust the probe test over temperature for doneness.
Step-by-Step Instructions
Step 1: Minimal Prep of the Brisket
Remove the whole Prime brisket from packaging. Place it on a large cutting board fat-side up. Examine the brisket for any loose or hanging pieces of fat or meat.
Using a sharp knife, remove only the loose pieces. These are scraps that won’t render properly and can burn. Don’t trim the fat cap. Don’t trim the deckle. Leave everything else intact.
The fat cap should be 1 to 2 inches thick at its deepest point. This seems excessive but it’s necessary for the no-trim method. The fat will render significantly during the long cook.
Flip the brisket meat-side up. Remove any silver skin or hard membrane if easily accessible. Don’t stress about getting everything. The goal is minimal intervention.
Pat the entire brisket completely dry on all sides with paper towels. Surface moisture prevents proper bark formation. The drier the surface, the better the seasoning adhesion and bark development.
Step 2: Season the Brisket
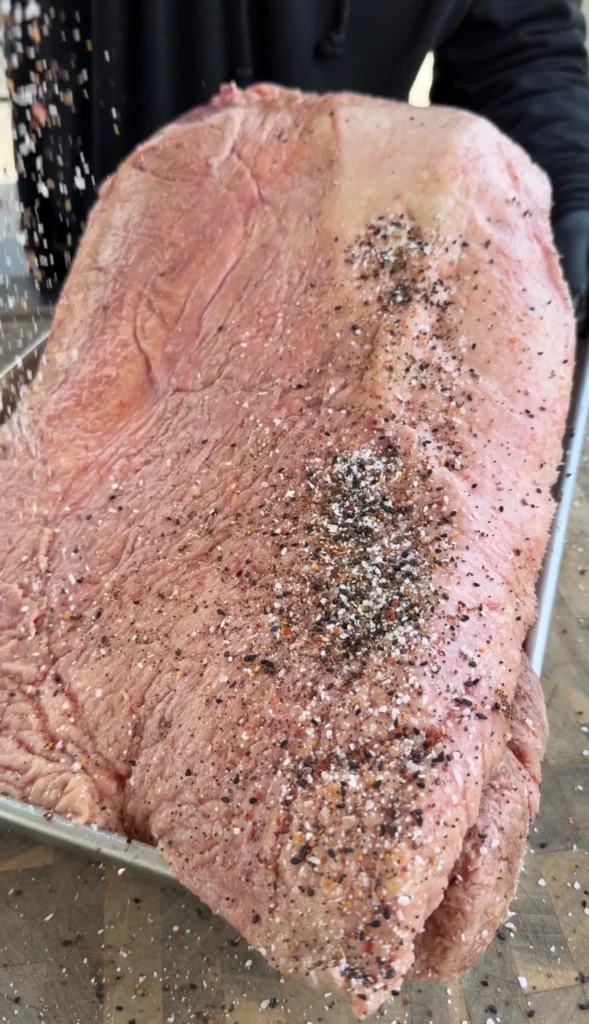
If using a binder, apply a thin coating of yellow mustard or neutral oil to all surfaces. The binder helps seasoning stick. Mustard flavor cooks away completely. This step is optional but helpful.
Combine 2 to 3 tablespoons coarse salt, 2 to 3 tablespoons coarse black pepper, and 1 tablespoon granulated garlic. Mix the seasoning together. You can use pre-mixed brisket rub instead if preferred.
Season the fat side first. Apply a heavy, even coating. You should barely see the fat through the seasoning. Don’t be conservative. The thick fat cap needs aggressive seasoning.
Flip the brisket and season the meat side equally heavily. Get into all the crevices. The sides and ends need seasoning too. Every exposed surface should be coated.
Pat the seasoning gently into the surface. This helps it adhere better. Don’t press so hard that you remove seasoning. Just a light pat.
Let the seasoned brisket sit at room temperature for 30 to 45 minutes while the smoker preheats. This allows the salt to begin penetrating the meat.
Step 3: Set Up the Pellet Smoker
Fill the pellet hopper with oak or hickory pellets. Oak provides clean, traditional smoke. Hickory creates bolder, more aggressive smoke. Both work well for beef.
Turn on the smoker and set temperature to 250°F. Let it preheat for 15 to 20 minutes with the lid closed. You want stable temperature before adding the brisket.
Place a drip tray on the lower rack directly below where the brisket will sit. This catches rendered fat and prevents flare-ups. The drip tray also protects the brisket from direct heat.
Position the brisket on the second shelf above the drip tray. The elevated placement creates better airflow around the brisket. It also keeps the brisket in the indirect heat zone.
Make sure you’re seeing thin blue smoke, not thick white smoke. White smoke indicates incomplete pellet combustion. Adjust dampers if needed for clean smoke.
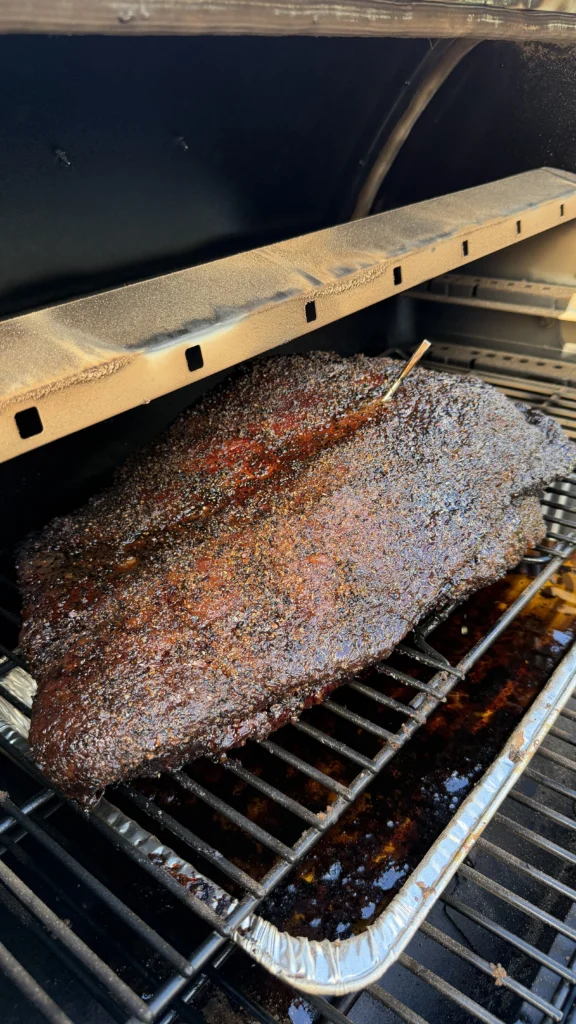
Step 4: Place Brisket Fat Side Up
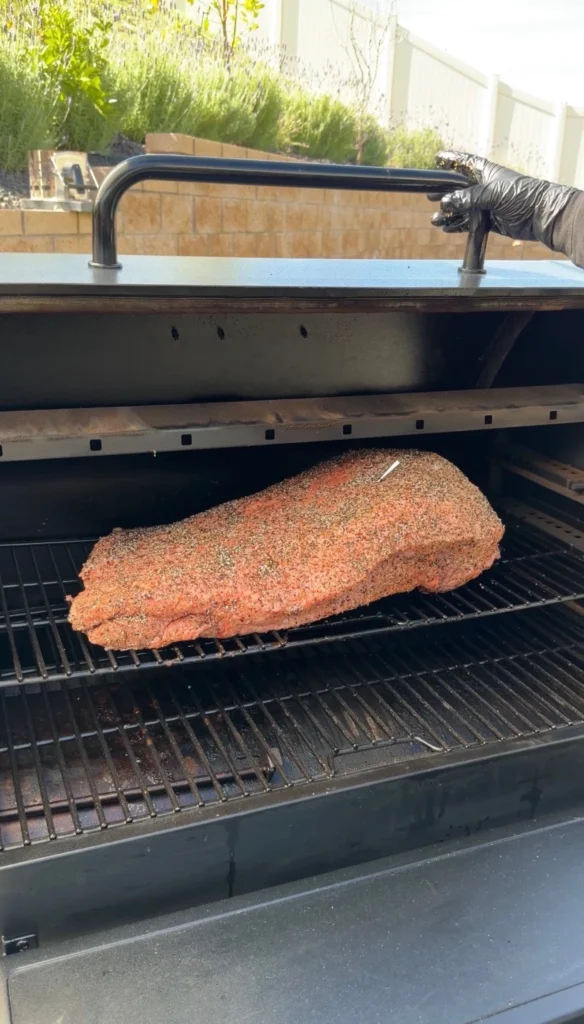
Place the brisket on the second shelf with the fat cap facing up. The point (thicker, fattier end) should be positioned toward the hotter side of the smoker if there’s temperature variation.
Insert a probe thermometer into the thickest part of the flat. The probe should go horizontally into the center of the meat, not touching fat pockets or the fat cap. You want to monitor the lean meat temperature.
If using a wireless thermometer like Meater Pro, place it now. Position it so you can monitor temperature remotely. The long cook benefits from remote monitoring.
Close the smoker lid. Don’t open it for at least 4 hours. Every time you open the lid, heat and smoke escape. This extends cooking time unnecessarily.
Step 5: Smoke at 250°F for 18 to 20 Hours
Let the brisket smoke at steady 250°F. Monitor smoker temperature through the built-in thermometer or a secondary probe. Adjust the temperature setting as needed to maintain 250°F.
The pellet smoker will automatically feed pellets to maintain temperature. Check the hopper every 4 to 6 hours and refill as needed. Running out of pellets mid-cook is a disaster.
After 8 hours, you can check the bark development. Open the lid quickly, examine the brisket, close immediately. The bark should be starting to set and darken. The fat cap should be rendering.
Around 10 to 12 hours, the internal temperature will likely be 165 to 175°F. This is where many people wrap. You’re not wrapping. Just note the temperature and continue.
After 15 hours, start checking temperature more frequently. Once you hit 195°F internal, begin testing for tenderness with a probe every 30 minutes.
The brisket is done when it reaches 200 to 205°F AND passes the probe test in multiple spots. This typically happens between 18 and 20 hours but can vary.
Step 6: Test for Doneness
Insert a probe thermometer or thin skewer into the thickest part of the flat. The probe should slide in and out with no resistance. It should feel like pushing through warm butter.
Test multiple locations in the flat. The flat has varying thickness. All areas should be equally tender. If thick spots are still resistant, continue cooking.
Test the point as well. The point is fattier and feels different but should still be probe tender. No tough or resistant areas.
Check the visual cues. The fat cap should be significantly reduced. The bark should be very dark, almost black. The brisket should bend noticeably when lifted with tongs.
When temperature is 200 to 205°F and probe test confirms tenderness everywhere, the brisket is done.
Step 7: Rest the Brisket
Remove the brisket from the smoker carefully. It’s heavy, hot, and the fat makes it slippery. Use heavy gloves and be cautious.
Wrap the brisket tightly in butcher paper or aluminum foil. Butcher paper is preferred. It allows some breathing while retaining heat. Foil holds heat longer but can soften bark slightly.
Place the wrapped brisket in a dry cooler or insulated container. You can also hold it in a 150°F oven if you have one available.
Rest for a minimum of 1 to 2 hours. Longer rest up to 4 hours is even better. The long rest allows juices to redistribute completely. The meat firms up slightly, making cleaner slices.
Don’t skip the rest. Slicing immediately causes significant juice loss. The brisket will be drier. Proper rest is essential for maximum juiciness.
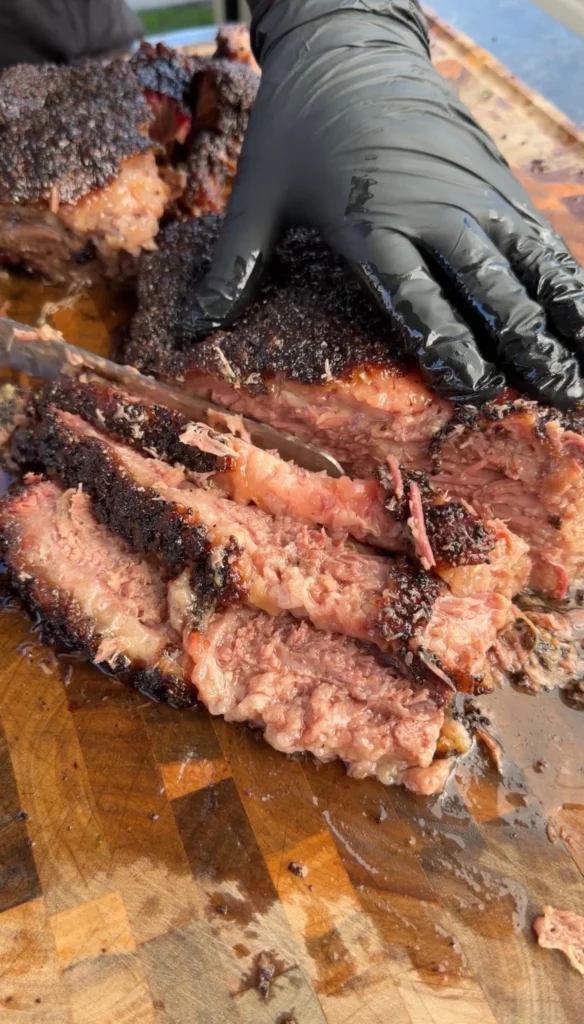
Step 8: Slice and Serve
After resting, unwrap the brisket. Place it on a large cutting board fat-side up. You’ll need to trim some of the remaining fat cap before slicing.
Using a sharp slicing knife, trim the fat cap to approximately ¼ inch thickness. The no-trim method means more trimming at serving time. Remove thick, unrendered sections but leave thin protective layer.
Separate the point from the flat by cutting along the fat seam. The point and flat slice differently. Handle them separately.
Slice the flat against the grain into ¼-inch thick slices. Identify the grain direction by looking at the meat fibers. Cut perpendicular to these fibers.
Slice the point against its grain. The point grain runs different direction than the flat grain. Rotate the point and slice accordingly.
Arrange slices on a serving platter. The no-trim method typically yields exceptionally juicy slices with good bark. Serve immediately while warm.

No-Trim Smoked Brisket
Ingredients
Equipment
Method
- Remove brisket from package. Remove only loose or hanging pieces. Leave fat cap and deckle intact. Pat completely dry.
- Optionally apply thin coating of mustard or oil as binder. Combine salt, pepper, and garlic. Season all surfaces heavily. Let sit 30 to 45 minutes at room temperature.
- Preheat pellet smoker to 250°F with oak or hickory pellets. Place drip tray on lower rack.
- Place brisket fat-side up on second shelf above drip tray. Insert probe thermometer into thickest part of flat. Close lid.
- Smoke at 250°F for 18 to 20 hours. Don’t wrap. Maintain steady temperature. Refill pellets as needed.
- Starting at 195°F internal temperature, test every 30 minutes with probe. Continue cooking until 200 to 205°F and probe slides through like warm butter in all areas.
- Remove from smoker. Wrap tightly in butcher paper or foil. Rest in cooler or 150°F oven for minimum 1 to 2 hours, up to 4 hours preferred.
- Trim remaining fat cap to ¼ inch. Separate point and flat. Slice each against the grain into ¼-inch slices.
Nutrition
Notes
Tried this recipe?
Let us know how it was!Frequently Asked Questions
Why Does No-Trim Brisket Take So Much Longer Than Trimmed?
The thick fat cap insulates the meat from direct heat. Heat must penetrate through 1 to 2 inches of fat before reaching the meat. This slows the cooking process significantly.
The fat also takes time to render. Fat rendering happens gradually at 250°F. Thick fat cap needs 12 to 15 hours to render substantially. Until the fat renders, it blocks heat from the meat.
Trimmed brisket with ¼-inch fat cap cooks faster because heat reaches meat quickly. The thin fat renders in 4 to 6 hours. The meat can cook efficiently after that.
The extended time is a feature, not a bug. The slow cooking allows thorough collagen breakdown and flavor development. The result justifies the patience required.
Can You Use This Method on a Different Smoker Type?
Offset stick burners work well for no-trim method. Maintain 250°F with hardwood. Place brisket on the cool end of the chamber away from the firebox. The long cook requires fire management attention.
Electric smokers can work but struggle with temperature consistency over 18 to 20 hours. Temperature fluctuations affect cooking time. If using electric, monitor carefully and adjust as needed.
Charcoal smokers work if you can maintain stable 250°F. This requires adding charcoal every 4 to 6 hours. The hands-on involvement is substantial. Pellet smokers are much more convenient for this specific method.
Gas grills with indirect heat can technically work but aren’t ideal. Gas doesn’t provide the same smoke flavor. The results won’t match wood-fired smokers.
What Do You Do With All the Rendered Fat?
The drip tray collects rendered fat during cooking. This fat is pure beef tallow. Don’t discard it. Strain it through cheesecloth to remove solids, then refrigerate or freeze.
Beef tallow is valuable for cooking. Use it for frying, sautéing, or adding to gravies and sauces. It has high smoke point and rich beef flavor.
The tallow can also be used for future brisket cooks. Brush it on lean areas or inject it into the flat for added moisture.
Some people make soap or candles with beef tallow. It’s a versatile rendered fat with many uses beyond cooking.
Should You Spritz or Mop No-Trim Brisket?
Spritzing is optional for no-trim method. The thick fat cap provides moisture protection. Additional spritzing isn’t necessary like it is with trimmed brisket.
If you choose to spritz, use water, apple juice, or beef broth starting around hour 8. Spritz every 2 hours. Don’t overdo it. The goal is maintaining surface moisture, not soaking the bark.
The no-wrap method means the brisket surface stays exposed. Light spritzing can help bark stay pliable rather than becoming too hard. But heavy spritzing washes away bark.
Many pitmasters successfully cook no-trim brisket without any spritzing. The fat self-basting is sufficient. Try it without spritzing first, then add spritzing if you feel it’s needed.
How Much Fat Should You Trim After Cooking?
After resting, the fat cap should be reduced to ¼ to ½ inch in most areas. Some sections might have more, some less. This is normal given the uneven raw fat cap.
Trim fat to approximately ¼ inch before slicing. This leaves enough fat for flavor and moisture without being excessive. Remove any hard, unrendered sections completely.
The deckle fat between point and flat should mostly be rendered and tender. If any sections are still hard, remove them. Tender, rendered fat is delicious and should stay.
Total trimmed fat waste is typically 1 to 2 pounds from a 14-pound raw brisket. This seems like a lot but remember you gained 18 to 20 hours of protection and basting from that fat.
Ready to Level Up?
Take your backyard cooking from good to legendary.
This is where I keep all my most-used smokers, knives, and favorite cooking tools.
Shop My Gear CollectionExplore More Recipes
Find more diverse flavors at CWFeats.com