North Carolina Pulled Pork
Hot and fast North Carolina pulled pork is an 8-pound bone-in pork butt seasoned simply with kosher salt, coarse black pepper, and garlic powder, then smoked uncovered at 350°F for 2 hours until a thick bark forms on the exterior. After the bark develops, you transfer the pork to a foil tray, add ½ to ¾ cup of vinegar mop sauce made from apple cider vinegar, water, salt, black pepper, and red pepper flakes, cover tightly with foil, and continue cooking at 350°F until the internal temperature reaches 203°F. This takes about 2½ additional hours. You rest the covered pork for 30 minutes, then pull it apart and toss with additional vinegar mop sauce to taste. The finished pulled pork is tangy, smoky, and pepper-forward without heavy sweetness.
The entire process takes about 5 to 5½ hours from start to finish. This includes 15 minutes to season the pork and make the vinegar mop sauce. The smoking phase is 4½ to 5 hours total between uncovered smoking and covered braising. A 30-minute rest happens after pulling from the smoker. Pulling and mixing with sauce takes another 10 to 15 minutes. The hot and fast method cuts traditional smoking time in half compared to low and slow approaches.
This North Carolina pulled pork represents Eastern North Carolina BBQ tradition. The vinegar-based sauce is the defining characteristic. There’s no tomato, no molasses, no brown sugar. Just vinegar, pepper, and salt. The sauce is thin and peppery. It penetrates the meat instead of coating it like thick Kansas City sauce. The pork flavor stays prominent. The smoke comes through clearly. The vinegar provides brightness that cuts through the rich pork fat.
The hot and fast cooking method at 350°F creates advantages over traditional 225°F smoking. Higher heat renders fat more completely. The bark develops faster and thicker. The total cooking time is dramatically shorter. You can start smoking mid-morning and serve pulled pork for dinner. With low and slow smoking, you’d need to start the night before or early morning for evening service.
Jump to RecipeWhat Makes North Carolina Vinegar Sauce Different from Other Regional BBQ Sauces
Vinegar Base Instead of Tomato or Mustard
North Carolina vinegar sauce uses apple cider vinegar as the primary ingredient. The ratio is typically 2 parts vinegar to 1 part water. This creates an intensely acidic, thin sauce. Compare this to Kansas City style which starts with tomato paste or ketchup. Kansas City sauce is thick, sweet, and clings to meat. North Carolina sauce is watery and soaks into meat.
South Carolina mustard sauce uses yellow mustard as the base. It adds vinegar and sugar to create tangy sweetness. The mustard provides body and richness. Alabama white sauce uses mayonnaise mixed with vinegar and horseradish. Each regional style has different base ingredients that create distinct flavor profiles.
The vinegar base in North Carolina sauce cuts through pork fat aggressively. Pork butt is a fatty cut. Without acid to balance, the richness can become overwhelming. The vinegar cleanses your palate between bites. You can eat more pulled pork without feeling heavy or greasy.
Minimal Sugar Content
Traditional North Carolina vinegar sauce contains little to no sugar. Some recipes add 1 teaspoon of sugar per 3 cups of sauce. This tiny amount rounds out harsh vinegar edges slightly. But it doesn’t create sweetness. The sauce tastes predominantly acidic and peppery.
Kansas City and Memphis sauces contain significant sugar. Brown sugar, molasses, and honey are common ingredients. These sauces can be 30 to 40% sugar by volume. They taste sweet first, with other flavors as background notes. The sugar caramelizes during cooking. It creates sticky glaze on the meat surface.
North Carolina pitmasters believe sugar masks pork flavor. They want to taste the meat and smoke. The vinegar enhances rather than covers. This philosophy extends to the dry rub too. Salt, pepper, and maybe garlic powder. No brown sugar rubs. No complex spice blends. Simple seasoning lets quality pork speak for itself.
Heavy Black Pepper Emphasis
North Carolina vinegar sauce uses coarse black pepper as a primary flavoring. You add 1 tablespoon of black pepper to 3 cups of liquid. This creates visible black specks throughout the sauce. When you pour it over pulled pork, every bite has pepper flavor.
The pepper provides heat without capsaicin burn. Black pepper has piperine which creates different heat sensation than chili peppers. It’s sharp and immediate. It doesn’t linger or build. This allows the pepper flavor to stand out without overwhelming.
Red pepper flakes add a second layer of heat. But they’re used sparingly. About 1 teaspoon per batch. The combination of black pepper and red pepper creates complexity. You get the sharp bite of black pepper first. The red pepper warmth comes through in the finish.
Thin Consistency for Penetration
North Carolina vinegar sauce has watery consistency. It’s barely thicker than water. When you pour it over pulled pork, it soaks in immediately. It doesn’t pool on the surface. The meat absorbs the sauce completely.
This penetration is intentional. The pitmasters want flavor throughout the meat. Not just on the exterior. Thick sauces coat the outside. The interior tastes plain. Thin vinegar sauce reaches every strand of pulled pork. Each bite has the same tangy, peppery flavor.
The thin sauce also makes it easy to adjust seasoning. If the pork tastes too dry, add more sauce. If it’s too tangy, add less. The liquid integrates quickly. You can fine-tune the final flavor right before serving. Thick sauces don’t allow this flexibility.
Hot and Fast vs Low and Slow: Why 350°F Creates Better Bark in Less Time
Accelerated Maillard Reactions
The Maillard reaction creates bark on smoked meat. This reaction occurs when proteins and sugars interact at high temperatures. It produces hundreds of flavor compounds. These create the complex, savory taste of properly smoked meat. The reaction accelerates dramatically above 300°F.
At 225°F low and slow smoking, Maillard reactions happen slowly. The bark develops over 12 to 16 hours. The exterior has time to dry out completely. This creates thick, dark bark. But it requires extended cooking time. At 350°F, the same reactions happen in 2 to 3 hours. The higher heat speeds up the chemistry.
The bark from hot and fast cooking is different from low and slow bark. It’s thinner and less crusty. But it still has deep brown color and complex flavor. The trade-off is time. If you only have 5 hours instead of 12, hot and fast delivers acceptable bark development in the available window.
Fat Rendering and Moisture Retention
Pork butt contains significant intramuscular fat and connective tissue. This fat needs to render during cooking. At 225°F, fat melts slowly over many hours. The melted fat drips out gradually. The meat loses moisture steadily throughout the long cook.
At 350°F, fat renders faster. The higher heat breaks down fat cells more quickly. But the shorter cooking time means less total moisture loss. The pork reaches 203°F in 4½ hours instead of 12 hours. Less time means less evaporation. The finished pulled pork stays juicier despite the higher temperature.
The foil wrapping phase also helps retain moisture. When you wrap the pork with vinegar sauce, you create a braising environment. The liquid in the pan surrounds the meat. Steam keeps the surface moist. The pork essentially braises in its own juices mixed with vinegar sauce. This prevents the drying that can happen during extended smoking.
Time Efficiency Without Sacrificing Quality
The primary advantage of hot and fast is time. You can smoke an 8-pound pork butt in 4½ to 5 hours. Traditional low and slow takes 12 to 16 hours. This time savings is significant for home cooks. You don’t need to wake up at 4 AM to have pulled pork ready for dinner.
The quality difference is minimal when done correctly. The pork still reaches 203°F internal temperature. The collagen still breaks down completely. The meat pulls apart easily. The bark development is adequate. The smoke flavor penetrates sufficiently in the uncovered phase.
Some purists claim low and slow produces superior results. They argue the extended smoke exposure creates deeper flavor. The thicker bark has better texture. These differences exist. But for most people eating the pulled pork, the quality is indistinguishable. The convenience of hot and fast outweighs the marginal quality gains from low and slow.
Smoke Penetration in Shorter Time
Smoke penetration happens primarily in the first few hours of cooking. After the surface forms a pellicle and bark develops, smoke absorption slows dramatically. Most smoke flavor develops in the first 3 to 4 hours regardless of total cooking time.
At 350°F, you smoke uncovered for 2 hours. This gives adequate time for smoke to penetrate the outer inch of meat. The higher heat doesn’t prevent smoke absorption. The meat surface is still receptive during the initial smoking phase. Once you wrap in foil, smoke exposure stops. But by that point, you’ve already achieved sufficient smoke flavor.
Low and slow smoking for 12+ hours doesn’t create proportionally more smoke flavor. The extended time allows more bark development and deeper smoke ring. But the actual smoky taste is similar. The hot and fast method delivers comparable smoke character in a fraction of the time.
Why Pork Butt Needs to Reach 203°F Instead of 165°F for Perfect Pulled Texture
Collagen Breakdown and Gelatin Formation
Pork butt contains extensive connective tissue. This collagen makes the raw meat tough and chewy. At temperatures below 180°F, the collagen stays intact. The cooked pork is technically safe to eat at 165°F. But it’s difficult to chew. The meat doesn’t pull apart easily.
Collagen begins converting to gelatin around 160°F. The conversion accelerates between 180°F and 205°F. By 203°F, most collagen has broken down completely. The tough connective tissue transforms into soft, lubricating gelatin. This gelatin coats the muscle fibers. It makes the pork feel moist and tender in your mouth.
The gelatin also holds moisture in the meat. As collagen converts to gelatin, it traps water molecules. This prevents moisture from escaping during cooking. Pork pulled at 165°F loses more juice when you shred it. Pork pulled at 203°F retains moisture because the gelatin network holds it.
Intramuscular Fat Rendering
Pork butt has fat distributed throughout the muscle. Individual fat deposits sit between muscle fiber bundles. This marbling creates richness and flavor. But the fat needs to render for optimal texture. Solid fat chunks in pulled pork are unappetizing.
Fat begins melting around 130°F. But the rendering process takes time. At 165°F internal temperature, much of the intramuscular fat remains solid. When you pull the pork, you encounter white fat chunks. These need to be removed. You lose weight and richness.
By 203°F, nearly all intramuscular fat has melted completely. The rendered fat bastes the meat from inside. It distributes throughout when you pull the pork. You don’t need to trim chunks. The fat integrates into the pulled texture. This creates the characteristic silky mouthfeel of properly cooked pulled pork.
The Pull Test and Physical Feedback
You can assess doneness without a thermometer by trying to pull the pork. At 165°F, the meat resists. You need to cut it with a knife. The muscle fibers hold together firmly. This is roast texture, not pulled pork texture.
At 190°F, the pork starts yielding. You can shred small portions. But it requires effort. The meat pulls into strips instead of chunks. Some areas separate easily while others resist.
At 203°F, the pork falls apart when you touch it. The bone slides out cleanly when you twist. You can pull the meat with your hands or forks with minimal effort. It separates into irregular chunks and shreds. This is the texture you want for authentic pulled pork.
Temperature and Time Relationship
The target temperature isn’t arbitrary. Through decades of experimentation, pitmasters determined 203°F produces optimal texture consistently. Some aim for 195°F. Others go to 205°F. The acceptable range is 195°F to 205°F internal temperature.
Below this range, the pork is undercooked for pulling purposes. Above this range, the meat can become mushy. The muscle fibers break down too much. The pork loses structural integrity. It turns into paste instead of shreds.
The time at temperature also matters. Pork that races to 203°F in 3 hours won’t pull as nicely as pork that reaches 203°F after 4½ hours. The extended cooking time allows more complete collagen conversion. Even though both reach the same final temperature, the slower approach creates better texture.
Should You Wrap Pork Butt in Foil or Butcher Paper During the Braising Phase

Foil Creates a Braising Environment
Aluminum foil is completely impermeable to moisture and air. When you wrap pork butt tightly in foil, you create a sealed environment. The moisture from the meat and added liquid stays trapped. Steam builds up inside the foil packet. This steam cooks the pork through moist heat rather than dry heat.
The braising effect tenderizes the meat faster. The moisture prevents surface drying. The pork stays wet throughout cooking. When you unwrap it, the surface is soft rather than crusty. The bark that developed during the initial smoking phase softens considerably.
The foil also reflects heat efficiently. The shiny surface bounces radiant heat back toward the meat. This creates faster cooking in the wrapped phase. The pork climbs from 165°F to 203°F more quickly in foil than it would unwrapped or in butcher paper.
Butcher Paper Allows Some Moisture Escape
Butcher paper is porous. Air and moisture can pass through slowly. When you wrap pork in butcher paper, you create partial protection. The meat retains more moisture than if left unwrapped. But it loses more moisture than if wrapped in foil.
This controlled moisture loss helps preserve bark texture. The surface doesn’t get soggy from trapped steam. The bark stays firmer and more pronounced. Competition BBQ teams often prefer butcher paper for this reason. The bark texture scores higher in judging.
The cooking time increases slightly with butcher paper versus foil. The heat transfer isn’t as efficient. The evaporative cooling from moisture escaping slows the temperature climb. Budget an extra 30 to 45 minutes when using butcher paper instead of foil.
Bark Preservation Considerations
The main trade-off between foil and butcher paper is bark texture. Foil sacrifices bark for speed and moisture. Butcher paper preserves bark but extends cooking time. Your priority determines the best choice.
For North Carolina-style pulled pork where the final product gets mixed with vinegar sauce, bark texture matters less. The sauce softens everything anyway. The pork gets tossed and broken up completely. Any crispy bark bits get distributed and softened by the liquid. Using foil makes sense for faster cooking without meaningful quality loss.
For competition BBQ or when you’re serving pulled pork dry (without mixing in sauce), bark matters more. Visible, defined bark pieces in the pulled pork look more appealing. The textural contrast between soft meat and firmer bark enhances the eating experience. Butcher paper is the better choice for preserving this quality.
Pan vs. Wrapped Only
Some recipes wrap the pork directly in foil without a pan. This creates the tightest seal. But it makes the pork awkward to handle. The foil can tear when moving the heavy roast. Leaks waste the braising liquid and create mess in the smoker.
Using a foil pan with a foil cover provides better structure. The pan holds the pork and liquid securely. The foil cover seals in moisture. You can move the pan easily without risk of tearing. When the pork is done, you can pull it right in the pan. The accumulated juices stay contained for mixing back into the pulled pork.
The pan method also lets you add more liquid if needed. If you check the pork and the pan looks dry, you can add more vinegar sauce. With wrapped-only approaches, you can’t add liquid without completely unwrapping and re-wrapping.
NC Pulled Pork Hot & Fast
Vinegar mop sauce, 350°F smoke, Eastern Carolina style
Ingredients
Pork
- 1 (8-lb) bone-in pork butt (pork shoulder)
- Kosher salt, to taste
- Coarse black pepper, to taste
- Garlic powder, to taste
North Carolina Vinegar Mop Sauce
- 2 cups apple cider vinegar
- 1 cup water
- 1 tablespoon kosher salt
- 1 tablespoon coarse black pepper
- 1 teaspoon crushed red pepper flakes
- 1 teaspoon sugar (optional)
Make the vinegar mop sauce at least 30 minutes before smoking. The flavors meld together as it sits. The pepper flakes soften slightly and release more heat into the vinegar. The salt dissolves completely.
Step-by-Step Instructions
Step 1: Make the North Carolina Vinegar Mop Sauce
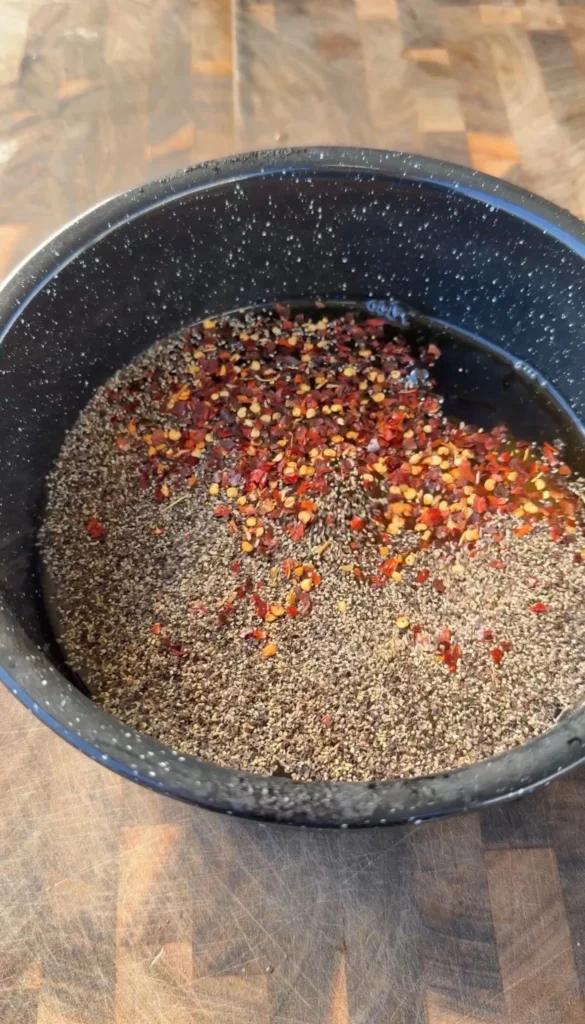
In a medium bowl or large measuring cup, combine 2 cups of apple cider vinegar and 1 cup of water. Stir to mix.
Add 1 tablespoon of kosher salt, 1 tablespoon of coarse black pepper, and 1 teaspoon of crushed red pepper flakes. If using sugar, add 1 teaspoon now. Stir well until the salt dissolves completely.
Cover and let the sauce sit at room temperature for at least 30 minutes before using. This resting time allows the pepper flavors to infuse into the vinegar. The sauce will keep in the refrigerator for up to 2 weeks.
The sauce should be thin and watery, not thick like barbecue sauce. It should smell strongly of vinegar with visible black pepper specks throughout.
Step 2: Season the Pork Butt
Remove the pork butt from the refrigerator 30 to 45 minutes before smoking. Let it sit at room temperature. This allows more even cooking.
Pat the pork butt completely dry with paper towels. Moisture on the surface prevents proper seasoning adhesion and bark formation.
Season the pork generously on all sides with kosher salt. Use more than seems necessary. An 8-pound roast needs significant seasoning. The salt should be visible as a coating.
Add coarse black pepper to all surfaces. Again, be generous. The pepper creates flavor and helps form the bark.
Sprinkle garlic powder over the entire pork butt. This adds aromatic depth without competing with the vinegar sauce.
Let the seasoned pork sit while you preheat the smoker. The salt will start drawing moisture to the surface. This creates a tacky layer that helps bark formation.
Step 3: Preheat Smoker to 350°F
Start your smoker and set the temperature to 350°F. This is significantly hotter than traditional low and slow smoking. Verify the temperature with a reliable thermometer.
Add your preferred smoking wood. Hickory or oak work well for pork. Fruit woods like apple or cherry are also good choices. Use a moderate amount of wood. The shorter cooking time means you don’t need as much as for low and slow.
Let the smoker preheat for 10 to 15 minutes with the lid closed. Make sure it’s producing thin blue smoke, not thick white smoke. Blue smoke creates clean flavor. White smoke tastes acrid.
Clean the grates with a grill brush. The pork will go directly on the grates for the initial smoking phase.
Step 4: Smoke Uncovered for 2 Hours
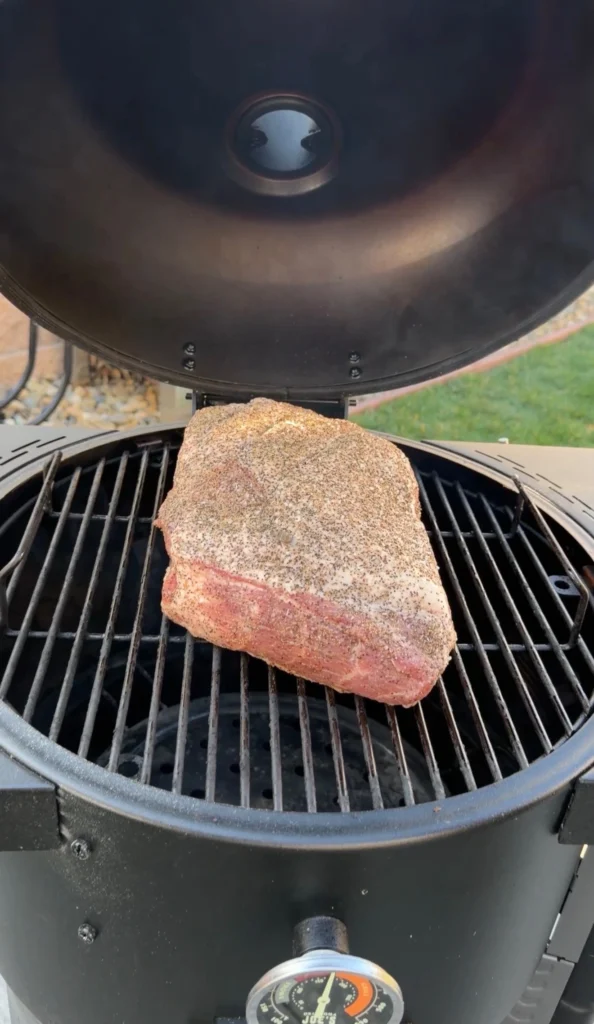
Place the seasoned pork butt directly on the smoker grates, fat cap up. Close the lid immediately to maintain temperature.
Smoke for 2 hours without opening the lid. Resist the temptation to check it constantly. Every time you open the smoker, heat escapes. The temperature drops. Recovery time extends your cook.
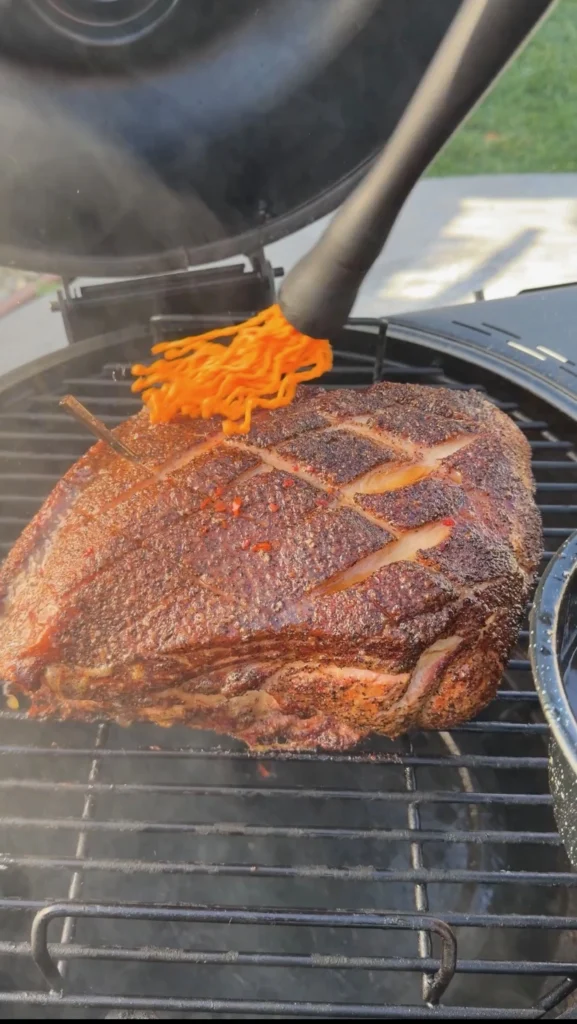
After 2 hours, check the bark development. The exterior should be dark brown to almost black. It should feel dry and crusty to the touch. The bark won’t be as thick as low and slow bark. But it should have good color and texture.
If the bark looks pale or wet, give it another 30 minutes. If it looks well-developed, move to the next step.
During this phase, you can optionally mop the pork once with vinegar sauce. Use a clean brush to apply a light coating. Don’t soak it. Too much liquid softens the developing bark.
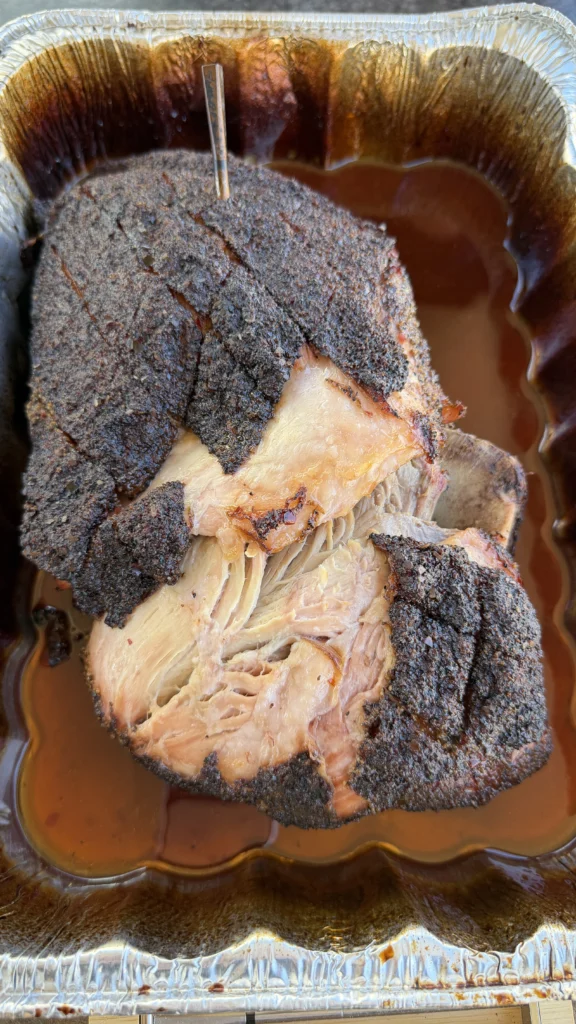
Step 5: Transfer to Foil Pan and Add Sauce
Remove the pork from the smoker. Place it in a disposable aluminum foil pan large enough to hold it comfortably. The pan should have at least 2-inch sides.
Pour ½ to ¾ cup of the vinegar mop sauce into the bottom of the pan around the pork. Don’t pour it directly over the bark. Let it pool in the pan.
Cover the pan tightly with heavy-duty aluminum foil. Make sure the seal is complete around all edges. No steam should escape during cooking.
Return the covered pan to the smoker. Close the lid and maintain 350°F temperature.
Step 6: Continue Cooking to 203°F Internal Temperature
Cook the covered pork for approximately 2½ more hours. The exact time varies based on the pork’s starting temperature and your smoker’s consistency.
After 2 hours in the foil pan, start checking internal temperature. Insert an instant-read thermometer into the thickest part of the pork. Avoid hitting the bone. The bone reads hotter than the meat.
When the pork reaches 195°F, start checking every 15 minutes. You’re looking for 203°F. This is the magic number where the collagen has converted to gelatin and the pork pulls easily.
At 203°F, the bone should wiggle freely when you twist it. The meat should feel very soft when you poke it. If it still feels firm, continue cooking even if the temperature reads 203°F.
Step 7: Rest Covered for 30 Minutes
Remove the pan from the smoker when the pork reaches 203°F. Keep the foil cover in place. Let the pork rest for at least 30 minutes.
During the rest, the internal temperature will stay elevated. The juices redistribute from the center back toward the edges. The meat firms up slightly. This makes pulling easier and cleaner.
Don’t skip the rest. Pork pulled immediately after cooking releases more juice. You lose moisture you want to keep in the meat. The texture is also slightly mushy. The 30-minute rest improves both moisture retention and texture.
The pork can rest for up to 2 hours if needed. Wrap the covered pan in towels and place in a cooler. This holds temperature safely. The long rest makes the pork even more tender.
Step 8: Pull the Pork and Mix with Sauce
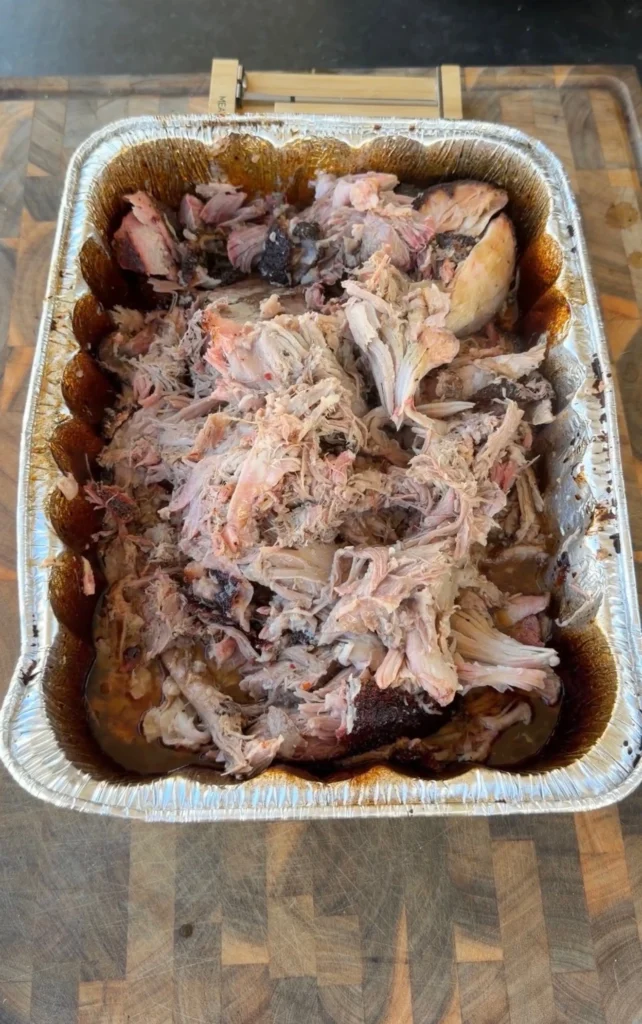
Remove the foil cover. The pork should be extremely tender. Use heat-resistant gloves or forks to pull the meat apart.
Discard the bone. It should slide out cleanly with minimal effort. Remove and discard any large chunks of fat. Small bits of fat throughout the meat are fine. They add richness.
Pull or chop the pork into irregular chunks and shreds. Don’t make it too fine. You want visible pieces, not mush.
Start by adding ¼ cup of fresh vinegar mop sauce to the pulled pork. Toss gently to distribute. Taste it. If it needs more tang and moisture, add another ¼ cup. Continue adding in small increments until it reaches your preferred flavor.
The pork should taste predominantly like pork, with smoke as a secondary note, and vinegar tang in the finish. If it tastes mostly like vinegar, you’ve added too much.
Step 9: Serve and Store
Serve the pulled pork immediately while warm. Provide extra vinegar mop sauce on the side for people who want to adjust their own portions.
Traditional North Carolina service is on a soft hamburger bun with coleslaw on top of the pork. The creamy, sweet slaw balances the tangy, peppery pork.
Store leftovers in an airtight container in the refrigerator for up to 4 days. The pork dries out slightly in the fridge. When reheating, add a few tablespoons of fresh vinegar sauce. This restores moisture and flavor.
Reheat gently in a 300°F oven for 15 to 20 minutes. Or reheat in a covered pan on the stovetop over low heat. Stir occasionally. Avoid microwaving if possible. It makes the pork rubbery.

Hot and Fast North Carolina Pulled Pork
Ingredients
Equipment
Method
- Make vinegar mop sauce by combining apple cider vinegar, water, salt, black pepper, red pepper flakes, and sugar if using. Stir until salt dissolves. Let sit at least 30 minutes.
- Pat pork butt dry and season generously on all sides with kosher salt, coarse black pepper, and garlic powder. Let sit at room temperature while preheating smoker.
- Preheat smoker to 350°F with your preferred smoking wood. Clean grates.
- Place pork butt directly on smoker grates, fat cap up. Smoke uncovered for 2 hours until dark bark forms.
- Transfer pork to aluminum foil pan. Add ½ to ¾ cup vinegar mop sauce to the pan bottom. Cover tightly with foil.
- Return covered pan to smoker. Continue cooking at 350°F until internal temperature reaches 203°F, about 2½ more hours. Check temperature starting at 2 hours in the pan.
- Remove from smoker and rest covered for 30 minutes minimum.
- Pull pork apart, discarding bone and excess fat. Add ¼ cup fresh vinegar mop sauce and toss. Taste and add more sauce in ¼ cup increments until desired flavor is reached.
- Serve warm with extra sauce on the side. Traditionally served on soft buns with coleslaw.
Nutrition
Notes
Tried this recipe?
Let us know how it was!Frequently Asked Questions
Can You Use Pork Loin Instead of Pork Butt?
You should not use pork loin for pulled pork. Pork loin is a lean cut with minimal fat and connective tissue. It’s best suited for roasting or grilling to medium doneness. When cooked to 203°F, pork loin becomes dry and stringy. It doesn’t have the collagen needed to create the pulled texture.
Pork butt (also called pork shoulder or Boston butt) is the correct cut. It comes from the upper shoulder. It has extensive marbling and connective tissue. This fat and collagen convert to gelatin during long cooking. The result is moist, tender pulled pork.
The names are confusing. Pork butt doesn’t come from the rear of the pig. It’s from the shoulder. If you’re at the butcher counter, ask for “pork shoulder” or “Boston butt.” Both terms refer to the same cut. Avoid anything labeled “pork loin” or “tenderloin.”
Bone-in pork butt is preferred over boneless. The bone helps regulate heat distribution during cooking. It also provides a visual indicator of doneness. When the bone wiggles freely, the pork is ready. Boneless works fine but requires more temperature monitoring.
How Do You Know When Pulled Pork Is Done Without a Thermometer?
The bone test is the most reliable non-thermometer method. Grip the exposed bone with tongs and twist gently. If the bone rotates easily in the meat and pulls out with minimal resistance, the pork is done. If the bone is firmly attached and doesn’t move, continue cooking.
The probe test also works. Insert a skewer or probe into the thickest part of the pork. It should slide in and out with no resistance, like pushing through soft butter. If you feel any toughness or resistance, the pork needs more time.
Visual cues can help. The pork should have pulled back from the bone by at least half an inch. The surface should be very dark, almost black in spots. The meat should look slightly shrunken compared to when you started.
These methods work but they’re less precise than a thermometer. For best results, invest in an instant-read thermometer. They cost $15 to $30. The accuracy is worth it for expensive cuts like pork butt. You’ll avoid both undercooking and overcooking.
Can You Make This in the Oven Instead of a Smoker?
You can cook pork butt in the oven using this method. Preheat to 350°F. Place the seasoned pork on a roasting rack in a foil pan. Roast uncovered for 2 hours. Then add vinegar sauce to the pan, cover with foil, and continue cooking to 203°F internal temperature.
The texture will be similar to smoked pork. The vinegar sauce provides tang. The pork still reaches proper doneness. But you’ll miss the smoke flavor entirely. This is a significant loss. Smoke is a primary characteristic of authentic North Carolina pulled pork.
To approximate smoke flavor, add 1 to 2 teaspoons of liquid smoke to the vinegar mop sauce. This creates some smoky character. But it doesn’t replicate real wood smoke. Liquid smoke tastes flat and one-dimensional. Real smoke provides layered complexity.
For best results, find a way to smoke the pork. Even a basic kettle grill set up for indirect heat can produce smoke. The investment in smoking equipment pays off for pulled pork. The flavor difference between oven-roasted and smoked is dramatic.
Why Is My Pulled Pork Dry Even Though I Cooked to 203°F?
Several factors can cause dry pulled pork despite hitting target temperature. The most common is cooking too quickly. If the pork races to 203°F in under 4 hours, the collagen hasn’t had time to convert fully to gelatin. The temperature is right but the texture suffers.
Another cause is leaving the pork uncovered too long. The extended time at high heat can evaporate too much moisture. Using a pan with sauce helps. But if you smoke uncovered for 3+ hours before wrapping, you might dry out the exterior significantly.
Insufficient fat in the pork butt can also create dryness. Some pork butts are leaner than others. If you got an unusually lean roast, it won’t have enough intramuscular fat to stay moist. Choose pork butts with visible marbling throughout.
Not adding enough finishing sauce is another issue. Even perfectly cooked pork needs sauce to reach ideal moisture. Add vinegar sauce in ¼ cup increments when pulling. Keep adding until the pork looks and tastes moist. Don’t be shy with the sauce.
How Do You Reheat Leftover Pulled Pork Without Drying It Out?
The key to reheating pulled pork is adding moisture. Mix a few tablespoons of vinegar mop sauce into the cold pork before heating. This replaces moisture lost during refrigeration. The pork absorbs the sauce as it warms.
For oven reheating, spread the pork in a baking dish. Add ¼ to ½ cup of water or vinegar sauce. Cover tightly with foil. Heat at 300°F for 15 to 20 minutes until warmed through. The steam from the liquid keeps the pork moist.
Stovetop reheating also works well. Place pork in a covered pan with a few tablespoons of liquid. Heat over low heat, stirring occasionally. The direct heat warms the pork faster than the oven. Keep it covered to trap steam.
Avoid microwaving if possible. Microwaves heat unevenly. The edges dry out while the center stays cold. If you must microwave, use 50% power. Heat in 1-minute intervals, stirring between. Add extra liquid before microwaving.
For best results, only reheat the amount you plan to eat immediately. Repeated heating and cooling degrades quality. Keep unused portions cold until needed. Pulled pork keeps refrigerated for 4 days or frozen for 3 months.
Ready to Level Up?
Take your backyard cooking from good to legendary.
This is where I keep all my most-used smokers, knives, and favorite cooking tools.
Shop My Gear CollectionExplore More Recipes
Find more diverse flavors at CWFeats.com
