Over-the-top smoked chili is ground beef and sausage mixed with salt, pepper, chili powder, smoked paprika, and garlic powder, formed into a single large log, then placed on a wire rack above a Dutch oven filled with diced onions, bell peppers, garlic, crushed tomatoes, fire-roasted diced tomatoes, kidney beans, pinto beans, tomato paste, beef broth, and spices. You smoke the entire setup at 275°F until the meat log reaches 165°F internal temperature, about 2 to 3 hours, allowing the rendered fat and juices from the meat to drip directly into the chili base below. After smoking, you crumble the smoked meat into the chili, stir to combine, and simmer until thick and rich. The result is chili with deep smoke flavor throughout from both the smoking process and the meat drippings.
The entire process takes about 3 to 4 hours from start to finish. This includes 15 minutes to prep the meat and chili base. Smoking takes 2 to 3 hours depending on meat log thickness and smoker consistency. The final simmering after adding the crumbled meat takes 15 to 20 minutes. You can prepare the ingredients while the smoker preheats to make efficient use of time.
This smoked chili serves 8 to 10 people with generous portions. The recipe yields about 12 to 14 cups of chili. Each serving is approximately 1½ cups. This is enough for a crowd at tailgates, game day parties, or family gatherings. The chili reheats well and actually improves after a day in the refrigerator as flavors meld.
The “over-the-top” name comes from the unique cooking method. The meat cooks literally over the top of the chili base. As it smokes, fat and juices drip down into the vegetables, beans, and tomatoes below. This creates flavor integration that can’t be achieved by cooking the components separately. Every element tastes smoky and meaty instead of just the meat having smoke flavor while the vegetables taste steamed.

What Makes This Chili “Over-The-Top” Compared to Traditional Chili
The Meat Log Dripping Method
Traditional chili browns meat in a pot first, then adds vegetables and liquid. The meat and vegetables cook together in the same liquid. Any fat that renders stays in the pot or gets skimmed off. The meat flavor disperses into the liquid through direct contact.
Over-the-top smoked chili physically positions the meat above the chili base. As the meat smokes, fat renders from both the ground beef and sausage. This fat is liquid at smoking temperature. It drips down into the chili below. The drippings carry dissolved proteins, spices from the meat seasoning, and smoke flavor absorbed during cooking.
These drippings provide continuous basting to the vegetables and beans. Each drop adds layers of meaty, smoky, spiced flavor. The onions and peppers essentially braise in beef fat and sausage drippings instead of just simmering in broth. This creates much richer flavor than traditional methods where vegetables cook in water-based liquid.
The technique also prevents the meat from becoming waterlogged. When you brown ground meat in liquid, it releases moisture. That moisture dilutes the chili. With the over-the-top method, moisture drains away from the meat. The meat stays drier and more concentrated in flavor. Only the flavorful fats and dissolved proteins drip into the chili.
Double Smoke Penetration
Traditional chili gets smoke flavor only if you add smoked ingredients like chipotle peppers or smoked paprika. The chili itself doesn’t absorb smoke because it’s covered in a pot. Some smoke might seep in around the lid. But penetration is minimal.
Over-the-top chili gets smoke from two sources. The meat log sits directly in the smoke stream. Smoke particles adhere to the meat surface. They also dissolve into the rendering fat. When this smoke-infused fat drips into the chili base, it carries smoke flavor with it.
The chili base itself also absorbs smoke. Dutch ovens aren’t perfectly sealed. Smoke circulates around the pot and seeps into the gaps. The vegetables, beans, and tomatoes all take on smoke character. Combined with the smoke-flavored drippings, the final chili tastes deeply smoky throughout.
This dual smoke exposure creates complexity. Different components have different smoke intensities. The meat tastes more aggressively smoky. The vegetables have mellower smoke notes. The beans fall somewhere in between. These variations create interest. Each bite tastes slightly different depending on which component dominates that particular spoonful.
Textural Contrast from Smoked Crust
When you form the meat into a log and smoke it, the exterior develops a crust. The Maillard reaction creates browning. Some fat renders out, leaving a drier surface that crisps slightly. This crust has concentrated flavor and interesting texture.
When you crumble this smoked meat log into the chili, those crispy, crusty bits distribute throughout. You get textural variation. Some bites have soft beans and tender vegetables. Others include firm, crusty meat pieces. This contrast makes the chili more engaging to eat.
Traditional chili with browned ground meat has more uniform texture. All the meat is the same softness. It blends into the bean and vegetable texture. There’s less variation bite to bite. The smoked crust pieces create surprise elements that make the eating experience more dynamic.
How the Meat Log Technique Works Better Than Browning Ground Meat
Fat Rendering Creates Natural Basting
When ground beef and sausage smoke at 275°F, the fat melts rapidly. Ground beef that’s 80/20 contains 20% fat. That’s a significant amount of rendered fat from 2 pounds of beef. Sausage contains even more fat, typically 25 to 30%. Combined, you’re rendering 8 to 10 ounces of liquid fat.
This fat drips continuously during the 2 to 3-hour smoking time. It’s not a single burst of moisture like when you drain browned meat. It’s steady, gradual basting. The chili base receives constant enrichment. The onions and peppers soak up this fat. They become incredibly flavorful and rich.
The rendered fat also carries spices from the meat seasoning. You season the meat with chili powder, smoked paprika, and garlic powder before forming the log. As fat renders, it dissolves these spices. They travel with the fat into the chili below. The spices distribute evenly instead of staying concentrated in the meat.
Surface Area for Smoke Adhesion
A meat log has much more exposed surface area than crumbled ground meat would have in a pot. All sides of the log are exposed to smoke. Smoke particles deposit on every surface. The log essentially becomes a smoke sponge.
If you crumbled the meat into a pot and tried to smoke it, only the top surface would receive smoke. The buried meat would stay relatively smoke-free. Stirring would help but would also cool the pot repeatedly. The log method ensures every part of the meat gets smoked.
The cylindrical shape also promotes even cooking. A uniform log thickness means all parts reach 165°F at roughly the same time. You don’t have some pieces overcooked while others are undercooked. The consistency creates better texture in the final crumbled meat.
Prevents Meat from Becoming Mushy
When you brown ground meat in liquid, it can become mushy or grainy. The meat absorbs water. The proteins swell. If you overcook slightly, the meat turns into tight, hard pellets. Getting perfect texture is difficult.
Smoking the meat log prevents this mushiness. The meat cooks in dry heat. Moisture escapes rather than being absorbed. The proteins firm up without becoming waterlogged. When you crumble the smoked log, the meat pieces maintain structure. They don’t fall apart into paste.
The final texture in the chili is much better. You get distinct meat pieces rather than an undifferentiated meat slurry. Each bite has identifiable chunks of beef and sausage. This creates a more satisfying eating experience. The chili feels substantial rather than soupy.
Flavor Concentration Through Moisture Loss
During smoking, the meat log loses 20 to 30% of its weight in moisture. This moisture loss concentrates flavor. The meat that remains is more intensely beefy and porky. The spices become more pronounced. The smoke flavor doesn’t get diluted by excess water.
When you crumble this concentrated meat into the chili, you’re adding pure flavor. Not diluted, watery meat. The chili tastes meatier without needing to use more meat. The 3 pounds of raw meat becomes about 2 to 2½ pounds of smoked meat. But it provides more flavor than 4 pounds of traditional browned ground meat would.
This concentration also affects the chili’s final consistency. Less moisture from the meat means the chili doesn’t become watery. You achieve proper thick, scoopable chili texture without needing to simmer for hours to reduce excess liquid.
Should You Use Kidney Beans, Pinto Beans, or Both in Chili
Kidney Beans for Firm Texture and Traditional Appeal
Kidney beans are the classic chili bean. They’re firm and hold their shape well during long cooking. The skin stays intact even with extended simmering. This creates satisfying texture. Each bean is a distinct entity rather than melting into the chili.
Dark red kidney beans have robust, slightly earthy flavor. They complement beef without being overshadowed. The beans taste substantial rather than bland. They feel like a main component, not just filler.
Kidney beans also have ideal size for chili. They’re large enough to provide textural contrast. But not so large that they dominate every spoonful. The bean-to-liquid ratio feels balanced. You get beans in every bite without the chili being bean-heavy.
Pinto Beans for Creaminess and Flavor Absorption
Pinto beans have thinner skins than kidney beans. They break down more during cooking. Some beans stay whole. Others partially dissolve into the chili. This creates natural thickening. The chili becomes creamier without adding flour or cornstarch.
Pinto beans also absorb flavor exceptionally well. They’re like little flavor sponges. They soak up the tomato, spices, and meat drippings. When you bite into a pinto bean, it tastes like concentrated chili flavor. Kidney beans maintain more of their own distinct bean flavor.
The creaminess from pintos creates better mouthfeel. The chili coats your spoon thickly. It doesn’t run off. This makes it ideal for topping hot dogs, fries, or nachos. It clings to whatever you put it on.
Using Both Creates Textural Complexity
Combining kidney and pinto beans gives you benefits of both. The kidney beans provide firm, distinct texture. The pintos create creaminess and thickening. Together they make more interesting chili than either bean alone.
The color variation also adds visual appeal. Dark red kidneys contrast with lighter tan pintos. The chili looks more complex. When you serve it, you see different bean shapes and colors. This signals that care went into the recipe.
The dual bean approach is also more forgiving. If some pintos overcook and dissolve, the kidney beans still provide texture. If kidney beans stay too firm, the pintos create smooth, creamy base. The combination buffers against cooking inconsistencies.
Black Beans and White Beans as Alternatives
Black beans work well in chili, especially Southwestern-style chili. They have firm texture like kidneys but earthier flavor. They pair especially well with cumin and smoked paprika. The dark color makes the chili look almost black, which can be striking.
White beans (cannellini or great northern) create lighter, milder chili. They’re less traditional. But they absorb smoke flavor beautifully. Their neutral taste lets smoke and spices shine. Some people prefer this if they find kidney beans too assertive.
For traditional Texas-style chili, you’d use no beans at all. Purists insist chili is just meat, chiles, and spices. But for most home cooks, beans add substance, nutrition, and help the chili feed more people affordably.
Why Dutch Ovens Work Better Than Aluminum Pans for Smoking Chili
Heat Retention and Distribution
Cast iron Dutch ovens retain heat exceptionally well. Once preheated, they maintain consistent temperature throughout the cooking process. When you open the smoker to check progress, the Dutch oven’s thermal mass prevents rapid temperature drops. The chili continues cooking steadily.
Aluminum pans have low thermal mass. They heat quickly but also cool quickly. Every time you open the smoker, the temperature in an aluminum pan drops significantly. Recovery takes time. This creates uneven cooking. The chili might simmer vigorously for periods, then barely simmer during recovery.
The heat retention also affects how the drippings integrate. In a hot Dutch oven, the fat hits simmering liquid immediately. It emulsifies into the chili. In a cooler aluminum pan, fat can pool on the surface without integrating. You end up with greasy chili instead of rich, well-incorporated chili.
Lid Seal and Moisture Control
Dutch ovens have heavy lids that create good seal. Some moisture escapes, but not excessively. The chili maintains proper liquid level throughout cooking. You don’t need to add broth repeatedly to compensate for evaporation.
Aluminum pans typically use foil as a lid. Foil seals poorly. Steam escapes easily. The chili can dry out during the long smoking time. You might need to add a cup or more of liquid to prevent burning. This dilutes flavor and creates watery chili.
The partial seal on a Dutch oven also allows just enough smoke to seep in. The chili gets smoke flavor without being overwhelmed. Perfect seal would prevent smoke penetration. No seal would oversaturate with smoke. The Dutch oven provides ideal balance.
Durability and Stability
Dutch ovens are extremely stable. They don’t tip easily. When you place a wire rack with 3 pounds of meat on top, the setup stays secure. Aluminum pans can buckle or tip under weight. This creates safety hazards. Hot fat spilling in a smoker can cause fires.
Dutch ovens also handle temperature changes without warping. Moving from room temperature to 275°F smoker doesn’t affect the pot. Aluminum pans can warp from rapid heating. Warped pans sit unevenly. The chili pools to one side instead of covering the bottom uniformly.
The durability means you can use the same Dutch oven for smoking repeatedly. It won’t degrade. Aluminum pans are typically disposable. They weaken after one use. For a recipe you’ll make multiple times, investing in a good Dutch oven makes sense.
Even Cooking and Hot Spot Prevention
Cast iron distributes heat evenly across the bottom and sides. There are no hot spots where food burns. The chili cooks uniformly. All vegetables soften at the same rate. The tomatoes reduce evenly. The beans heat through consistently.
Thin aluminum pans create hot spots. The areas directly over heat sources get hotter than surrounding areas. Vegetables in hot spots can scorch while others stay raw. The chili requires constant stirring to prevent burning. This is difficult when the pan is in a smoker.
The even heating also prevents the need for stirring during cooking. You can let the chili smoke undisturbed for the full 2 to 3 hours. Only stir when adding the crumbled meat. Less stirring means less heat loss from opening the smoker. The cooking environment stays more consistent.
Over-The-Top Smoked Chili
Meat log smoked above chili base, dripping method
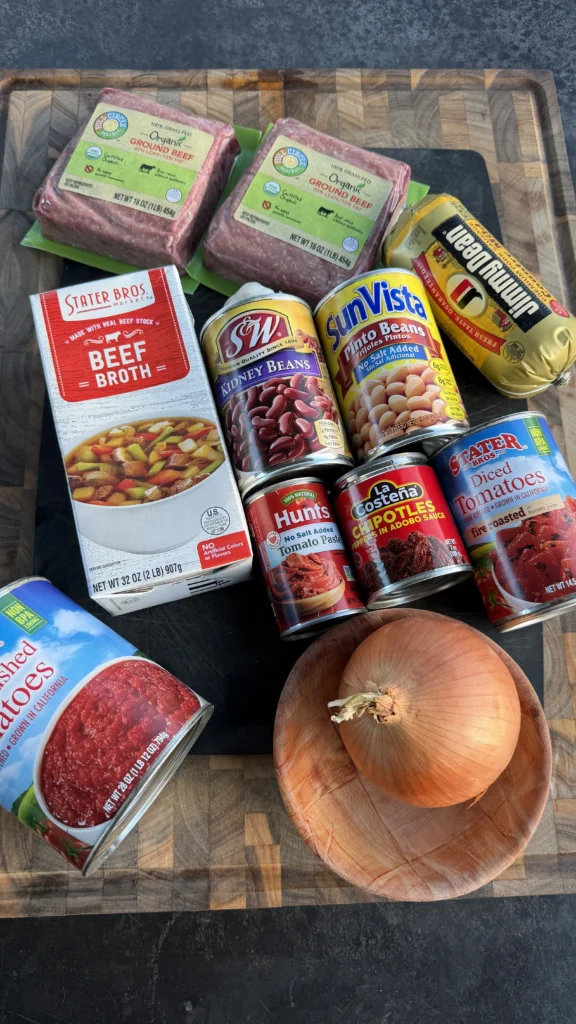
Ingredients
Meat
- 2 lbs ground beef
- 1 lb sausage (spicy or mild)
- 1 tablespoon kosher salt
- 1 teaspoon black pepper
- 1 teaspoon chili powder
- 1 teaspoon smoked paprika
- 1 teaspoon garlic powder
Chili Base
- 1 large yellow onion, diced
- 1 green bell pepper, diced
- 3-4 cloves garlic, minced
- 1 (28 oz) can crushed tomatoes
- 1 (14 oz) can fire-roasted diced tomatoes
- 1 (15 oz) can kidney beans, drained
- 1 (15 oz) can pinto beans, drained
- 2 tablespoons tomato paste
- 1 cup beef broth
- 2 teaspoons chili powder
- 1 teaspoon cumin
- 1 teaspoon smoked paprika
- ½ teaspoon oregano
- Salt to taste
Garnish
- Shredded cheddar cheese
- Sliced jalapeños
- Chopped onion
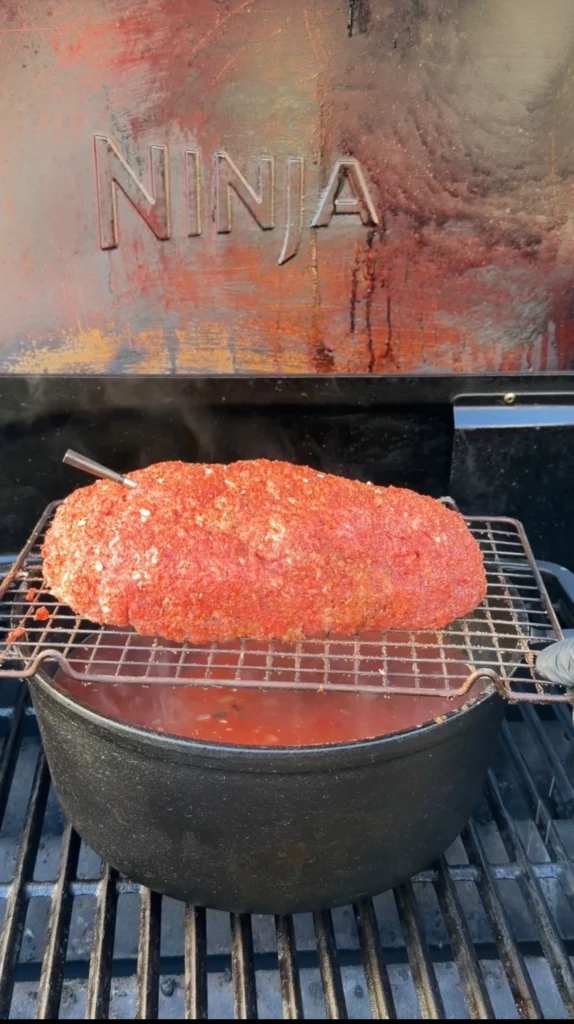
Form the meat log on parchment paper for easy transfer to the wire rack. Make it uniform thickness, about 3 to 4 inches in diameter. Even thickness ensures it cooks through at the same rate. Thicker sections take longer and can leave the ends overcooked.
Step-by-Step Instructions
Step 1: Season and Form the Meat Log
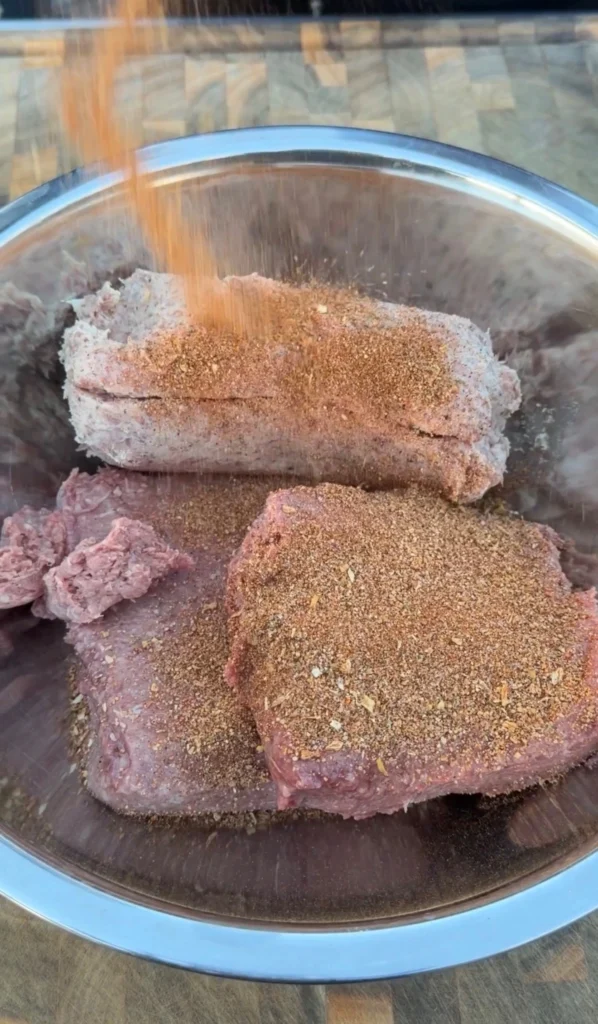
In a large bowl, combine 2 pounds of ground beef and 1 pound of sausage. Remove sausage from casings if using links. Add 1 tablespoon kosher salt, 1 teaspoon black pepper, 1 teaspoon chili powder, 1 teaspoon smoked paprika, and 1 teaspoon garlic powder.
Mix the meat and seasonings together with your hands. Don’t overmix. You want everything incorporated but the meat should stay loosely packed. Overmixing creates dense, tough texture.
Form the seasoned meat into a single log shape. Aim for about 12 to 14 inches long and 3 to 4 inches in diameter. Try to keep the thickness uniform from end to end. This ensures even cooking.
Place the meat log on a sheet of parchment paper for easy handling. You’ll transfer it to a wire rack later. The parchment prevents sticking and makes the transfer cleaner.
Step 2: Prepare the Chili Base
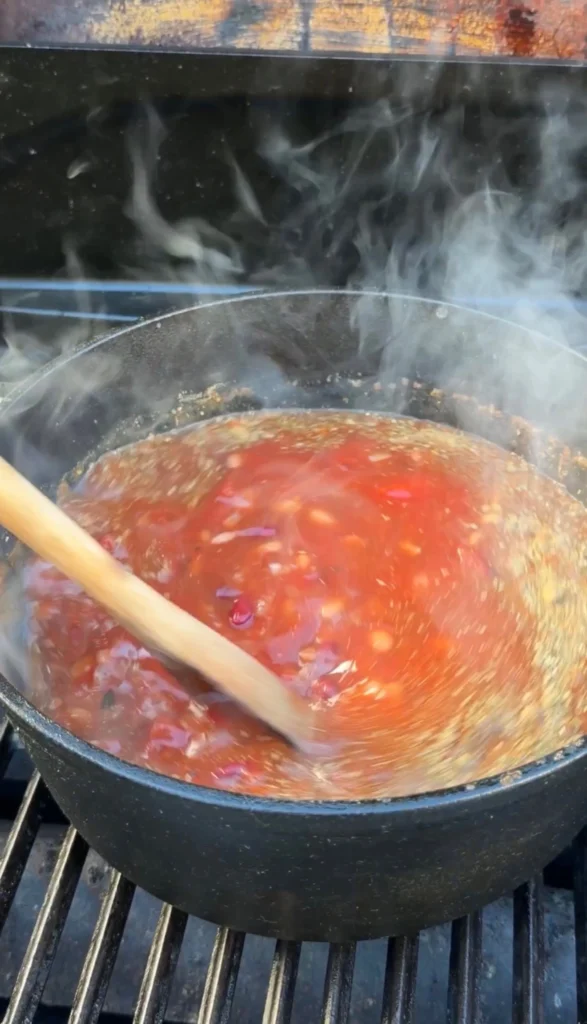
In a large Dutch oven, add 1 diced yellow onion and 1 diced green bell pepper. Add 3 to 4 cloves of minced garlic.
Pour in 1 (28 oz) can of crushed tomatoes and 1 (14 oz) can of fire-roasted diced tomatoes. Add 1 drained can of kidney beans and 1 drained can of pinto beans.
Add 2 tablespoons of tomato paste and 1 cup of beef broth. The broth provides liquid for simmering and prevents burning during the long cook.
Season with 2 teaspoons chili powder, 1 teaspoon cumin, 1 teaspoon smoked paprika, and ½ teaspoon oregano. Add salt to taste. Start with 1 teaspoon and adjust later if needed.
Stir everything together thoroughly. Make sure the tomato paste is fully incorporated. The mixture should look like raw chili before any cooking.
Step 3: Set Up the Smoking Rig
Preheat your smoker to 275°F. Add wood chunks or chips. Hickory works great for beef. Apple or cherry provide milder smoke if preferred.
Place a wire cooling rack across the top of the Dutch oven. The rack should be sturdy enough to support 3 pounds of meat. Make sure it sits securely without tipping.
Using the parchment paper, carefully transfer the meat log onto the wire rack. Center it so weight distributes evenly. The meat should sit about 2 to 3 inches above the chili base.
Remove the parchment paper. The meat log should now be resting directly on the wire rack.
Step 4: Smoke Until Meat Reaches 165°F
Place the entire setup in the smoker. The Dutch oven with chili base sits on the grate. The meat log sits on the wire rack above it.
Smoke at 275°F for 2 to 3 hours. Don’t open the smoker frequently. Each time you open it, heat escapes. This extends cooking time.
After about 2 hours, start checking the meat’s internal temperature. Insert an instant-read thermometer into the thickest part of the log. You’re looking for 165°F.
As the meat cooks, you’ll see fat and juices dripping into the chili below. This is exactly what you want. The chili will start bubbling gently. The liquid level might increase from the drippings.
When the meat reaches 165°F internal temperature, it’s done. Remove the entire setup from the smoker. Be careful. The Dutch oven is very hot.
Step 5: Crumble the Meat and Combine
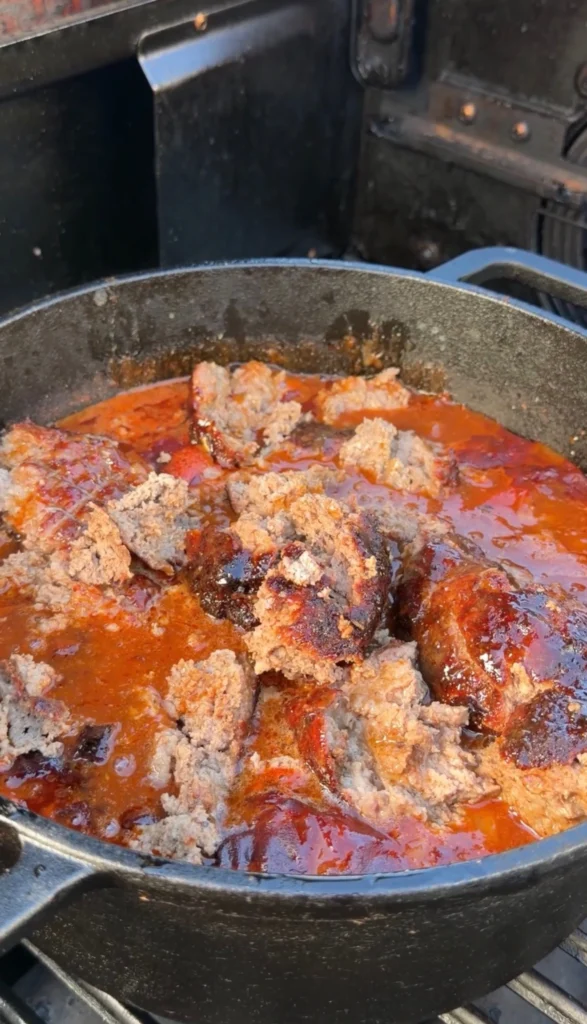
Carefully remove the wire rack with the meat log from the top of the Dutch oven. Set it aside on a cutting board or heat-safe surface.
Using two forks or your hands (wear heat-resistant gloves), crumble or shred the meat log. Break it into bite-sized chunks. Some pieces will be crustier from the exterior. Others will be softer from the interior. This variety is good.
Add all the crumbled meat directly into the Dutch oven with the chili base. The meat should still be very hot. Stir everything together thoroughly. The meat should distribute evenly throughout the chili.
The chili will look different now. It’s thicker. The color is darker from the meat. The texture is heartier with visible meat chunks.
Step 6: Simmer to Thicken
Return the Dutch oven to the smoker or move it to a stovetop over medium-low heat. Let the chili simmer for 15 to 20 minutes. This allows flavors to meld. The chili will thicken as some liquid evaporates.
Stir occasionally to prevent sticking. Taste and adjust seasoning. You might need more salt at this point. The meat absorbs some of the seasoning from the base.
The chili is ready when it’s thick enough to coat a spoon. It should be scoopable, not soupy. If it’s too thick, add a splash of beef broth or water. If too thin, simmer longer uncovered.
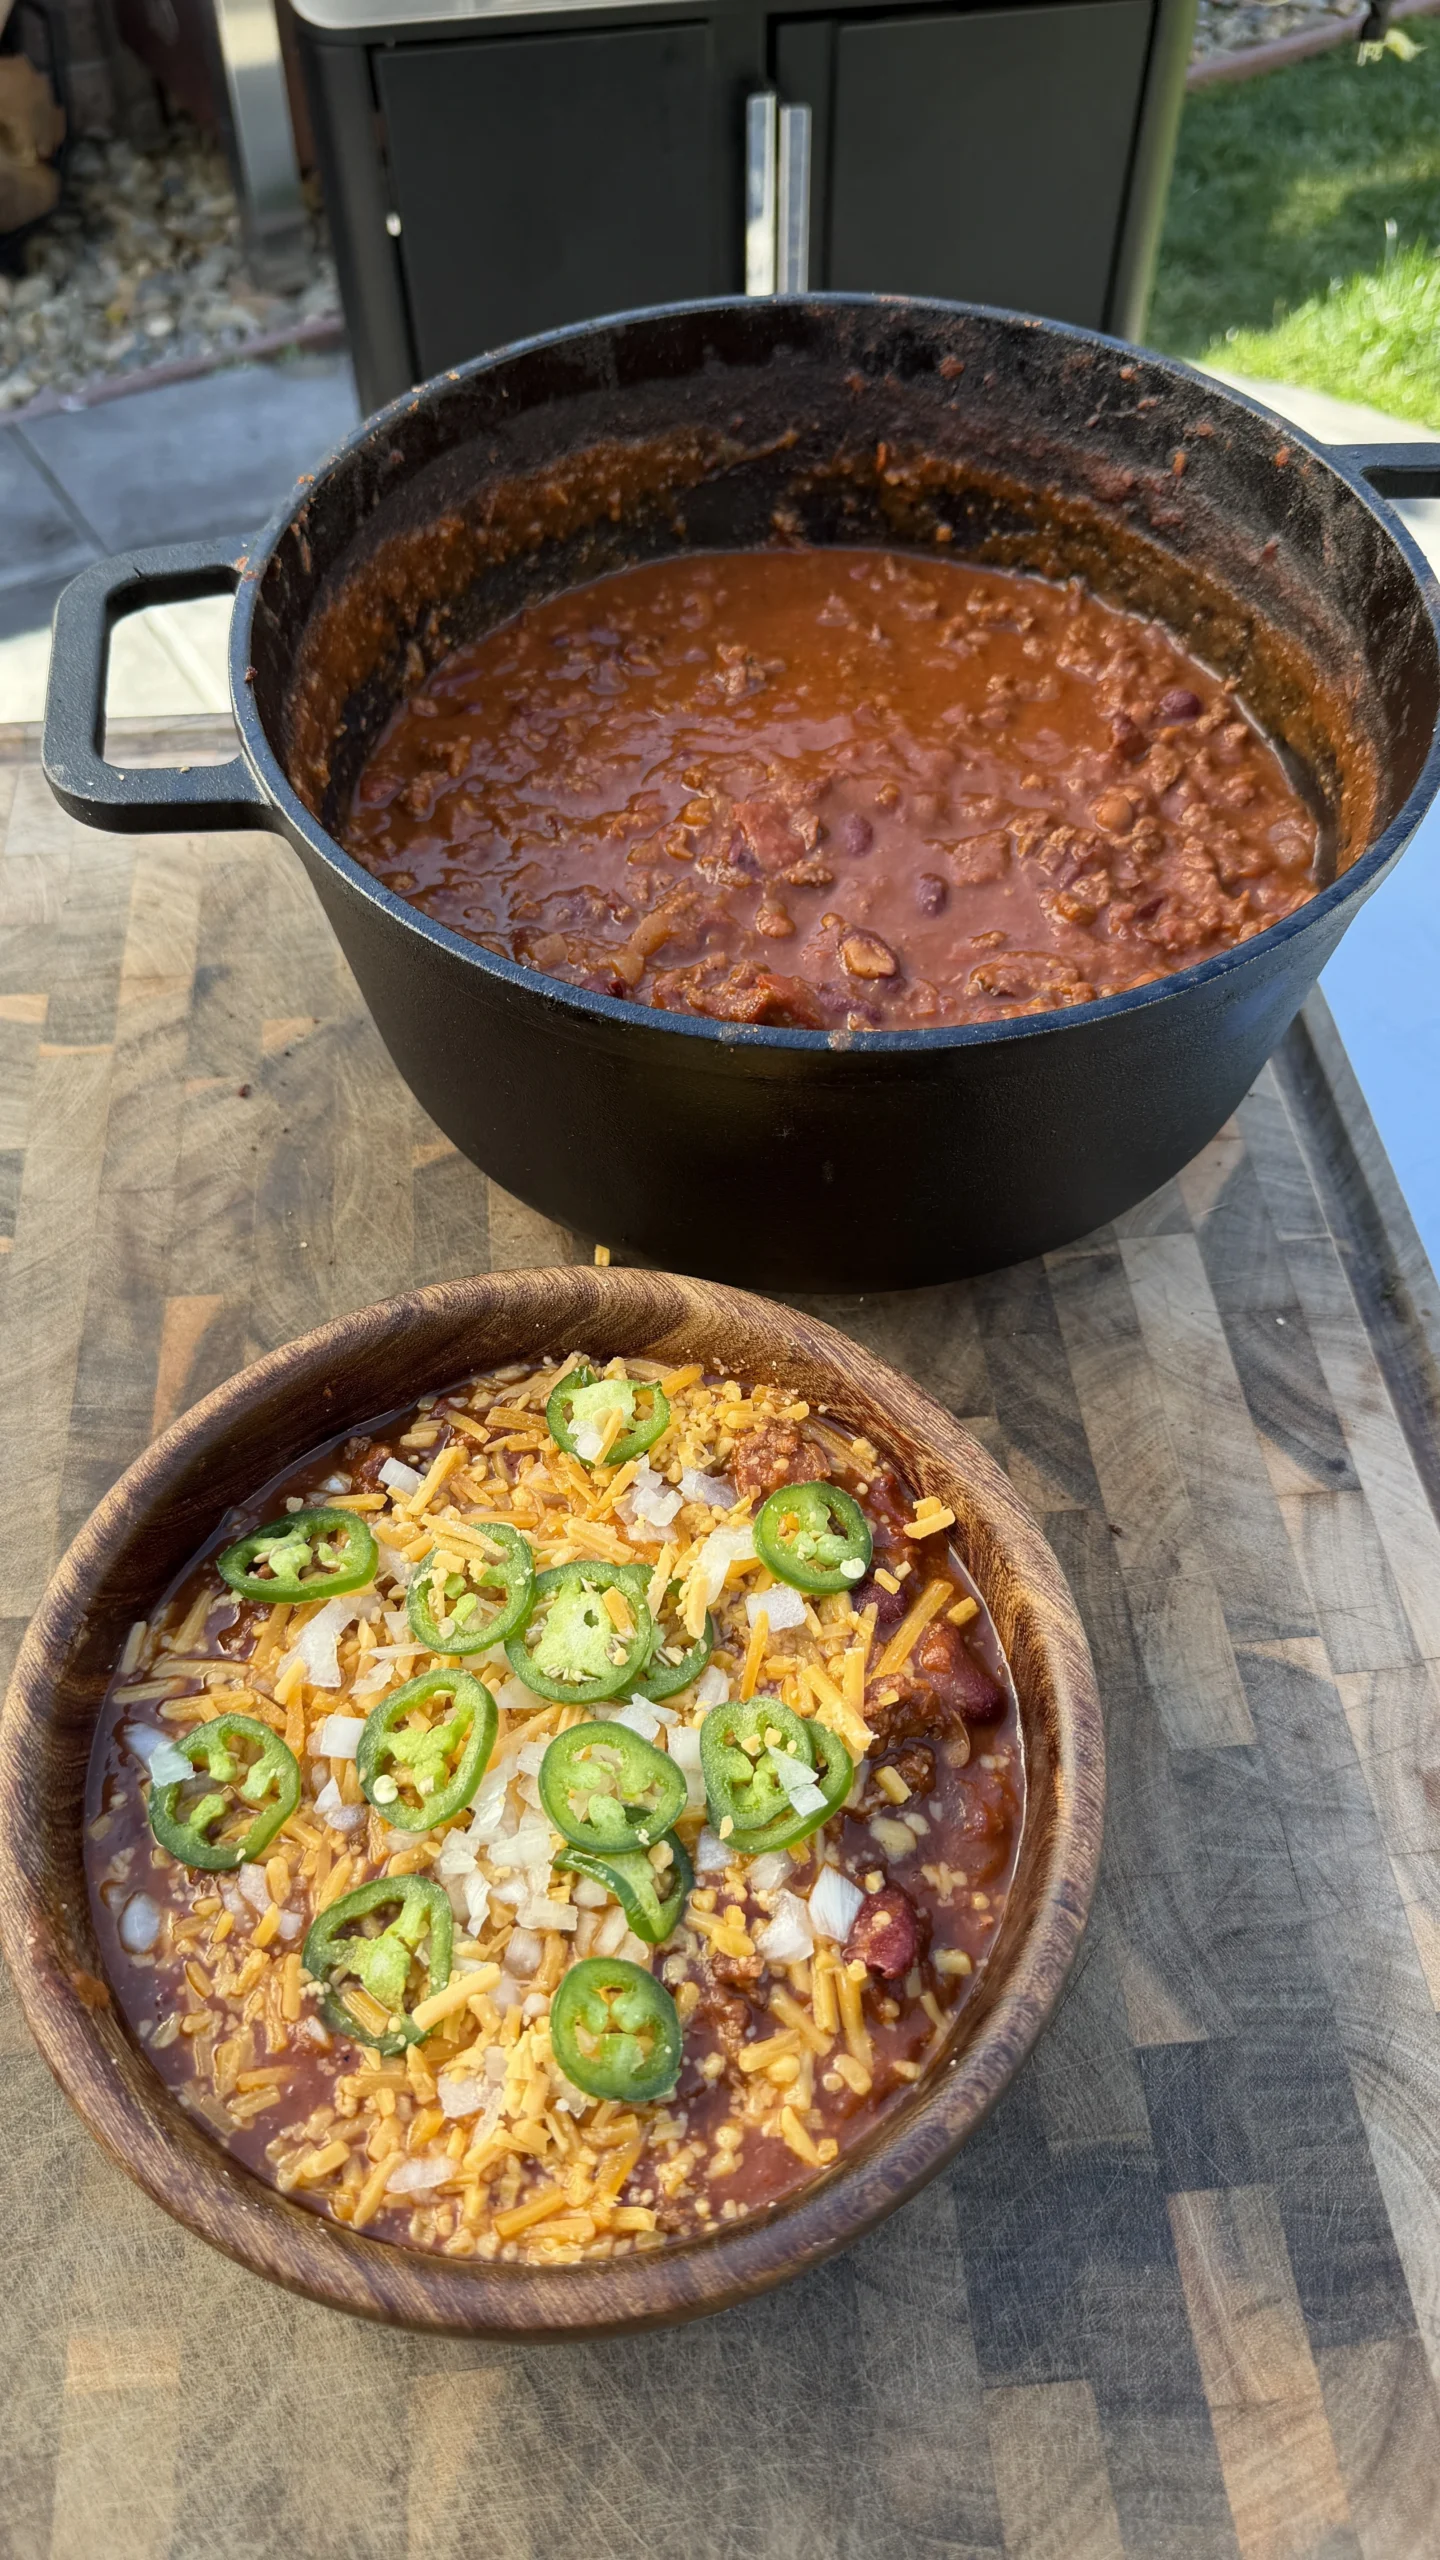
Step 7: Serve with Toppings
Ladle the hot chili into bowls. Top each serving with shredded cheddar cheese while the chili is hot. The cheese will melt slightly from the heat.
Add sliced jalapeños for those who want extra heat. Chopped raw onion provides fresh crunch that contrasts with the tender cooked components.
Other optional toppings include sour cream, diced avocado, tortilla chips, or cornbread on the side. Serve immediately while hot.
Store leftovers in an airtight container in the refrigerator for up to 5 days. The chili actually improves after a day as flavors continue melding. Freeze for up to 3 months.
Over-The-Top Smoked Chili
Ingredients
Equipment
Method
- In a large bowl, combine ground beef, sausage, salt, pepper, chili powder, smoked paprika, and garlic powder. Mix gently without overworking. Form into a single log about 12 to 14 inches long and 3 to 4 inches in diameter.
- In a Dutch oven, combine diced onion, bell pepper, garlic, crushed tomatoes, fire-roasted tomatoes, kidney beans, pinto beans, tomato paste, and beef broth. Season with chili powder, cumin, smoked paprika, oregano, and salt. Stir well.
- Preheat smoker to 275°F. Place a wire rack across the top of the Dutch oven. Transfer meat log onto the rack, centering it above the chili base.
- Smoke for 2 to 3 hours until meat reaches 165°F internal temperature. Fat and juices will drip into the chili below.
- Remove from smoker. Carefully remove wire rack with meat. Crumble or shred the smoked meat. Add all crumbled meat to the Dutch oven with chili. Stir to combine.
- Return to smoker or move to stovetop over medium-low heat. Simmer 15 to 20 minutes until thickened, stirring occasionally. Taste and adjust seasoning.
- Serve hot with shredded cheddar cheese, sliced jalapeños, and chopped onion. Store leftovers up to 5 days refrigerated or 3 months frozen.
Nutrition
Notes
Tried this recipe?
Let us know how it was!Frequently Asked Questions
Can You Make This Chili Without a Smoker?
You can make a version of this chili in a regular oven, but you’ll lose the smoke flavor that makes it special. Preheat your oven to 275°F. Set up the Dutch oven with wire rack and meat log the same way. Bake for 2 to 3 hours until the meat reaches 165°F.
For smoke flavor without a smoker, add 1 to 2 teaspoons of liquid smoke to the chili base. Use smoked sausage instead of regular sausage. Increase the smoked paprika to 2 teaspoons in both the meat and chili base. These substitutions approximate smoke flavor.
A gas or charcoal grill can work as a smoker substitute. Set up for indirect cooking. Add wood chunks or chips. Maintain 275°F temperature. Place the Dutch oven on the cool side away from direct heat. This creates similar results to a dedicated smoker.
The oven version is still good chili. But it misses the authentic smoke character that makes over-the-top chili distinctive. If you make it regularly, investing in a basic smoker or learning to smoke on your grill is worthwhile.
What Type of Sausage Works Best?
Italian sausage is a popular choice. Hot Italian sausage adds extra heat. Sweet Italian sausage provides milder, fennel-forward flavor. Both work well depending on your spice preference.
Breakfast sausage creates more traditional American chili flavor. The sage and black pepper seasoning blend complements beef nicely. This is a safe choice if you’re unsure what your guests prefer.
Chorizo adds bold, spicy flavor with paprika and garlic. Mexican chorizo is softer and fattier. Spanish chorizo is firmer and smokier. Either works but creates different flavor profiles. Chorizo makes the chili more aggressively spiced.
Andouille sausage brings Cajun influence with lots of garlic and heat. This creates Creole-style chili. The smoke in andouille doubles down on the smoked flavor from the cooking method. Some people find this too smoky. Others love it.
For milder chili, use bratwurst or Polish kielbasa. These sausages have subtle seasoning. They add pork flavor and fat without competing with the chili spices. Good choice for kids or heat-sensitive eaters.
How Do You Prevent the Chili from Burning During Long Smoking?
The beef broth in the chili base provides essential liquid. Make sure you add the full cup. This creates enough moisture for the 2 to 3-hour cook time. The drippings from the meat also add liquid as cooking progresses.
Check the chili after 90 minutes. If it looks dry or the liquid level has dropped significantly, add another ½ cup of beef broth. Stir gently without removing the setup from the smoker if possible. If you need to remove it to stir properly, work quickly to minimize heat loss.
Don’t let the smoker temperature climb above 300°F. Higher heat evaporates liquid too quickly. The vegetables on the bottom can scorch before the meat finishes cooking. Maintain consistent 275°F throughout.
Using a heavy Dutch oven with a good lid helps retain moisture. Thin pots allow too much evaporation. The heavy lid on a Dutch oven limits steam escape. The chili stays moist with less intervention needed.
Can You Use This Method for Turkey or Chicken Instead of Beef?
Ground turkey or chicken can replace the beef. Use 80/20 or 85/15 turkey if available. Lean 93/7 turkey doesn’t provide enough fat for proper dripping. The chili will be drier. You might need to add olive oil or bacon fat to the chili base to compensate.
Turkey and chicken need to reach 165°F just like the beef mixture. The cooking time should be similar. But poultry is leaner. The meat log might dry out on the exterior before the interior reaches temperature. Consider wrapping the log in bacon to add fat and prevent drying.
The flavor will be different. Poultry is milder than beef. The smoke flavor will be more prominent relative to the meat flavor. Some people prefer this. Others find it unbalanced. Adding extra chili powder and cumin to the meat helps create stronger flavor.
For best results with poultry, use half turkey or chicken and half pork sausage. The sausage provides the fat and flavor that lean poultry lacks. This combination creates better texture and taste than all poultry alone.
How Long Can You Store Leftover Smoked Chili?
Refrigerate leftover chili in airtight containers for up to 5 days. Let it cool to room temperature before refrigerating. Don’t leave it sitting out for more than 2 hours. Bacteria grow rapidly in the temperature danger zone of 40 to 140°F.
The chili actually improves after a day in the refrigerator. The flavors meld and deepen. The beans absorb more of the tomato and spice flavors. Many people deliberately make this chili a day ahead of when they plan to serve it.
For freezing, portion the chili into freezer-safe containers or heavy-duty freezer bags. Leave 1 inch of headspace for expansion. Freeze for up to 3 months. Label with the date so you know how long it’s been frozen.
To reheat, thaw frozen chili in the refrigerator overnight. Reheat on the stovetop over medium-low heat, stirring occasionally. Add a splash of beef broth if it’s too thick. The chili tends to thicken during storage as the beans absorb liquid.
Microwave reheating works but can create hot spots. Stir every minute during reheating. Use 50% power for more even heating. The texture is better with stovetop reheating if you have time.
Ready to Level Up?
Take your backyard cooking from good to legendary.
This is where I keep all my most-used smokers, knives, and favorite cooking tools.
Shop My Gear CollectionExplore More Recipes
Find more diverse flavors at CWFeats.com