Red Wine Braised Short Ribs
Recipe Overview:
Red Wine Braised Short Ribs
Bone-in beef short ribs seared until browned, braised in red wine with aromatics, carrots, celery, and fresh herbs until fork-tender and falling off the bone
Prep Time: 15 min | Cook Time: 3 hrs | Total Time: 3 hrs 15 min | Servings: 4-6 | Calories: 680/serving

See How It’s Done
Red wine braised short ribs represent the pinnacle of comfort food – tough, collagen-rich beef transformed through slow braising into fall-off-the-bone tenderness with a rich, glossy sauce that tastes like hours of work. These braised beef short ribs start with a hard sear in a Dutch oven that develops a mahogany crust and fond (those brown bits stuck to the bottom) that become the foundation of flavor. Aromatic vegetables – onion, carrots, and celery – sauté in the beef fat before tomato paste and garlic caramelize to add depth. Two cups of dry red wine deglaze the pot, dissolving all those flavorful brown bits, then beef broth and fresh herbs join to create the braising liquid. The covered pot goes into a 325°F oven for two and a half to three hours until the meat is so tender it pulls apart with a fork.
What makes this red wine short ribs recipe special is how the long, slow braise in wine and broth breaks down the abundant connective tissue in short ribs into silky gelatin that enriches the sauce. Short ribs contain more collagen than almost any other cut, which makes them tough when cooked quickly but incredibly tender and rich when braised for hours. The wine provides acidity that helps tenderize the meat while contributing complex flavors from the grapes, tannins, and oak aging. As the braising liquid reduces and concentrates, it transforms into a luxurious sauce that coats the meat with glossy, wine-dark richness.
This Dutch oven short ribs recipe delivers restaurant-quality results with surprisingly straightforward technique. The hands-on work takes only thirty minutes – searing meat and vegetables, then assembly. The oven does the rest, requiring no attention for three hours. Whether you’re making dinner for a special occasion or just want deeply satisfying comfort food, these wine-braised short ribs consistently deliver tender, flavorful results that make any meal feel like an event.
Why Short Ribs Are Perfect for Braising
Beef short ribs come from the chuck or plate sections of the cow, areas that get significant exercise and develop dense muscle fibers along with abundant connective tissue. This combination makes short ribs tough and chewy when cooked with dry heat methods like grilling or roasting to medium-rare. However, these same qualities make them ideal for braising – the long, slow cooking in liquid breaks down the collagen into gelatin that creates luxurious, silky texture while the fat renders and bastes the meat from within.
Each short rib section contains a thick band of meat surrounding a section of rib bone. The bone contributes flavor to the braising liquid while helping conduct heat into the center of the meat. Bone-in short ribs also present beautifully when served, with the meat clinging to the bone in a way that signals rustic, hearty cooking. Some recipes call for boneless short ribs which work fine but lack the flavor contribution and visual appeal of bone-in.
Look for short ribs with good marbling throughout the meat and a thick cap of meat over the bone – at least one and a half to two inches thick. Avoid ribs that are mostly bone with thin meat, as they won’t provide enough substance after the long braise. Four to five pounds of bone-in short ribs will serve four to six people generously, accounting for the bone weight and the fat that renders out during cooking.
The Science of Braising
Braising combines dry heat (the initial sear) with moist heat (the covered cooking in liquid) to transform tough cuts into tender, flavorful dishes. The technique works because the moist heat and long cooking time convert collagen – the tough connective tissue that makes short ribs chewy – into gelatin, a soft substance that gives braised meats their characteristic tender, almost gelatinous texture. This transformation begins around 160°F but accelerates dramatically above 180°F, which is why braising requires hours at moderate oven temperature rather than minutes at high heat.
The liquid in braising serves multiple purposes beyond just providing moisture. It conducts heat more efficiently than air, creating gentle, even cooking throughout the meat. The liquid also prevents the meat from drying out during the long cook time, while the steam created in the covered pot helps maintain consistent temperature. As the meat cooks, it releases juices and gelatin into the braising liquid, which then reduces and concentrates into a rich sauce.
The covered pot is crucial to braising success. The lid traps moisture and heat, creating a mini-oven environment within the oven. This enclosed space maintains steady temperature while the liquid simmers gently rather than boiling away. The moderate 325°F oven temperature is hot enough to keep the liquid at a gentle simmer but not so hot that the meat dries out or the liquid reduces too quickly.
Building Flavor Through Searing and Fond
Searing the short ribs before braising serves multiple purposes beyond just aesthetics. The high heat creates Maillard reaction – the chemical process where proteins and sugars on the meat’s surface break down and recombine into hundreds of new flavor compounds. This browning develops complex, savory flavors that wouldn’t exist without the sear. The caramelized proteins also add visual appeal, creating an appetizing mahogany color on the finished ribs.
Equally important is the fond – those brown bits stuck to the bottom of the pot after searing. Fond is concentrated flavor from caramelized proteins and sugars that would be wasted if you simply discarded it. Deglazing with wine dissolves this fond into the braising liquid, incorporating all that flavor into the final sauce. This is why you sear in the same pot you’ll braise in rather than using separate vessels.
Proper searing requires dry meat and high heat. Pat the short ribs completely dry with paper towels – any surface moisture will create steam rather than browning. Heat the pot until the oil is shimmering and almost smoking before adding the meat. Don’t move the ribs once they’re in the pot – let them sit undisturbed for three to four minutes per side to develop proper crust. Crowding the pot lowers temperature and creates steam, so sear in batches if necessary rather than packing everything in at once.
The Role of Mirepoix and Aromatics
Mirepoix – the classic French combination of diced onion, carrot, and celery – forms the aromatic base for countless braises and sauces. The three vegetables contribute different flavor elements that create complexity. Onions provide sweet, pungent depth and become soft and almost melting during the long braise. Carrots add natural sweetness and earthy notes that balance the wine’s acidity. Celery contributes subtle bitterness and aromatic complexity that prevents the sauce from tasting one-dimensional.
Sautéing the mirepoix in the beef fat left from searing serves two purposes. First, it softens the vegetables and begins developing their flavors through caramelization. Second, it picks up any remaining fond from the pot bottom, incorporating those flavors into the vegetables. The five-minute sauté is enough to soften the vegetables and make them translucent without fully cooking them – they’ll finish during the long braise.
Smashed garlic cloves and tomato paste get added after the mirepoix to prevent burning. Garlic would scorch during the long vegetable sauté, so it goes in near the end. Tomato paste needs a minute of cooking to caramelize its sugars and deepen its flavor – raw tomato paste tastes sharp and acidic, but cooked tomato paste becomes sweet and rich with concentrated umami. Stirring constantly during this minute prevents burning while allowing the paste to darken to brick red.
Choosing the Right Red Wine
The wine you choose significantly impacts the final sauce flavor. Dry red wines like Cabernet Sauvignon, Merlot, Côtes du Rhône, or Pinot Noir all work well. Cabernet Sauvignon provides bold, tannic structure with dark fruit flavors that stand up to rich beef. Merlot is softer and rounder with plum notes that create a slightly sweeter sauce. The key is using wine you’d actually drink – if it’s not good enough to drink, it’s not good enough to cook with.
Avoid cooking wines sold in grocery stores, which contain added salt and inferior quality grapes. Also skip sweet wines like Port or dessert wines, which would make the sauce cloying rather than balanced. The wine should be dry with good acidity and some tannins. Those tannins and acids help tenderize the meat while preventing the sauce from tasting flat or one-dimensional.
You don’t need to use expensive wine – mid-priced bottles in the ten to fifteen dollar range work perfectly. The heat cooks off the alcohol while concentrating the wine’s flavors, so subtle nuances from expensive bottles are lost. What matters is using real wine with good structure rather than cheap cooking wine or wine that’s gone bad. Two cups might seem like a lot, but the wine reduces significantly during braising, concentrating into the rich sauce that defines this dish.
Fresh Herbs for Depth
Fresh rosemary, thyme, and bay leaves create the herb profile that defines classic braised short ribs. These hardy herbs withstand the long cooking time without disintegrating or turning bitter. Rosemary provides piney, aromatic notes with a slightly medicinal quality that complements rich beef. Thyme contributes earthy, slightly minty flavor that’s essential to traditional French braising. Bay leaves add subtle complexity – hard to identify specifically but noticeably missed if omitted.
Using whole sprigs rather than chopped herbs makes removal easy after braising. You don’t want to eat woody rosemary stems or chewy bay leaves, so keeping the herbs whole allows you to fish them out before serving. The long braise extracts all the aromatic oils from the herbs into the liquid, so you get full flavor without any texture issues.
Ingredients
- 4-5 lbs bone-in beef short ribs
- Kosher salt, to taste
- 2 tbsp avocado oil
- 1 large onion, diced
- 2 carrots, diced
- 2 celery stalks, diced
- 5 cloves garlic, smashed
- 2 tbsp tomato paste
- 2 cups dry red wine (Cabernet Sauvignon or Merlot work great)
- 2 cups beef broth
- 2 sprigs fresh rosemary
- 4 sprigs fresh thyme
- 2 bay leaves
Optional for serving:
- Mashed potatoes, creamy polenta, or roasted potatoes
- Fresh parsley for garnish
Step-by-Step Instructions
Prepare and Season the Short Ribs
Remove the short ribs from refrigeration and let them sit at room temperature for thirty to forty-five minutes to take the chill off. This promotes more even searing and cooking. Pat each short rib completely dry on all surfaces using paper towels. Press firmly to absorb all surface moisture – any dampness will create steam rather than allowing proper browning during searing.
Season all sides of each short rib generously with kosher salt. Use more than you think you need – these are large pieces of meat that can handle aggressive seasoning. The salt should be visible on the surface. Season right before searing rather than far in advance, as salt will draw out moisture if left sitting too long. Black pepper is optional at this stage since it can burn during the high-heat sear – you can add it later if desired.
Sear the Short Ribs Until Deeply Browned
Preheat your oven to 325°F. While the oven heats, place a large Dutch oven (at least six quarts) over medium-high heat on the stovetop. Add the two tablespoons of avocado oil and heat until shimmering and almost smoking. Avocado oil has a high smoke point which makes it ideal for high-heat searing without burning.
Working in batches to avoid crowding, carefully place the short ribs in the hot oil. You should hear immediate, aggressive sizzling. Don’t move the meat once it’s in the pot – let it sit undisturbed for three to four minutes to develop a deep brown crust. If you try to flip too early, the meat will stick; when properly seared, it releases naturally. Flip to the next side and sear for another three to four minutes. Continue until all sides are deeply browned – this takes about twelve to fifteen minutes total per batch.
The goal is a dark mahogany crust with the fond (brown bits) accumulating on the pot bottom. These brown bits are concentrated flavor that will become part of the sauce. Transfer the seared short ribs to a plate and set aside. If searing in batches, repeat with remaining ribs. Don’t discard the fat or clean the pot – you want all that beef fat and fond for building the sauce.
Sauté the Aromatic Vegetables
If there’s excessive fat in the pot after searing (more than two to three tablespoons), pour some off but leave enough to sauté the vegetables. The beef fat adds flavor to the mirepoix. Keep the pot over medium-high heat and add the diced onion, carrots, and celery. Stir to coat the vegetables in the fat and scrape up any fond stuck to the bottom.
Sauté for about five minutes, stirring occasionally, until the vegetables soften and become translucent. The onions should lose their raw appearance while the carrots and celery begin to soften around the edges. You’re not looking for deep browning here – just softening and light caramelization. The vegetables will continue cooking during the long braise, so they just need to start releasing their moisture and flavors now.
Add the five smashed garlic cloves and two tablespoons of tomato paste. Stir constantly for about one minute, letting the tomato paste caramelize and darken to brick red. The raw tomato smell should give way to a sweet, concentrated aroma. The garlic should become fragrant but not browned. This quick cooking step is crucial – it transforms the sharp, acidic tomato paste into something rich and sweet that adds depth to the final sauce.
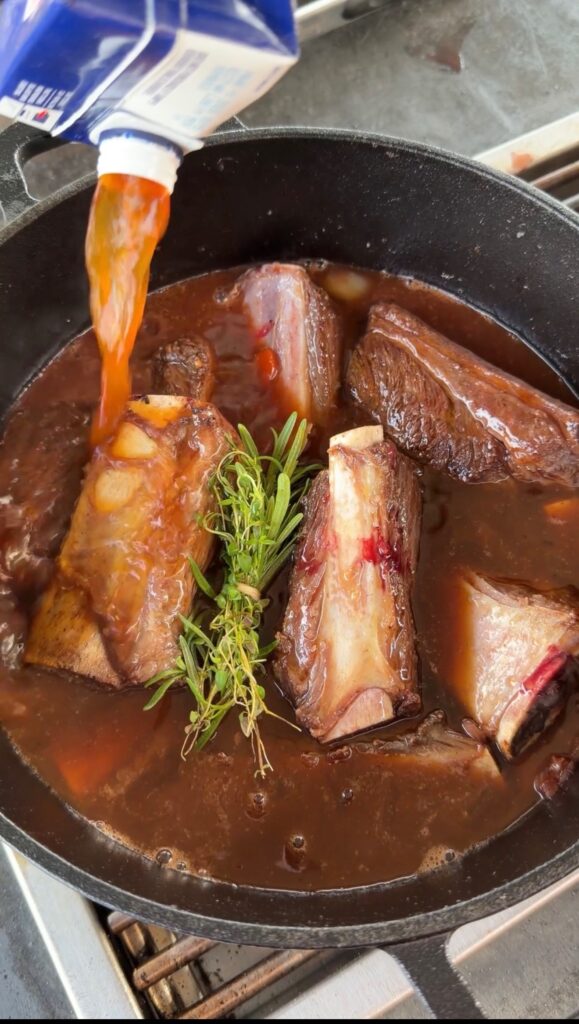
Deglaze with Red Wine
Pour in the two cups of dry red wine. The wine will immediately bubble and steam as it hits the hot pot. Using a wooden spoon or spatula, scrape the bottom of the pot vigorously, loosening and dissolving all the brown fond stuck to the bottom. This deglazing process incorporates all that concentrated flavor into the braising liquid. Keep scraping until the bottom feels smooth with no more crusty bits.
Let the wine simmer over medium-high heat for about ten minutes, stirring occasionally. The wine will reduce by roughly one-third, concentrating its flavors while the alcohol cooks off. You should see the liquid level drop noticeably and the bubbles become larger and slower as the liquid thickens slightly. This reduction step intensifies the wine flavor and removes the harsh alcohol notes that would make the sauce taste sharp rather than mellow.
Add Broth and Herbs, Return Ribs to Pot
Pour in the two cups of beef broth, stirring to combine it with the reduced wine. The braising liquid should taste well-balanced – you should be able to detect both the wine and the broth without either dominating. Add the two sprigs of fresh rosemary, four sprigs of fresh thyme, and two bay leaves directly to the liquid. These herbs will infuse their flavors throughout the long braise.
Return the seared short ribs to the pot along with any accumulated juices from the plate. Nestle the ribs into the liquid, arranging them so they fit relatively snugly. The liquid should come about two-thirds to three-quarters of the way up the sides of the ribs – they don’t need to be completely submerged. If the liquid doesn’t come up high enough, add a bit more beef broth or water. The steam and the covered pot will keep the exposed portions moist during cooking.
Braise in the Oven Until Fork-Tender
Cover the Dutch oven with its lid and place it in the preheated 325°F oven. The moderate temperature will keep the liquid at a gentle simmer – you should see small, lazy bubbles if you peek under the lid, not a rolling boil. Braise for two and a half to three hours without opening the lid frequently. Every time you open it, you lose heat and moisture, extending cooking time.
After two and a half hours, carefully remove the pot from the oven and check the meat. Insert a fork into one of the short ribs and twist gently. The meat should be so tender that the fork slides in with almost no resistance and the meat pulls apart easily. If it still feels firm or the fork meets resistance, cover and return to the oven for another twenty to thirty minutes, then check again. Total cooking time can vary based on the size of your ribs and the accuracy of your oven temperature.
When properly braised, the meat should be falling off the bone tender. The connective tissue will have completely broken down into gelatin, creating meat that’s rich and almost gelatinous in texture. The bones may even pull out cleanly with gentle tugging. This is the texture you’re looking for – anything less means the ribs need more time.
Remove Ribs and Finish the Sauce
Once the short ribs are fork-tender, carefully transfer them from the pot to a serving platter using tongs or a slotted spoon. Be gentle as they’ll be very tender and can fall apart if handled roughly. Tent the ribs loosely with foil to keep them warm while you finish the sauce. Remove and discard the rosemary sprigs, thyme sprigs, and bay leaves from the braising liquid – they’ve given all their flavor and you don’t want to serve them.
Assess the sauce consistency. It should be rich and slightly thickened but still pourable – somewhere between heavy cream and maple syrup. If it’s too thin, place the Dutch oven over medium-high heat on the stovetop and simmer the liquid uncovered for ten to fifteen minutes, stirring occasionally. As it reduces, it will thicken and the flavors will concentrate. If you want to skim excess fat from the surface, use a ladle or spoon to remove the clear fat that rises to the top, though some fat adds richness and flavor.
Taste the sauce and adjust seasoning if needed. It should taste deeply beefy with prominent wine flavor, balanced acidity, and sweet notes from the caramelized vegetables. Add salt and pepper if needed. The sauce should be glossy and coat the back of a spoon – this gloss comes from the gelatin released by the short ribs during braising.
Serve with Starch and Garnish
Return the short ribs to the sauce briefly to reheat if needed, or simply spoon the rich red wine sauce generously over the plated short ribs. The meat should glisten with the dark, glossy sauce. Serve immediately while hot with your choice of starch – creamy mashed potatoes, soft polenta, or roasted potatoes all work beautifully to soak up the incredible sauce.
Garnish with freshly chopped parsley for a pop of color and fresh flavor that brightens the rich, wine-dark dish. The parsley’s herbal notes provide contrast to the deep, savory flavors of the braised meat and sauce. Each serving should include one or two short ribs with plenty of sauce and some of the tender braised vegetables. The meat should be so tender it pulls apart with a fork, requiring no knife to eat.
FAQ
Can I make this ahead of time?
Yes, braised short ribs actually improve when made ahead. The flavors meld and deepen as the dish sits. Braise completely, let cool, then refrigerate for up to three days. The fat will solidify on top, making it easy to remove if desired. Reheat gently in a 325°F oven until warmed through, about thirty to forty-five minutes. The meat will be just as tender as when freshly made.
What if I don’t have a Dutch oven?
You can use any large, heavy pot with a tight-fitting lid that’s oven-safe. A covered roasting pan works, though you’ll need to do the searing and vegetable cooking in a separate skillet first, then transfer everything to the roasting pan for braising. The heavy, thick walls of a Dutch oven provide the best heat distribution, but other vessels work if that’s what you have.
Can I make this on the stovetop instead of the oven?
Yes, though the oven provides more even, gentle heat. If using the stovetop, keep the heat very low so the liquid just barely simmers with occasional small bubbles. Too much heat will make the meat tough. You’ll need to check more frequently to ensure the liquid isn’t reducing too much – add more broth if needed. The oven is preferred because it provides heat from all sides rather than just the bottom.
What can I do with leftover sauce?
The sauce is incredible tossed with pasta, spooned over mashed potatoes, or used as a base for other dishes. It freezes beautifully for up to three months. Some people reduce it even further to make a concentrated sauce that can be whisked into risotto or used as a finishing sauce for steaks. The gelatin-rich sauce adds body and flavor to anything it touches.
Why are my short ribs still tough after braising?
They need more time. Tough short ribs mean the collagen hasn’t fully broken down yet. Return them to the oven and continue braising, checking every thirty minutes. Eventually, the meat will become tender – it’s impossible to over-braise to the point of toughness. Temperature that’s too low can also be an issue – make sure your oven is truly at 325°F. An oven thermometer can verify accuracy.
Conclusion
Red wine braised short ribs prove that time and technique can transform tough, inexpensive cuts into elegant, restaurant-quality dishes. The combination of proper searing, aromatic vegetables, quality wine, and low, slow cooking in a covered pot creates fork-tender meat with a sauce so rich and flavorful it needs nothing more than a good starch to soak it up. The three-hour mostly hands-off cooking time means you can make this for dinner parties without spending all day in the kitchen.
What makes this Dutch oven short ribs recipe so successful is how each step builds on the previous one. The sear develops flavor and fond, the aromatics add depth and sweetness, the wine provides acidity and complexity, and the long braise transforms everything into tender, cohesive deliciousness. The moderate oven temperature and covered pot create the gentle, moist heat that converts tough collagen into silky gelatin without drying out the meat.
These wine-braised short ribs work beautifully for special occasions and cold weather comfort food alike. The make-ahead friendly nature means you can prep them a day or two in advance and just reheat before serving. The impressive presentation and restaurant-quality flavors make them perfect for dinner parties, while the deeply satisfying, rich flavors make them ideal for Sunday dinners. Master this classic braising technique and you’ll have a recipe that consistently delivers tender, flavorful results that make any meal feel like a celebration.
Ready to Take Your Cooking to the Next Level?
This is where I keep all my most-used products, gear, and favorite cooking tools — check it out:
View My Cooking Gear & Tools: https://linktr.ee/cooking_with_fire___
Recipe Categories
If you loved this recipe, you’ll find more to savor across our diverse categories. From beef to pork, chicken to turkey, seafood to appetizers, there’s a wealth of flavors waiting for you. Explore them all at CWFeats.
- Beef Recipes: https://cwfeats.com/beef-recipes/
- Pork Recipes: https://cwfeats.com/pork-4/
- Chicken Recipes: https://cwfeats.com/chicken-recipes/
