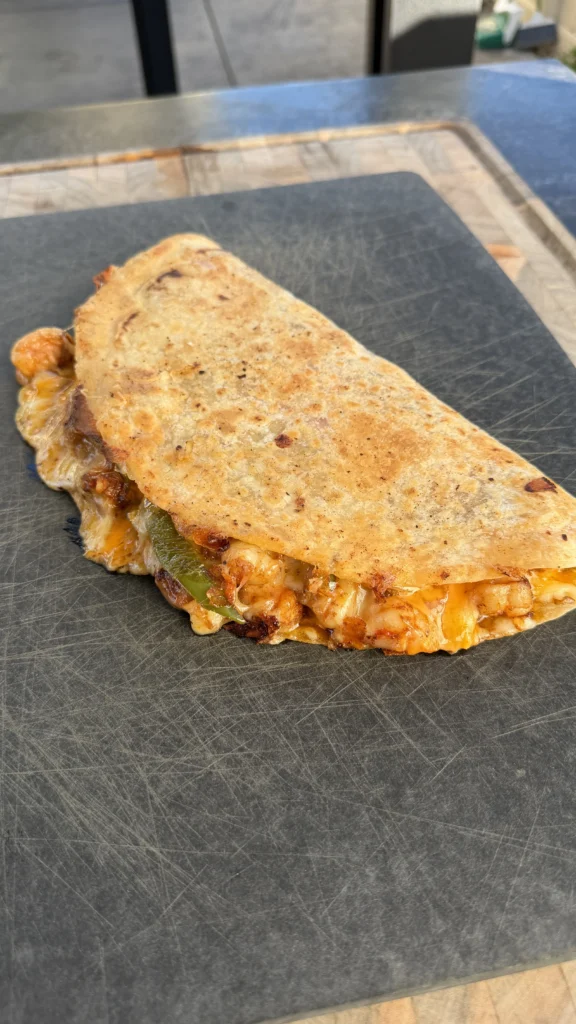
Shrimp fajita quesadillas are crispy griddled flour tortillas filled with bite-size pieces of seasoned jumbo shrimp, charred bell peppers and onions, melted mozzarella or pepper jack cheese, and drizzled with homemade sriracha mayo made from mayonnaise, sriracha, lime juice, and honey. The shrimp are cut into bite-size pieces and cooked on high heat for about 3 minutes with seafood or Cajun seasoning, while the bell peppers and onions are charred on the griddle for 5 minutes until softened and slightly caramelized. The quesadillas are assembled by layering cheese, shrimp, vegetables, and sriracha mayo on half a tortilla, folding it over, and cooking in butter on medium-low heat until the tortilla crisps to golden brown and the cheese melts completely. This shrimp quesadilla recipe delivers restaurant-quality results in about 30 minutes from start to finish.
The whole process takes 15 minutes of prep to cut and season ingredients, plus 15 minutes of active cooking time on the griddle. You cook the vegetables first while making the sriracha mayo, then quickly cook the shrimp, and finally assemble and griddle the quesadillas in batches. The combination of sweet shrimp, smoky charred vegetables, melted cheese, and creamy-spicy sriracha mayo creates layers of flavor and texture that beat any takeout version. These fajita quesadillas work perfectly for quick weeknight dinners, game day appetizers, or anytime you want satisfying Tex-Mex food without extensive prep or cleanup.
Why Jumbo Shrimp Work Best for Quesadillas
Jumbo shrimp provide the ideal size and texture for quesadilla fillings because they’re large enough to cut into multiple bite-size pieces that distribute evenly throughout the tortilla while still delivering meaty, substantial shrimp flavor in every bite. A single jumbo shrimp cuts into about 4 pieces, giving you consistent shrimp coverage across the entire quesadilla rather than having whole shrimp that create uneven filling distribution where some bites are all shrimp and others have none.
The firm, meaty texture of jumbo shrimp holds up better to high-heat griddle cooking than smaller shrimp, which can become rubbery or overcooked in the 3 minutes it takes to cook them through. Jumbo shrimp have enough mass that they stay tender and juicy even when cooked quickly over high heat, while medium or small shrimp can dry out or turn tough in the same conditions. The larger size also makes them easier to handle when cutting and cooking without losing pieces through the griddle grates.
Cutting jumbo shrimp into bite-size pieces before cooking solves the problem of trying to eat quesadillas with whole shrimp that stick out and fall out when you bite down. When shrimp are pre-cut, they nestle into the cheese and vegetables, creating a cohesive filling that stays in the tortilla rather than sliding out. This makes the quesadillas easier to eat and ensures every triangle or wedge you cut has a balanced ratio of shrimp to other fillings.
The cost difference between jumbo shrimp and smaller sizes is minimal when you’re using 2 pounds total, and the superior texture and ease of eating make jumbo shrimp worth the slight premium. You can use large or extra-large shrimp if jumbo aren’t available, just cut each one into 2-3 pieces instead of 4 to maintain good size distribution. Avoid tiny salad shrimp or pre-cooked shrimp, which become rubbery when reheated and don’t have enough individual shrimp flavor to stand up to the cheese and seasonings.
What Makes Sriracha Mayo the Perfect Sauce for Shrimp Quesadillas
Sriracha mayo combines creamy richness from mayonnaise with sweet-spicy heat from sriracha, creating a sauce that cools the palate while adding flavor complexity that plain sour cream or salsa can’t match. The mayonnaise base provides fat that carries flavor across your entire palate and creates smooth, luxurious texture that contrasts perfectly with crispy tortillas and tender shrimp. Unlike watery sauces that make tortillas soggy, mayo-based sauces stay thick and cling to the filling without soaking through.
Sriracha brings fermented garlic-chili flavor with moderate heat that builds gradually rather than hitting all at once like cayenne or jalapeños would. The garlic notes in sriracha complement seafood naturally, while the fermented quality adds depth and complexity beyond just heat. The 2-3 tablespoons sriracha to ½ cup mayo ratio creates balanced sauce where you taste both the creamy and spicy elements without either one dominating.
Lime juice adds brightness and acidity that cuts through the richness of mayo and cheese while enhancing the shrimp’s natural sweetness. Just 1 teaspoon is enough to lift all the flavors without making the sauce taste citrusy or sour. The optional honey or sugar rounds out any harsh edges from the sriracha and creates sweet-heat balance that makes the sauce addictive rather than just spicy.
This homemade sriracha mayo takes 2 minutes to mix together and tastes dramatically better than store-bought “spicy mayo” or sriracha aioli, which often contain unnecessary additives and cost 3-4 times more per ounce. You can adjust the heat level precisely to your preference by adding more or less sriracha, and you can make it ahead and refrigerate for up to a week. The same sauce works excellently on fish tacos, grilled shrimp, poke bowls, or as a dipping sauce for any seafood.
Why You Should Cook Vegetables and Shrimp Separately
Cooking the fajita vegetables and shrimp separately on the griddle ensures both components reach their ideal texture without either one overcooking or undercooking. Bell peppers and onions need 5 minutes of high-heat cooking to soften, char slightly, and develop caramelized sweet flavor. Shrimp need only 3 minutes total to cook through from raw to perfectly tender. If you cooked them together, you’d either have crunchy, undercooked vegetables or rubbery, overcooked shrimp.
The vegetables release moisture as they cook, which creates steam that prevents proper browning and char development. By cooking the vegetables first and moving them to a cooler zone of the griddle, you allow them to char and caramelize properly without the moisture from the shrimp interfering. Once you move them aside, the griddle surface is hot and dry, perfect for quickly searing the shrimp to develop light browning without steaming.
Shrimp cook so quickly that they need your full attention for those 3 minutes. You should stir them occasionally to ensure even cooking on all surfaces, which is easier to do when you’re focused solely on the shrimp rather than trying to manage vegetables at the same time. Multitasking between two different proteins cooking at different rates is a recipe for overcooked shrimp or undercooked vegetables.
The separate cooking method also gives you better control over seasoning. You can season the vegetables with whatever complements peppers and onions (salt, pepper, maybe cumin), then season the shrimp specifically with seafood or Cajun seasoning that enhances their flavor. If you cooked everything together, you’d have to compromise on seasoning that works for both, which rarely gives optimal results for either component.
How to Get Perfectly Crispy Quesadilla Tortillas
The secret to crispy quesadillas is using butter on medium-low heat rather than oil on high heat, which creates golden, evenly browned tortillas that stay crispy even as the filling steams. Butter has milk solids that brown beautifully and add nutty, rich flavor that oil can’t provide. The lower heat prevents burning while giving the cheese time to melt completely, so you don’t end up with charred exterior and cold, unmelted cheese inside.
Add butter to the griddle just before you place the quesadilla, letting it melt and foam slightly before the tortilla hits the surface. The tortilla should sizzle gently when it touches the melted butter, not aggressively like it would on screaming hot heat. As the quesadilla cooks, the butter seeps into the tortilla’s surface, creating a golden crust that crisps as the moisture evaporates.
Cook the folded quesadilla undisturbed for 2-3 minutes on the first side before checking the bottom. When you lift the edge with a spatula, you should see even golden-brown color across the entire tortilla surface. If there are pale spots, those areas didn’t get enough heat or butter contact. Flip the quesadilla carefully with a large spatula to avoid spilling the filling, and cook another 2-3 minutes on the second side.
Press down gently on the folded quesadilla with your spatula while it cooks to ensure good contact between the tortilla and the hot griddle surface. This pressure helps the cheese melt evenly and creates better browning. Don’t press too hard or you’ll squeeze out filling, just firm enough to keep the tortilla flat against the heat. The quesadilla is done when both sides are golden brown and crispy, and the cheese has melted completely so it oozes slightly when you cut into it.
What Cheese Melts Best for Seafood Quesadillas
Mozzarella and pepper jack are the ideal cheeses for shrimp quesadillas because they melt smoothly without becoming greasy or grainy, and their mild to medium flavors don’t overpower the delicate shrimp. Mozzarella provides excellent stretch and gooey texture that holds the filling together while staying creamy rather than oily. Its mild, slightly tangy flavor works as a blank canvas that lets the shrimp, vegetables, and sriracha mayo shine through.
Pepper jack adds subtle heat and more assertive flavor if you want the cheese itself to contribute spice rather than just acting as a binder. The jalapeño flecks in pepper jack complement the Cajun or seafood seasoning on the shrimp and add visual interest to the melted cheese. The heat level is mild enough that it won’t overwhelm people who don’t like spicy food, but noticeable enough to add another layer of flavor complexity.
Freshly grated cheese from a block melts significantly better than pre-shredded cheese from bags, which contains anti-caking agents like cellulose that interfere with smooth melting. These additives can make the melted cheese grainy or separated instead of smooth and creamy. Taking 2 minutes to grate your own cheese makes a noticeable difference in the final quesadilla quality.
Avoid strong-flavored cheeses like sharp cheddar, blue cheese, or aged cheeses that would compete with rather than complement the shrimp. Also skip cheeses that don’t melt well like feta, queso fresco, or halloumi, which would create a crumbly filling instead of the cohesive, melted texture you want. Monterey Jack works well as an alternative to mozzarella if you prefer slightly more flavor, and you can mix mozzarella with pepper jack for balanced heat and meltability.
Step-by-Step Instructions
Step 1: Prep the Shrimp and Make Sriracha Mayo

Peel and devein 2 pounds jumbo shrimp if they aren’t already cleaned, then pat them completely dry with paper towels. Moisture on the shrimp’s surface will create steam during cooking and prevent proper browning. Place the cleaned shrimp on a cutting board and cut each one into approximately 4 bite-size pieces, making your cuts perpendicular to the length of the shrimp.
Season the shrimp pieces generously with 2-3 teaspoons seafood seasoning or Cajun seasoning, tossing them in a bowl to coat evenly. Use enough seasoning that you can see it coating the shrimp surfaces, as this is their only source of flavor before cooking. Set the seasoned shrimp aside while you prepare the other components.
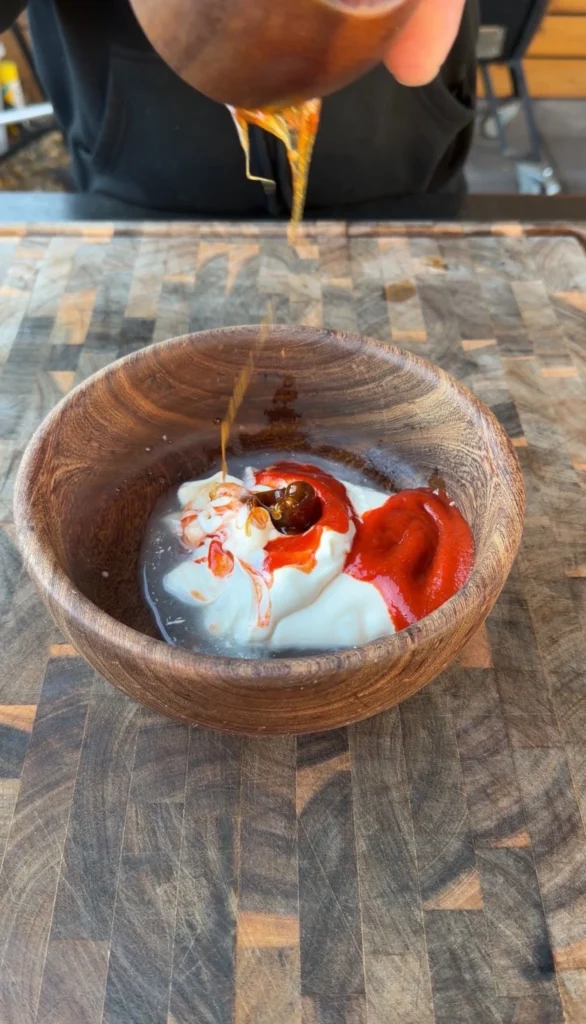
Make the sriracha mayo by combining ½ cup mayonnaise, 2-3 tablespoons sriracha (adjust to your heat preference), 1 teaspoon lime juice, and 1 teaspoon honey or sugar if using in a small bowl. Whisk everything together until smooth and uniform in color, with no streaks of plain mayo visible. Taste and adjust the sriracha level if needed, keeping in mind that the sauce will taste slightly less spicy once mixed with the other quesadilla ingredients.
Set the sriracha mayo aside at room temperature for easy drizzling during assembly. If you make it ahead and refrigerate it, let it come to room temperature for 10-15 minutes before using so it’s easier to drizzle rather than being thick and difficult to spread.
Step 2: Prep and Cook the Fajita Vegetables
Slice 2 bell peppers (any colors you prefer) and 1 large onion into thin strips about ¼ inch wide and 2-3 inches long. Keep the slices relatively uniform in size so they cook evenly. Thicker pieces will stay crunchy while thin pieces char too quickly, so aim for consistency.
Heat your griddle or large flat-top pan over high heat for 2-3 minutes until very hot. Add 2 tablespoons oil to the griddle surface and spread it around to coat the area where you’ll cook the vegetables. The oil should shimmer but not smoke when the griddle is at proper temperature.
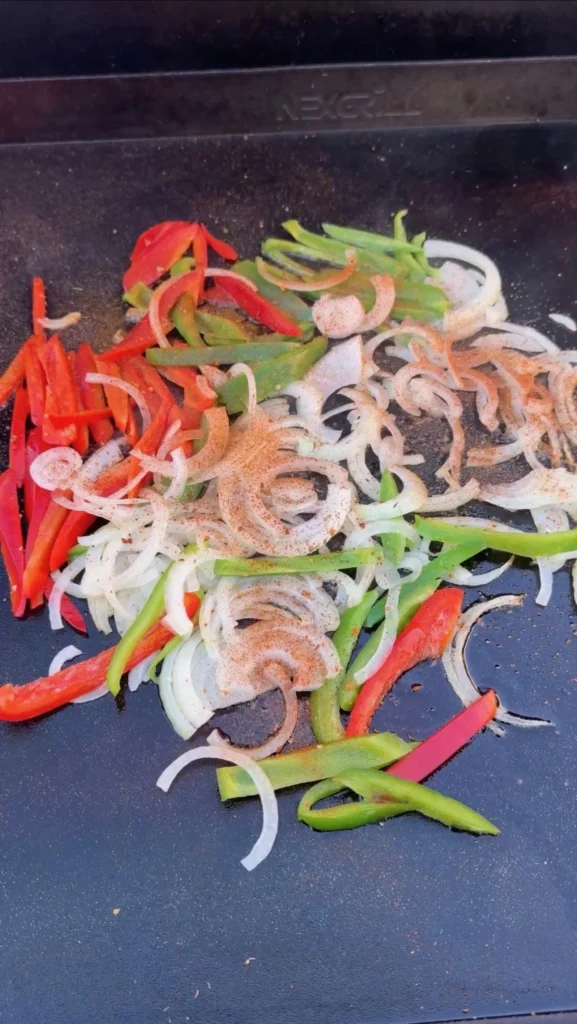
Add all the sliced peppers and onions to the hot oiled griddle, spreading them into a relatively even layer. Cook for about 5 minutes, stirring occasionally with a metal spatula, until the vegetables have softened significantly and developed char marks on some edges. You’re looking for tender-crisp texture with visible browning and slight caramelization.
Once the vegetables are cooked, push them to one side of the griddle and turn off or reduce the burner under that zone to keep them warm without continuing to cook. This frees up the hot zone of the griddle for cooking the shrimp next.
Step 3: Cook the Shrimp on High Heat
Make sure the empty zone of your griddle is still on high heat from cooking the vegetables. The surface should be very hot, around 400-450°F if you have a thermometer, or hot enough that a drop of water sizzles and evaporates immediately. You may need to add a small amount of additional oil if the griddle looks dry.
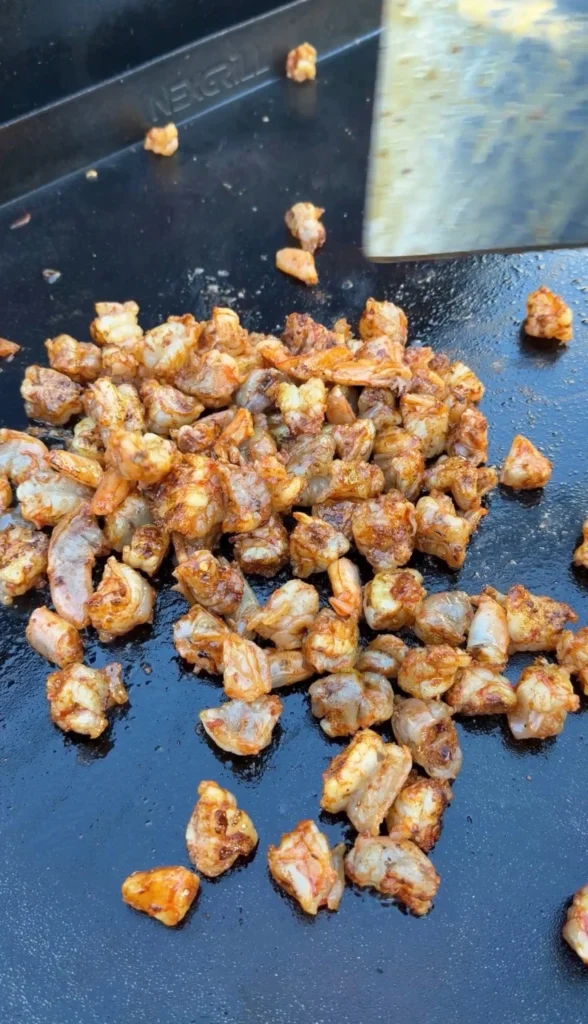
Add all the seasoned shrimp pieces to the hot griddle in a single layer, spreading them out so they’re not piled on top of each other. The shrimp should sizzle immediately when they hit the surface. If they don’t make noise, your griddle isn’t hot enough yet.
Cook the shrimp for about 3 minutes total, stirring occasionally with a spatula to ensure all surfaces make contact with the hot griddle. The shrimp will turn from translucent gray to opaque pink-white as they cook. They’re done when they’re completely pink with no gray remaining and have started to curl slightly. Don’t overcook them or they’ll become rubbery; 3 minutes is usually perfect for bite-size pieces.
Remove the cooked shrimp from the griddle to a clean plate. Reduce your griddle temperature to medium-low for assembling and cooking the quesadillas. The vegetables can stay on the warm zone of the griddle or you can transfer them to a bowl if you need the space.
Step 4: Assemble the Quesadillas
Reduce the griddle temperature to medium-low heat, around 300-325°F, for cooking the quesadillas. This moderate heat allows the cheese to melt completely while the tortilla browns to golden crispy without burning.
Place a large flour tortilla flat on the griddle. Sprinkle a handful of freshly grated mozzarella or pepper jack cheese on one half of the tortilla, leaving the other half empty for folding. Use enough cheese to create a good base layer, approximately ¼ to ⅓ cup per quesadilla.
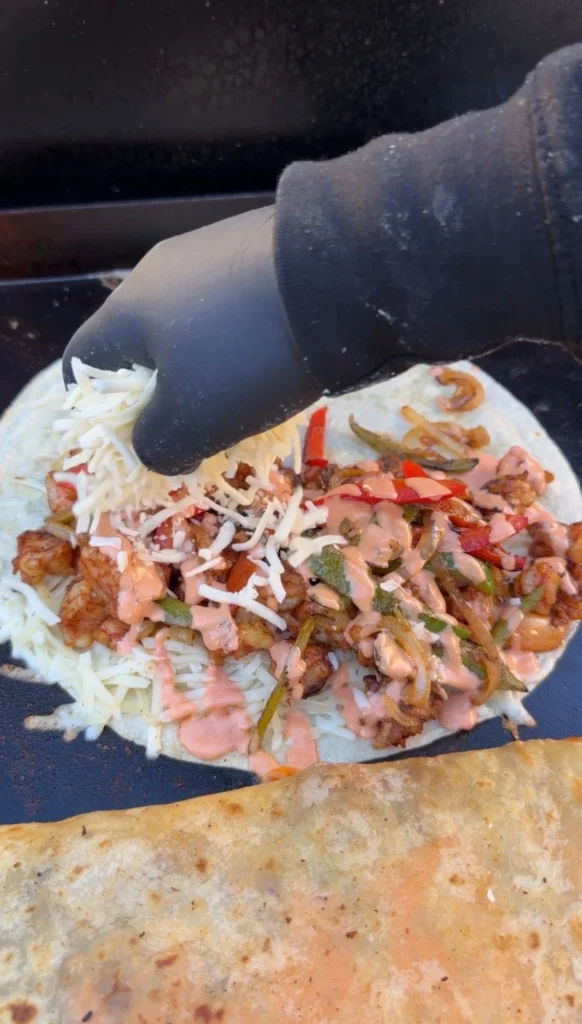
Layer cooked shrimp pieces on top of the cheese, using about ⅓ to ½ cup shrimp per quesadilla depending on how generously you want to fill them. Add a portion of the cooked fajita vegetables on top of the shrimp, distributing them evenly so every bite will have vegetables.
Drizzle 1-2 tablespoons sriracha mayo over the filling in zigzag or crosshatch pattern. Don’t use too much or the quesadilla will be messy and drip when you eat it. Finish by sprinkling another layer of cheese on top of everything, which will help bind the filling together when it melts.
Step 5: Cook the Quesadillas Until Golden and Crispy
Add about 1 tablespoon butter to the empty half of the tortilla and to the griddle surface around it. Let the butter melt and foam slightly. Fold the empty half of the tortilla over the filled half, creating a half-moon shape. Press down gently with your spatula to flatten the quesadilla and ensure good contact with the griddle surface.
Cook undisturbed for 2-3 minutes on the first side, resisting the urge to peek underneath too soon. When you lift the edge with a spatula after 2-3 minutes, the bottom should be golden brown with even color across the entire surface. If it’s still pale, give it another 30-60 seconds.
Carefully flip the quesadilla using a large spatula, supporting it from underneath to prevent the filling from spilling out. Cook the second side for another 2-3 minutes until equally golden brown and crispy. The cheese inside should be completely melted and you might see some oozing slightly from the edges, which indicates perfect doneness.
Transfer the finished quesadilla to a cutting board and repeat the assembly and cooking process with remaining ingredients to make additional quesadillas. You can keep finished ones warm in a low oven (200°F) while you cook the rest, or serve them immediately and cook more as people are eating.
Step 6: Slice and Serve with Extra Sriracha Mayo
Let the quesadilla rest on the cutting board for 30-60 seconds before slicing to allow the cheese to set slightly, which prevents all the filling from sliding out when you cut it. Use a sharp knife or pizza cutter to slice each quesadilla into 3-4 triangular wedges, cutting from the curved edge toward the folded edge.
Arrange the quesadilla wedges on a serving platter, either fanning them out to show the filling or stacking them slightly for a more casual presentation. The golden-brown crispy exterior should be visible with melted cheese and colorful filling peeking out from the edges.
Serve immediately while the tortillas are still crispy and the cheese is warm and melted. Provide extra sriracha mayo on the side in a small bowl for dipping or drizzling. The quesadillas are substantial enough to serve as a main course with a side salad, or you can serve them as appetizers or party food cut into smaller pieces.
Garnish the platter with lime wedges and fresh cilantro if desired, though the quesadillas are complete and flavorful enough on their own that garnishes are optional rather than necessary.

Shrimp Fajita Quesadillas with Sriracha Mayo
Ingredients
Equipment
Method
- Cut jumbo shrimp into bite-size pieces (about 4 pieces per shrimp). Season generously with seafood or Cajun seasoning. Make sriracha mayo by whisking together mayonnaise, sriracha, lime juice, and honey until smooth. Set aside.
- Heat griddle over high heat. Add oil and cook sliced peppers and onions for 5 minutes, stirring occasionally, until softened and charred. Move to cooler zone of griddle.
- On high heat, cook seasoned shrimp for 3 minutes, stirring occasionally, until fully cooked and pink throughout. Remove from heat. Reduce griddle to medium-low.
- Place a tortilla on the griddle. Add cheese to one half, then layer shrimp, vegetables, sriracha mayo drizzle, and more cheese on top.
- Add butter to griddle and tortilla, fold tortilla over filling, and cook 2-3 minutes per side until golden brown and crispy and cheese is melted.
- Transfer to cutting board, let rest briefly, then slice into wedges. Serve hot with extra sriracha mayo on the side.
Nutrition
Notes
Tried this recipe?
Let us know how it was!Frequently Asked Questions
Can You Use Pre-Cooked Shrimp for This Recipe?
You can use pre-cooked shrimp for this recipe in a pinch, though fresh raw shrimp deliver better texture and flavor. Pre-cooked shrimp have already been heated once, and reheating them on the hot griddle can make them rubbery and tough rather than tender and juicy. If you use pre-cooked shrimp, cut them into pieces, season them, and just warm them briefly on the griddle for 60-90 seconds rather than cooking for the full 3 minutes.
The main advantage of pre-cooked shrimp is convenience and speed, cutting your total prep and cook time down by several minutes. They’re already cleaned, peeled, and cooked, so you just need to cut and season them. This works well if you’re making quesadillas for a crowd and want to minimize active cooking time.
For best results with pre-cooked shrimp, buy high-quality frozen cooked shrimp and thaw them properly in the refrigerator overnight rather than using the emergency water-bath method. Pat them very dry before cutting and seasoning since excess moisture will create steam rather than browning. Season them more aggressively than you would raw shrimp since they won’t absorb seasoning as well during brief reheating.
Raw shrimp remain the preferred option because you control the cooking process and can achieve perfect tender texture with light caramelization on the surface. The price difference between raw and cooked shrimp is minimal, and the superior texture of properly cooked raw shrimp makes them worth the extra few minutes of cooking time.
What’s the Best Way to Prevent Quesadillas from Getting Soggy?
The best way to prevent soggy quesadillas is managing moisture in the filling by not overloading with wet ingredients and using moderate heat that crisps the tortilla while melting the cheese. Too much sriracha mayo or watery vegetables will soak into the tortilla and make it soft and soggy rather than crispy. Use just 1-2 tablespoons sauce per quesadilla and make sure your cooked vegetables aren’t sitting in their own juices.
Let the cooked shrimp and vegetables drain for a minute before assembling quesadillas. If you see liquid pooling around the shrimp or vegetables on the griddle, tilt your spatula to let the excess liquid run off before adding them to the tortilla. This small step prevents moisture from migrating into the tortilla during cooking.
Use enough cheese to act as a moisture barrier between the wet filling ingredients and the tortilla. The cheese layer on the bottom (touching the tortilla) creates a protective coating that prevents liquids from soaking through. Adding cheese on top of the filling also helps bind everything together and create another moisture barrier.
Don’t stack or cover finished quesadillas while they’re still hot, as trapped steam will soften the crispy tortilla immediately. Serve them as soon as they’re cut, or if you need to keep them warm, place them on a wire rack in a low oven (200°F) rather than stacking them on a plate. The wire rack allows air circulation that maintains crispness, while a plate traps steam that softens the exterior.
Can You Make These Quesadillas Ahead of Time?
You can prep all the quesadilla components ahead of time and store them separately, but you shouldn’t assemble or cook the quesadillas until you’re ready to serve them. Cooked shrimp, cooked vegetables, sriracha mayo, and grated cheese can all be refrigerated for up to 2 days in separate airtight containers. When you’re ready to eat, bring the components to room temperature for 15-20 minutes, then assemble and cook fresh quesadillas.
Prepping components ahead makes weeknight dinners much faster since all the cooking and chopping is done. You can go from refrigerator to hot quesadillas on the table in about 10 minutes if everything is prepped. This approach works particularly well for meal prep where you cook the shrimp and vegetables on Sunday and make fresh quesadillas throughout the week.
Assembled but uncooked quesadillas don’t store well because the moisture from the filling will soak into the raw tortilla and make it soggy before you even cook it. The filling will also make the tortilla stick to itself, creating a mess when you try to separate and cook it. Always assemble immediately before cooking for best results.
Fully cooked quesadillas can be refrigerated or frozen, but they lose significant crispness even when reheated properly. To reheat refrigerated quesadillas, place them in a 375°F oven or toaster oven for 8-10 minutes until heated through and the exterior re-crisps slightly. Frozen quesadillas need 15-20 minutes from frozen in a 375°F oven. Neither method fully restores the fresh-cooked crispy texture, so freshly made is always superior.
Ready to Level Up?
Take your backyard cooking from good to legendary.
This is where I keep all my most-used smokers, knives, and favorite cooking tools.
Shop My Gear CollectionExplore More Recipes
Find more diverse flavors at CWFeats.com