Smoked beef shank Thor’s Hammer uses 1 whole beef shank patted dry and seasoned generously on all sides with salt, garlic powder, and black pepper, then smoked at 275°F placed directly on the grates until deep, dark bark forms and internal temperature reaches approximately 175°F, typically 3-4 hours. Transfer to foil pan and add 2-3 cups beef broth until it reaches about halfway up the meat, cover tightly with foil, increase smoker temperature to 300°F, and braise for approximately 3 hours until internal temperature reaches 205-210°F and meat is probe-tender (probe slides in and out like soft butter). Rest covered for 15 minutes, then pull or slice and serve with braising juices. This beef shank recipe delivers dramatic presentation with the massive bone extending from fall-off-the-bone tender meat, crusty bark from extended smoking, and rich beefy flavor intensified by the two-stage cooking method that combines smoke penetration with collagen breakdown, creating the ultimate showpiece BBQ centerpiece nicknamed Thor’s Hammer for its mythical appearance.
The whole process takes about 7-8 hours from start to finish including rest. Spend 10 minutes patting dry and seasoning. Smoke for 3-4 hours to 175°F for bark development. Braise covered for 3 hours to 205-210°F for tenderness. Rest for 15 minutes. The 275°F smoking temperature provides steady heat for bark without rushing, while the 300°F braising temperature accelerates the collagen breakdown during the covered phase. Beef shank is one of the most collagen-rich cuts, requiring extended cooking to transform from impossibly tough to spoon-tender.
What Makes Beef Shank Different from Other Braising Cuts?

Beef shank comes from the leg of the cow, specifically the portion between the knee and ankle (front shank) or hock and hip (hind shank). This heavily-worked muscle group contains extraordinary amounts of connective tissue and collagen since these muscles support the animal’s entire body weight throughout its life. The constant movement creates dense, sinewy meat that’s nearly inedible when raw but transforms into incredibly tender, gelatinous texture when cooked properly.
The defining characteristic of beef shank is the large marrow bone running through the center. When cut crosswise (osso buco style), you get rounds with bone in the middle. When left whole for Thor’s Hammer presentation, you get a massive piece of meat attached to a dramatic bone that extends several inches. This bone contributes flavor during cooking and provides the iconic visual that gives Thor’s Hammer its name.
Beef shank has more collagen than chuck roast, short ribs, or brisket. The meat is also leaner than these cuts, with minimal marbling and fat deposits. This combination of high collagen and low fat means beef shank absolutely requires moist cooking methods. Dry heat cooking like roasting would create leather-tough meat. The extended braising breaks down collagen into gelatin, creating luxurious, silky texture despite the initial toughness.
The shank’s massive size also distinguishes it from other braising cuts. A whole beef shank can weigh 4-8 lbs, making it an impressive centerpiece for presentations. The Thor’s Hammer nickname comes from this dramatic appearance – it genuinely looks like a weapon from Norse mythology with the huge bone handle and meat “head.” This visual impact makes beef shank popular for competition BBQ and special occasion cooking where presentation matters.
Why Smoke Beef Shank to 175°F Before Braising?
Smoking beef shank to 175°F before braising allows the meat to absorb maximum smoke flavor while developing crusty bark on the exterior. During this initial smoke phase (3-4 hours at 275°F), the meat is exposed and dry, creating ideal conditions for smoke penetration and Maillard browning. The meat surface dehydrates, concentrates seasonings, and develops mahogany color. If you started braising immediately, the moist environment would prevent proper bark formation.
The 175°F target temperature ensures the exterior has spent sufficient time in the smoke zone. Meat stops absorbing smoke compounds around 140-150°F as the surface firms up and moisture evaporates. By smoking to 175°F, you guarantee the shank has absorbed all the smoke it can. Going beyond 175°F before braising would just extend cook time without adding more smoke flavor since absorption plateaus.
This temperature also represents when the shank is ready for braising. At 175°F, the collagen hasn’t broken down yet and the meat is still very tough. The exterior has developed bark but the interior needs the moist heat of braising to tenderize. This is the perfect transition point – maximum bark achieved, now time to introduce moisture for tenderness. Starting the braise earlier would sacrifice bark; starting later would unnecessarily extend total cook time.
The two-stage method also creates textural contrast. The bark remains relatively intact during braising since it’s already set and crusty. While the braising liquid softens it slightly, you still maintain that initial crusty exterior developed during smoking. If you only braised from the start, the meat would be tender but lack the textural contrast of crusty bark against silky, gelatinous interior.
Why Does Beef Shank Need to Reach 205-210°F?
Beef shank must reach 205-210°F internal temperature for complete collagen breakdown and proper tenderness. At these temperatures, the extensive connective tissue in shank meat fully converts to gelatin, transforming the tough muscle into spoon-tender texture. Below 200°F, significant collagen remains intact and the meat feels chewy and sinewy despite hours of cooking. The final 10-15 degrees make the difference between decent and exceptional.
The probe tenderness test matters as much as temperature. At 205-210°F, insert a probe or skewer into the thickest part of the meat – it should slide in and out with no resistance, like probing room temperature butter. If you feel any toughness or the probe requires force, continue cooking even if temperature reads 210°F. Some shanks need 215°F depending on their specific collagen content and the individual animal.
This temperature range also ensures the bone pulls clean. When beef shank is properly cooked, the bone should slide out with minimal effort, leaving a clean cavity. This happens because the connective tissue attaching meat to bone dissolves at these high temperatures. If you pull the shank at 190°F, the bone will still be firmly attached. At 210°F, it releases beautifully. This clean bone pull is part of Thor’s Hammer’s appeal.
The meat should also “jiggle” when the pan is shaken at proper doneness. The gelatin-rich meat moves like jello rather than staying firm. This visual cue indicates complete collagen conversion. The combination of 205-210°F temperature, probe tenderness, bone pull, and jiggle tells you the shank is perfectly done. Temperature alone isn’t sufficient – all indicators should align.
What Creates the “Thor’s Hammer” Appearance?
The Thor’s Hammer nickname comes from the beef shank’s dramatic visual resemblance to the mythical weapon. When the whole shank is cooked with bone intact, the long bone extending from one end looks like a handle while the large mass of meat represents the hammer head. The proportion and scale are genuinely impressive – a 6-8 lb shank with a 10-12 inch bone creates genuine wow factor.
The presentation is enhanced by the dark, crusty bark covering the meat. After smoking to 175°F, the exterior develops deep mahogany to nearly black color from smoke and Maillard browning. This dark coating against the massive size creates primal, Viking-feast aesthetic. The visual is amplified when you rest the shank bone-down on a cutting board, standing upright like an actual hammer ready to be wielded.
The shank’s natural shape also contributes to the Thor’s Hammer look. The meat is thicker at one end (near where it attached to the body) and tapers toward the other end where the bone extends. This creates the hammer-head profile. Unlike uniform cuts like brisket or chuck roast, the shank has this distinctive shape that lends itself to dramatic presentation.
Serving Thor’s Hammer creates memorable experience. When you bring a whole smoked and braised beef shank to the table, people react. It’s conversation-starting, photo-worthy, and genuinely impressive. The combination of massive size, dramatic bone, crusty bark, and the knowledge that this primal cut requires serious cooking skill creates event-worthy presentation. This makes beef shank popular for competition BBQ where presentation scores matter.
Beef Shank Thor’s Hammer
Smoked until bark forms, braised until tender
Ingredients
Beef Shank
- 1 whole beef shank (Thor’s Hammer)
- Salt (to taste)
- Garlic powder (to taste)
- Black pepper (to taste)
Braising Liquid
- 2-3 cups beef broth
The two-stage cooking method is essential for beef shank. Smoking to 175°F develops deep bark and smoke flavor without the meat becoming tender yet. The collagen and connective tissue remain intact during this phase. Braising from 175°F to 205-210°F in beef broth provides the moist heat needed to break down collagen into gelatin while the covered pan prevents the bark from drying out. If you braised from the start, you’d have no bark. If you only smoked, the meat would never become tender.
Step-by-Step Instructions
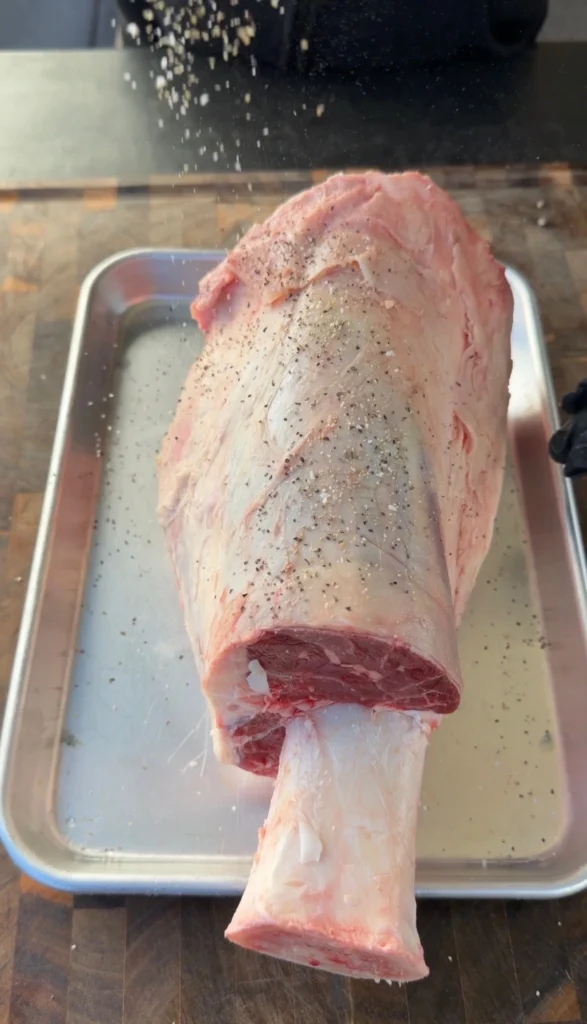
Step 1: Prep and Season the Beef Shank
Remove 1 whole beef shank from packaging and place on a large cutting board. Pat it completely dry on all surfaces using paper towels. The shank will have significant surface moisture from packaging. Press firmly with paper towels to absorb all moisture. A dry surface allows better seasoning adhesion and promotes bark formation during smoking.
Inspect the shank for any loose pieces of connective tissue or membrane on the surface. You can trim these if desired, though they’ll break down during cooking. The shank should have the large bone extending from one end with meat surrounding it. Some shanks come with more fat cap than others – this is fine and will render during cooking.
Season the beef shank generously on all surfaces with salt, garlic powder, and black pepper. Use approximately 2-3 tablespoons total seasoning for a large shank. The SPG (salt, pepper, garlic) combination is classic for beef and allows the natural meat flavor to shine. Apply seasoning heavily – the large surface area and extended cooking time require more seasoning than smaller cuts.
Let the seasoned shank sit at room temperature for 30-60 minutes while the smoker preheats. This removes refrigerator chill and allows seasonings to begin dissolving into the surface moisture, creating better adhesion. The salt will begin drawing moisture to the surface which then evaporates, helping create dry pellicle that promotes smoke adhesion.
Step 2: Smoke to 175°F

Preheat your smoker to 275°F using oak, hickory, or mesquite wood. Beef can handle stronger smoke than pork or poultry, so robust woods work well. Let the smoker stabilize at temperature with thin blue smoke – avoid heavy white smoke which creates bitter flavor. The smoke should be barely visible.
Place the seasoned beef shank directly on the smoker grates. Position it so the bone is parallel to the grates for stability. The shank should sit firmly without rolling. Close the smoker lid and smoke undisturbed for the first 2 hours. Don’t open frequently or you’ll lose heat and extend cooking time.
After 2 hours, check the shank. It should be developing color and firming up. The bark won’t be fully formed yet but you should see progress. Insert an instant-read thermometer into the thickest part of the meat, avoiding bone contact which gives false readings. You’re targeting 175°F but the shank likely won’t be there yet.
Continue smoking, checking temperature every 30-45 minutes. Total smoking time to 175°F is typically 3-4 hours depending on shank size and smoker efficiency. When the shank reaches 175°F and has developed deep, dark bark (mahogany to nearly black color), it’s ready for braising. The bark should be crusty and dry to the touch.
Step 3: Braise in Beef Broth
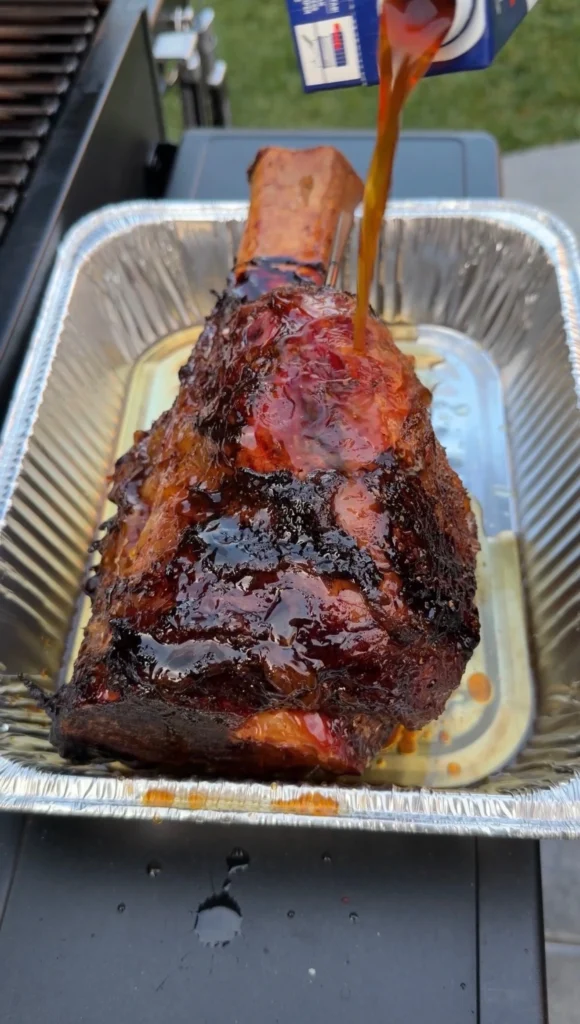
When the shank reaches 175°F with good bark, carefully remove it from the smoker and transfer to a large disposable aluminum foil pan. The pan should be deep enough to hold the shank and several cups of liquid. Position the shank in the pan so it lies relatively flat.
Pour 2-3 cups of beef broth into the pan around the shank. The liquid should come approximately halfway up the meat – not submerging it completely but providing plenty of moisture for steaming. Use good quality beef broth or stock for best flavor. The braising liquid will concentrate during cooking and become the serving sauce.
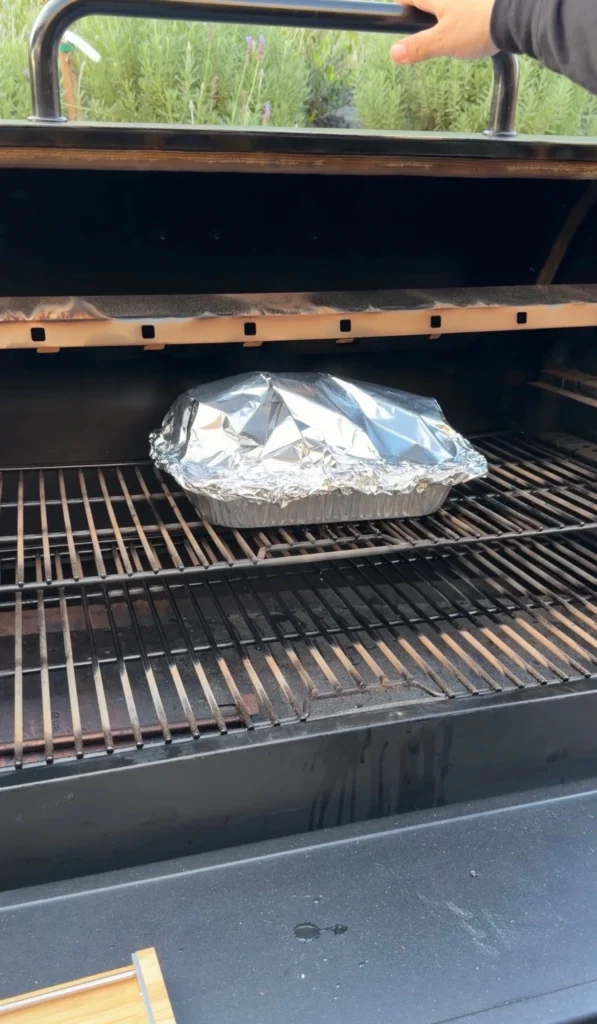
Cover the pan tightly with heavy-duty aluminum foil. Press the foil edges firmly against the pan rim to create a good seal. This seal traps steam which is essential for braising. If steam escapes, the shank won’t braise properly and may dry out. Double-layer foil if needed to ensure complete seal.
Increase the smoker temperature to 300°F. Once it reaches temp, return the covered pan to the smoker. At this point, the smoker is acting as an oven since the covered pan prevents further smoke penetration. The goal now is moist heat to break down collagen. Close the smoker lid and braise undisturbed for 1.5 hours before checking.
Step 4: Monitor and Complete Braise
After 1.5 hours of braising, carefully lift a corner of the foil and check the internal temperature. Avoid releasing too much steam. Insert the thermometer into the thickest part. You’re targeting 205-210°F but the shank likely won’t be there yet – probably around 190-195°F at this point.
Re-cover tightly and continue braising. Check temperature every 30 minutes from this point. Total braising time is typically 3 hours but can vary based on shank size and individual collagen content. Don’t rush – the shank needs time at high temperature in moist environment for proper collagen breakdown.
When temperature reaches 205-210°F, do the probe tenderness test. Insert a probe or thin skewer into the thickest part of the meat. It should slide in and out smoothly with no resistance, like probing soft butter. If you feel any toughness, continue cooking even if temperature reads 210°F.
Check if the bone pulls clean. Grip the bone (carefully, it’s hot) and wiggle gently. The bone should move freely and feel loose in the meat. If it’s still firmly attached, continue cooking. When the shank is properly done, the bone slides out leaving a clean cavity. The meat should also jiggle when you shake the pan – this indicates gelatin-rich, tender texture.
Step 5: Rest and Serve
When the beef shank reaches 205-210°F and passes probe, bone pull, and jiggle tests, carefully remove the pan from the smoker. The pan will be very hot and full of liquid. Use heavy oven mitts and move slowly. Place on a heat-safe surface and leave the foil cover in place.
Rest the covered shank for 15 minutes. This allows juices to redistribute and the meat to firm slightly, making it easier to handle and slice if desired. The shank will stay hot due to its massive size. The braising liquid will settle and any fat will rise to the top where you can skim it if desired.
After resting, remove the foil. The shank should be deeply tender with the bone potentially already loose or pulled away from the meat. You have several serving options: pull the meat into chunks, slice it against the grain, or present the whole shank Thor’s Hammer style for dramatic table presentation.
Transfer the shank to a cutting board or serving platter. Pour some of the braising liquid over the meat to keep it moist and flavorful. The liquid is rich with rendered collagen, beef flavor, and seasonings – it’s excellent sauce. Serve the shank hot with remaining braising liquid on the side for dipping. The meat should be fall-apart tender, requiring only a fork to eat.

Smoked Beef Shank – Thor’s Hammer
Ingredients
Equipment
Method
- Pat 1 whole beef shank completely dry with paper towels. Season generously on all sides with salt, garlic powder, and black pepper. Let sit at room temperature 30-60 minutes while smoker preheats.
- Preheat smoker to 275°F with oak, hickory, or mesquite wood. Place beef shank directly on grates. Smoke until deep, dark bark forms and internal temperature reaches 175°F, about 3-4 hours.
- Transfer shank to large foil pan. Add 2-3 cups beef broth until it reaches about halfway up the meat. Cover pan tightly with heavy-duty foil.
- Increase smoker temperature to 300°F. Return covered pan to smoker. Braise for about 3 hours, checking temperature every 30 minutes after first 1.5 hours, until internal temperature reaches 205-210°F and meat is probe-tender.
- Test doneness: probe should slide in like soft butter, bone should pull clean, and meat should jiggle when pan is shaken.
- Remove from smoker and rest covered for 15 minutes. Pull or slice meat and serve with braising juices.
Nutrition
Notes
Tried this recipe?
Let us know how it was!Frequently Asked Questions
Can I cook beef shank in the oven instead of smoker?
Yes, season the shank and roast uncovered at 275°F for 3-4 hours to develop crust. Transfer to covered pan with beef broth and braise at 300°F for 3 hours to 205-210°F. Add 1 teaspoon liquid smoke to the broth for smoky flavor. The result won’t have authentic smoke ring but will be tender and flavorful.
The oven method is more forgiving since temperature stays consistent. You’ll miss the smoke flavor and bark won’t be as dark, but the braising technique works identically.
What if my beef shank is smaller or larger than average?
Adjust cooking times based on weight. A 4 lb shank might only need 2.5-3 hours smoking and 2.5 hours braising. An 8 lb shank could take 4-5 hours smoking and 3.5-4 hours braising. Always cook to temperature (175°F for smoke, 205-210°F for braise) rather than time.
The probe tenderness test is your most reliable doneness indicator regardless of size. If probe slides in like butter and bone pulls clean, it’s done.
Can I use a different braising liquid?
Red wine, beer, or a combination of broth and wine all work well for braising beef shank. The liquid provides moisture for steam and adds flavor. Avoid using just water which creates bland results. Whatever liquid you choose will reduce and concentrate during braising, so use something flavorful.
For Asian-inspired flavors, use beef broth with soy sauce and ginger. For Italian-style, use beef broth with red wine and tomatoes.
How do I know if my beef shank is done?
Use four tests: (1) Internal temperature 205-210°F, (2) Probe slides in and out like soft butter with no resistance, (3) Bone pulls clean when wiggled gently, (4) Meat jiggles like jello when pan is shaken. All four should be true for perfectly cooked shank.
Temperature alone isn’t enough since collagen content varies. The probe test ensures collagen has broken down. If any test fails, continue cooking.
What can I do with leftover beef shank?
Shredded beef shank makes excellent tacos, sandwiches, ramen topping, or beef and noodles. The meat reheats beautifully in its braising liquid. You can also slice it cold for sandwiches. The bone marrow can be scooped out and spread on toast. The braising liquid makes excellent base for beef soup or gravy.
Freeze portions in the braising liquid for up to 3 months. The gelatin-rich liquid protects the meat from freezer burn and adds flavor when reheating.
Ready to Level Up?
Take your backyard cooking from good to legendary.
This is where I keep all my most-used smokers, knives, and favorite cooking tools.
Shop My Gear CollectionExplore More Recipes
Find more diverse flavors at CWFeats.com