Smoked Hot & Fast Pulled Pork
Smoked Hot & Fast Foil Boat Pulled Pork
This hot and fast pulled pork method cuts your smoking time in half while still delivering tender, juicy results that rival traditional low and slow cooking. The foil boat technique is what makes this recipe special – it keeps the bark intact while creating a braising effect that breaks down tough connective tissue quickly. This smoked pulled pork recipe is perfect when you want barbecue flavor but don’t have 12-16 hours to babysit a smoker.
Fast pulled pork works because higher temperatures (300°F instead of 225°F) accelerate the breakdown of collagen into gelatin, which is what makes tough pork shoulder turn tender and shreddable. The foil boat method captures all those flavorful juices while protecting the bottom of the meat from drying out, giving you the best of both worlds – crispy bark on top and moist, tender meat throughout.
What makes this pork butt recipe different from traditional methods is how it balances speed with quality. Most people think good barbecue requires all day cooking, but this technique proves you can get restaurant-quality pulled pork in about 8 hours total, including rest time. The apple cider vinegar and apple juice mixture adds moisture and flavor while helping to tenderize the meat faster than dry heat alone.
Smoked Hot & Fast Foil Boat Pulled Pork
Cut smoking time in half with this hot and fast pulled pork method using the foil boat technique for tender, juicy results in just 8 hours
Ingredients
For the Pork:
- 1 pork butt/shoulder (8-10 lbs)
- Your favorite pork rub/seasoning (enough to coat generously)
- 1 cup apple cider vinegar
- 1 cup apple juice
Why Hot and Fast Works for Pork Shoulder
Hot and fast pulled pork challenges the traditional low and slow barbecue wisdom, but the science backs it up. Pork shoulder has enough fat and connective tissue to handle higher temperatures without drying out. The key is understanding that collagen breakdown happens based on time and temperature combined – you can achieve the same results with higher heat in less time.
The 300°F temperature is the sweet spot for this method. It’s hot enough to render fat efficiently and break down tough fibers quickly, but not so hot that the outside burns before the inside is done. This temperature also maintains good smoke absorption for the first few hours when the meat is most receptive to flavor.
Pork shoulder smoking at higher temperatures actually produces more consistent results than low and slow for many home cooks. Lower temperatures require more precise temperature control and longer monitoring, while 300°F is more forgiving and easier to maintain on most smokers.
The foil boat technique is crucial because it prevents the bottom of the meat from overcooking while allowing the top to develop proper bark. Traditional foil wrapping steams the entire piece of meat and softens the bark, but the boat method protects only the bottom while keeping the top exposed to heat and smoke.
Understanding the Foil Boat Method
The foil boat technique is like creating a mini braising environment for the bottom half of your pork shoulder while leaving the top exposed for bark development. This dual cooking method gives you the benefits of both dry heat smoking and moist heat braising in one cook.
When you place the pork in the foil boat with liquid, the bottom portion cooks in its own juices and the added apple mixture. This creates incredibly tender, moist meat on the bottom while the exposed top continues to develop color and texture from direct heat and smoke.
The timing of when to boat the pork matters. You want to develop good bark first – usually about 4 hours at 300°F – before adding the foil boat. This ensures you get proper color and smoke penetration before switching to the accelerated cooking method.
The liquid in the boat serves multiple purposes. It prevents scorching, adds flavor, provides moisture for steam, and creates concentrated au jus that you’ll mix back into the finished pork. Don’t skip this liquid – it’s essential for the method to work properly.
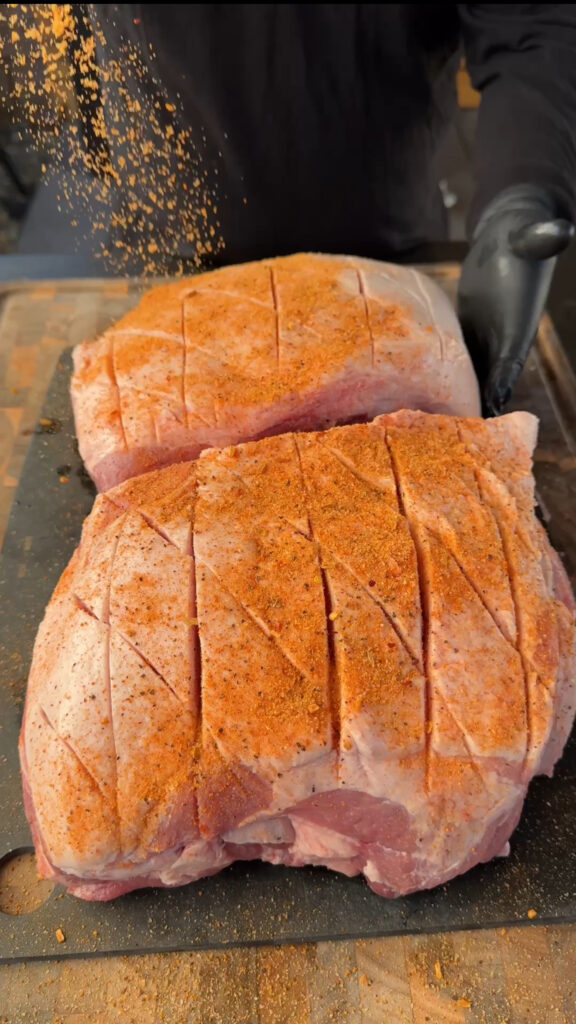
Scoring and Seasoning Techniques
Scoring the fat cap in crosshatch patterns helps the seasoning penetrate and allows fat to render more efficiently. Make cuts about 1/4 inch deep and 1 inch apart in both directions. Don’t cut into the meat, just through the fat layer.
Pulled pork seasoning should be applied generously since pork shoulder can handle bold flavors. Use enough rub to coat all surfaces evenly, pressing it into the scored fat cap and any crevices in the meat. The rub helps form the bark and adds the flavor foundation for your finished pork.
Let the seasoned pork sit at room temperature for 30-60 minutes before smoking. This helps the seasoning penetrate and brings the meat closer to room temperature for more even cooking. Cold meat takes longer to cook and can result in overcooked exteriors.
Choose a rub that balances sweet and savory elements. Brown sugar helps with caramelization and bark formation, while salt and pepper provide the backbone. Paprika adds color, while garlic and onion powders contribute savory depth.
Temperature Control and Timing
Maintaining 300°F throughout the cook is critical for fast pulled pork success. This temperature is high enough to render fat quickly but low enough to prevent burning. Most pellet grills and gas smokers can hold this temperature easily, while charcoal and wood smokers may require more attention.
The first 4 hours are crucial for smoke absorption and bark development. Keep the smoker closed as much as possible during this phase. Every time you open it, you lose heat and smoke, extending the cooking time and reducing flavor development.
Start checking internal temperature around hour 5, but don’t rely solely on temperature for doneness. Pork shoulder is done when it probes tender – your thermometer should slide in and out like the meat is made of butter. This usually happens between 195°F and 205°F internal temperature.
Weather affects cooking time significantly. Cold, windy conditions can add 1-2 hours to your cook, while hot, still weather might speed things up. Always build in extra time rather than rushing the process.
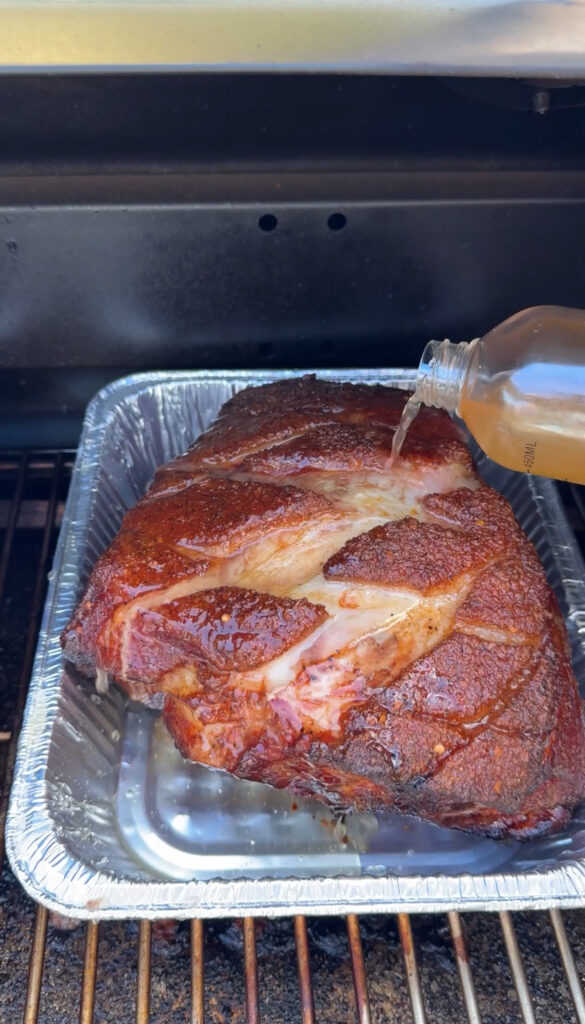
The Spritzing Strategy
The apple cider vinegar and apple juice mixture serves as both a spritz and braising liquid. The vinegar helps tenderize tough fibers while adding tangy flavor that complements pork. The apple juice provides sweetness and helps balance the vinegar’s acidity.
Spritzing every hour during the first 4 hours keeps the surface moist and helps smoke adhere to the meat. Don’t over-spritz – just a light misting is enough. Too much liquid can wash away seasoning and prevent proper bark formation.
Save about half of your spritz mixture for the foil boat. This liquid will create steam and concentrate into a flavorful au jus that you’ll mix back into the pulled pork for extra moisture and flavor.
Some people add other ingredients to their spritz like butter, beer, or hot sauce, but apple cider vinegar and apple juice is a proven combination that won’t overpower the pork’s natural flavors.
Ingredients
For the Pork:
- 1 pork butt/shoulder (8-10 lbs)
- Your favorite pork rub/seasoning (enough to coat generously)
- 1 cup apple cider vinegar
- 1 cup apple juice
Step-by-Step Instructions
Prepare the Pork Shoulder
Start by trimming any loose or hanging pieces of fat from the pork shoulder, but leave the fat cap intact. The fat cap protects the meat during cooking and adds flavor as it renders.
Score the fat cap in a crosshatch pattern, making cuts about 1/4 inch deep and 1 inch apart. Don’t cut into the meat itself, just through the fat layer. This helps the fat render more efficiently and allows seasoning to penetrate better.
Pat the entire pork shoulder dry with paper towels. Any surface moisture will prevent the rub from sticking properly and interfere with bark formation.
Apply your pork rub generously to all surfaces, pressing it into the scored fat cap and working it into any crevices. Don’t be shy with the seasoning – pork shoulder can handle bold flavors and some will fall off during cooking.
Let the seasoned pork sit at room temperature for 30-60 minutes while you prepare your smoker. This helps the seasoning penetrate and brings the meat closer to room temperature for more even cooking.
Set Up Your Smoker
Preheat your smoker to 300°F using your preferred wood. Apple, cherry, or hickory work well with pork and complement the apple juice flavors. Make sure you have enough fuel for a 6-7 hour cook.
Set up for indirect cooking if using a charcoal or wood smoker. The pork should not be directly over the heat source, as this can cause scorching at the higher temperature.
Place a water pan in the smoker if it tends to run dry. The humidity helps keep the meat moist and aids in smoke absorption during the first few hours.
Mix your apple cider vinegar and apple juice in a spray bottle for spritzing. Reserve about half the mixture in a separate container for the foil boat later.
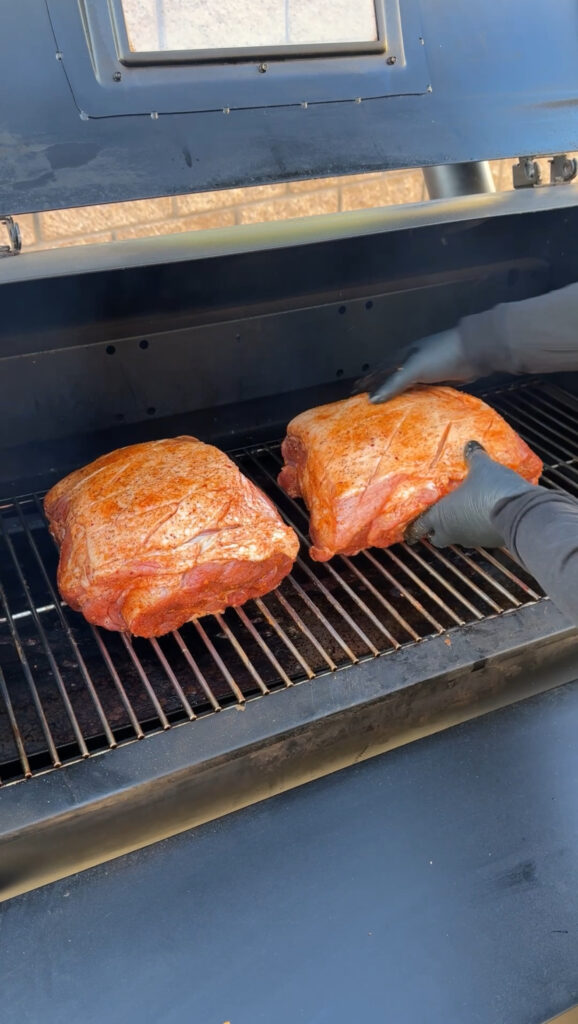
Start the Smoke
Place the seasoned pork shoulder directly on the cooking grates, fat side up. This allows the rendering fat to baste the meat as it cooks.
Close the smoker and maintain 300°F temperature. Don’t open the smoker for the first hour – this is when the meat absorbs the most smoke flavor.
Start spritzing lightly every hour beginning at hour 1. Just a light misting is enough – you want to keep the surface moist without washing away the seasoning.
Continue smoking for about 4 hours or until the bark develops good color. The exterior should be dark reddish-brown and feel firm to the touch.
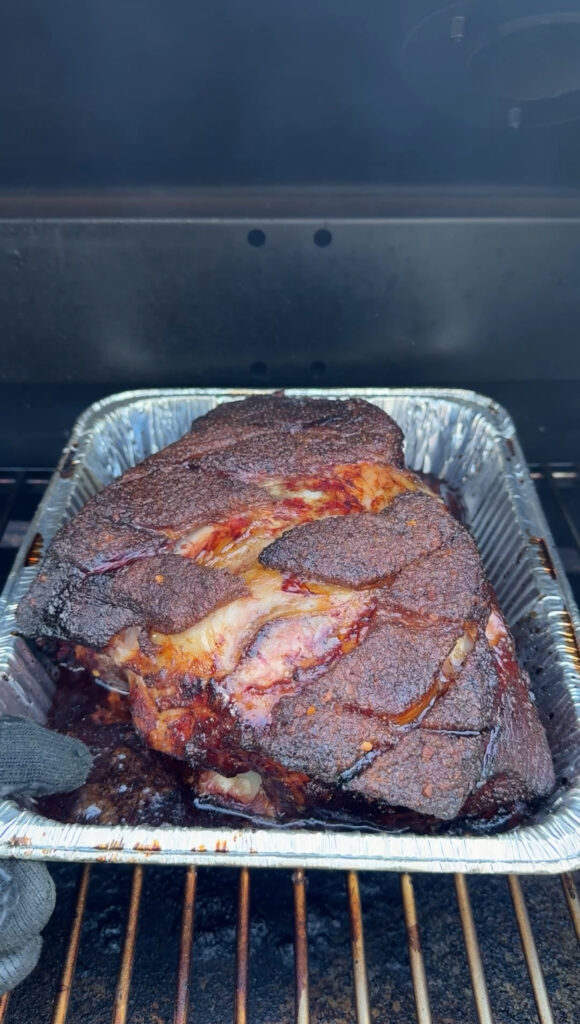
Create the Foil Boat
After 4 hours of smoking, it’s time to create the foil boat. Use heavy-duty aluminum foil or a disposable aluminum pan large enough to hold the pork shoulder.
If using foil, tear off a piece large enough to wrap around the pork with extra on all sides. Place the pork in the center and fold the foil up around the sides, creating walls that come about halfway up the meat.
The key is leaving the top portion of the pork exposed to continue developing bark while protecting the bottom portion with foil and liquid.
Pour the remaining apple cider vinegar and apple juice mixture into the bottom of the foil boat. The liquid should cover the bottom but not touch the exposed top portion of the meat.
Finish the Cook
Return the foil-boated pork to the smoker and continue cooking at 300°F. The cooking will accelerate now because of the braising effect from the liquid.
Check the internal temperature starting around hour 5-6. You’re looking for 203°F in the thickest part of the meat, but more importantly, the probe should slide in and out easily.
The meat is done when it feels tender throughout and offers little resistance to a probe or fork. Don’t rely solely on temperature – tenderness is the ultimate test.
Remove the pork from the smoker when it reaches proper tenderness. This usually takes 6-7 hours total for an 8-10 pound shoulder.
Rest the Pork
Tent the foil boat loosely with additional foil and let the pork rest for at least 1 hour. This resting time allows the juices to redistribute throughout the meat and makes shredding easier.
The pork will stay hot for several hours in the foil boat, so don’t worry about it getting cold. Use this time to prepare sides and get your serving area ready.
Don’t skip the resting step – pork that’s shredded immediately after cooking will be drier and less flavorful than properly rested meat.
Shred and Serve
Remove any remaining large pieces of fat and the bone, which should slide out easily. Use two forks or meat claws to shred the pork into bite-sized pieces.
Mix the concentrated juices from the foil boat back into the shredded pork. This adds moisture and incredible flavor that you can’t get any other way.
Taste and adjust seasoning if needed. You can add a bit of your favorite BBQ sauce, but the pork should be flavorful and moist enough to stand on its own.
Serve immediately while hot, or keep warm in a slow cooker for serving later.
Tips for Consistent Results
Temperature control is everything with hot and fast pulled pork. Invest in a good thermometer and monitor both smoker temperature and internal meat temperature throughout the cook.
Don’t rush the bark development phase. If your pork doesn’t have good color after 4 hours, give it another hour before boating. Proper bark is worth the extra time.
Save some of the concentrated juices from the foil boat separately for serving. This liquid gold can be drizzled over the pulled pork or used to moisten dry spots.
If your smoker runs hot, reduce the temperature to 275°F rather than fighting to keep it at 300°F. Consistency is more important than hitting exact numbers.
Troubleshooting Common Issues
If the bark isn’t developing properly, check your smoker temperature and make sure you’re not over-spritzing. Too much moisture prevents proper bark formation.
Dry pulled pork usually results from overcooking or not using the foil boat method properly. Make sure there’s liquid in the boat and don’t cook past the tenderness point.
If the cook is taking longer than expected, it’s usually due to cold weather, a larger piece of meat, or lower actual temperatures than what your thermometer reads. Be patient and cook to tenderness, not time.
Tough pulled pork means it wasn’t cooked long enough. Pork shoulder needs to reach that magic tenderness point where collagen fully converts to gelatin.
Serving Suggestions and Storage
Smoked pulled pork is incredibly versatile. Serve it on buns for sandwiches, over baked potatoes, in tacos, or just on a plate with your favorite BBQ sides. The rich, smoky flavor pairs well with coleslaw, baked beans, and cornbread.
Leftover pulled pork keeps in the refrigerator for up to 4 days and freezes well for up to 3 months. Reheat gently with a splash of the reserved juices to restore moisture.
The foil boat method produces enough flavorful au jus to use in other dishes. Save it to make gravies, add to baked beans, or use as a base for BBQ sauce.
For large gatherings, this recipe scales well. You can cook multiple pork shoulders using the same technique, just make sure your smoker has enough capacity.
The 300°F temperature is the sweet spot for hot and fast pulled pork. It’s hot enough to render fat efficiently and break down tough fibers quickly, but not so hot that the outside burns before the inside is done. Collagen breakdown happens based on time and temperature combined – you can achieve the same tender results with higher heat in less time. This temperature also maintains good smoke absorption during the crucial first few hours.
The foil boat technique creates walls of foil around the sides of the pork while leaving the top exposed. This protects the bottom from overcooking while allowing the top to develop proper bark. The liquid in the boat (apple juice and vinegar mixture) creates a braising effect for the bottom portion while the exposed top continues to get smoke and heat. This gives you the best of both worlds – crispy bark and incredibly tender, moist meat.
Add the foil boat after about 4 hours of smoking at 300°F, or when the bark has developed good dark reddish-brown color. You need to develop proper bark first before switching to the accelerated cooking method. If your pork doesn’t have good color after 4 hours, give it another hour before boating – proper bark is worth the extra time.
Don’t rely solely on temperature – tenderness is the ultimate test. The pork is done when your thermometer or probe slides in and out like the meat is made of butter, usually between 195°F and 205°F internal temperature. The meat should offer little resistance when pierced and the bone should slide out easily. This typically takes 6-7 hours total for an 8-10 pound shoulder.
Yes! Most pellet grills and gas smokers can hold 300°F easily, while charcoal and wood smokers may require more attention to maintain consistent temperature. If your smoker runs hot, reduce to 275°F rather than fighting to keep it at exactly 300°F – consistency is more important than hitting exact numbers. Set up for indirect cooking so the pork isn’t directly over the heat source.
Conclusion
This hot and fast pulled pork method proves that great barbecue doesn’t always require all-day cooking. The foil boat technique delivers tender, flavorful results in about half the time of traditional methods while maintaining the bark and smoky flavors that make pulled pork special. Whether you’re short on time or just want to try a different approach, this smoked pulled pork recipe consistently delivers restaurant-quality results that will have people asking for your secrets.
The beauty of this pork butt recipe is how it balances convenience with quality. You get all the flavors and textures of traditional barbecue with a more manageable time commitment, making it perfect for weeknight dinners or last-minute gatherings. Once you master this technique, you’ll have a reliable method for producing amazing pulled pork whenever the craving strikes.
Ready to Take Your Cooking to the Next Level?
This is where I keep all my most-used products, gear, and favorite cooking tools — check it out:
🔥 View My Cooking Gear & ToolsRecipe Categories
If you loved this recipe, you’ll find more to savor across our diverse categories. From beef to pork, chicken to turkey, seafood to appetizers, there’s a wealth of flavors waiting for you. Explore them all at CWFeats.
