Smoked Spiral Ham Recipe

See How It’s Done
Smoked spiral ham recipe uses a pre-cooked spiral-cut ham brushed with Dijon mustard, seasoned with sweet BBQ rub, then smoked at 300°F in a foil pan until it reaches 145°F internal temperature. Apply a brown sugar honey bourbon glaze during the last 30 minutes, brushing every 10 minutes to build layers of sweet, sticky coating. The glaze combines brown sugar, honey, bourbon, apple cider vinegar, butter, cinnamon, cloves, and black pepper, simmered until thick and glossy. The smoking process adds subtle wood flavor while the glaze caramelizes into a beautiful mahogany coating. This brown sugar glazed ham delivers tender, juicy meat with a sweet-savory crust perfect for holiday dinners, special occasions, or anytime you want impressive results with minimal effort.
The whole process takes about 3 hours from start to finish. Spend 15 minutes preparing the ham and making the glaze. Smoke for 2-3 hours depending on ham size. The final 30 minutes focus on glazing, building layers of caramelized sweetness. Rest for 10 minutes before serving. Since spiral ham is already cooked, you’re really just heating it through and adding smoke flavor. The pre-sliced spiral makes serving effortless. Just pull apart the slices and arrange on a platter. This simplicity combined with stunning presentation makes smoked spiral ham ideal for feeding crowds during holidays without the stress of complicated preparation.
What Temperature Should You Smoke Spiral Ham
Smoke spiral ham at 300°F for the ideal balance of heating speed and smoke absorption. This temperature warms the ham through in 2-3 hours while allowing enough time for smoke flavor to develop. Lower temperatures like 225-250°F extend cooking to 3-4+ hours without significantly improving flavor or texture. Since spiral ham is already fully cooked, you’re not actually cooking it but reheating it. The goal is reaching safe serving temperature while adding smoke flavor, not transforming raw meat.
Higher temperatures like 350°F+ heat the ham too quickly, finishing before adequate smoke absorption occurs. You’d get warm ham with minimal smoke character. The 300°F sweet spot gives you 2-3 hours of smoking time, which is enough for noticeable wood flavor without being overwhelming. Ham is milder than beef or pork shoulder, so you want subtle smoke that enhances rather than dominates.
The target internal temperature is 145°F in the thickest part of the ham. This is the USDA recommendation for reheating pre-cooked ham. Insert an instant-read thermometer into the center of the ham without hitting bone, which conducts heat differently and gives false readings. The ham is technically safe at lower temperatures since it’s already cooked, but 145°F ensures it’s hot throughout and pleasant to eat. Nobody wants lukewarm ham.
Start checking temperature at the 2-hour mark for an 8-10 lb ham. Smaller hams finish faster, larger ones take longer. Shape matters as much as weight. A compact, rounded ham takes longer than a flatter, more spread-out one. Use temperature as your guide, not time. Every ham heats at a different rate depending on starting temperature, exact weight, and smoker consistency. Pull at 145°F regardless of elapsed time.
Why Glaze Ham 30 Minutes Before Finishing
Applying glaze during the last 30 minutes prevents burning while allowing enough time for multiple coats to build up and caramelize. The glaze contains brown sugar, honey, and optional preserves, all of which burn easily when exposed to heat for extended periods. If you glaze at the beginning, the sugars char and turn bitter during the 2-3 hour smoking time. Waiting until the ham is mostly done gives the glaze just enough heat exposure to caramelize without burning.
The timing also allows for multiple glaze applications. At 30 minutes before finishing (when the ham reaches about 135°F internal), brush on the first coat. The heat begins caramelizing the sugars while the glaze starts to set. After 10 minutes, apply a second coat over the first. Repeat every 10 minutes for 3-4 total applications. Each layer builds thickness and complexity, creating a sticky, glossy coating rather than a thin wash.

The ham surface needs to be dry for glaze to adhere properly. For the first 1.5-2 hours of smoking, moisture evaporates from the surface as the ham heats. By the time you’re ready to glaze, the surface is dry and tacky, creating the perfect base for the glaze to stick. If you glaze too early when the surface is still releasing moisture, the glaze slides off or gets diluted, never setting properly.
Multiple thin coats work better than one thick application. Each coat has time to heat, thicken, and stick before the next one goes on. The layers create depth of flavor and build the thick, sticky coating that defines glazed ham. By the time you pull the ham at 145°F, you have a beautiful mahogany glaze that’s caramelized but not burnt, sweet but not cloying, and firmly adhered to every surface.
Should You Cover Spiral Ham with Foil While Smoking
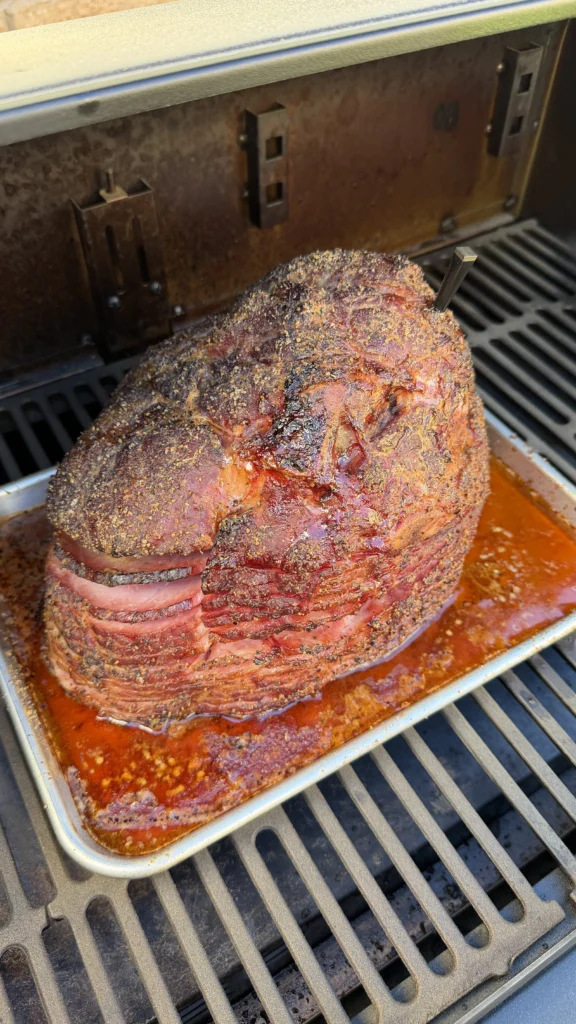
Place the spiral ham in a foil pan but don’t cover the top with foil during smoking. The foil pan catches drippings and glaze, keeping your smoker clean and creating accumulated juices you can use for basting. It also helps retain some moisture around the bottom and sides of the ham. However, covering the top with foil prevents smoke from reaching the ham surface and blocks the glaze from caramelizing properly.
Uncovered ham develops better color and smoke penetration. The exposed surface allows smoke compounds to adhere and the glaze to caramelize into that beautiful mahogany coating. Covered ham steams rather than smokes, creating a pale, wet surface without proper bark or glaze development. The steam also dilutes the glaze, preventing it from setting into the sticky coating you want.
If you’re concerned about the ham drying out, the foil pan provides sufficient protection without covering the top. The pan creates a humid microenvironment around the lower portion while leaving the top exposed to smoke. You can also add 1/2 cup of water, apple juice, or pineapple juice to the bottom of the pan before adding the ham. This adds moisture without steaming the top surface.
For the final 30 minutes of glazing, definitely keep the ham uncovered. The glaze needs direct heat exposure to caramelize and set. Any covering would trap steam and prevent proper caramelization. The multiple glaze applications keep the surface moist during this final stage, so there’s no drying concern. The result is perfectly heated ham with a stunning glaze that looks as good as it tastes.
What Internal Temperature Should Smoked Spiral Ham Reach
Smoked spiral ham should reach 145°F internal temperature in the thickest part for safe reheating and optimal serving quality. This is the USDA-recommended temperature for reheating pre-cooked ham. Since spiral hams are already fully cooked when you buy them, you’re reheating rather than cooking from raw. The 145°F target ensures the ham is hot throughout and kills any bacteria that may have developed during storage.
Insert an instant-read thermometer into the thickest part of the ham, typically near the bone if it’s bone-in. Push it deep into the center without letting it touch bone, which conducts heat faster than meat and gives falsely high readings. Check in 2-3 spots since hams heat unevenly. The thickest area takes longest to reach temperature and is your final checkpoint before pulling from the smoker.
Don’t rely on heating time alone since variables like starting temperature, exact weight, smoker consistency, and ham shape affect cooking time. A cold ham straight from the fridge takes significantly longer than one brought to room temperature. A thick, compact ham needs more time than a flatter one. Temperature is your reliable indicator, not elapsed time. Trust the thermometer and pull at 145°F.
The ham will continue cooking slightly after you remove it from the smoker through carryover heat. Remove at exactly 145°F and let it rest for 10 minutes. The temperature may rise another 2-3 degrees to 147-148°F during rest. This final temp is perfect for serving. The ham will be hot throughout, juicy, and the glaze will have set into a sticky coating. Pulling earlier means the center may be warm but not hot. Pulling later means you risk drying out the edges.
Smoked Spiral Ham
Brown sugar honey bourbon glaze with sweet BBQ rub
Ingredients
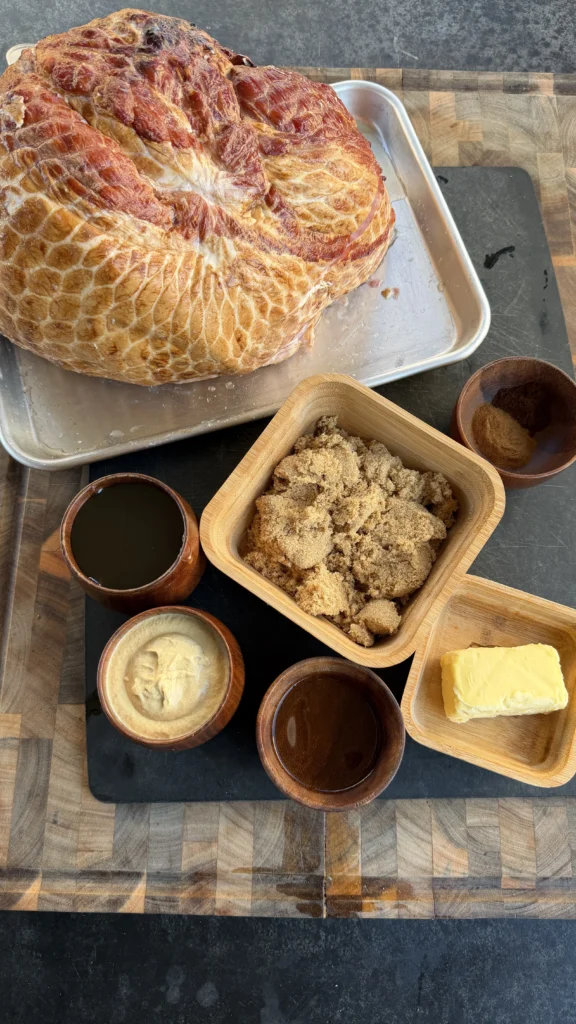
Ham
- 1 spiral-cut ham (8-10 lbs)
- 1/4 cup Dijon mustard
- Sweet BBQ rub (about 1/4 cup)
Brown Sugar Honey Glaze
- 1 cup brown sugar
- 1/2 cup honey
- 1/4 cup bourbon (optional)
- 2 tablespoons apple cider vinegar
- 2 tablespoons butter
- 1 teaspoon ground cinnamon
- 1/2 teaspoon ground cloves
- 1/2 teaspoon black pepper
- Pinch of salt
- 2 tablespoons apricot or peach preserves (optional)
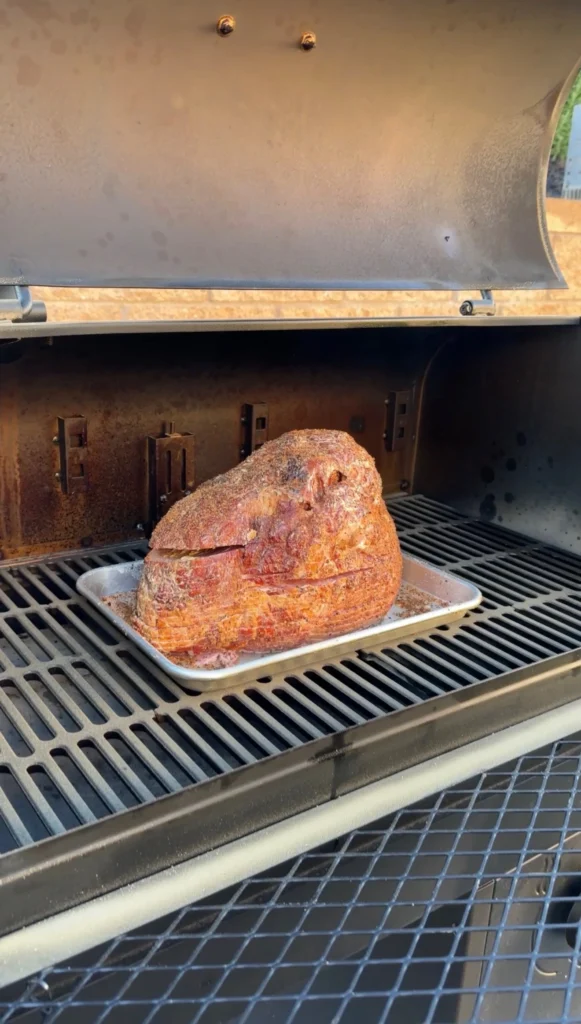
Place the spiral ham in a disposable aluminum foil pan to catch all the drippings and glaze. This keeps your smoker clean and makes it easy to baste the ham with accumulated juices. The pan also helps retain moisture around the ham during smoking.
Step-by-Step Instructions
Step 1: Prep the Spiral Ham
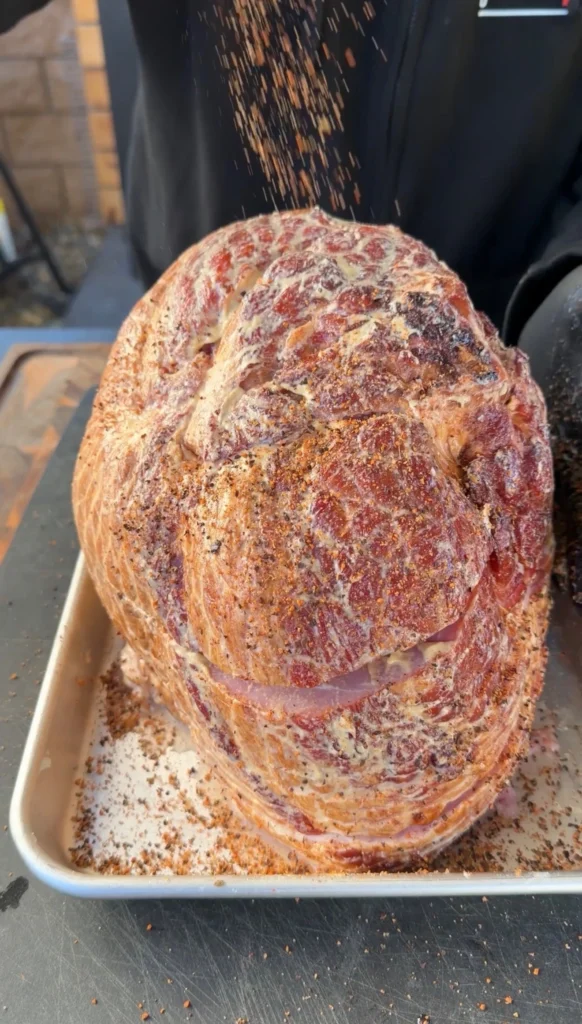
Remove the spiral ham from packaging and place it in a large disposable aluminum foil pan. The pan should be deep enough to catch drippings and glaze. If the ham came with a glaze packet, discard it or save for another use since you’re making your own. Pat the ham dry with paper towels, removing any excess moisture. Dry surface accepts the mustard and rub better than wet surface.
Using a basting brush, apply a thin, even layer of Dijon mustard all over the ham. Cover all exposed surfaces including the top, sides, and any visible meat between the spiral slices. The mustard layer should be barely visible, not thick and pasty. Let the mustard-coated ham sit for 5-10 minutes to become tacky. This tackiness helps the rub stick during the long smoking process.
Sprinkle your favorite sweet BBQ rub evenly over the entire ham. Use approximately 1/4 cup total, adjusting based on ham size. Sweet rubs with brown sugar, paprika, and warming spices work perfectly here. The sweetness complements the brown sugar honey glaze while the spices add complexity. Press the rub gently into the mustard coating with your hands, making sure it adheres well. Cover all surfaces for even flavor development.
Step 2: Preheat the Smoker
Set your smoker to 300°F using a mild wood like apple or cherry. These fruit woods provide subtle sweetness that enhances ham without overpowering it. Avoid strong woods like hickory or mesquite which can make ham taste like a smokehouse rather than glazed meat. Let the smoker preheat completely and stabilize at 300°F with thin blue smoke before adding the ham. This typically takes 15-20 minutes.
While the smoker preheats, add 1/2 cup of apple juice, pineapple juice, or water to the bottom of the foil pan. This creates a humid environment around the ham and provides liquid for basting later if desired. The liquid prevents the bottom of the pan from burning and makes cleanup easier. Position the ham in the pan cut-side down so the spiral slices face up for easy serving later.
Make sure your smoker has stable temperature control before adding the ham. Temperature swings create uneven heating and unpredictable cooking times. Use an oven thermometer to verify your smoker’s built-in gauge is accurate if you’re uncertain. Consistent 300°F is more important than exact 300°F. Whether it runs 290°F or 310°F matters less than whether it holds steady at that temperature for 2-3 hours.
Step 3: Make the Brown Sugar Honey Glaze
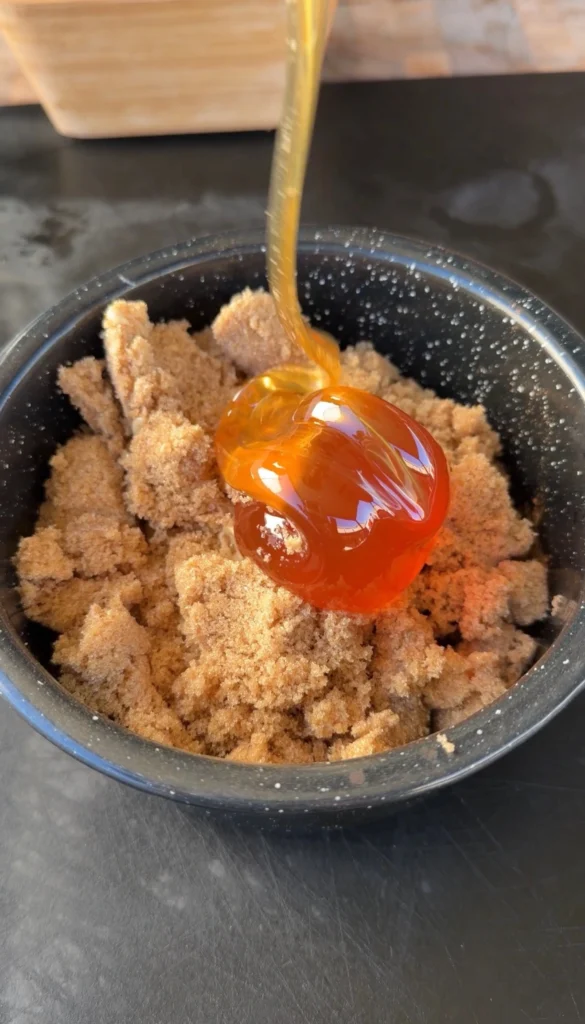
In a medium saucepan over medium heat, combine 1 cup brown sugar, 1/2 cup honey, 1/4 cup bourbon (if using), 2 tablespoons apple cider vinegar, and 2 tablespoons butter. The bourbon adds depth and helps cut the sweetness, but you can omit it for a family-friendly version. The vinegar provides acidity that balances the sugar and honey. The butter adds richness and helps the glaze stick to the ham.
Add 1 teaspoon ground cinnamon, 1/2 teaspoon ground cloves, 1/2 teaspoon black pepper, and a pinch of salt. These warming spices create classic glazed ham flavor. The cinnamon and cloves are traditional, the pepper adds subtle heat, and the salt enhances all the other flavors. If using, add 2 tablespoons of apricot or peach preserves for fruity complexity and extra thickness.
Stir constantly over medium heat until the butter melts and the brown sugar dissolves completely. Bring to a gentle simmer and cook for 5-7 minutes, stirring frequently. The glaze will thicken noticeably and become glossy. It should coat the back of a spoon and drip slowly rather than running off immediately. Don’t let it boil hard or the sugar can burn. Keep at a gentle simmer.
Remove from heat and set aside. The glaze will continue to thicken as it cools. If it becomes too thick to brush, reheat it gently for 30-60 seconds to thin it back out. The glaze can be made several hours ahead and refrigerated. Just reheat before using. The flavors actually improve with sitting time as the spices infuse into the sweet base.
Step 4: Smoke the Ham
Place the foil pan with the prepared ham directly on the smoker grate. Position it in the center for even heat exposure. Close the lid and smoke for 1.5-2 hours without opening. The ham needs consistent heat to warm through properly. Every time you open the lid, you lose heat and extend cooking time. Let it smoke undisturbed while you prepare sides or clean up the kitchen.
During this time, the ham absorbs smoke flavor while the rub develops color and the surface dries out. The mustard and rub form a light crust while the ham heats from the outside in. The juices in the pan begin to accumulate from rendered fat and moisture. The ham will smell incredible, filling your backyard with smoky, sweet aromas that signal something special is cooking.
At the 1.5-2 hour mark, check the internal temperature with an instant-read thermometer. Insert it into the thickest part without hitting bone. You’re looking for 135-140°F at this point. If it reads 135°F or higher, prepare to start glazing. If it’s below 135°F, close the lid and check again in 15-20 minutes. Don’t start glazing until the ham is close to finished or the glaze will have too much heat exposure.
Step 5: Glaze the Ham
When the ham reaches 135-140°F internal temperature, it’s time to start glazing. Using a silicone basting brush, apply a generous coat of the brown sugar honey glaze all over the ham. Cover every visible surface, working the glaze between the spiral slices where possible. Don’t worry about using too much at this stage. The ham can handle a thick coating. The heat will melt and spread the glaze as it cooks.
Close the lid and continue smoking for 10 minutes. The glaze begins to heat, melt, and caramelize. The sugars start browning while the glaze thickens and becomes sticky. After 10 minutes, open the smoker and apply a second coat of glaze over the first. The first coat should look set and slightly darker. The second coat builds additional layers. Brush it on thoroughly, covering everything again.
Repeat this glazing process every 10 minutes for 3-4 total applications. Each coat builds more thickness and creates deeper color. By the third or fourth glaze application, the ham should be approaching 145°F internal temperature. The exterior develops a beautiful mahogany color with a glossy, sticky glaze coating. Some darker spots are normal and desirable from the caramelized sugars. These add flavor and visual interest.
When the ham reaches 145°F internal temperature after your final glaze application, remove it from the smoker. The glaze should be dark, glossy, and very sticky. It should not be black or burnt, which indicates too much heat or too early glazing. The smoked spiral ham recipe is complete when you have 145°F internal temp and a stunning glazed exterior that looks like something from a magazine cover.
Step 6: Rest and Serve
Remove the foil pan with the ham from the smoker carefully. The pan is heavy and full of hot drippings, so use heavy gloves or sturdy pot holders. Transfer the pan to a heat-safe surface and let the ham rest for 10 minutes before serving. This brief rest allows the internal temperature to stabilize and the glaze to set into its final sticky coating. The ham firms up slightly, making it easier to handle and slice.
During rest, the glaze continues to cool and thicken into that signature sticky coating that clings to each slice. The internal juices redistribute throughout the meat. Any residual heat from smoking dissipates to a comfortable serving temperature. Ten minutes is the minimum rest time. You can rest longer if needed for timing purposes, keeping the ham loosely tented with foil to maintain warmth. The foil prevents the glaze from hardening too much.
After resting, the spiral ham is ready to serve. Since it’s pre-sliced, simply pull apart the slices following the spiral cuts. Arrange the slices on a large serving platter, slightly overlapping them for presentation. Drizzle any accumulated glaze and juices from the pan over the slices. The glaze adds extra flavor and makes the platter look more appealing with its glossy coating pooled around the meat.
Serve immediately while warm. The brown sugar glazed ham is perfect for holiday buffets, special dinners, or anytime you’re feeding a crowd. The sweet, smoky, savory flavors work with classic sides like mashed potatoes, roasted vegetables, mac and cheese, or dinner rolls. Leftover ham keeps in the refrigerator for 5-7 days and makes excellent sandwiches, omelets, or additions to soups and casseroles.

Smoked Spiral Ham with Brown Sugar Honey Glaze
Ingredients
Method
- Place spiral ham in a disposable aluminum foil pan. Brush with Dijon mustard all over. Sprinkle sweet BBQ rub evenly over entire surface.
- Preheat smoker to 300°F with apple or cherry wood. Add 1/2 cup apple juice to bottom of pan.
- Make glaze by combining all glaze ingredients in a saucepan over medium heat. Simmer 5-7 minutes until thick and glossy, stirring frequently. Set aside.
- Place pan with ham in smoker. Close lid and smoke for 1.5-2 hours until internal temperature reaches 135-140°F.
- When ham reaches 135-140°F, begin glazing. Brush generous coat of glaze all over ham. Continue smoking and glazing every 10 minutes for 3-4 total applications.
- Remove when internal temperature reaches 145°F. The glaze should be dark, glossy, and caramelized.
- Rest 10 minutes before serving. Pull apart spiral slices and arrange on platter. Drizzle with accumulated glaze from pan.
Notes
Tried this recipe?
Let us know how it was!Frequently Asked Questions
Can I use a boneless spiral ham instead of bone-in?
Yes, boneless spiral ham works perfectly with this method. Boneless hams typically cook 15-20 minutes faster than bone-in since there’s no bone to slow heat penetration. Start checking temperature at 1.5 hours instead of 2 hours. Everything else remains the same including the mustard, rub, smoking temperature, and glazing technique. Boneless ham is also easier to carve and serves more people per pound since there’s no bone waste.
The glaze adheres equally well to boneless ham and creates the same beautiful caramelized coating. The only difference is slightly faster cooking time and easier serving. For holiday meals when you’re managing multiple dishes, boneless ham can be a time-saver. Just monitor temperature carefully since the shorter cooking time means less margin for error.
How do I make this ham ahead for holiday dinners?
You can smoke the spiral ham recipe completely 1-2 days before serving. Smoke and glaze as directed, then cool completely and refrigerate wrapped tightly in foil. To reheat, place in a 300°F oven still wrapped in foil for 45-60 minutes until warmed through (about 140°F internal). Brush with additional glaze during the last 15 minutes of reheating for refreshed shine and stickiness.
Alternatively, smoke the ham to 135°F a day ahead, refrigerate, then finish smoking and glazing on serving day. This spreads the work across two days and ensures the glaze is fresh and glossy. The make-ahead approach is perfect for holidays when oven and stove space is limited. The smoker handles the ham while your oven manages sides and other dishes.
What if my glaze is too thick or too thin?
If the glaze becomes too thick to brush, thin it by reheating gently and adding 1-2 tablespoons of water, apple juice, or bourbon. Stir until it reaches brushable consistency. If it’s too thin and runs off the ham immediately, return it to the stove and simmer another 3-5 minutes to reduce and thicken. The glaze should coat the back of a spoon and drip slowly, not run off in a stream.
Temperature affects glaze consistency dramatically. Cold glaze is very thick, hot glaze is quite thin. Keep the glaze warm (not hot) throughout the glazing process for easiest brushing. If working in cold weather, place the glaze pot on the edge of the smoker or grill to maintain warmth. Proper consistency makes glazing easier and creates better coating on the ham.
Can I skip the bourbon in the glaze?
Absolutely. The bourbon adds depth and complexity but isn’t essential. Replace it with equal parts apple juice, pineapple juice, or just use an extra 1/4 cup of honey. The glaze will be slightly sweeter without bourbon’s balancing bitterness, but it still tastes excellent. Many family recipes skip alcohol for kid-friendly meals. The brown sugar, honey, and spices carry the flavor profile successfully without bourbon.
If you want to keep the complexity bourbon provides without alcohol, add 1 teaspoon of vanilla extract or 1 tablespoon of maple syrup. These add depth and warmth similar to bourbon’s contribution. The cinnamon and cloves also become more prominent without bourbon, creating a spicier, holiday-spiced profile that works beautifully for brown sugar glazed ham.
What sides pair well with smoked spiral ham?
Classic holiday sides complement smoked spiral ham perfectly. Mashed potatoes, sweet potato casserole, green bean casserole, and macaroni and cheese are all traditional choices. The sweet glaze pairs beautifully with savory sides. Roasted Brussels sprouts, glazed carrots, and asparagus add color and freshness. Dinner rolls are essential for soaking up the glaze and making ham sandwiches with leftovers.
For lighter options, serve a crisp salad with vinaigrette to cut through the rich, sweet ham. Fruit salads or ambrosia provide refreshing contrast. Cornbread or biscuits work wonderfully, especially when split and filled with ham slices. For holidays, this ham works alongside turkey as a dual-protein option, giving guests variety. The leftover ham makes incredible breakfast scrambles, quiches, sandwiches, and additions to soups and beans throughout the week.
Ready to Take Your Cooking to the Next Level?
This is where I keep all my most-used products, gear, and favorite cooking tools — check it out:
🔥 View My Cooking Gear & ToolsRecipe Categories
If you loved this recipe, you’ll find more to savor across our diverse categories. From beef to pork, chicken to turkey, seafood to appetizers, there’s a wealth of flavors waiting for you. Explore them all at CWFeats.
