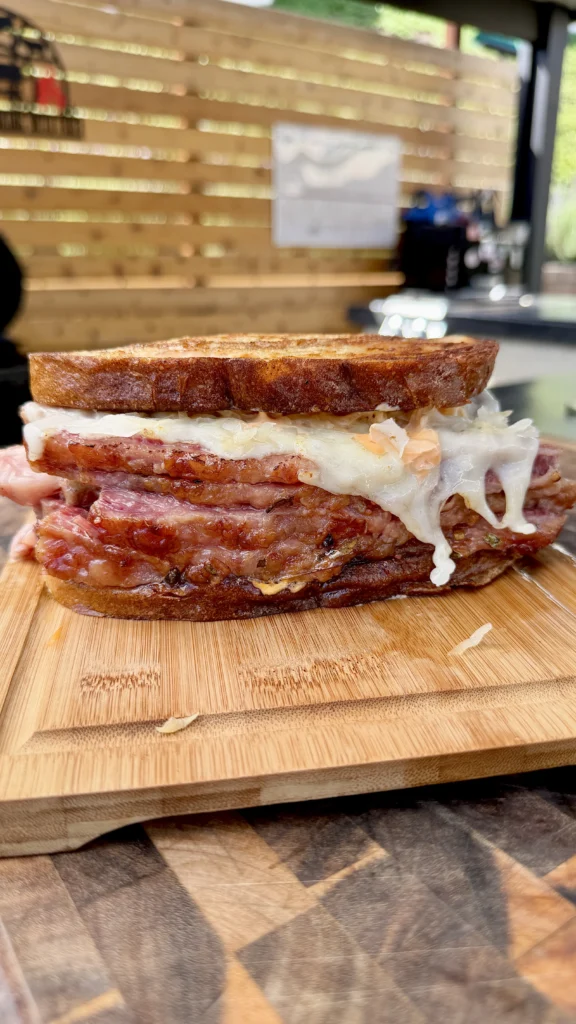
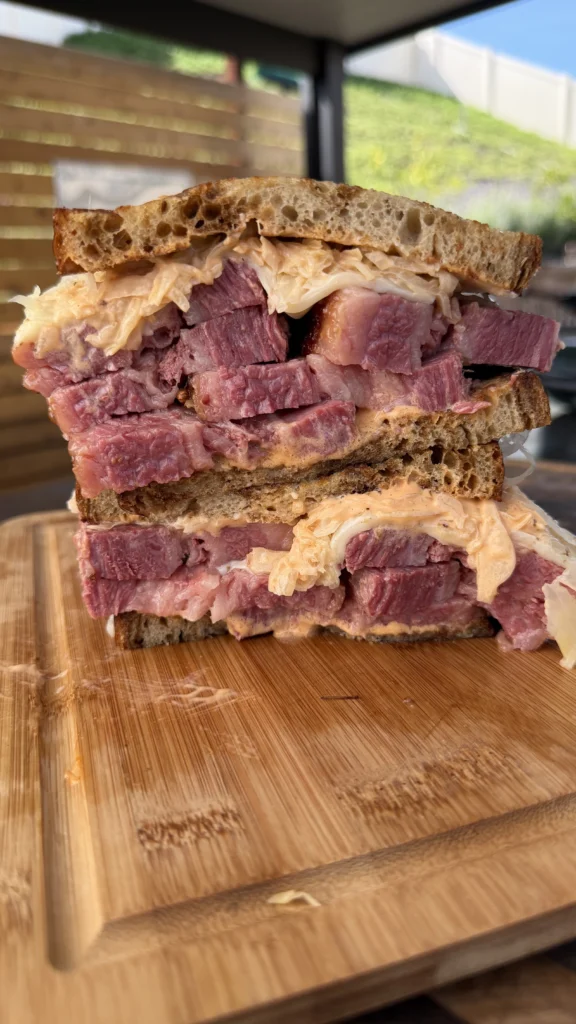
Boiled corned beef sandwich is made by taking a whole corned beef brisket (3 to 4 pounds), rinsing it lightly, placing it in a large pot covered with water 1 to 2 inches above the meat along with the included seasoning packet, bringing to a boil then reducing to a gentle simmer, and cooking covered for 2½ to 3½ hours until the internal temperature reaches 203°F and the meat is fork-tender but still sliceable. After resting 15 to 20 minutes, you slice the corned beef thinly against the grain, then layer the hot slices on toasted marble rye bread (toasted with mayo spread on the outside) with Swiss cheese, well-drained sauerkraut, and Thousand Island dressing.
The entire process takes 3 to 4 hours from start to finish. This includes 5 minutes for prep and getting the corned beef in the pot. The boiling phase takes 2½ to 3½ hours depending on the size of the corned beef. Resting adds 15 to 20 minutes. Slicing and assembling sandwiches takes about 10 minutes. You can boil the corned beef a day ahead and refrigerate, then slice and assemble sandwiches when ready to serve, which reduces day-of work to just 15 minutes.
This corned beef sandwich recipe makes 8 to 12 sandwiches depending on the size of the corned beef and how generously you stack the meat. A 3-pound corned beef yields approximately 2 pounds of cooked meat after shrinkage. Each sandwich uses about 2½ to 3 ounces of sliced corned beef. The sandwiches are substantial and filling. Most people eat one sandwich as a complete meal with pickles or chips on the side.
Jump to RecipeWhy 203°F Internal Temperature Creates Fork-Tender Texture
Collagen Conversion Requires Extended Heat
Corned beef brisket contains substantial collagen in the connective tissue. This collagen makes raw corned beef very tough. The collagen must convert to gelatin for tender texture. This conversion happens between 160°F and 205°F but accelerates significantly above 195°F.
At 165°F, the USDA minimum safe temperature, corned beef is safe to eat but the texture is terrible. The collagen has barely begun converting. The meat is tough, stringy, and requires significant chewing. Most of the connective tissue is still intact.
At 180 to 190°F, the collagen conversion is progressing but incomplete. The meat is somewhat tender but still has tough sections. You can slice it but it doesn’t pull apart easily. The texture is acceptable but not ideal.
At 203°F, the collagen has fully converted to gelatin throughout the meat. The texture transforms from tough to fork-tender. You can insert a fork and the meat yields easily. Slices pull apart with minimal effort. This is the sweet spot for boiled corned beef.
Gentle Simmer vs Rapid Boil
The cooking method matters as much as the final temperature. Rapid boiling at high heat can bring corned beef to 203°F quickly but the texture suffers. Aggressive heat causes proteins to tighten excessively. The meat becomes stringy even at proper temperature.
Gentle simmering at just below boiling allows slow, even heating. The proteins relax gradually. The collagen converts thoroughly without protein tightening. The result is tender meat with good texture throughout.
The simmer should produce small bubbles breaking the surface occasionally. If the water is rolling with large bubbles constantly, reduce heat. If no bubbles appear, increase heat slightly. The gentle simmer is the key to success.
Why Corned Beef Needs Higher Temperature Than Fresh Brisket
Fresh brisket cooked sous vide or braised can be tender at 180 to 190°F with extended cooking time. The collagen converts slowly at these temperatures. But corned beef is cured with salt, which affects protein structure.
The curing process makes the proteins firmer. They need higher heat to break down properly. Cooking corned beef to 180°F produces tougher texture than cooking fresh brisket to the same temperature.
The 203°F target ensures the cured proteins have fully relaxed and the collagen has converted despite the firmer structure from curing. This temperature works reliably across different corned beef brands and curing methods.
The Fork-Tender Test Confirms Doneness
Temperature is a guideline but the fork test is definitive. Insert a fork into the thickest part of the corned beef. Twist the fork gently. The meat should yield and start to pull apart. If the fork meets resistance or the meat stays firm, continue cooking regardless of temperature.
Some corned beef reaches fork-tender at 198°F. Others need 208°F. Variables include the specific cut, how it was cured, and the animal’s age and diet. The fork test accounts for these variables.
The fork-tender stage is just before falling-apart tender. The meat should still hold together for slicing. If it falls apart when you try to remove it from the pot, it’s overcooked for sandwiches. For hash or other chopped applications, falling-apart tender is fine. For sandwiches, you want tender but structured.
What Makes Marble Rye the Traditional Choice for Corned Beef Sandwiches
Flavor Balance with Salty Corned Beef
Marble rye combines light rye and dark rye doughs swirled together. The rye flavor is moderate, not aggressive. This provides subtle earthiness that complements corned beef without competing.
Plain white bread is too neutral. It doesn’t add anything to the sandwich. The corned beef dominates completely. Whole wheat is too assertive and can taste bitter against the salty meat.
Pumpernickel is too strong. Dark rye is similarly overpowering. The heavy rye flavor fights with the corned beef’s seasoning. Marble rye provides rye character without overwhelming.
The caraway seeds traditional in rye bread add aromatic notes that enhance the pickling spices in corned beef. The flavors are complementary. Both have Eastern European roots. They’re culinary partners.
Structural Integrity for Heavy Sandwiches
Corned beef sandwiches are substantial. You’re stacking 3 ounces of meat plus sauerkraut, cheese, and dressing. The bread needs structure to support this weight without falling apart.
Marble rye is denser than white bread. The combination of wheat and rye flour creates sturdy crumb. The bread holds up to moisture from sauerkraut and dressing without becoming soggy quickly.
The crust on rye bread is also firmer than white bread crust. When toasted, it creates a protective barrier. The crispy exterior prevents moisture penetration while the dense interior provides support.
Soft sandwich bread or brioche would compress under the weight of the filling. The sandwich would be sloppy and difficult to eat. Marble rye maintains structure throughout the eating experience.
Visual Appeal and Tradition
The marbled appearance is distinctive and attractive. The swirl of light and dark creates visual interest on the plate. This matters for presentation whether serving guests or photographing for content.
Marble rye signals “deli sandwich” culturally. When you see marble rye, you expect pastrami, corned beef, or Reuben. The bread choice sets expectations and satisfies them.
New York delis standardized marble rye for corned beef sandwiches in the early 1900s. The tradition has remained because it works. Some traditions persist because they’re the best solution, not just from habit.
Toasting Characteristics
Marble rye toasts beautifully with mayo on the exterior. The sugars in the rye flour caramelize nicely. The bread develops golden-brown color with slight char at the edges.
The dense texture prevents the bread from drying out during toasting. White bread can become hard and brittle when toasted. Rye stays tender inside while crisping outside.
The toasted rye aroma combines with the corned beef, creating complex scent profile. The Maillard reaction in the toasted bread adds depth that elevates the entire sandwich.
Why You Must Slice Corned Beef Against the Grain
Muscle Fiber Structure in Brisket
Corned beef is cured brisket. Brisket has long muscle fibers running in parallel lines. These fibers are visible when you look at the meat. They appear as lines or striations across the surface.
When you bite meat, your teeth must cut through these muscle fibers. Long, intact fibers are tough to bite through. They require chewing and can feel stringy. Short fibers cut cleanly and feel tender.
The grain is the direction these muscle fibers run. Identifying the grain means looking at the meat and seeing which direction the lines go. This is usually obvious on the flat of the brisket.
Against the Grain vs With the Grain
Slicing against the grain means cutting perpendicular to the fiber direction. Your knife cuts across the fibers, creating short segments. Each slice contains thousands of short fiber pieces rather than long continuous fibers.
Slicing with the grain means cutting parallel to the fibers. The fibers stay long and intact. When you bite the meat, you’re trying to tear through fibers that might be 3 to 4 inches long. This is very tough.
The difference in texture is dramatic. Against-the-grain slices are tender and easy to bite through. With-the-grain slices are chewy and stringy even when the meat is properly cooked. The cooking temperature doesn’t matter if you slice with the grain.
Finding the Grain on Corned Beef
After resting, place the corned beef on a cutting board. Look at the surface. You’ll see lines running in one direction. This is the grain. On the flat portion of brisket, the grain usually runs lengthwise along the meat.
The grain direction can change between the flat and point of the brisket. The flat and point have different muscle structures. You might need to adjust your slicing angle when you transition from one section to the other.
If you’re unsure, make a test cut. Slice the meat and examine the cut edge. If you see long fiber strands hanging out, you cut with the grain. Rotate 90 degrees and try again. If the cut is clean with no visible long fibers, you cut against the grain correctly.
Slicing Thickness Matters
For sandwiches, slice corned beef approximately ⅛ to ¼ inch thick. Thin slices stack well and create good meat-to-bread ratio. They’re also easier to bite through than thick slices.
Too-thin slices, like deli shaving thickness, don’t have enough substance. The meat gets lost in the sandwich. You want enough thickness to provide meaty bite without being chewy.
Use a sharp slicing knife or electric knife. Dull knives tear the meat rather than cutting cleanly. This creates rough edges that feel tougher when eating. Sharp, clean cuts create tender-feeling slices.
How to Properly Drain Sauerkraut to Prevent Soggy Sandwiches
Understanding Sauerkraut Moisture Content
Sauerkraut is fermented cabbage packed in brine. The cabbage releases liquid during fermentation. When you open a jar or can, the sauerkraut is sitting in substantial liquid. This liquid is approximately 60 to 70% of the total weight.
The brine carries flavor. It’s acidic and salty. But it’s also very wet. If you add undrained sauerkraut to a sandwich, the brine soaks into the bread. The sandwich becomes soggy within minutes.
The cabbage itself also holds moisture like a sponge. Even after removing from brine, the cabbage is saturated. It needs squeezing to remove the absorbed liquid.
The Drain and Squeeze Method
Remove sauerkraut from the jar with a fork or slotted spoon. Let it drain over the jar for a few seconds. This removes the surface liquid but not the absorbed moisture.
Place the sauerkraut in a fine-mesh strainer or colander. Let it sit for 2 to 3 minutes. Additional liquid will drip out. Press down gently with a spoon to encourage drainage.
Take a handful of sauerkraut and squeeze it firmly over the sink. You’ll be surprised how much liquid comes out. Squeeze until no more liquid drips. The sauerkraut should feel damp but not soaking wet.
Rinsing Considerations
Some people rinse sauerkraut to reduce the intense tanginess. Rinsing removes some of the acidic brine flavor. If you find sauerkraut too sour, rinse it under cold water before draining and squeezing.
Rinsing also reduces sodium. Sauerkraut is very salty. Rinsing removes surface salt. For people watching sodium intake, this helps without eliminating the sauerkraut entirely.
However, rinsing adds more moisture that must be squeezed out. If you rinse, the squeezing step becomes even more critical. You need to remove the rinse water plus the original brine.
Traditional preparations don’t rinse. The full tang of sauerkraut is part of the flavor profile. The acidity cuts through the rich, fatty corned beef. Rinsing moderates this but can make the sauerkraut bland.
Timing and Temperature
Add sauerkraut to sandwiches just before serving. Don’t build sandwiches with sauerkraut and let them sit. Even well-drained sauerkraut will release additional moisture over time as the salt draws liquid from the cabbage.
Room temperature or cold sauerkraut works for sandwiches. Some people heat sauerkraut slightly. Warm sauerkraut releases less moisture than cold because heat drives out some remaining liquid during warming.
For make-ahead situations, keep the sauerkraut separate. Build sandwiches minus sauerkraut. Add sauerkraut right before serving. This prevents soggy bread regardless of how well you drained it initially.
Boiled Corned Beef Sandwich
Fork-tender at 203°F, marble rye, Swiss, sauerkraut
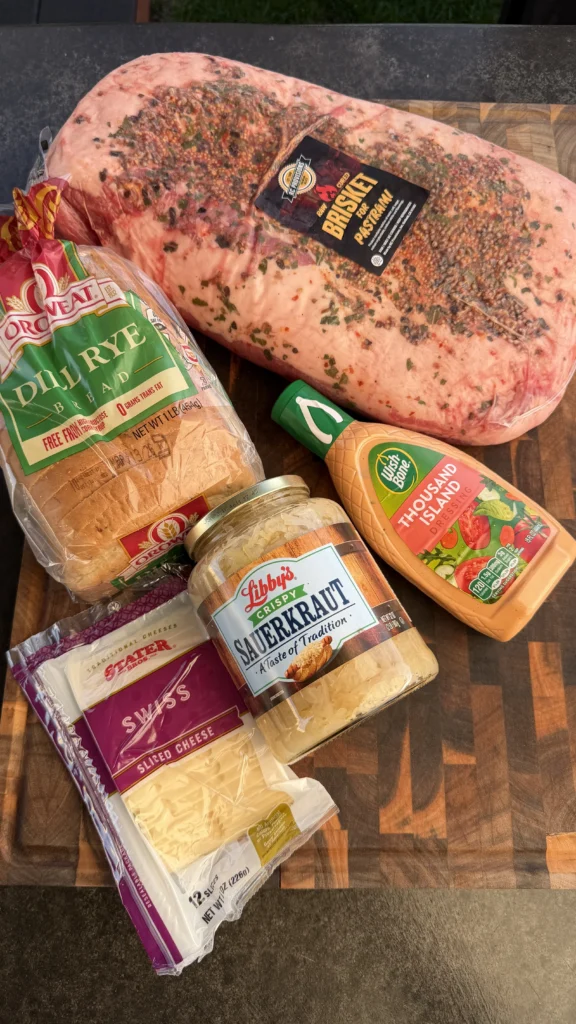
Ingredients
Corned Beef
- 1 whole corned beef (3-4 lbs, with seasoning packet)
Sandwich Assembly
- 1 loaf marble rye bread
- Swiss cheese slices
- Sauerkraut (well-drained)
- Thousand Island dressing
- Mayonnaise (for toasting bread)
Pull corned beef at 203°F fork-tender, not earlier. The collagen needs to fully convert to gelatin. Slice against the grain after resting. Squeeze sauerkraut dry to prevent soggy bread. Toast bread with mayo, not butter, for even browning without burnt spots.
Step-by-Step Instructions
Step 1: Prepare the Corned Beef
Remove the corned beef from packaging. You’ll notice it’s in brine. The meat will feel wet and slimy. This is normal.
Rinse the corned beef lightly under cold running water. This removes surface brine. Don’t over-rinse. A quick rinse is sufficient. The meat is already cured and seasoned throughout.
Check the package for a seasoning packet. Most corned beef includes pickling spices. Set this aside. You’ll add it to the cooking water.
Step 2: Boil the Corned Beef
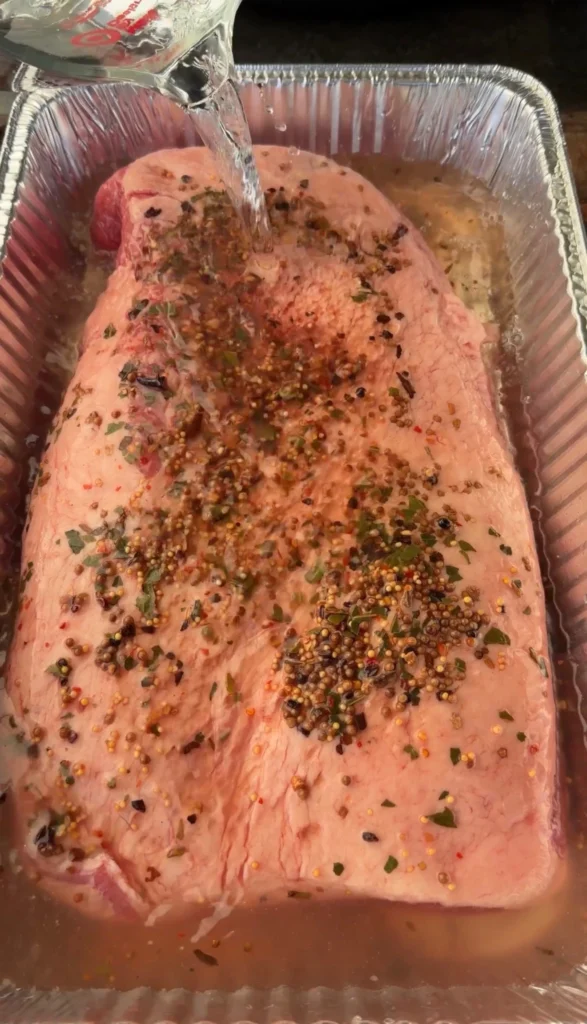
Place the rinsed corned beef in a large pot. The pot should be big enough that the meat fits comfortably without cramming. A 6 to 8-quart pot works for most corned beef sizes.
Fill the pot with cold water. Cover the corned beef completely. The water should be 1 to 2 inches above the meat. Don’t skimp on water. The meat needs room to move slightly during cooking.
Add the seasoning packet to the water. If you don’t have a packet, you can add your own pickling spices. Use 1 tablespoon whole peppercorns, 1 tablespoon mustard seeds, 1 tablespoon coriander seeds, and 2 bay leaves.
Place the pot on the stove over high heat. Bring the water to a full rolling boil. This takes 15 to 20 minutes depending on water amount and burner power.
Once boiling, reduce heat to low or medium-low. The water should reduce to a gentle simmer. You want small bubbles breaking the surface occasionally, not aggressive rolling bubbles.
Cover the pot with a lid. The lid traps heat and maintains steady temperature. It also prevents excessive evaporation.
Step 3: Simmer Until Fork-Tender

Set a timer for 2½ hours. This is the minimum cook time for most corned beef. Larger pieces (4+ pounds) might need 3 to 3½ hours.
Maintain the gentle simmer throughout cooking. Check occasionally to ensure the water isn’t boiling aggressively or dropping below a simmer. Adjust heat as needed.
After 2½ hours, check the internal temperature. Insert an instant-read thermometer into the thickest part of the corned beef. You’re looking for 203°F.
If the temperature is below 200°F, continue cooking and check every 15 minutes. Different corned beef sizes and shapes affect cooking time.
When the temperature reads 203°F, perform the fork test. Insert a fork into the meat and twist gently. The fork should slide in easily and the meat should start to pull apart. If the fork meets resistance, continue cooking even if temperature is correct.
Step 4: Rest the Corned Beef
When the corned beef is fork-tender at 203°F, carefully remove it from the pot. Use tongs or a large fork. The meat is heavy and slippery. Be cautious.
Place the corned beef on a large cutting board or rimmed baking sheet. Let it rest uncovered for 15 to 20 minutes. Don’t skip this step.
During rest, the juices redistribute throughout the meat. The temperature equalizes. The meat firms up slightly, making it easier to slice cleanly.
The corned beef will remain hot after 20 minutes of resting. The internal temperature might drop to 190 to 195°F but the meat stays warm enough for hot sandwiches.
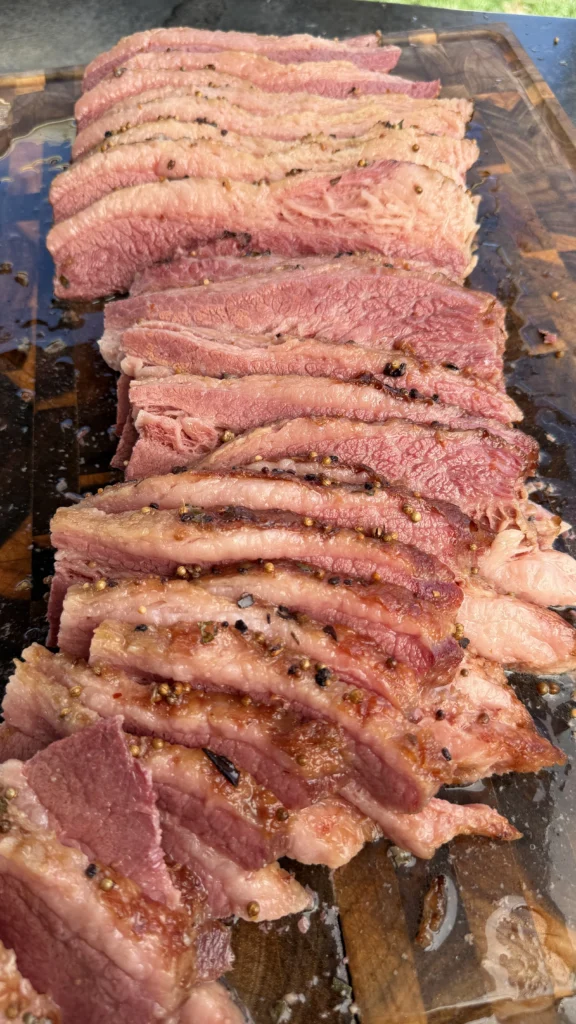
Step 5: Slice Against the Grain
After resting, examine the corned beef to identify the grain. Look at the surface. You’ll see lines running in one direction. This is the grain.
Using a sharp slicing knife, cut perpendicular to these lines. Your knife should cut across the grain, not parallel to it. This creates short muscle fibers that are tender to bite.
Slice the corned beef approximately ⅛ to ¼ inch thick. Thin slices work best for sandwiches. They stack well and create good texture.
Continue slicing until you have enough for your desired number of sandwiches. Each sandwich uses approximately 2½ to 3 ounces of sliced corned beef, which is 4 to 5 thin slices.
Step 6: Prepare the Sauerkraut
While the corned beef rests, prepare the sauerkraut. Open the jar or can. Remove sauerkraut with a fork or slotted spoon.
Place the sauerkraut in a fine-mesh strainer or colander. Let it drain for 2 to 3 minutes. Press down with a spoon to encourage drainage.
Take handfuls of sauerkraut and squeeze firmly over the sink. You’ll be surprised how much liquid comes out. Squeeze until no more liquid drips.
The sauerkraut should feel damp but not soaking wet. This is critical for preventing soggy sandwiches.
Step 7: Toast the Bread
Spread a thin layer of mayonnaise on one side of each marble rye bread slice. The mayo side will be the outside of the sandwich.
Heat a large skillet or griddle over medium heat. Let it preheat for 2 minutes.
Place bread slices mayo-side down in the skillet. Cook for 2 to 3 minutes until golden brown with slight char at edges. Watch carefully to prevent burning.
The toasted side should be crispy and golden. The untoasted side stays soft.
Step 8: Assemble the Sandwiches
On the soft (untoasted) side of one bread slice, layer Swiss cheese. Use 1 to 2 slices depending on size.
Add hot sliced corned beef on top of the cheese. Stack 4 to 5 slices or about 3 ounces of meat.
Add a generous portion of well-drained sauerkraut on top of the corned beef. Approximately 2 to 3 tablespoons.
Drizzle Thousand Island dressing over the sauerkraut. Use about 1 to 2 tablespoons. Don’t overdo it. Too much dressing makes the sandwich messy.
Top with the second slice of toasted bread, crispy side out.
Press the sandwich gently to compress slightly. This helps everything stay together.
Slice diagonally if desired. Serve immediately while the corned beef is hot and the bread is crispy.

Boiled Corned Beef Sandwich
Ingredients
Equipment
Method
- Rinse corned beef lightly. Place in large pot. Cover with water 1 to 2 inches above meat. Add seasoning packet.
- Bring to boil over high heat. Reduce to gentle simmer. Cover. Cook 2½ to 3½ hours until internal temperature reaches 203°F and fork slides in easily.
- Remove from pot. Rest uncovered 15 to 20 minutes on cutting board.
- Identify grain direction by looking at muscle fiber lines. Slice against the grain approximately ⅛ to ¼ inch thick.
- Drain sauerkraut in strainer. Squeeze handfuls firmly until no liquid drips. Sauerkraut should be damp but not wet.
- Spread thin layer of mayo on one side of each bread slice. Heat skillet over medium heat. Toast bread mayo-side down 2 to 3 minutes until golden brown.
- On soft side of bread, layer Swiss cheese, hot corned beef (3 oz), squeezed sauerkraut (2-3 tbsp), and Thousand Island dressing (1-2 tbsp). Top with second slice crispy-side out.
- Press gently. Serve immediately.
Nutrition
Notes
Tried this recipe?
Let us know how it was!Frequently Asked Questions
Can You Cook Corned Beef in a Slow Cooker or Instant Pot?
Slow cooker works well for corned beef. Place corned beef in slow cooker. Add enough water to cover. Add seasoning packet. Cook on low for 8 to 10 hours or high for 4 to 5 hours until fork-tender.
The gentle, even heat of slow cookers creates excellent texture. The collagen converts thoroughly. The meat stays moist throughout the long cook. Check with fork test to confirm doneness.
Instant Pot pressure cooks corned beef much faster. Place corned beef in Instant Pot with 2 cups water and seasoning packet. Pressure cook on high for 90 minutes. Natural release for 15 minutes.
Pressure cooking produces tender corned beef in about 2 hours total including pressurizing and release time. The texture is slightly different from boiled but still excellent. The high pressure forces moisture into the meat.
Both methods work. Choose based on your available time and equipment. Boiled is traditional. Slow cooker is hands-off. Instant Pot is fastest.
What’s the Difference Between Corned Beef and Pastrami?
Corned beef is beef brisket cured in brine with salt, sugar, and pickling spices. It’s then boiled until tender. The meat is pink from the curing salts. The flavor is salty, slightly sweet, and has pickle spice character.
Pastrami starts as corned beef. After curing, it’s coated with black pepper and coriander. Then it’s smoked at low temperature for several hours. Finally it’s steamed to finish.
The smoking step is the key difference. Pastrami has intense smoke flavor and darker exterior from the spice rub. Corned beef is lighter in color and has no smoke flavor.
Both work for sandwiches but taste distinctly different. Corned beef is cleaner and less complex. Pastrami is bolder with layered smoke and spice flavors.
You can’t make pastrami by just boiling corned beef. The smoking step is essential to pastrami’s character.
How Do You Store and Reheat Leftover Corned Beef?
Store leftover corned beef whole or sliced in airtight container in refrigerator for up to 5 days. Whole corned beef maintains moisture better than sliced. Slice as needed for sandwiches.
For longer storage, freeze corned beef for up to 3 months. Slice before freezing. Layer slices with parchment paper between them. This lets you remove only what you need.
Reheat corned beef gently to prevent drying. Place slices in a steamer basket over simmering water. Steam for 3 to 5 minutes until heated through. This method maintains moisture.
Microwave works but can dry the meat. Use 50% power. Heat in 30-second intervals. Place a damp paper towel over the meat to create steam.
Don’t boil leftover corned beef. It’s already cooked. Additional boiling overcooks and toughens the meat. Gentle reheating is all that’s needed.
Can You Use Regular Rye Bread Instead of Marble Rye?
Regular dark rye works fine for corned beef sandwiches. It has stronger rye flavor than marble rye. Some people prefer this bolder taste. Others find it too intense.
Light rye (white rye) is milder than marble rye. It works but doesn’t have the classic deli sandwich appearance. The lighter color looks less traditional.
Pumpernickel is very dark with strong flavor. It can overpower the corned beef. Use it if you love strong rye flavor but it’s not traditional for this sandwich.
Marble rye is traditional because it balances rye flavor with visual appeal. The swirl pattern is distinctive. But any rye bread works technically.
If you can’t find marble rye, use dark or light rye. The sandwich will still taste good. The bread choice is about preference and tradition, not necessity.
What Other Toppings Work Besides Thousand Island Dressing?
Russian dressing is very similar to Thousand Island and works equally well. It has mayo, ketchup, horseradish, and sometimes pickle relish. The horseradish adds kick that complements corned beef.
Yellow mustard is classic deli topping for corned beef. It’s simpler than Thousand Island. The sharp mustard flavor cuts through the fatty meat. Many people prefer this traditional approach.
Spicy brown mustard or whole grain mustard add more complexity than yellow mustard. The texture and stronger flavor work well with corned beef’s richness.
Horseradish sauce (prepared horseradish mixed with mayo or sour cream) provides heat without sweetness. This is excellent for people who don’t like Thousand Island’s sweetness.
Some people skip all condiments and rely on the corned beef’s natural flavor with just sauerkraut. This minimalist approach works if the corned beef is high quality and properly cooked.
Ready to Level Up?
Take your backyard cooking from good to legendary.
This is where I keep all my most-used smokers, knives, and favorite cooking tools.
Shop My Gear CollectionExplore More Recipes
Find more diverse flavors at CWFeats.com