Recipe Overview:
Garlic Herb Butter Spatchcock Roasted Chicken
Whole chicken butterflied and flattened, stuffed with garlic herb compound butter under the skin, roasted on indirect grill heat until crispy and juicy
Prep Time: 20 min | Cook Time: 1 hr 15 min | Total Time: 1 hr 35 min | Servings: 4-6 | Calories: 520/serving
See How It’s Done
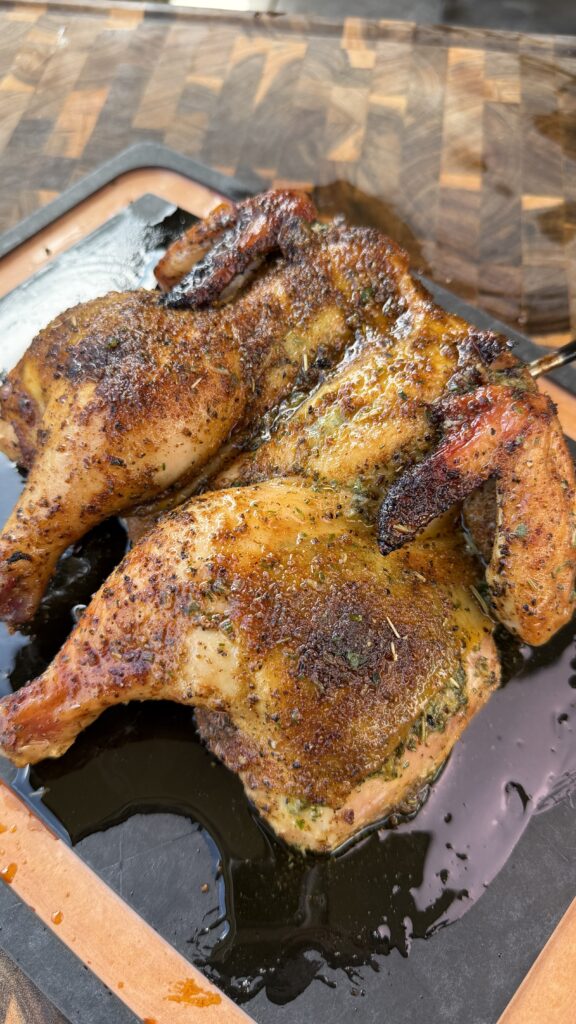
Garlic herb butter spatchcock roasted chicken delivers restaurant-quality results through a simple technique that reduces cooking time while maximizing crispy skin and juicy meat. This spatchcocked chicken starts by removing the backbone and flattening the bird so it cooks in a single even plane rather than the traditional rounded shape. Compound butter loaded with fresh garlic, parsley, thyme, rosemary, and lemon juice gets spread directly under the skin over the breast and thigh meat, basting from within as it melts during cooking. The flattened bird roasts over indirect heat at 350°F until it reaches perfect doneness – 165°F in the breast and 175°F in the thighs – with gloriously crispy skin and herb-infused meat throughout.
What makes this spatchcock chicken with garlic herb butter special is how the butterflying technique cuts cooking time nearly in half compared to traditional roasting while creating more consistent results. A whole chicken standing upright takes ninety minutes to two hours to cook through, with the breast often overcooking before the thighs reach proper temperature. Spatchcocking creates uniform thickness that allows everything to finish simultaneously. The flattened shape also exposes maximum skin surface to heat, creating more of that coveted crispy skin that makes roasted chicken so appealing.
This herb butter roasted chicken recipe works brilliantly for weeknight dinners and special occasions alike. The compound butter technique infuses flavor deep into the meat rather than just seasoning the surface, while the spatchcock method ensures foolproof results even for beginners. The indirect grilling adds subtle smoke while the optional direct heat finish creates skin so crispy it shatters when you bite into it. Master this technique and you’ll never roast chicken the traditional way again.
Understanding the Spatchcock Technique
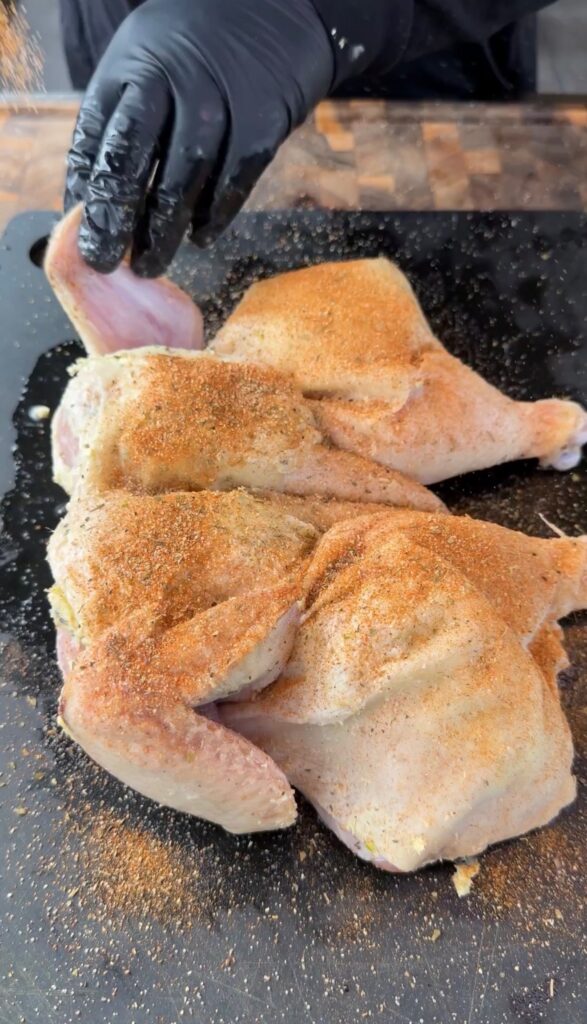
Spatchcocking, also called butterflying, involves removing the chicken’s backbone and flattening the bird so it lies completely flat in a single plane. This technique originated as a quick-cooking method for game birds but works brilliantly for chicken because it solves the fundamental problem of uneven cooking. Traditional whole roasted chicken has the breast meat stacked above the dark meat, with the legs tucked underneath where they receive less heat. This arrangement means the breast overcooks while waiting for the thighs to reach safe temperature.
Flattening the chicken spreads everything out at the same height, exposing all parts to equal heat. The breast and thighs finish cooking at the same time rather than at different rates. The flattened bird also sits directly on the cooking surface with more contact points, promoting better heat transfer and more even cooking. The breast meat shields itself somewhat by being positioned over the carcass while the thighs extend outward where they can reach higher temperature without drying the breast.
The increased surface area from flattening also means more skin exposed to heat, creating more crispy skin per chicken. Traditional roasting leaves the underside pale and flabby while only the top browns and crisps. Spatchcocking allows nearly the entire skin surface to become golden and crispy. The flattened shape is also easier to carve – you can cut straight down through the breast and separate the legs with clean cuts rather than navigating around a rounded carcass.
Removing the backbone is easier than it sounds and requires only kitchen shears and about sixty seconds. The backbone has no meat worth eating and removing it eliminates the structural support that keeps the chicken rounded. Once the backbone is gone, simply flipping the bird over and pressing on the breastbone breaks the cartilage and allows the chicken to lie completely flat.
Building the Garlic Herb Compound Butter
Compound butter combines softened butter with aromatics and herbs to create a flavored butter that melts into meat during cooking. The butter acts as a vehicle for delivering garlic, herbs, and lemon throughout the chicken rather than just coating the surface. As the butter melts during roasting, it bastes the meat from within while the fat helps the skin crisp up. The milk solids in butter also contribute to browning and create nutty, caramelized flavors.
Fresh garlic provides pungent, sharp flavor when raw but mellows and sweetens during the long roast. Two tablespoons of minced garlic (about six cloves) might seem aggressive, but the heat tames it into sweet, aromatic garlic that permeates the meat. The garlic should be minced finely so it distributes evenly through the butter without creating chunks. A microplane grater works even better than mincing, creating a paste that blends seamlessly.
The herb combination of parsley, thyme, and rosemary creates classic poultry flavoring that’s been used for centuries. Parsley provides fresh, slightly peppery notes and bright green color. Thyme contributes earthy, slightly minty flavor that complements chicken beautifully. Rosemary adds piney, aromatic complexity with its distinctive resinous character. Together, these herbs create a balanced, sophisticated profile that enhances rather than masks the chicken’s natural flavor.
Lemon juice provides acidity that brightens all the rich, fatty components while helping tenderize the meat’s surface. Just a tablespoon is enough to add zing without making the butter taste sour or citrus-forward. The acid also helps the butter emulsify slightly, creating better texture. Fresh lemon juice is essential – bottled lemon juice lacks the aromatic oils and bright flavor of fresh.
Why Butter Goes Under the Skin
Placing compound butter directly under the skin rather than on top serves multiple purposes. The skin creates a protective barrier that traps the butter against the meat, preventing it from dripping off and wasting all that flavor. As the butter melts during cooking, it stays in contact with the meat rather than running off into the pan. This direct contact allows the garlic and herbs to infuse deeply into the chicken.
The layer of fat between skin and meat also helps keep the breast meat moist during cooking. Chicken breast has virtually no fat marbling, so it’s prone to drying out. The butter bastes the meat continuously from the outside in, keeping it juicy throughout the cook. The thighs have more fat naturally, but they still benefit from the additional butter enrichment and herb flavoring.
The technique of loosening the skin without tearing it requires a gentle touch but isn’t difficult. Running your fingers between skin and meat creates a pocket that the butter can fill. Work slowly and carefully, especially around the breast where the skin is most delicate. A spoon handle can help reach deeper areas without tearing. The goal is to create space while keeping the skin attached at the edges so the butter stays contained.
Temperature Targets for Perfect Chicken
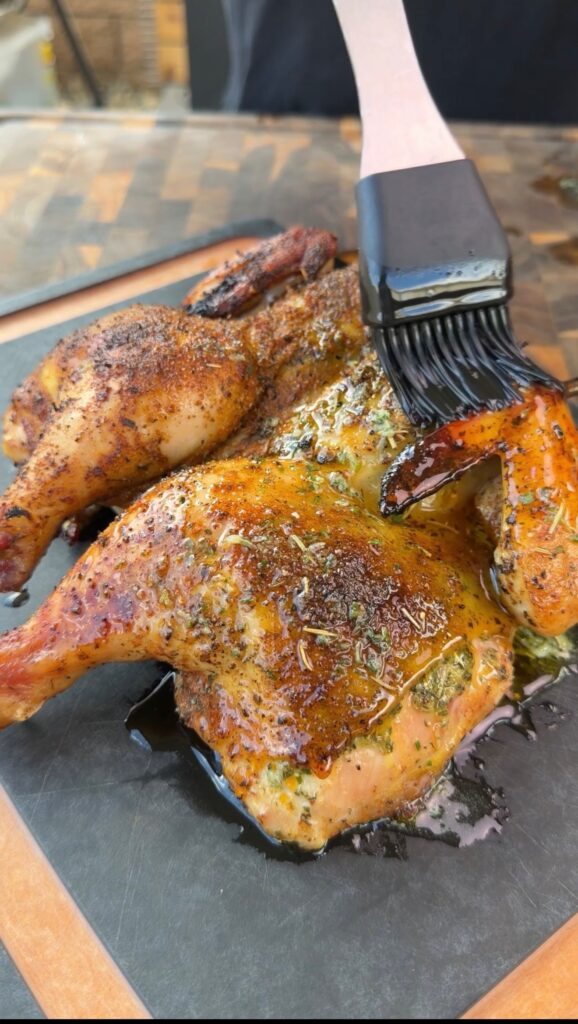
The different temperature targets for breast (165°F) versus thighs (175°F) reflect the different muscle structures in white versus dark meat. Breast meat is all white muscle fibers that dry out above 165°F, which is why the USDA identifies this as the minimum safe temperature. Going higher creates dry, chalky breast meat that’s unpleasant to eat. However, 165°F isn’t high enough for optimal thigh texture.
Thigh meat contains dark muscle fibers with more connective tissue that needs higher temperature to break down properly. At 165°F, thighs are safe but still somewhat tough with chewy texture. Taking them to 175-180°F breaks down the collagen completely, creating tender, juicy dark meat. The higher fat content in thighs means they won’t dry out at these temperatures the way breast would.
The spatchcock method helps achieve both temperatures simultaneously because the thighs extend outward where they receive more heat while the breast is positioned over the chicken’s center mass where it’s somewhat protected. This natural heat distribution means the thighs reach 175°F right when the breast hits 165°F. Using an instant-read thermometer in multiple locations ensures you’ve reached safe temperature throughout.
Ingredients
- 1 whole chicken (about 4-5 lbs)
- 1 cup (2 sticks) unsalted butter, softened
- 2 tbsp minced garlic (about 6 cloves)
- 2 tbsp chopped fresh parsley
- 1 tbsp chopped fresh thyme (or 1 tsp dried)
- 1 tbsp chopped fresh rosemary (or 1 tsp dried)
- 1 tbsp lemon juice
- 2 tsp kosher salt (plus more for the skin)
- 1 tsp black pepper
- Poultry seasoning
- Olive oil (optional, for the skin)
Step-by-Step Instructions
Spatchcock the Chicken
Remove the whole chicken from refrigeration and remove any giblets or neck from the cavity. Place the chicken breast-side down on a large cutting board so the backbone is facing up. The backbone runs lengthwise down the center of the back. Using sharp kitchen shears or poultry shears, cut along one side of the backbone from the tail end to the neck end. The shears should cut through the ribs relatively easily – if you hit resistance, reposition slightly and try again.
Once you’ve cut along one side of the backbone, cut along the other side to completely remove the backbone. You should now have a strip of spine and ribs that you can discard or save for making stock. Flip the chicken over so the breast side is facing up. Locate the breastbone in the center – you’ll feel a raised ridge. Using both hands, press down firmly on the breastbone until you hear and feel a crack. This breaks the cartilage connecting the two breast halves, allowing the chicken to lie completely flat.
The spatchcocked chicken should now lay flat in a single plane like a book that’s been opened and pressed. The legs and wings should be spread outward with the breast meat in the center. This flattened shape is what creates even cooking. Set the prepared chicken aside while you make the compound butter.
Make the Garlic Herb Compound Butter
Place the two sticks (one cup) of softened butter in a medium mixing bowl. The butter should be soft enough that your finger leaves an indentation when pressed, but not melting or greasy. Room temperature butter mixes smoothly with other ingredients while cold butter won’t incorporate properly. Add the minced garlic, chopped fresh parsley, chopped thyme, chopped rosemary, lemon juice, two teaspoons of kosher salt, and one teaspoon of black pepper.
Using a fork or spatula, mix everything together vigorously until the herbs and garlic are evenly distributed throughout the butter with no white streaks remaining. The butter should be uniformly green-flecked with visible herb pieces and the garlic should be thoroughly incorporated. Taste the compound butter – it should be assertively flavored with prominent garlic and herb notes. Remember that these flavors will mellow during cooking and be distributed through the entire chicken, so what tastes strong now will be perfectly balanced later. Set the compound butter aside at room temperature so it stays spreadable.
Loosen the Skin and Apply Butter Under
Pat the spatchcocked chicken completely dry with paper towels, paying special attention to the skin. Any moisture will prevent the skin from crisping properly and will interfere with the butter application. Place the chicken breast-side up on the cutting board. Starting at the neck end of one breast, carefully slide your fingers between the skin and the meat. Work gently to avoid tearing the skin – it should separate relatively easily with patient, slow movements.
Continue working your fingers down the breast and over toward the thigh, creating a pocket between skin and meat. The skin is attached at certain points which is good – you want it to stay connected around the edges to trap the butter. Repeat on the other side, creating pockets over both breasts and both thighs. If you encounter resistance, use the handle of a wooden spoon to help push the skin away from the meat in hard-to-reach areas.
Once you’ve created pockets under the skin, take about half of the prepared compound butter and push it into the pockets you’ve created. Use your fingers or a spoon to work the butter between the skin and meat, spreading it as evenly as possible over the breast and thigh meat. Aim for roughly equal distribution on both sides. Massage the outside of the skin gently to help distribute the butter evenly underneath. You should be able to see the greenish herb-flecked butter through the translucent skin. Reserve the remaining half of the compound butter for basting during cooking or serving alongside the finished chicken.
Season the Exterior
Lightly rub the outside of the chicken skin with olive oil if desired – this is optional but helps with browning and crisping. Whether or not you use oil, season the entire exterior generously with poultry seasoning and additional kosher salt. The poultry seasoning typically contains sage, thyme, marjoram, and other herbs that complement the compound butter underneath. Sprinkle the seasoning evenly over all visible surfaces, including the wings and legs.
Don’t neglect the underside – flip the chicken and season the side that will be facing down on the grill as well. Even though this side won’t crisp as much, it still benefits from seasoning. Use more seasoning than you think you need – a four to five pound chicken can handle aggressive seasoning, and some will fall off during handling and cooking.
Preheat the Grill for Indirect Cooking
Preheat your grill to 350°F set up for indirect cooking. For a gas grill, this means lighting burners on one side while leaving the other side off, or lighting the outer burners while leaving the center off. For a charcoal grill, push all the coals to one side, leaving the other side empty. The chicken will cook over the side with no direct heat underneath, using convective heat (like an oven) rather than direct radiant heat that would burn the skin before the meat cooks through.
Place a drip pan on the cool side of the grill to catch any drippings and prevent flare-ups. If you want to add smoke flavor, add a chunk of hardwood (apple, cherry, or hickory work well with chicken) to the coals or in a smoker box on the gas grill. Let the grill preheat for ten to fifteen minutes with the lid closed until it reaches stable 350°F temperature.
Roast the Spatchcocked Chicken
Place the seasoned, butter-stuffed spatchcocked chicken skin-side up on the grill over the indirect heat zone (the side with no flames or coals directly underneath). The chicken should be positioned so it’s receiving heat from the side rather than from below. Close the grill lid to create an oven environment.
Roast for approximately one hour to one hour and fifteen minutes without opening the lid frequently. Every time you open the lid, you lose heat and extend cooking time. After forty-five minutes, you can start checking on the chicken and basting with any remaining compound butter if desired. The skin should be turning golden brown with the fat rendering and becoming crispy.
Begin checking internal temperature after one hour by inserting an instant-read thermometer into the thickest part of the breast (avoiding bone) and the thickest part of the thigh. You’re looking for 165°F in the breast and 175°F in the thigh. The thighs will typically reach temperature first or simultaneously with the breast thanks to the spatchcocking technique. If the breast is approaching 165°F but the thighs are still below 175°F, continue cooking – the breast won’t overcook significantly in the time it takes the thighs to finish.
Optional: Crisp the Skin Over Direct Heat
If you want extra-crispy skin with charred spots, you can finish the chicken over direct heat for the last five to ten minutes of cooking. Once the chicken has reached proper internal temperature, carefully move it over the hot side of the grill directly over the flames or coals. Keep a close eye on it and rotate as needed to crisp all areas of the skin evenly.
This direct heat creates additional browning and crisping, taking the skin from golden and crispy to deeply bronzed and shattering-crisp. Watch carefully to prevent burning – you just want a few minutes of high heat to finish the skin. If flare-ups occur from dripping fat, move the chicken temporarily to the cool side until flames subside. This step is optional but creates restaurant-quality skin that’s dramatically crispy.
Rest and Carve
Once the chicken reaches 165°F in the breast and 175°F in the thighs, remove it from the grill and transfer to a cutting board. Tent loosely with aluminum foil and let rest for ten to fifteen minutes. This rest allows the juices to redistribute throughout the meat – cutting immediately would cause all those flavorful juices to run out onto the board instead of staying in the meat.
After resting, carve the chicken by cutting down through the center of the breast to separate the two halves. Then cut through the joints to separate the legs from the breast. You can leave the breasts whole or slice them crosswise for easier serving. The spatchcocked shape makes carving straightforward since everything is already flat and spread out. Arrange the carved chicken on a serving platter and spoon any accumulated juices over the top. Serve with any remaining compound butter on the side for spreading on the meat.
FAQ
Is spatchcocking really worth the effort?
Yes, absolutely. The technique takes less than two minutes once you’ve done it once and cuts cooking time nearly in half while creating more consistent results. The flattened bird cooks more evenly, creates more crispy skin, and is easier to carve. Once you spatchcock chicken, you’ll never want to roast it the traditional way again.
Can I roast this in the oven instead of on the grill?
Yes, the technique works identically in a 350°F oven. Place the chicken skin-side up on a wire rack set over a rimmed baking sheet. Roast for the same time until it reaches temperature. For crispy skin, finish under the broiler for three to five minutes, watching carefully. You won’t get the subtle smoke from the grill, but the results are still excellent.
What if I don’t have kitchen shears?
A sharp chef’s knife can work to remove the backbone, though it requires more effort. Cut along each side of the backbone using the knife tip, working through the ribs and joints. Poultry shears are inexpensive and worth having if you plan to spatchcock chickens regularly – they make the job much easier.
Can I use dried herbs instead of fresh?
Yes, use one-third the amount of dried herbs as fresh (so one teaspoon dried instead of one tablespoon fresh). Dried herbs are more concentrated but won’t provide the same bright, vibrant flavor as fresh. The compound butter will still be delicious, just with slightly different character. Mix dried herbs thoroughly into the butter so they distribute evenly.
How do I know when the chicken is done without a thermometer?
While a thermometer is strongly recommended for accuracy, you can test by piercing the thigh at its thickest point – the juices should run clear with no pink tinge. The legs should also feel loose and wiggle easily when moved. However, visual and tactile tests are less reliable than temperature, so invest in an instant-read thermometer for consistent results.
Conclusion
Garlic herb butter spatchcock roasted chicken proves that simple techniques can dramatically improve classic recipes. The spatchcocking method cuts cooking time while creating more consistent results, ensuring the breast stays juicy while the thighs reach proper tenderness. The compound butter technique infuses flavor throughout the meat rather than just seasoning the surface, creating chicken that’s herb-infused in every bite. The indirect grilling adds subtle smoke while the optional direct heat finish creates skin so crispy it rivals the best rotisserie chicken.
What makes this spatchcock chicken with garlic herb butter so successful is how each element serves a specific purpose. Removing the backbone and flattening creates even cooking, the butter under the skin bastes from within while helping skin crisp, the herb combination provides classic poultry flavoring, and the temperature targets ensure both white and dark meat finish perfectly. The result is restaurant-quality chicken that’s actually easier to make than traditional roasting.
This herb butter roasted chicken recipe works beautifully for weeknight dinners and holiday meals alike. The technique is straightforward enough for beginners but delivers results that impress experienced cooks. Master the spatchcock method and compound butter technique, and you’ll have skills that apply to any poultry from Cornish hens to turkeys. This recipe creates juicy, flavorful, crispy-skinned chicken that consistently delivers perfect results.
Ready to Take Your Cooking to the Next Level?
This is where I keep all my most-used products, gear, and favorite cooking tools — check it out:
View My Cooking Gear & Tools: https://linktr.ee/cooking_with_fire___
Recipe Categories
If you loved this recipe, you’ll find more to savor across our diverse categories. From beef to pork, chicken to turkey, seafood to appetizers, there’s a wealth of flavors waiting for you. Explore them all at CWFeats.
- Beef Recipes: https://cwfeats.com/beef-recipes/
- Pork Recipes: https://cwfeats.com/pork-4/
- Chicken Recipes: https://cwfeats.com/chicken-recipes