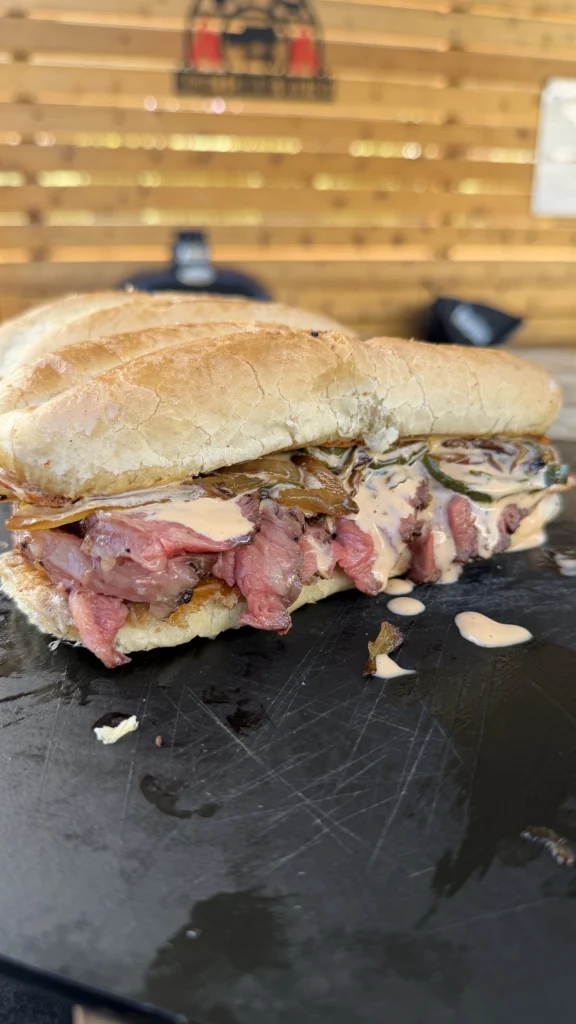
Ribeye steak sandwich uses one thick 2.5-3 lb cowboy ribeye seasoned generously with steak seasoning, seared over high heat to develop crust, then moved to cooler side of the grill and cooked to 125°F internal temperature for medium-rare. Rest for 10 minutes, then slice thin against the grain. Sauté sliced onions and jalapeños until softened, adding Worcestershire sauce and cooking until slightly charred. Create crispy cheese crust by placing cheese slices in a hot pan, then pressing hoagie rolls face-down onto the melting cheese until golden and fused. Build sandwiches with mayo on the roll, piled-high sliced ribeye, sautéed jalapeños and onions, and drizzled sriracha mayo. This cowboy ribeye sandwich delivers steakhouse quality in handheld form with spicy kick from jalapeños and sriracha, sweet caramelized onions, and the signature crispy cheese crust that makes the bread itself a featured component rather than just a vessel.
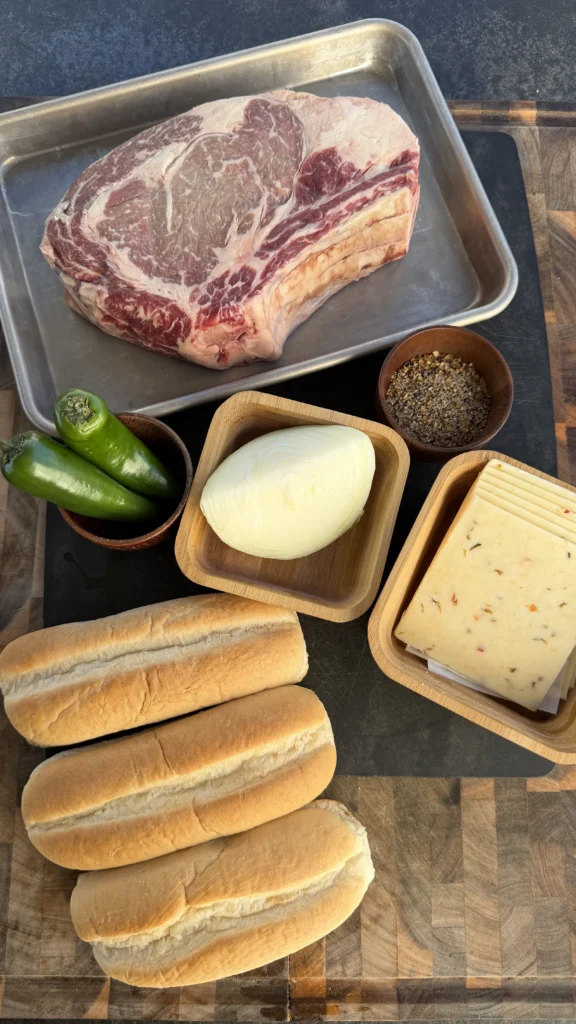
The whole process takes about 40 minutes from start to finish. Spend 10 minutes seasoning the steak and slicing vegetables. Cook the steak for 10-15 minutes total between searing and finishing. Rest for 10 minutes while you sauté the onions and jalapeños. Assemble sandwiches with the crispy cheese crust technique in 5 minutes. The cowboy ribeye’s thick cut and long bone handle make it perfect for grilling since you can achieve excellent sear without overcooking the interior. The bone adds flavor during cooking and creates impressive presentation. One 2.5-3 lb cowboy ribeye provides enough meat for 2-3 generous sandwiches, making this an efficient use of premium beef.
What Makes a Cowboy Ribeye Different from Regular Ribeye
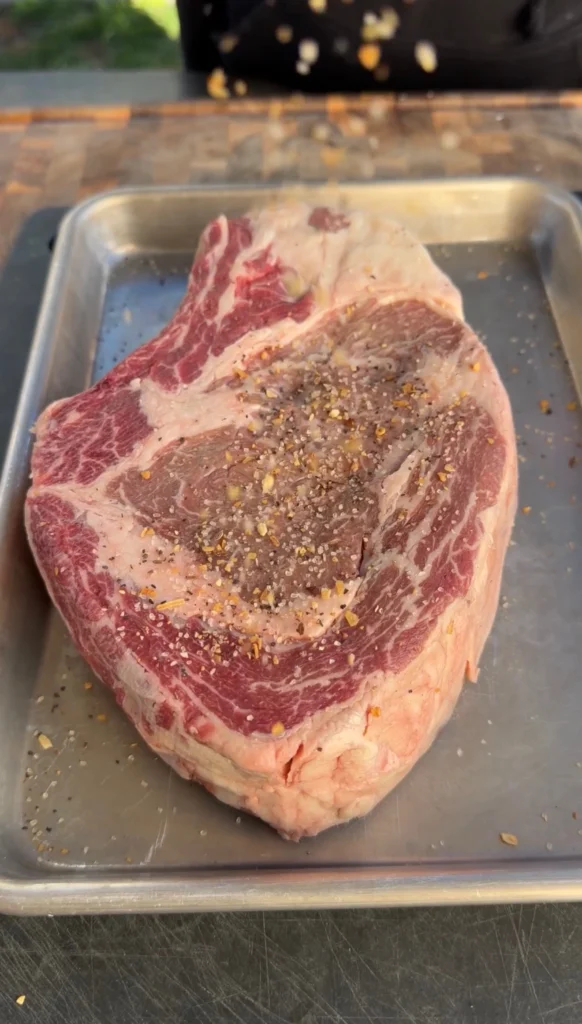
A cowboy ribeye is a bone-in ribeye with an extra-long rib bone left attached, typically 5-8 inches long. This extended bone serves as a natural handle during cooking and creates dramatic presentation. The bone itself doesn’t add much flavor during the brief cooking time for steaks, but it does conduct heat differently than meat, affecting how the steak cooks near the bone. The meat closest to the bone stays slightly rarer than the rest of the steak, creating a gradient of doneness that some people prefer.
Cowboy ribeyes are cut thicker than standard ribeyes, usually 1.5-2 inches thick compared to 1-1.25 inches for regular cuts. This thickness is necessary to balance the visual proportions with the long bone. The extra thickness also makes them ideal for reverse searing or two-zone grilling where you sear first then finish on indirect heat. Thin steaks overcook easily with this method, but thick cowboy ribeyes give you control over internal temperature while developing excellent crust.
The name “cowboy” refers to the rustic, hearty appearance with the prominent bone. It’s sometimes called a “tomahawk” ribeye when the bone is exceptionally long (10+ inches) and the meat is trimmed away from the bone to expose it completely. Cowboy cuts typically have some meat left on the bone. Both are essentially bone-in ribeyes with extended bones, priced at premium because of the presentation value and thick cut.
For ribeye steak sandwich, the cowboy cut provides enough meat for multiple sandwiches from a single impressive steak. You’re essentially serving ribeye steak on bread, so using a premium cut makes sense. The bone doesn’t go in the sandwich but creates a better cooking experience with easier handling and more even heat distribution during the sear-and-finish technique.
What Temperature Should You Cook Ribeye for Sandwiches
Cook ribeye to 125°F internal temperature for medium-rare, which is optimal for slicing thin for sandwiches. At 125°F, the steak has a warm red center that’s tender and juicy. During the 10-minute rest, the temperature will rise to 130-135°F through carryover cooking. This final temperature provides the best balance of tenderness, juiciness, and flavor for ribeye. The fat is rendered enough to be creamy rather than chewy, and the meat slices cleanly without being tough.
Medium-rare is especially important for sandwiches because you’re slicing the meat thin. Well-done or even medium steak becomes dry and chewy when sliced thin. The thin slices don’t retain moisture the way a thick steak does. Medium-rare steak sliced thin stays tender and juicy, creating better eating experience in sandwich form. The pink interior also looks more appealing stacked in a sandwich compared to gray well-done meat.
For people who prefer more doneness, pull at 135°F for medium (final temp 140-145°F after rest). Beyond this, ribeye begins losing its optimal texture and juiciness. The well-marbled fat in ribeye is what makes it tender and flavorful. Overcooking renders out too much of this fat, leaving dry, tough meat that doesn’t work well for sandwiches. If your guests insist on well-done, consider using a different cut and save ribeye for those who appreciate proper doneness.
Use an instant-read thermometer inserted into the thickest part of the steak, avoiding contact with bone which conducts heat differently and gives false readings. Check in 2-3 spots since thick steaks can have temperature variation. Pull the steak when the coolest spot reaches 125°F. The warmer spots near the edges may be 130-135°F, which is fine. The gradient of doneness from edge to center is normal and desirable for thick steaks.
How to Get Crispy Cheese Crust on Sandwich Bread
The crispy cheese crust technique starts with placing cheese slices directly in a hot, dry pan without any butter or oil. Use medium-high heat so the cheese begins melting and bubbling immediately. The cheese creates its own fat as it melts, eliminating need for added oil. Place 2-3 slices of cheese per hoagie roll, arranging them where the bread will make contact.
As soon as the cheese starts melting (within 30 seconds), place the hoagie roll cut-side down directly onto the melting cheese. Press down firmly with a spatula. The bread’s weight and pressure help the cheese adhere while the heat from the pan crisps both the cheese and the bread surface. Hold for 30-60 seconds, pressing occasionally. You’ll hear sizzling as the cheese fuses to the bread and the bread toasts from the pan’s heat.
The cheese performs double duty as adhesive and crispy layer. It glues itself to the bread while simultaneously frying and crisping from direct pan contact. The bread itself gets toasted from the heat. The result is bread with a golden, crispy, cheese-infused crust that’s crunchy and flavorful. This texture contrast makes each bite of sandwich more interesting compared to plain toasted bread or untoasted bread.
Pepper jack or provolone work best for this technique. They melt smoothly and brown nicely without burning. Harder cheeses like cheddar can work but don’t melt as smoothly. Very soft cheeses like American melt too quickly and can burn. The cheese should be sliced, not shredded, for best adhesion to the bread. Shredded cheese doesn’t create the same cohesive crust. This technique is the signature element that elevates this ribeye steak sandwich from good to memorable.
Why Rest Steak Before Slicing for Sandwiches
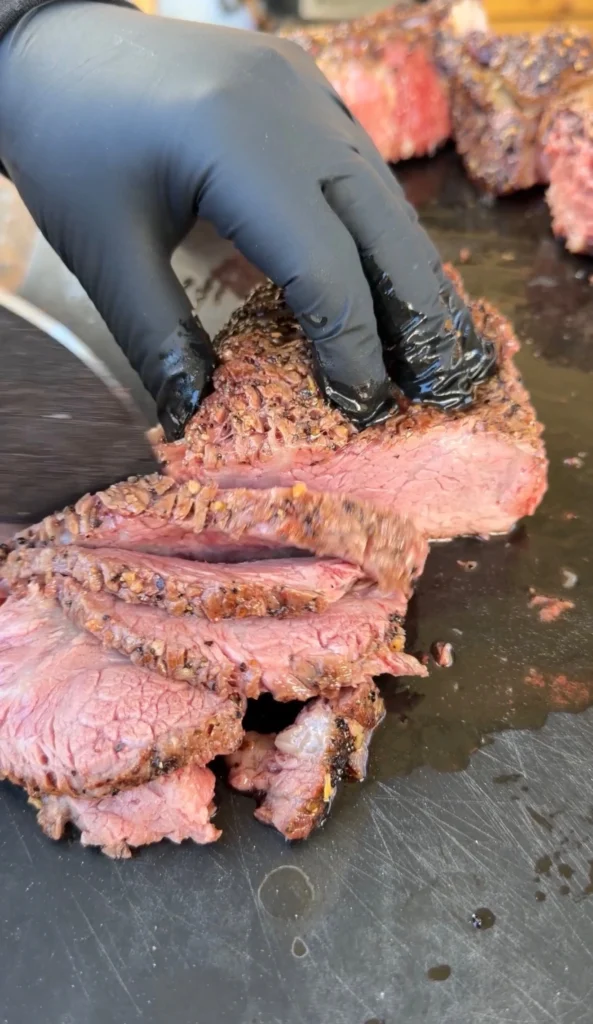
Resting steak for 10 minutes before slicing allows the juices to redistribute throughout the meat. During cooking, heat drives juices toward the center as the exterior proteins contract. If you slice immediately after cooking, these concentrated juices run out onto the cutting board, leaving the meat drier. The resting period allows proteins to relax and juices to flow back through the meat evenly. When you slice after resting, the juices stay in the meat rather than spilling out.
The rest also allows the temperature to equalize throughout the steak. The exterior is hotter than the center when you first pull the steak from the grill. During rest, the exterior cools slightly while residual heat continues penetrating to the center. This brings the entire steak to a more uniform temperature. For sandwiches, this means every slice has similar doneness and temperature rather than varying dramatically from edge to center.
Resting makes slicing easier and cleaner. Hot steak is softer and more difficult to slice neatly. Rested steak firms up slightly, allowing cleaner cuts with less tearing or ragged edges. This is particularly important when slicing thin for sandwiches. Clean, even slices stack better and create more appealing sandwich construction. Ragged, uneven slices make messy sandwiches that fall apart.
Tent the steak loosely with aluminum foil during rest to retain some heat without steaming the crust. Don’t wrap tightly or the trapped moisture softens the seared exterior you worked to develop. Just drape foil over the top. The steak will stay warm enough for sandwich assembly. If you’re concerned about it cooling too much, rest in a warm spot like a turned-off oven with the door cracked or near (not on) the grill.
Should You Slice Ribeye Thin or Thick for Sandwiches
Slice ribeye thin for ribeye steak sandwich, approximately 1/4 inch thick or slightly thinner. Thin slices are easier to bite through in sandwich form, creating better eating experience. Thick slices require harder biting that can pull the entire filling out of the sandwich in one bite, making a mess. Thin slices also stack better, allowing you to pile meat high while maintaining manageable sandwich height.
Thin slicing also distributes the ribeye’s flavor more evenly throughout the sandwich. Each bite gets multiple thin slices rather than one thick piece. This creates more surface area for the mayo and sriracha mayo to coat. The onions and jalapeños integrate better with thin slices too, creating balanced flavor in every bite rather than alternating bites of mostly meat or mostly vegetables.
Always slice against the grain for maximum tenderness. The grain refers to the direction of muscle fibers running through the meat. Cutting perpendicular to these fibers creates short fiber segments that are easy to chew. Cutting with the grain leaves long fibers that are tougher and stringier. For ribeye, look at the meat and identify which direction the lines run, then cut perpendicular to them.
Use a very sharp knife for clean slicing. A dull knife tears the meat rather than cutting cleanly, creating ragged slices that don’t stack well. Let the knife do the work with long, smooth strokes rather than sawing back and forth. Consistent pressure creates uniform slices. Aim for 8-12 thin slices from a 2.5-3 lb cowboy ribeye after trimming the bone. This provides plenty of meat for 2-3 loaded sandwiches.
Ribeye Steak Sandwich
Jalapeños, onions, crispy cheese crust, sriracha mayo
Ingredients
Steak
- 1 thick cowboy ribeye (2.5-3 lbs)
- Your favorite steak seasoning (McCormick, Dano’s, etc.)
Vegetables
- 1 large onion, sliced
- 2 jalapeños, sliced
- 1-2 tablespoons Worcestershire sauce
Sandwich Assembly
- 2 hoagie rolls
- Slices of melty cheese (pepper jack or provolone)
- Mayo
- Sriracha mayo (mayo + sriracha mixed)
The crispy cheese crust technique transforms ordinary hoagie rolls into restaurant-quality sandwich bread. Place cheese slices directly in the hot pan, then press the hoagie roll face-down onto the melting cheese. The cheese fuses to the bread while crisping into a golden, crunchy layer that adds texture and flavor to every bite.
Step-by-Step Instructions
Step 1: Season and Prepare the Cowboy Ribeye
Remove the 2.5-3 lb cowboy ribeye from refrigeration 30-45 minutes before cooking to take the chill off. Cold steak hitting a hot grill creates uneven cooking with cold center when the exterior reaches proper sear. Room temperature steak cooks more evenly throughout. Pat the steak completely dry with paper towels on all surfaces including around the bone. Moisture prevents proper searing and creates steam instead of crust.
Season the steak generously on all sides with your favorite steak seasoning. Use approximately 2-3 tablespoons total for a steak this size. McCormick Grill Mates, Dano’s Seasoning, or any quality steak blend works excellently. Apply heavy coating, pressing the seasoning into the meat with your hands. Don’t be shy with application since thick steaks need more seasoning than thin cuts. The bone doesn’t need seasoning since it won’t be eaten.
Let the seasoned steak sit at room temperature while you preheat the grill. The seasoning begins penetrating the surface and any surface moisture evaporates further. This dry surface is essential for developing the dark, crusty sear that defines great steak. Some seasoning may fall off during cooking, which is normal. The coating that adheres creates plenty of flavor.
Step 2: Set Up Two-Zone Grilling
Preheat your grill to create two distinct heat zones: one very hot for searing and one cooler for finishing. For gas grills, turn all burners to high initially, then once preheated, turn half the burners off or to low. For charcoal grills, bank all the coals on one side, leaving the other side empty. The hot zone should be 450-500°F+ for searing. The cool zone should be 300-350°F for gentle finishing.
This two-zone setup allows you to develop excellent crust without overcooking the interior. You’ll sear the steak over high heat to create browning and flavor development, then move it to the cooler side to bring the internal temperature up gently. This method gives you much better control than trying to cook entirely over high heat, which burns the exterior before the center cooks, or entirely over low heat, which cooks through without developing proper crust.
Oil the grill grates before adding the steak to prevent sticking. Use tongs to hold a paper towel soaked in high-heat oil (vegetable or canola) and wipe it across the hot grates. Be careful of flare-ups. The oil creates a non-stick surface that helps release the steak after searing. Don’t skip this step or your steak may stick and tear when you try to flip it.
Step 3: Sear the Steak Over High Heat
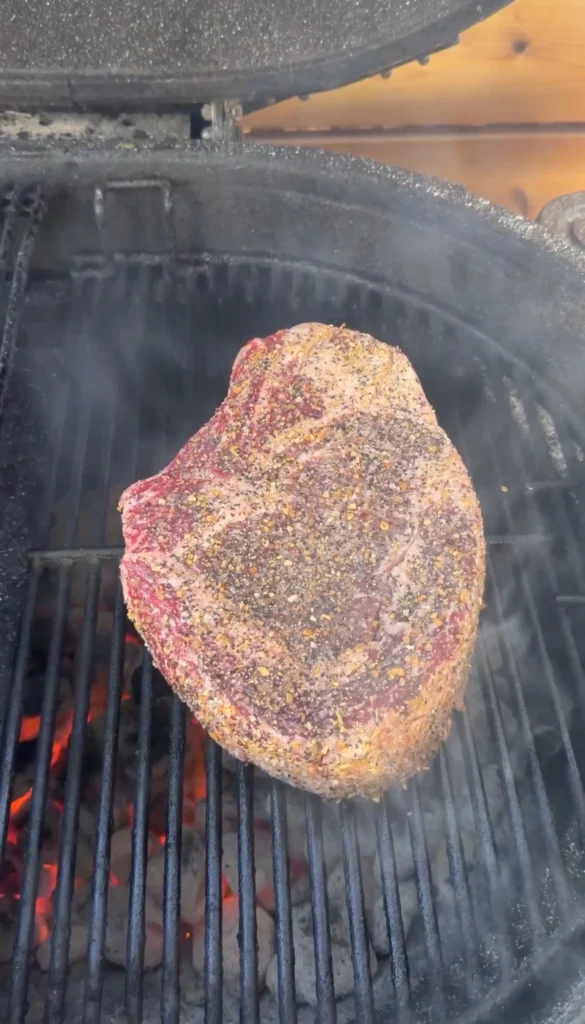
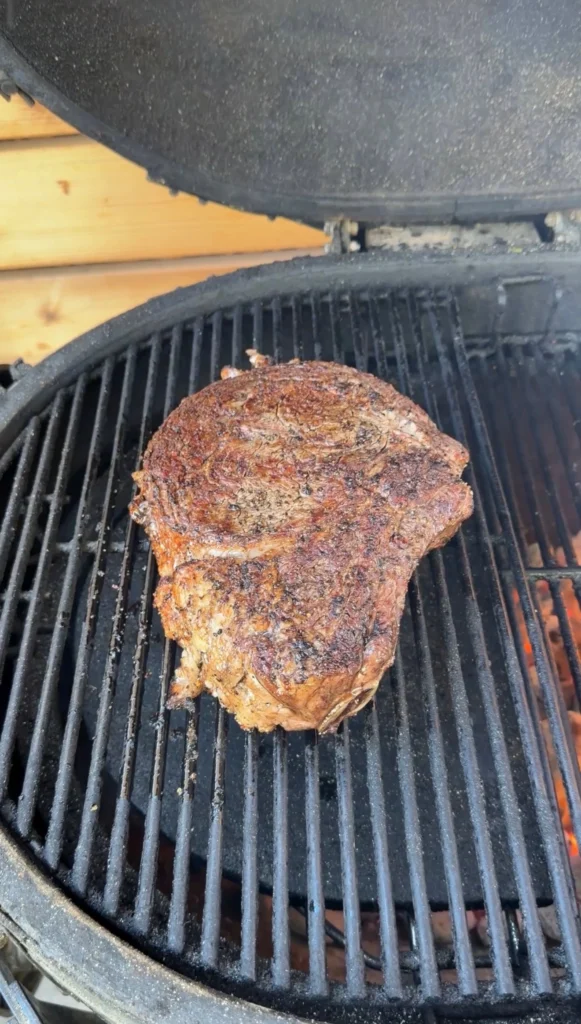
Place the seasoned cowboy ribeye on the hot zone of the grill. You should hear an immediate sizzle. If it doesn’t sizzle loudly, the grill isn’t hot enough. Let the steak sit undisturbed for 3-4 minutes. Don’t move it, flip it, or peek under it. The high heat is creating the Maillard reaction that browns proteins and develops complex flavors. Moving the steak interrupts this process and prevents proper crust development.
After 3-4 minutes, lift the steak with tongs and check the bottom. It should have deep brown to dark mahogany color with defined grill marks. If it’s pale or light brown, give it another minute. When properly seared, flip the steak and sear the second side for 3-4 minutes. Again, leave it undisturbed. The bone provides a natural handle that makes flipping easier than boneless steaks.
Sear the edges too if possible. Use tongs to hold the steak on its sides for 30-60 seconds per edge. The fat cap edge benefits particularly from direct heat which renders the fat and crisps it. Don’t worry about searing around the bone since that won’t be eaten. Focus on the meat surfaces that will be sliced for sandwiches.
Step 4: Move to Cool Zone and Finish Cooking
After searing both sides, move the steak to the cool zone of the grill away from direct heat. Insert a leave-in probe thermometer into the thickest part if you have one, avoiding contact with bone. Close the grill lid. The ambient heat in the closed grill will gently bring the internal temperature up without burning the exterior. This is the finishing phase.
Cook for 8-12 minutes depending on exact thickness and starting temperature. Start checking internal temperature at 8 minutes with an instant-read thermometer if you don’t have a leave-in probe. Insert into the thickest part, avoiding bone contact. You’re looking for 125°F for medium-rare. If it reads 115-120°F, close the lid and check again in 3-5 minutes. Temperature rises quickly in the final stages.
When the thickest part reaches exactly 125°F, remove the steak immediately from the grill. Don’t wait for it to reach higher temperature or it will overshoot during rest. The carryover cooking during the 10-minute rest will bring it to perfect 130-135°F final temperature. Transfer to a cutting board or plate and tent loosely with aluminum foil.
Step 5: Rest the Steak and Prepare Vegetables
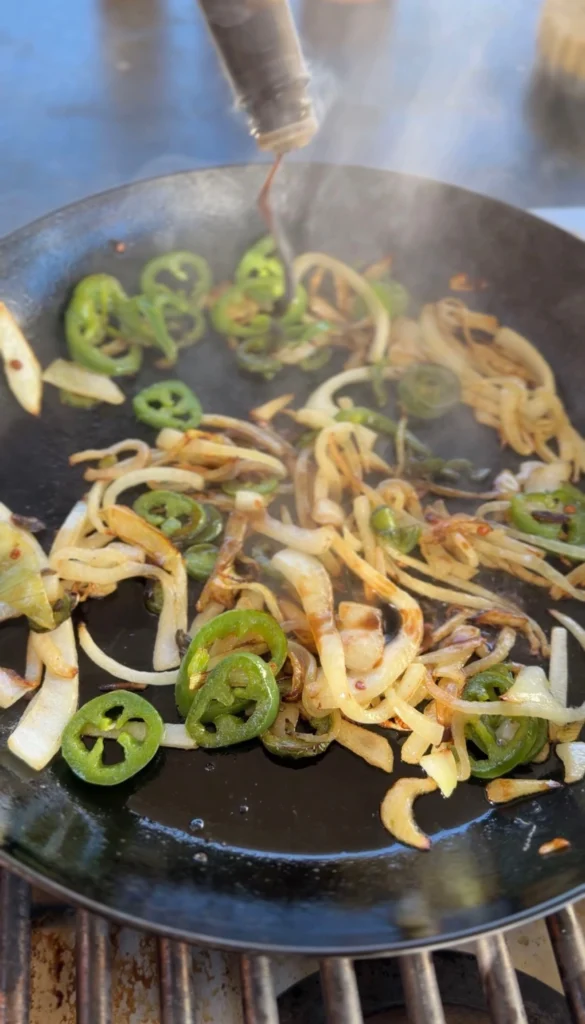
Let the steak rest for 10 minutes, loosely tented with foil. This rest is non-negotiable for juicy results. While the steak rests, prepare the onions and jalapeños. Slice 1 large onion into thin strips. Slice 2 jalapeños into rings or strips, removing seeds if you want less heat. Heat a large skillet over medium-high heat. Add a small amount of oil if needed, though the vegetables will release moisture as they cook.
Add the sliced onions to the hot pan. Cook for 3-4 minutes, stirring occasionally, until they begin to soften and brown at the edges. Add the sliced jalapeños and continue cooking for another 2-3 minutes. The jalapeños should soften and develop some char spots. The onions should be translucent and caramelized.
Add 1-2 tablespoons Worcestershire sauce to the pan with the onions and jalapeños. Stir to coat everything. Cook for another 1-2 minutes, allowing the Worcestershire to reduce and caramelize slightly. The sauce adds savory, umami depth while creating light char on the vegetables. The finished mixture should be soft, slightly charred, and aromatic. Remove from heat and set aside.
Step 6: Slice the Rested Steak
After 10 minutes of rest, remove the foil from the steak. Place it on a cutting board. If the bone interferes with slicing, you can carefully remove it by cutting along the bone to separate the meat. This makes slicing easier. Save the bone for someone to gnaw on or discard. Use a very sharp knife to slice the ribeye thin against the grain.
Identify the grain by looking at which direction the muscle fibers run through the meat. Cut perpendicular to these lines. Aim for slices about 1/4 inch thick or slightly thinner. Make smooth, even cuts without sawing back and forth. Let the sharp knife do the work. Each slice should be relatively uniform in thickness for even stacking in sandwiches.
Continue slicing until you have enough for your sandwiches. A 2.5-3 lb cowboy ribeye yields approximately 8-12 thin slices after accounting for the bone weight and trimming any excess fat. Set the sliced steak aside while you prepare the crispy cheese crust bread.
Step 7: Create Crispy Cheese Crust Bread
Heat a large skillet or griddle over medium-high heat. Don’t add any oil or butter. Place 2-3 slices of pepper jack or provolone cheese directly in the hot pan where you’ll place the hoagie roll. The cheese should be arranged in roughly the shape of the hoagie roll’s face. Let the cheese begin melting, which takes about 30 seconds. It will start bubbling and spreading.
Immediately place a hoagie roll cut-side down directly onto the melting cheese. Press down firmly with a spatula. The bread should make full contact with the cheese. Hold for 30-60 seconds, pressing occasionally. You’ll hear sizzling and smell toasting bread. The cheese is fusing to the bread while crisping from the pan’s heat. The bread itself is toasting from contact with the hot pan.
Check the underside by lifting the edge with a spatula. The cheese should be golden brown and crispy, fused completely to the bread. The bread should be toasted to golden color. If it needs more time, press down for another 15-30 seconds. When done, remove to a plate. The cheese crust should be crispy and make crackling sounds when you press it. Repeat with the second hoagie roll.
Step 8: Build and Serve the Sandwiches
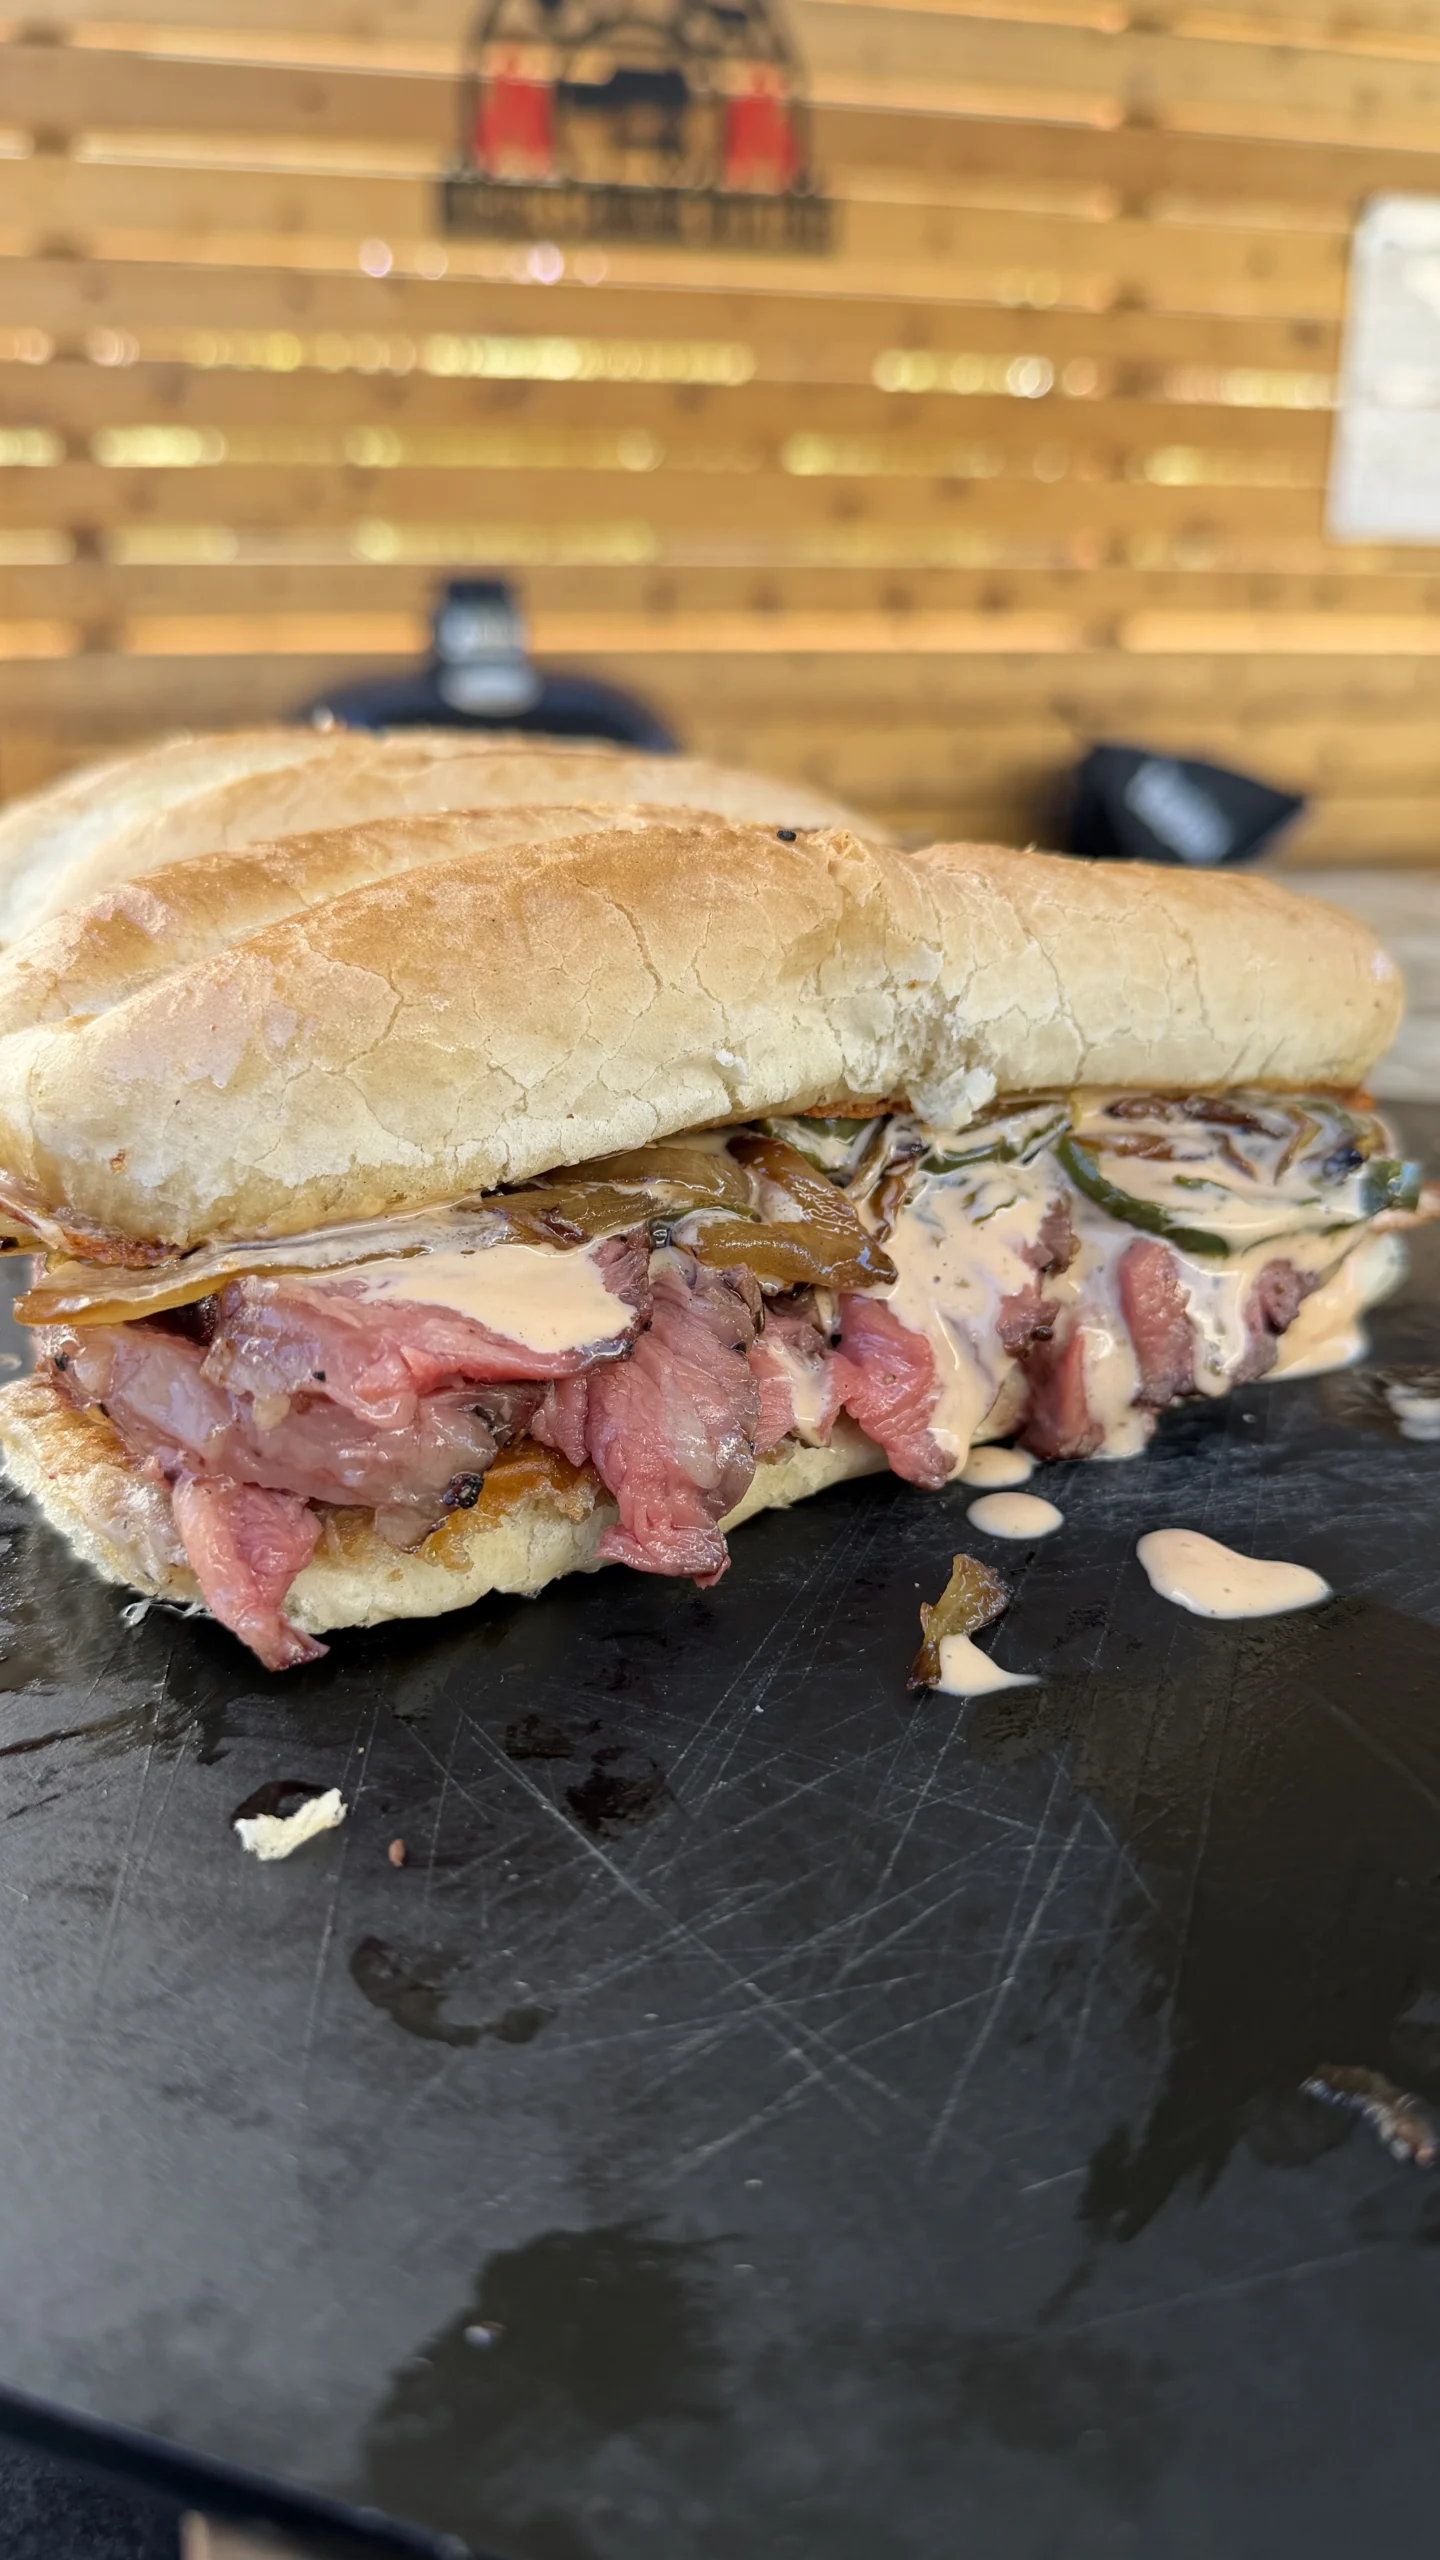
Spread regular mayo on the bottom half of each hoagie roll (the side without the crispy cheese crust). Use about 1-2 tablespoons per sandwich. The mayo adds richness and helps other ingredients adhere. Pile sliced ribeye generously on the mayo-coated bottom roll. Use 4-6 thin slices per sandwich depending on how loaded you want them. The slices should overlap and pile high.
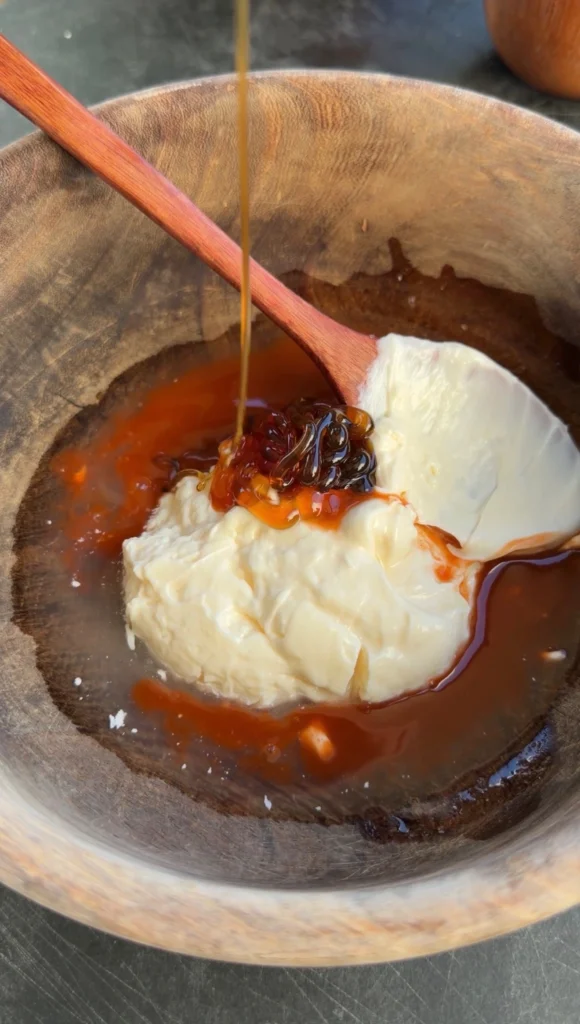
Top the steak with a generous portion of the sautéed onions and jalapeños. Spoon them over the steak, distributing evenly. The vegetables should be visible and abundant, not just a token garnish. Drizzle sriracha mayo over everything. Make sriracha mayo by mixing regular mayo with sriracha to taste, starting with 1 tablespoon sriracha per 1/4 cup mayo and adjusting heat level preference.
Place the top hoagie roll (the one with the crispy cheese crust) cheese-side down onto the sandwich. The cheese crust faces the inside, protecting it slightly from becoming soggy while adding that signature crunch when you bite. Press down gently to compress the sandwich slightly. The ingredients should be piled high but manageable to eat.
Slice each sandwich in half diagonally for easier handling and more dramatic presentation showing the layers of steak, vegetables, and sauces. Serve immediately while the bread is still warm and the cheese crust is crispy. The ribeye steak sandwich is best eaten fresh within 15 minutes of assembly for optimal texture.
Spicy Cowboy Ribeye Steak Sandwich
Ingredients
Method
- Remove steak from refrigeration 30-45 minutes before cooking. Pat dry and season generously with steak seasoning.
- Set up two-zone grill with hot zone (450-500°F+) and cool zone (300-350°F). Oil grill grates.
- Sear steak over high heat for 3-4 minutes per side until deep brown crust forms. Sear edges briefly.
- Move steak to cool zone. Close lid and cook 8-12 minutes until internal temperature reaches 125°F for medium-rare.
- Remove steak and rest 10 minutes loosely tented with foil. While resting, sauté sliced onions 3-4 minutes, add jalapeños and cook 2-3 minutes more. Add Worcestershire sauce and cook 1-2 minutes until slightly charred.
- Slice rested steak thin against the grain, about 1/4 inch thick.
- For crispy cheese crust, place 2-3 cheese slices in hot dry pan. When melting, press hoagie roll cut-side down onto cheese for 30-60 seconds until golden and crispy. Repeat with second roll.
- Spread mayo on bottom roll. Pile sliced ribeye, top with sautéed onions and jalapeños, drizzle with sriracha mayo. Top with crispy cheese crust roll. Slice and serve immediately.
Notes
Tried this recipe?
Let us know how it was!Frequently Asked Questions
Can I use a different cut of steak for this sandwich?
Strip steak or sirloin work well as alternatives to cowboy ribeye. Strip steak (New York strip) has excellent beefy flavor with less marbling than ribeye, creating slightly leaner sandwiches. Sirloin is more budget-friendly with good flavor though less tender than ribeye or strip. Use the same cooking method: sear over high heat, finish on cool zone to 125°F, rest, and slice thin.
Avoid cuts that are too lean like eye of round or too tough like flank steak (unless marinated). The ideal sandwich steak has good marbling for flavor and tenderness when sliced thin. Ribeye is superior because the fat creates juiciness and flavor that remains even when sliced. If using a leaner cut, be extra careful not to overcook past 130°F final temperature or the thin slices will be dry and tough.
How do I make this sandwich less spicy?
Remove jalapeño seeds and membranes before slicing to reduce heat significantly. The capsaicin that creates spiciness concentrates in these parts. The flesh alone provides mild jalapeño flavor without intense heat. Use regular mayo instead of sriracha mayo, or reduce sriracha amount to just a small drizzle for color without much heat.
Replace pepper jack cheese with provolone, Swiss, or white cheddar for milder cheese options. Pepper jack contains jalapeño pieces that add heat. Omit jalapeños entirely if needed, using just caramelized onions for sweetness and flavor. You can add bell peppers for color and vegetable presence without heat. These modifications create a savory, rich steak sandwich without spicy elements.
What sides pair well with ribeye steak sandwiches?
Classic steakhouse sides complement ribeye steak sandwich perfectly. French fries (regular or sweet potato), onion rings, or potato wedges provide starchy contrast. Coleslaw adds cool, crunchy contrast that cuts through the rich steak. Potato salad or pasta salad work for casual meals or cookouts. A simple green salad with vinaigrette provides freshness.
For more substantial meal, serve with grilled vegetables like asparagus, zucchini, or corn on the cob. Pickles (dill or bread and butter) add acidity that balances the richness. Chips work for quick, casual option. The sandwich itself is quite filling, so sides can be light. A cold beer or iced tea pairs excellently with the spicy, savory flavors.
Can I make the components ahead for easier assembly?
The vegetables can be sautéed up to 2 days ahead and refrigerated. Reheat gently in a pan before assembling sandwiches. The sriracha mayo can be mixed and refrigerated for up to 1 week. However, the steak must be cooked fresh for best texture and flavor. Cooked steak doesn’t reheat well while maintaining its quality. The juices redistribute during rest and reheating can make it dry.
For meal prep efficiency, prep all vegetables (slice onions and jalapeños), mix sauces, and have cheese ready. When ready to eat, cook the steak fresh which takes only 20 minutes. The crispy cheese crust bread must also be made fresh immediately before assembly or the cheese loses its crispiness. This sandwich is best as a fresh-cooked meal rather than make-ahead option.
How do I know when the steak is perfectly medium-rare?
Use an instant-read thermometer inserted into the thickest part of the steak, avoiding bone contact. Pull the steak at exactly 125°F internal temperature. It will feel slightly firm with some give when pressed. The color won’t be visible during cooking, so temperature is the only reliable indicator. After the 10-minute rest, the final temperature will be 130-135°F.
If you don’t have a thermometer, use the touch test as backup. Medium-rare steak feels like the fleshy part of your palm below your thumb when you touch your thumb and middle finger together. It has resistance but still gives under pressure. This method is less reliable than a thermometer. For consistent results especially when cooking expensive cuts like cowboy ribeye, invest in a good instant-read thermometer.
Ready to Take Your Cooking to the Next Level?
This is where I keep all my most-used products, gear, and favorite cooking tools — check it out:
🔥 View My Cooking Gear & ToolsRecipe Categories
If you loved this recipe, you’ll find more to savor across our diverse categories. From beef to pork, chicken to turkey, seafood to appetizers, there’s a wealth of flavors waiting for you. Explore them all at CWFeats.