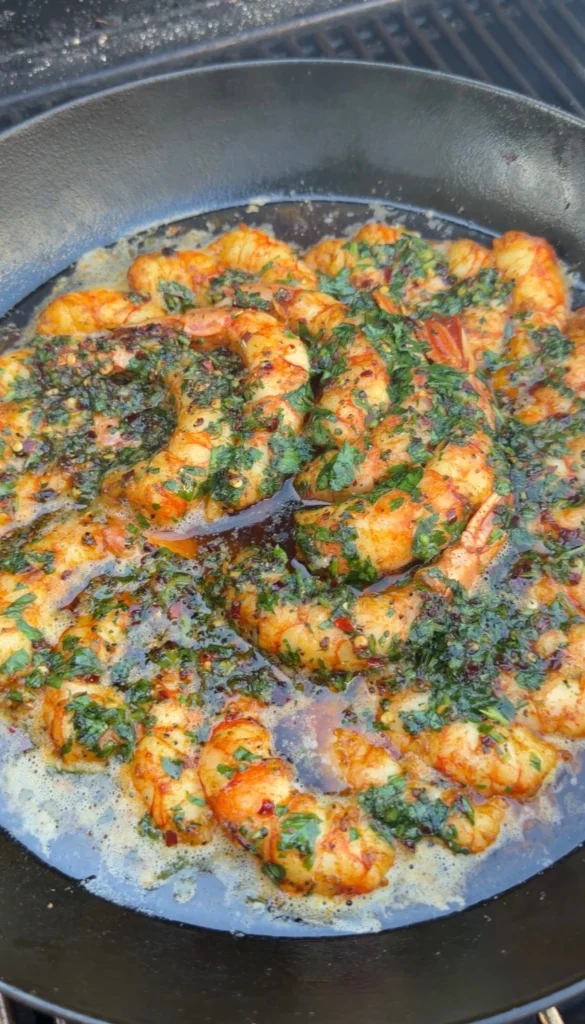
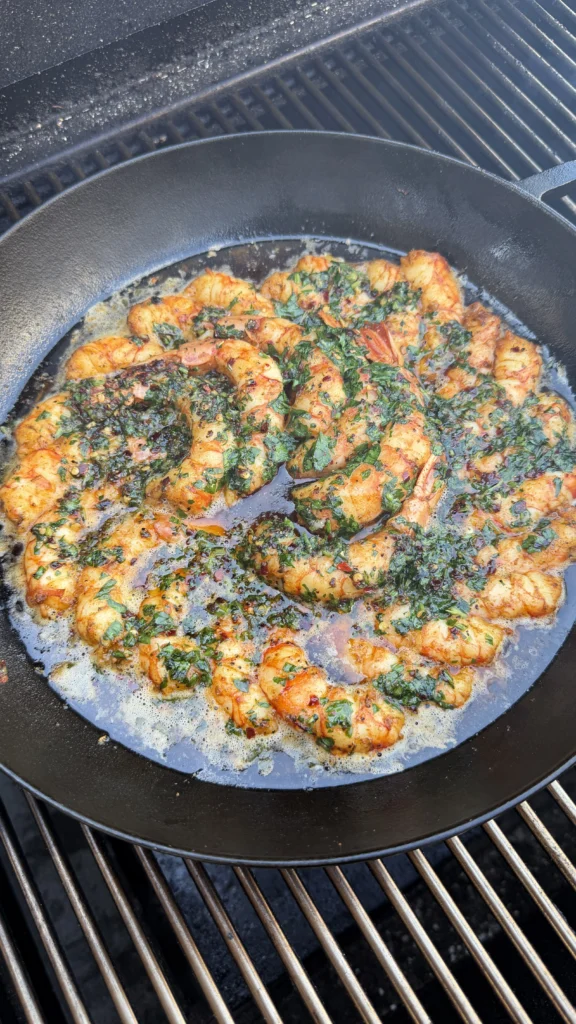
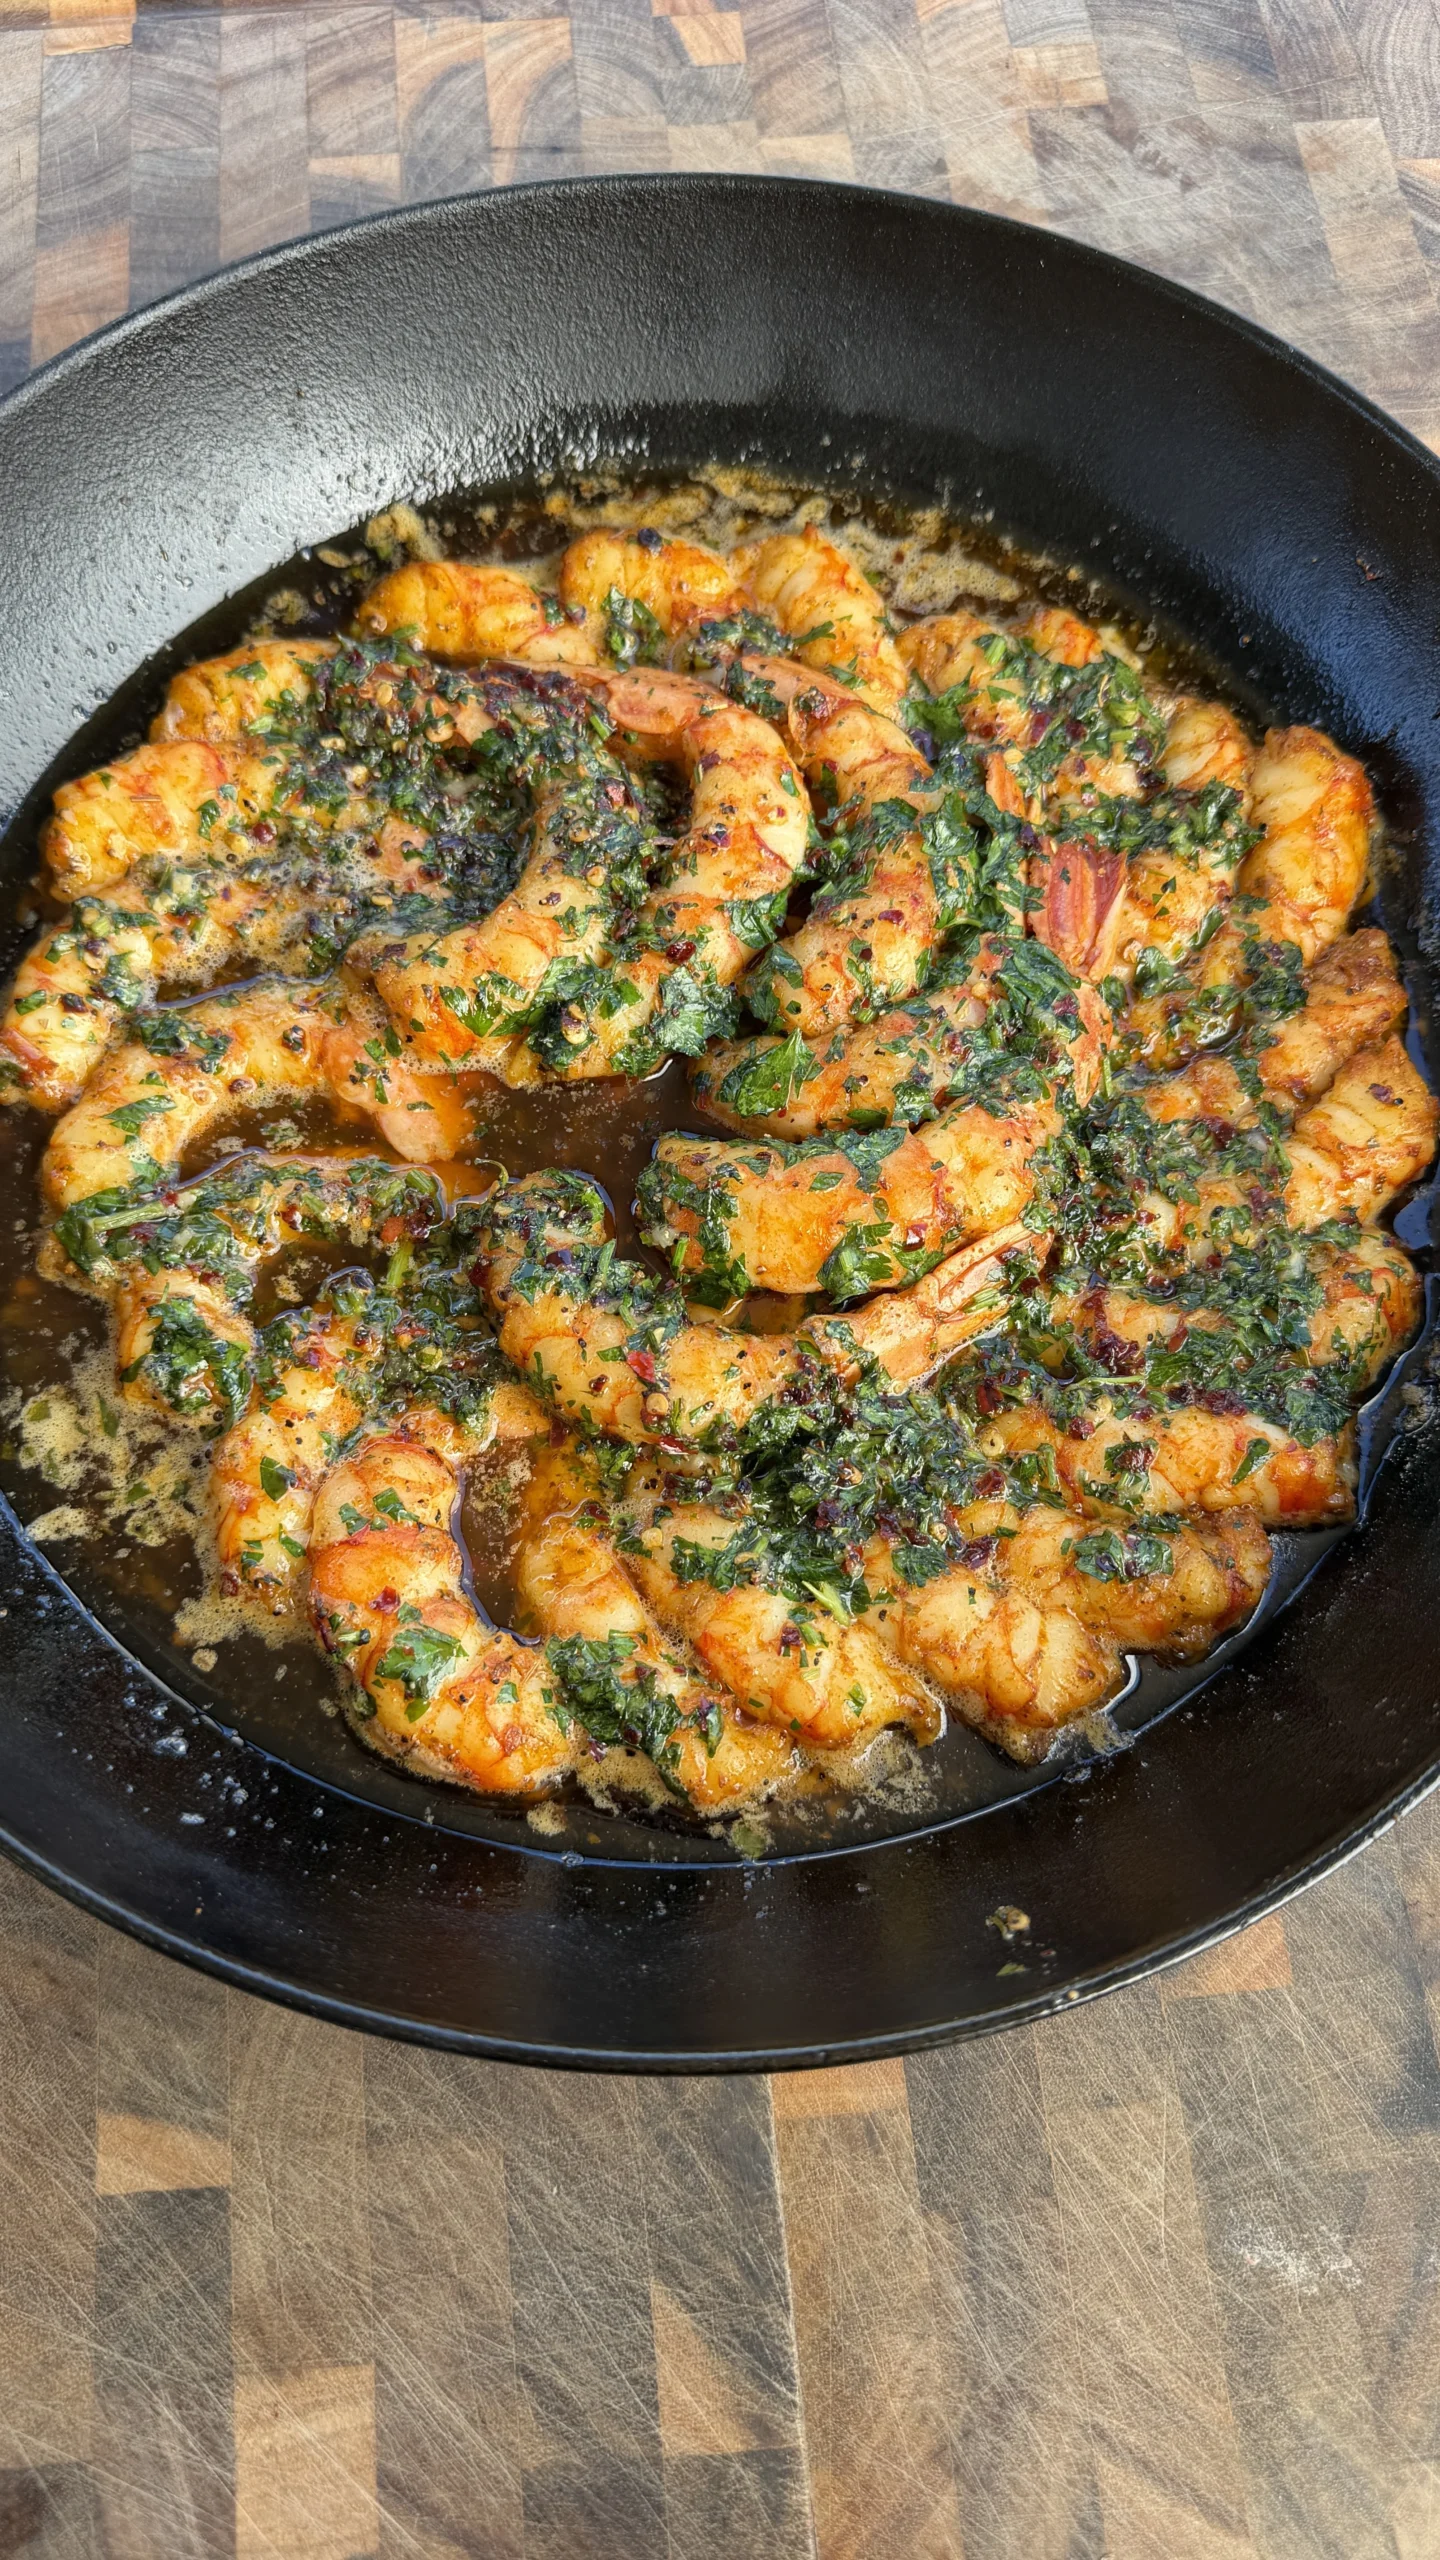
Garlic butter smoked shrimp is large shrimp peeled and deveined with tails left on, arranged in a spiral pattern in a cast iron pan, then covered with melted butter mixed with minced garlic, fresh parsley, red chili flakes, and black pepper. You smoke the entire pan at 250°F over applewood or cherrywood until the shrimp reach 140°F internal temperature. This takes 30 to 40 minutes depending on shrimp size. The gentle smoke infuses into the butter. The butter bastes the shrimp continuously during cooking. You pull the pan when the shrimp just hit 140°F. At this temperature, the proteins are fully coagulated but still tender. The shrimp stay plump and juicy instead of becoming rubbery.
The entire process takes about 1 hour from start to finish. This includes 10 minutes to peel and devein the shrimp. You spend 5 minutes making the garlic butter sauce. Arranging the shrimp in the pan takes another 5 minutes. The smoking itself is 30 to 40 minutes of hands-off time. There’s no rest period needed. You can serve immediately after pulling from the smoker.
These smoked shrimp deliver clean seafood flavor enhanced by smoke and garlic without being overwhelmed. The applewood or cherrywood provides mild, slightly sweet smoke that complements shrimp’s natural sweetness. Stronger woods like hickory or mesquite would overpower the delicate seafood. The garlic butter creates richness. The chili flakes add subtle heat. Fresh parsley provides brightness that cuts through the butter’s heaviness.
Jump to RecipeWhat Makes Apple and Cherry Wood Best for Smoking Shrimp
Mild Smoke Character That Doesn’t Overpower
Shrimp have delicate, sweet flavor. Strong smoke woods like mesquite or hickory dominate this subtle taste. The shrimp end up tasting more like smoke than seafood. Applewood and cherrywood provide background smoke flavor. They enhance rather than mask the natural shrimp sweetness.
Applewood creates the lightest smoke of all fruit woods. It has subtle fruity notes with hints of sweetness. The smoke is clean and mild. This allows the garlic butter to remain the primary flavor. The smoke adds complexity without taking over. You taste buttery garlic shrimp with a whisper of smoke in the finish.
Cherrywood is slightly stronger than apple but still in the mild category. It provides more color development. The smoke has a deeper, almost wine-like quality. There’s still sweetness but with more depth. Cherry creates beautiful mahogany color on the shrimp. The visual appeal matters for presentation.
Both woods work because they complement seafood’s natural flavors. The fruit wood sugars caramelize during combustion. This creates sweet-smelling smoke. The compounds in the smoke bond with the shrimp proteins and fats. You get layered flavor where smoke, butter, and shrimp all taste distinct but harmonious.
Temperature of Combustion and Smoke Production
Fruit woods like apple and cherry burn at moderate temperatures. They produce steady, consistent smoke over long periods. This is ideal for the 30 to 40-minute cook time. You get continuous smoke exposure without fluctuations.
Harder woods like oak or hickory burn hotter. They create more intense smoke initially. But they also burn through faster. You might need to add wood halfway through the cook. This disrupts temperature. Every time you open the smoker to add wood, heat escapes. The temperature drops. Recovery time extends your cook.
The moderate burn rate of fruit woods also prevents bitter creosote buildup. When wood smolders at too-low temperatures, it creates thick white smoke. This smoke contains creosote. It tastes acrid and bitter. It coats food in a sooty layer. Fruit woods combust cleanly at proper smoking temperatures. They create thin blue smoke. This is the goal for all smoking.
How Wood Choice Affects Butter Flavor
The smoke doesn’t just flavor the shrimp directly. It also infuses into the butter. As the butter sits in the pan during smoking, it absorbs smoke compounds. These compounds are fat-soluble. Butter is pure fat. It’s an excellent smoke carrier.
When you drizzle this smoked garlic butter over the finished shrimp, you’re adding another layer of smoke flavor. The butter acts like a sauce. It coats every surface of the shrimp. You get smoke flavor from both the direct smoking of the shrimp and from the smoked butter.
Applewood-smoked butter tastes subtly sweet and fruity. It’s delicious for dipping bread. Cherrywood-smoked butter has deeper, richer character. Either version elevates the dish beyond what plain butter would provide. The smoke integration happens naturally. You don’t need to do anything special. Just let the butter sit in the pan during the entire smoke.
Regional and Availability Considerations
Apple and cherry are widely available across most of the United States. You can find them at hardware stores, BBQ specialty shops, and online. They come in chunks, chips, and pellets. This makes them accessible for any type of smoker.
Some regional woods work well too. Pecan is popular in the South. It provides slightly stronger smoke than fruit woods but still complements seafood. Maple works in Northern regions. It’s mild and slightly sweet like apple. Alder is Pacific Northwest standard for all seafood. It’s the mildest of all smoking woods.
The key is avoiding woods that are too strong or resinous. Never use pine, fir, or other conifers. The resin creates acrid smoke that tastes like turpentine. Mesquite is too aggressive for shrimp. Hickory overpowers in most cases. Stick to fruit woods or other mild options. You’ll have better results consistently.
How to Arrange Shrimp in a Cast Iron Pan for Even Cooking
The Spiral Pattern Technique
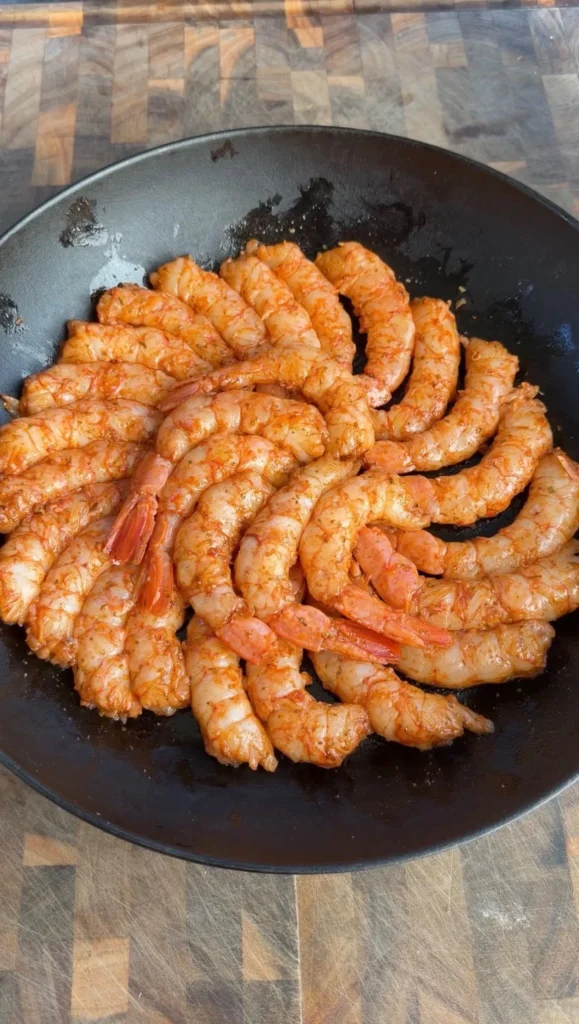
Arranging shrimp in a spiral pattern creates even thickness across the pan. You start at the outer edge. Place the first shrimp with its tail pointing toward the center. The body curves along the pan edge. Place the next shrimp slightly overlapping, continuing the curve. Work your way around the edge in a circle.
Once the outer ring is complete, start a second inner ring. Continue the spiral toward the center. Each ring nests inside the previous one. The pattern looks like a tightly coiled spring when viewed from above. All the tails point toward the center. All the bodies curve in the same direction.
This arrangement ensures every shrimp is roughly the same distance from the heat source. The outer edge and the center receive similar heat exposure. Compare this to random placement where some shrimp sit directly over hot spots while others sit in cooler zones. Random placement creates uneven cooking. Some shrimp overcook while others stay underdone.
The spiral also looks visually impressive. When you pull the pan from the smoker, guests see an intentional, artistic arrangement. It signals that care went into preparation. The presentation elevates the dish from casual to special occasion.
Maximizing Pan Surface Contact
Each shrimp should lay flat against the pan bottom. Don’t pile shrimp on top of each other. Double-layered shrimp cook unevenly. The bottom layer overcooks. The top layer stays undercooked. You want single-layer contact with the hot cast iron.
The flat contact also ensures every shrimp sits in the garlic butter pool. The butter level should come about halfway up the shrimp bodies. Not so deep that they’re swimming. Not so shallow that the tops stay dry. When shrimp lay flat in proper depth butter, they baste themselves continuously. The butter circulates with heat convection. It coats all surfaces repeatedly.
If your pan is too small for single-layer spiral arrangement, use two pans. Don’t compromise on the single layer. Proper contact with the pan and butter is critical for even cooking and maximum flavor absorption. Two smaller pans work better than one crowded large pan.
Size Sorting for Consistency
Before arranging, sort your shrimp by size if they vary significantly. Put the largest shrimp in one pan. Smaller shrimp in another pan. This prevents the small ones from overcooking while you wait for large ones to reach temperature.
Shrimp labeled “large” from the seafood counter should be relatively uniform. But there’s always some variation. A quick sort takes 30 seconds. It can make the difference between perfectly cooked and mixed results. The largest shrimp might be 30% bigger than the smallest. That size difference matters at 250°F over 30 minutes.
If you must mix sizes in one pan, place larger shrimp toward the pan edges. Smaller shrimp toward the center. Pan edges often run slightly hotter than the center. The larger shrimp can handle more heat. The smaller shrimp benefit from the gentler center zone. This compensates somewhat for size differences.
Leaving Space Between Shrimp
Don’t pack shrimp so tightly that they touch along their entire length. Leave small gaps. These gaps allow butter to flow between shrimp. They also create channels for heat circulation. The gaps ensure each shrimp cooks individually rather than as one connected mass.
When shrimp touch completely, they steam each other. The contact points don’t develop any color or texture. They stay pale and soft. Small gaps allow each shrimp to cook as a distinct piece. You get better browning. The texture is more consistent from one shrimp to the next.
The spiral pattern naturally creates appropriate gaps when done correctly. The curve of each shrimp’s body creates space between it and its neighbors. You don’t need to measure or space perfectly. Just follow the spiral. The geometry works automatically.
Why Shrimp Should Be Pulled at 140°F Instead of Higher
Protein Structure and Texture Changes
Shrimp proteins begin denaturing around 130°F. By 140°F, the proteins have coagulated completely. The shrimp are fully cooked and safe to eat. The flesh is opaque white or pink depending on the shrimp variety. The texture is firm but still tender.
Beyond 140°F, the proteins continue contracting. They squeeze out moisture. By 150°F, shrimp become noticeably drier. The texture turns from tender to slightly chewy. At 160°F and above, shrimp are rubbery. They’re tough to bite through. The pleasant snap of perfectly cooked shrimp disappears. You get dense, bouncy texture instead.
The window between perfectly cooked and overcooked is narrow with shrimp. A 10-degree difference in internal temperature creates dramatic texture changes. This is why monitoring temperature matters. You can’t rely on time alone. One batch of shrimp might hit 140°F in 30 minutes. Another batch takes 40 minutes because of size differences or smoker temperature fluctuations.
Moisture Retention at Lower Temperatures
At 140°F, shrimp retain maximum moisture while still being fully cooked. The muscle fibers have firmed up. But they haven’t expelled all their water yet. You get juicy shrimp that release their natural sweet liquid when you bite into them.
As temperature climbs past 140°F, the muscle fibers contract more aggressively. Think of wringing out a wet towel. The twisting motion squeezes water out. Protein contraction works similarly. The fibers tighten. Water between the fibers gets pushed out. This water drips into the pan or evaporates. Either way, it’s no longer in the shrimp where you want it.
The garlic butter helps compensate for some moisture loss. The butter coats the exterior. It provides lubrication even if the interior is slightly dry. But no amount of butter can fix severely overcooked, rubbery shrimp. Prevention through proper temperature control is the only solution.
Carryover Cooking Considerations
Shrimp are small. They don’t have much mass. Carryover cooking is minimal compared to large roasts or whole chickens. A thick ribeye might climb 10 degrees after pulling. Shrimp might climb 2 to 3 degrees at most.
This means you can pull right at 140°F. You don’t need to undershoot. The carryover won’t push you significantly past your target. The shrimp will peak around 142 to 143°F during the brief time between pulling from the smoker and serving. This is still in the optimal range.
The cast iron pan holds heat well. This creates slightly more carryover than if you cooked shrimp on a wire rack. The pan stays hot for several minutes after leaving the smoker. The residual heat continues gently cooking. But even with this factor, pulling at 140°F keeps you safe. You won’t overshoot into the rubbery zone.
Visual Cues to Confirm Doneness
If you don’t have a thermometer, visual cues can help. At 140°F, shrimp should be completely opaque. No translucent gray areas should remain. The color should be uniform from exterior to center when you cut one open.
The shrimp will have curled into a C-shape. They start relatively straight. As they cook, they curl. A gentle C-curve indicates proper cooking. If they curl into tight O-shapes where the tail nearly touches the head, they’re overcooked. The excessive curling shows the proteins contracted too much.
The texture when pressed should be firm but yielding. Press the thickest part of a shrimp with your finger. It should feel springy. It bounces back when you release pressure. Mushy texture means undercooked. Rock-hard texture means overcooked. The springy firmness is the sweet spot. This corresponds to 140°F internal temperature.
Should You Leave the Tails On When Smoking Shrimp
Flavor Contribution from the Shell
Shrimp tails contain concentrated seafood flavor. The shell material is mostly chitin. This doesn’t add much flavor directly. But the meat inside the tail and the connective tissue attaching the tail to the body are intensely shrimp-flavored. During cooking, these components release compounds into the surrounding butter.
The tail meat also prevents the body meat from overcooking as quickly at the very end. The shell insulates slightly. The meat nearest the tail stays a degree or two cooler than the exposed body meat. This creates a temperature gradient. The tail end might be perfect while you’re still waiting for the thickest part of the body to reach 140°F.
Some people eat the tails. They’re edible when cooked. The shell becomes crispy. It has concentrated shrimp flavor. Others don’t eat them. But even if you discard tails while eating, their presence during cooking benefits the overall dish. You can always remove them before serving if presentation without tails is preferred.
Visual Appeal and Presentation
Tails make shrimp look more impressive. Tail-on shrimp appear more premium than completely peeled shrimp. The tail provides visual interest. It breaks up the monotony of uniform pink bodies. The red shell color contrasts with the white meat. This creates depth in the presentation.
In the spiral arrangement, the tails pointing toward the center create a focal point. They draw the eye inward. The pattern becomes more obvious and intentional-looking with the tail markers. Without tails, the spiral would be less defined. The shrimp would blend together visually.
For upscale presentations and entertaining, tail-on is standard. For casual family meals where ease of eating matters more than looks, removing tails is acceptable. Consider your audience and occasion when deciding.
Handling and Eating Convenience
Tails provide a natural handle. Diners can pick up shrimp by the tail without getting butter all over their fingers. This is especially helpful with garlic butter shrimp where the entire pan is slick with melted butter. Trying to grab a completely peeled shrimp from butter results in slippery fingers.
The tail handle also makes it easier to dip shrimp in extra butter or sauce.
Some diners find tails annoying. They have to remove them while eating. This creates extra work. For buffets or cocktail parties where people eat standing up, tail-on can be challenging. They need somewhere to put the discarded tails. Providing a separate small bowl for shells helps. But it’s an extra consideration.
Industry Standard and Expectations
Most restaurant preparations of shrimp in butter, garlic, or scampi-style keep the tails on. This has become the expected presentation. When people order shrimp dishes, they anticipate seeing tails. Removing them might make the dish look cheaper or less authentic to some diners.
The food service industry leaves tails on for both practical and traditional reasons. It’s faster to prep. Peeling the body but leaving the tail takes less time than removing everything. The tails also help portion control. You can count shrimp easily in the kitchen. The tails make them visually distinct.
Following this standard makes your home cooking look professional. If you’re trying to recreate restaurant-quality smoked shrimp, leave the tails on. If you’re prioritizing convenience over presentation, remove them. Both choices are valid depending on your goals.
How to Prevent Garlic from Burning in the Butter Sauce
Low Heat Melting and Gentle Combination
Garlic burns easily at high heat. The sugars and amino acids in garlic undergo rapid browning at temperatures above 250°F. Burnt garlic tastes bitter and acrid. It ruins the entire sauce. The key is keeping the heat low while making the garlic butter.
Melt the butter over the lowest burner setting. Let it melt slowly. Once liquid, add the minced garlic. Don’t add garlic to cold butter and then heat. The garlic will sit in hot butter for too long as the butter melts. This extended exposure can brown it too much even at low heat.
Stir the garlic into the melted butter. Let the mixture sit over low heat for 1 to 2 minutes. This is enough time for the garlic flavor to infuse into the butter. The heat activates garlic’s aromatic compounds. They dissolve into the butter fat. But the heat isn’t high enough or sustained enough to brown the garlic.
Remove from heat immediately after the parsley, chili flakes, and black pepper go in. The residual heat continues infusing flavors for another minute. But you’ve eliminated the risk of burning. The garlic will be soft and fragrant without any brown color.
Mincing Size and Surface Area
The finer you mince garlic, the more surface area is exposed to heat. More surface area means faster cooking and faster potential burning. Extremely fine minced garlic (almost paste-like) can burn in seconds at medium heat. Larger chunks are more forgiving.
For this garlic butter, mince to about 1/8-inch pieces. Not so fine that it’s mush. Not so chunky that you bite whole pieces of raw-tasting garlic. This medium-fine mince provides good flavor release. But it’s sturdy enough to tolerate the brief cooking without burning.
Some recipes call for grated garlic using a microplane. This creates garlic paste consistency. It integrates completely into sauces. It’s invisible in the final product. But it burns nearly instantly at anything above low heat. For smoking applications where the butter sits in heat for 30 to 40 minutes, paste-like garlic would overcook and turn bitter. The slightly larger mince is more stable.
Adding Garlic to Already-Heated Butter vs Cold Starts
If you add minced garlic to cold butter and then start heating, the garlic sits in butter for several minutes while waiting for the butter to melt. Even over low heat, this extended exposure can brown the garlic more than desired. The garlic is cooking the entire time the butter is melting.
The better method is melting butter first. Once it’s fully liquid, add garlic. Now the garlic only cooks for the 1 to 2 minutes of infusion time. This shortened exposure gives you more control. The garlic flavors the butter without browning significantly.
This technique works for any garlic-butter preparation. Garlic bread, pasta sauces, sautéed vegetables. Melt butter first. Add garlic to hot butter. Cook briefly. Remove from heat. You get garlic flavor without burnt bitterness.
The Smoking Process and Continued Cooking
Even after pouring the garlic butter over the shrimp, cooking continues in the smoker. The butter sits at 250°F ambient temperature for 30 to 40 minutes. The garlic continues to cook during this time. If you browned it significantly during the initial preparation, it will over-brown in the smoker. It might burn.
Starting with barely-cooked garlic compensates for the extended smoking time. The garlic that was pale and just fragrant when you poured it over the shrimp will be golden and fully cooked by the time you pull the pan. It develops complexity during the smoke. But it doesn’t cross into burnt territory.
The butter also protects the garlic somewhat. The fat coats each garlic piece. This insulates it slightly from direct heat. Fat-coated garlic burns less readily than dry garlic exposed to air. The butter medium creates a gentle cooking environment. But only if you didn’t start with already-browned garlic.
If you notice garlic starting to brown too much in the smoker, you can tent the pan with foil. This shields the surface from direct heat. The smoking still happens because smoke circulates under the foil. But the radiant heat from above is blocked. The garlic stops browning. This is a rescue technique if you see browning happening faster than expected.
Garlic Butter Smoked Shrimp
Apple or cherry wood, cast iron pan method
Ingredients
Shrimp
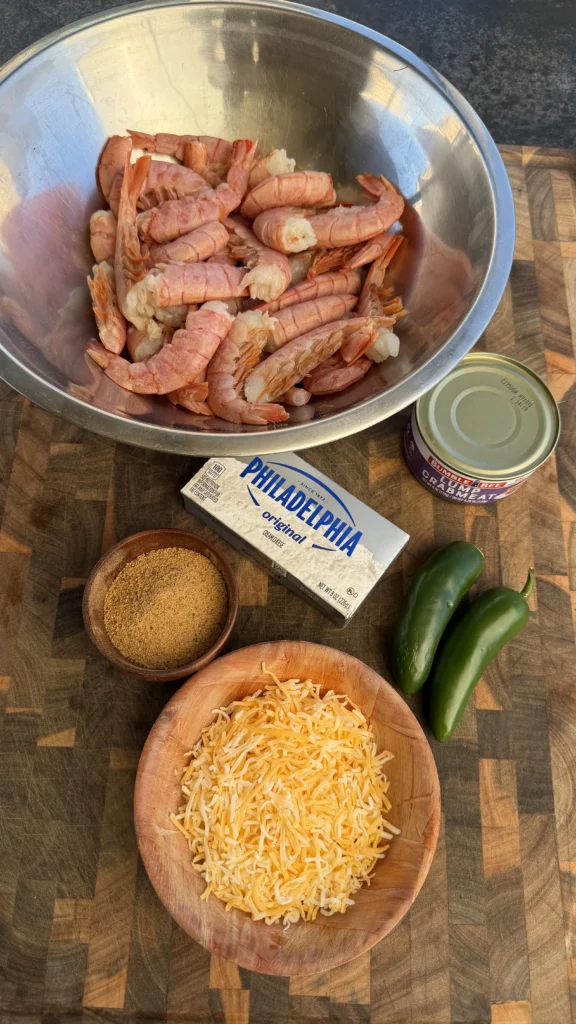
- 2 lbs large shrimp, peeled, deveined, tails on
Garlic Butter Sauce
- 6 oz unsalted butter
- 4 cloves garlic, finely minced
- 1 tablespoon fresh parsley, finely chopped
- 1 teaspoon red chili flakes (adjust to taste)
- ¼ teaspoon black pepper
- Pinch of kosher salt (optional)
Apple wood creates the lightest, sweetest smoke. Cherry wood adds deeper color and slightly richer smoke flavor. Both work perfectly. Never use hickory or mesquite with shrimp – they overpower the delicate seafood.
Step-by-Step Instructions
Step 1: Prep the Shrimp
Remove shrimp from the refrigerator. If they’re already peeled and deveined with tails on, you can skip this step. If not, peel each shrimp by gripping the shell at the head end and pulling it off toward the tail. Leave the tail shell attached.
Make a shallow cut down the back of each shrimp with a sharp knife. This exposes the dark vein. Use the tip of your knife or your fingers to pull out the vein. Rinse shrimp under cold water. Pat completely dry with paper towels.
Dry shrimp are critical for proper smoke adhesion and browning. Wet shrimp steam instead of cooking properly. The moisture creates a barrier that smoke can’t penetrate effectively. Take the extra time to pat each shrimp thoroughly dry.
If your shrimp vary significantly in size, sort them now. Put similar-sized shrimp together. This ensures even cooking later.
Step 2: Arrange Shrimp in Cast Iron Pan
Select a cast iron skillet large enough to hold all the shrimp in a single layer. A 12-inch skillet works for 2 pounds of large shrimp. If your pan is smaller, use two pans.
Starting at the outer edge of the pan, place the first shrimp with its tail pointing toward the center. The body should curve along the pan’s edge. Place the next shrimp slightly overlapping, continuing the curve around the edge.
Work your way around the entire outer edge, creating a ring of shrimp. All tails should point toward the center. All bodies curve the same direction.
Once the outer ring is complete, start a second inner ring. Continue spiraling toward the center. Keep placing shrimp in the same curved pattern. Each ring nests inside the previous one.
Continue until all shrimp are arranged in a tight spiral. The pattern should look intentional and artistic. Leave small gaps between shrimp. Don’t pack so tightly that they touch along their entire length.
Step 3: Make the Garlic Butter Sauce
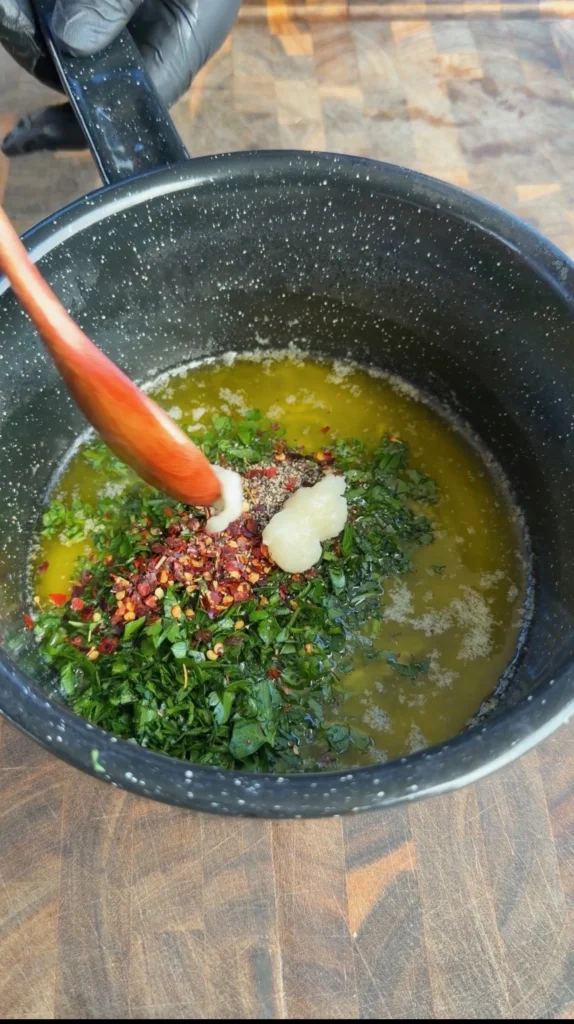
In a small saucepan, melt 6 oz of unsalted butter over the lowest heat setting on your stovetop. Let it melt slowly. Don’t rush this by increasing heat. Slow melting prevents the butter from browning or separating.
Once the butter is completely melted and liquid, add 4 cloves of finely minced garlic. Stir to combine. Let the garlic sit in the hot butter for 1 to 2 minutes over low heat. The garlic should soften and become fragrant. It should not brown or sizzle aggressively.
Add 1 tablespoon of finely chopped fresh parsley, 1 teaspoon of red chili flakes, and ¼ teaspoon of black pepper. Stir everything together. Let the mixture sit over low heat for another 30 seconds to 1 minute. This allows the parsley and chili to release their flavors into the butter.
Remove from heat immediately. Taste the butter. If it needs salt, add a small pinch of kosher salt. Stir to dissolve. Most shrimp have natural saltiness, so additional salt is often unnecessary. But this depends on personal preference and the specific shrimp you’re using.
Step 4: Pour Butter Over Shrimp
Pour the garlic butter mixture evenly over the arranged shrimp in the cast iron pan. Start in the center and work your way outward in a spiral motion. This matches the shrimp arrangement pattern.
Make sure every shrimp gets coated with butter. Use a spoon to drizzle butter into any gaps or areas that look dry. The butter level should come about halfway up the shrimp bodies. The shrimp should not be completely submerged. But they shouldn’t sit in just a thin film of butter either.
If you see any garlic pieces that pooled in one area, use a spoon to distribute them more evenly. You want garlic throughout the pan, not concentrated in one spot.
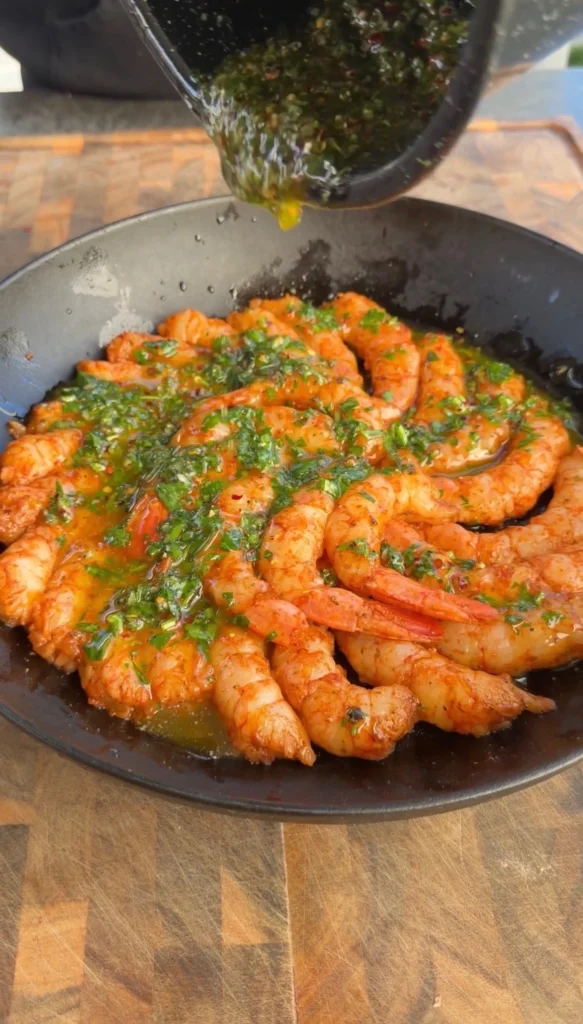
Tilt the pan slightly in different directions. This helps the butter flow into all the gaps between shrimp. Every surface should have butter contact.
Step 5: Preheat Smoker to 250°F
Start your smoker and set the temperature to 250°F. Add applewood or cherrywood chunks or chips to your smoke source. For pellet grills, use apple or cherry pellets. For charcoal or offset smokers, add wood chunks directly to the coals.
Let the smoker preheat with the lid closed for 10 to 15 minutes. You want clean, thin blue smoke. Not thick white smoke. White smoke indicates incomplete combustion. It creates bitter, sooty flavors. If you see billowing white smoke, wait until it clears and thins out before adding food.
Check the temperature at grate level where you’ll place the pan. Built-in thermometers are often inaccurate. Use a separate oven thermometer placed on the grate to verify actual cooking temperature. Adjust vents or burners as needed to achieve and maintain 250°F.
Step 6: Smoke the Shrimp
Once the smoker reaches 250°F with clean smoke, carefully place the cast iron pan directly on the grate. Position it in the center if possible. This is usually the most consistent temperature zone.
Close the smoker lid. Set a timer for 30 minutes. Don’t open the smoker during this time. Every time you lift the lid, heat and smoke escape. This extends cooking time and reduces smoke flavor.
After 30 minutes, open the smoker and check the internal temperature of the largest shrimp. Insert an instant-read thermometer into the thickest part of the body. Avoid hitting the pan underneath. You want the shrimp temperature, not the pan temperature.
If the shrimp read 135 to 137°F, give them another 5 minutes. If they’re at 138 to 140°F, pull the pan immediately. The shrimp will continue to climb a few degrees from carryover heat. Don’t wait for them to reach higher than 140°F in the smoker.
If they’re still below 135°F after 30 minutes, check again in 5-minute intervals. Some batches take the full 40 minutes depending on shrimp size and smoker temperature consistency.
Step 7: Serve Immediately
Remove the cast iron pan from the smoker using heavy oven mitts or welding gloves. The pan will be extremely hot. The handle stays hot for several minutes even after leaving the smoker.
Let the shrimp rest in the pan for 1 to 2 minutes. This isn’t a long rest like meat. Just enough time for the butter to stop bubbling vigorously. The shrimp will finish climbing to their final temperature during this brief rest.
Bring the entire pan to the table for rustic presentation. Or transfer shrimp to a serving platter using tongs. Drizzle any remaining garlic butter from the pan over the plated shrimp.
Garnish with additional chopped parsley if desired. Serve with crusty bread for soaking up the garlic butter. Lemon wedges are optional. Some people like the brightness of lemon with shrimp. Others prefer the pure garlic butter flavor without citrus.
Serve immediately while hot. These shrimp are best within 10 minutes of pulling from the smoker. As they cool, the butter begins to solidify. The texture changes. They’re still good at room temperature. But optimal eating is when they’re fresh and hot with liquid butter.
Garlic Butter Smoked Shrimp
Ingredients
Equipment
Method
- Peel and devein shrimp if needed, leaving tails on. Pat completely dry with paper towels.
- Arrange shrimp in a spiral pattern in a cast iron skillet. Start at the outer edge with tails pointing toward the center. Work inward in concentric circles until all shrimp are arranged in a single layer.
- In a small saucepan over low heat, melt butter completely. Add minced garlic and cook for 1 to 2 minutes until fragrant but not browned. Add parsley, chili flakes, and black pepper. Stir and remove from heat. Add salt if desired.
- Pour garlic butter evenly over arranged shrimp, making sure every piece is coated. Butter should come about halfway up the shrimp bodies.
- Preheat smoker to 250°F with applewood or cherrywood.
- Place cast iron pan directly on smoker grate. Close lid and smoke for 30 to 40 minutes until shrimp reach 140°F internal temperature. Check at 30 minutes and every 5 minutes after until they reach target temperature.
- Remove pan from smoker using heat-resistant gloves. Rest for 1 to 2 minutes. Serve immediately in the pan or transfer to a platter with the garlic butter.
Nutrition
Notes
Tried this recipe?
Let us know how it was!Frequently Asked Questions
Can You Use Frozen Shrimp for This Recipe?
You can use frozen shrimp. But you must thaw them completely first. Never smoke frozen shrimp. The ice crystals create excess moisture. This prevents proper smoke adhesion and browning. The shrimp steam instead of smoking.
Thaw frozen shrimp in the refrigerator overnight. Place them in a colander set over a bowl. This allows the thawed liquid to drain away from the shrimp. Leaving shrimp sitting in their thaw water makes them mushy.
For faster thawing, place frozen shrimp in a sealed plastic bag. Submerge in cold water. Change the water every 15 minutes. Most shrimp thaw completely in 30 to 45 minutes using this method. Never use warm or hot water. This starts cooking the exterior while the interior stays frozen.
After thawing by either method, pat the shrimp completely dry. Use multiple layers of paper towels. Press firmly to absorb all surface moisture. Thawed shrimp are wetter than fresh shrimp. Extra drying effort is essential.
Quality matters with frozen shrimp. Look for bags labeled “dry” or “chemical-free.” Some frozen shrimp are treated with sodium tripolyphosphate. This preservative makes shrimp absorb excess water. They plump up artificially. When cooked, they release this water and shrink dramatically. Untreated frozen shrimp maintain better texture.
What’s the Best Size Shrimp for Smoking?
Large shrimp work best for smoking. This usually means 21/30 count per pound. Each shrimp weighs about half an ounce. They’re substantial enough to handle 30 to 40 minutes of smoke without overcooking. They also have enough surface area to absorb good smoke flavor.
Extra-large shrimp at 16/20 count also work well. These are even more forgiving on timing. The larger mass takes slightly longer to reach 140°F. You have a wider window before they overcook.
Medium shrimp at 31/40 count cook too quickly. They might hit 140°F in 20 minutes. By the time they’ve absorbed decent smoke flavor, they’re already at risk of overcooking. The timing becomes too tight.
Jumbo or colossal shrimp (under 15 count per pound) work but they’re expensive for this preparation. The spiral arrangement also becomes challenging with very large shrimp. They don’t nest together as neatly. You might need a larger pan or multiple pans.
When buying shrimp, check the count per pound on the label. This tells you actual size more accurately than vague terms like “large” or “jumbo.” Different stores use these terms inconsistently. The count number is standardized.
How Spicy Are These Shrimp with the Chili Flakes?
With 1 teaspoon of red chili flakes in 6 oz of butter spread over 2 pounds of shrimp, the heat is mild to moderate. Most people notice warmth without intense burn. The butter and shrimp dilute the chili significantly.
Chili flake heat varies by brand. Some are quite mild. Others are very spicy. If you’re unsure about your specific chili flakes, start with ½ teaspoon. You can always add more next time. You can’t remove heat once it’s in the dish.
For completely mild garlic butter shrimp, omit the chili flakes. The dish still tastes excellent with just garlic, parsley, and black pepper. The shrimp’s natural sweetness and the smoke flavor carry the dish without heat.
For spicier versions, increase chili flakes to 1½ or 2 teaspoons. You can also add a pinch of cayenne pepper. Or use fresh minced jalapeño or serrano in addition to or instead of dried chili flakes. Fresh peppers provide different heat character and brightness.
The garlic butter soaking bread helps temper any heat. If someone finds the shrimp too spicy, the bread provides relief. The starchy bread absorbs capsaicin. It neutralizes the burn sensation.
Can You Make This in the Oven Without a Smoker?
You can make garlic butter shrimp in the oven. But you’ll miss the smoke flavor that makes this recipe special. Preheat your oven to 375°F. Arrange shrimp in the buttered cast iron pan as directed. Bake for 12 to 15 minutes until shrimp reach 140°F.
The texture will be similar. The garlic butter flavor will be identical. You just lose the smoke component. These become standard garlic butter shrimp instead of smoked garlic butter shrimp.
To approximate smoke flavor, add ¼ teaspoon of liquid smoke to the garlic butter before pouring over shrimp. This won’t replicate real smoking. But it adds some smoky character. Use liquid smoke sparingly. Too much tastes artificial and chemical.
You can also finish under the broiler for 1 to 2 minutes. This creates some char and caramelization on the shrimp tops. It adds visual appeal and slightly deeper flavor. Watch carefully. Shrimp can burn quickly under the broiler.
For best results, invest in a basic smoker. Even an inexpensive bullet smoker or kettle grill set up for indirect heat produces real smoke flavor. The difference between oven-baked and genuinely smoked is significant. Smoke adds complexity that liquid smoke and broiling can’t match.
How Do You Store and Reheat Leftover Smoked Shrimp?
Store leftover smoked shrimp in an airtight container in the refrigerator. Pour any remaining garlic butter from the pan over the shrimp before sealing. The butter helps preserve moisture. It also carries flavor. Properly stored shrimp last 2 days refrigerated.
Don’t leave shrimp at room temperature for more than 2 hours total. This includes time on the table during dinner. Seafood is highly perishable. Bacteria multiply rapidly at room temperature. When in doubt, refrigerate sooner rather than later.
To reheat, use a 300°F oven. Place shrimp in an oven-safe dish. Add a tablespoon or two of water or additional butter. Cover loosely with foil. Heat for 5 to 7 minutes until warmed through. Don’t overheat. You’re just warming, not cooking again. Overheating makes them rubbery.
Never microwave shrimp. Microwaves heat unevenly. The exterior overcooks while the center stays cold. The texture becomes rubbery and unpleasant. The extra few minutes to use the oven is worth it for better results.
You can also eat leftover smoked shrimp cold. Chop them and add to salads. Use them in shrimp cocktail. Mix with mayo for shrimp salad sandwiches. The smoke flavor persists when cold. It adds interesting depth to cold preparations.
Conclusion
These garlic butter smoked shrimp demonstrate how gentle heat and mild wood create perfect smoked seafood. The 250°F smoking temperature cooks shrimp to tender 140°F without overcooking. The applewood or cherrywood provides background smoke that enhances rather than overpowers. The cast iron pan method keeps butter with the shrimp throughout cooking. This creates continuous basting and deep flavor integration.
The spiral arrangement in cast iron isn’t just for looks. It ensures even cooking across all shrimp. Every piece sits in butter. Every piece gets equal heat exposure. The visual appeal of the spiral pattern makes this dish impressive for entertaining. Guests see the effort and artistry. But you know it only took a few minutes to arrange.
Pulling shrimp at exactly 140°F is critical for tender texture. Higher temperatures create rubbery, overcooked shrimp. Lower temperatures leave them underdone. The narrow window requires temperature monitoring. An instant-read thermometer is essential. Don’t rely on timing alone. Temperature is the only reliable doneness indicator for shrimp.
Ready to Level Up?
Take your backyard cooking from good to legendary.
This is where I keep all my most-used smokers, knives, and favorite cooking tools.
Shop My Gear CollectionExplore More Recipes
Find more diverse flavors at CWFeats.com