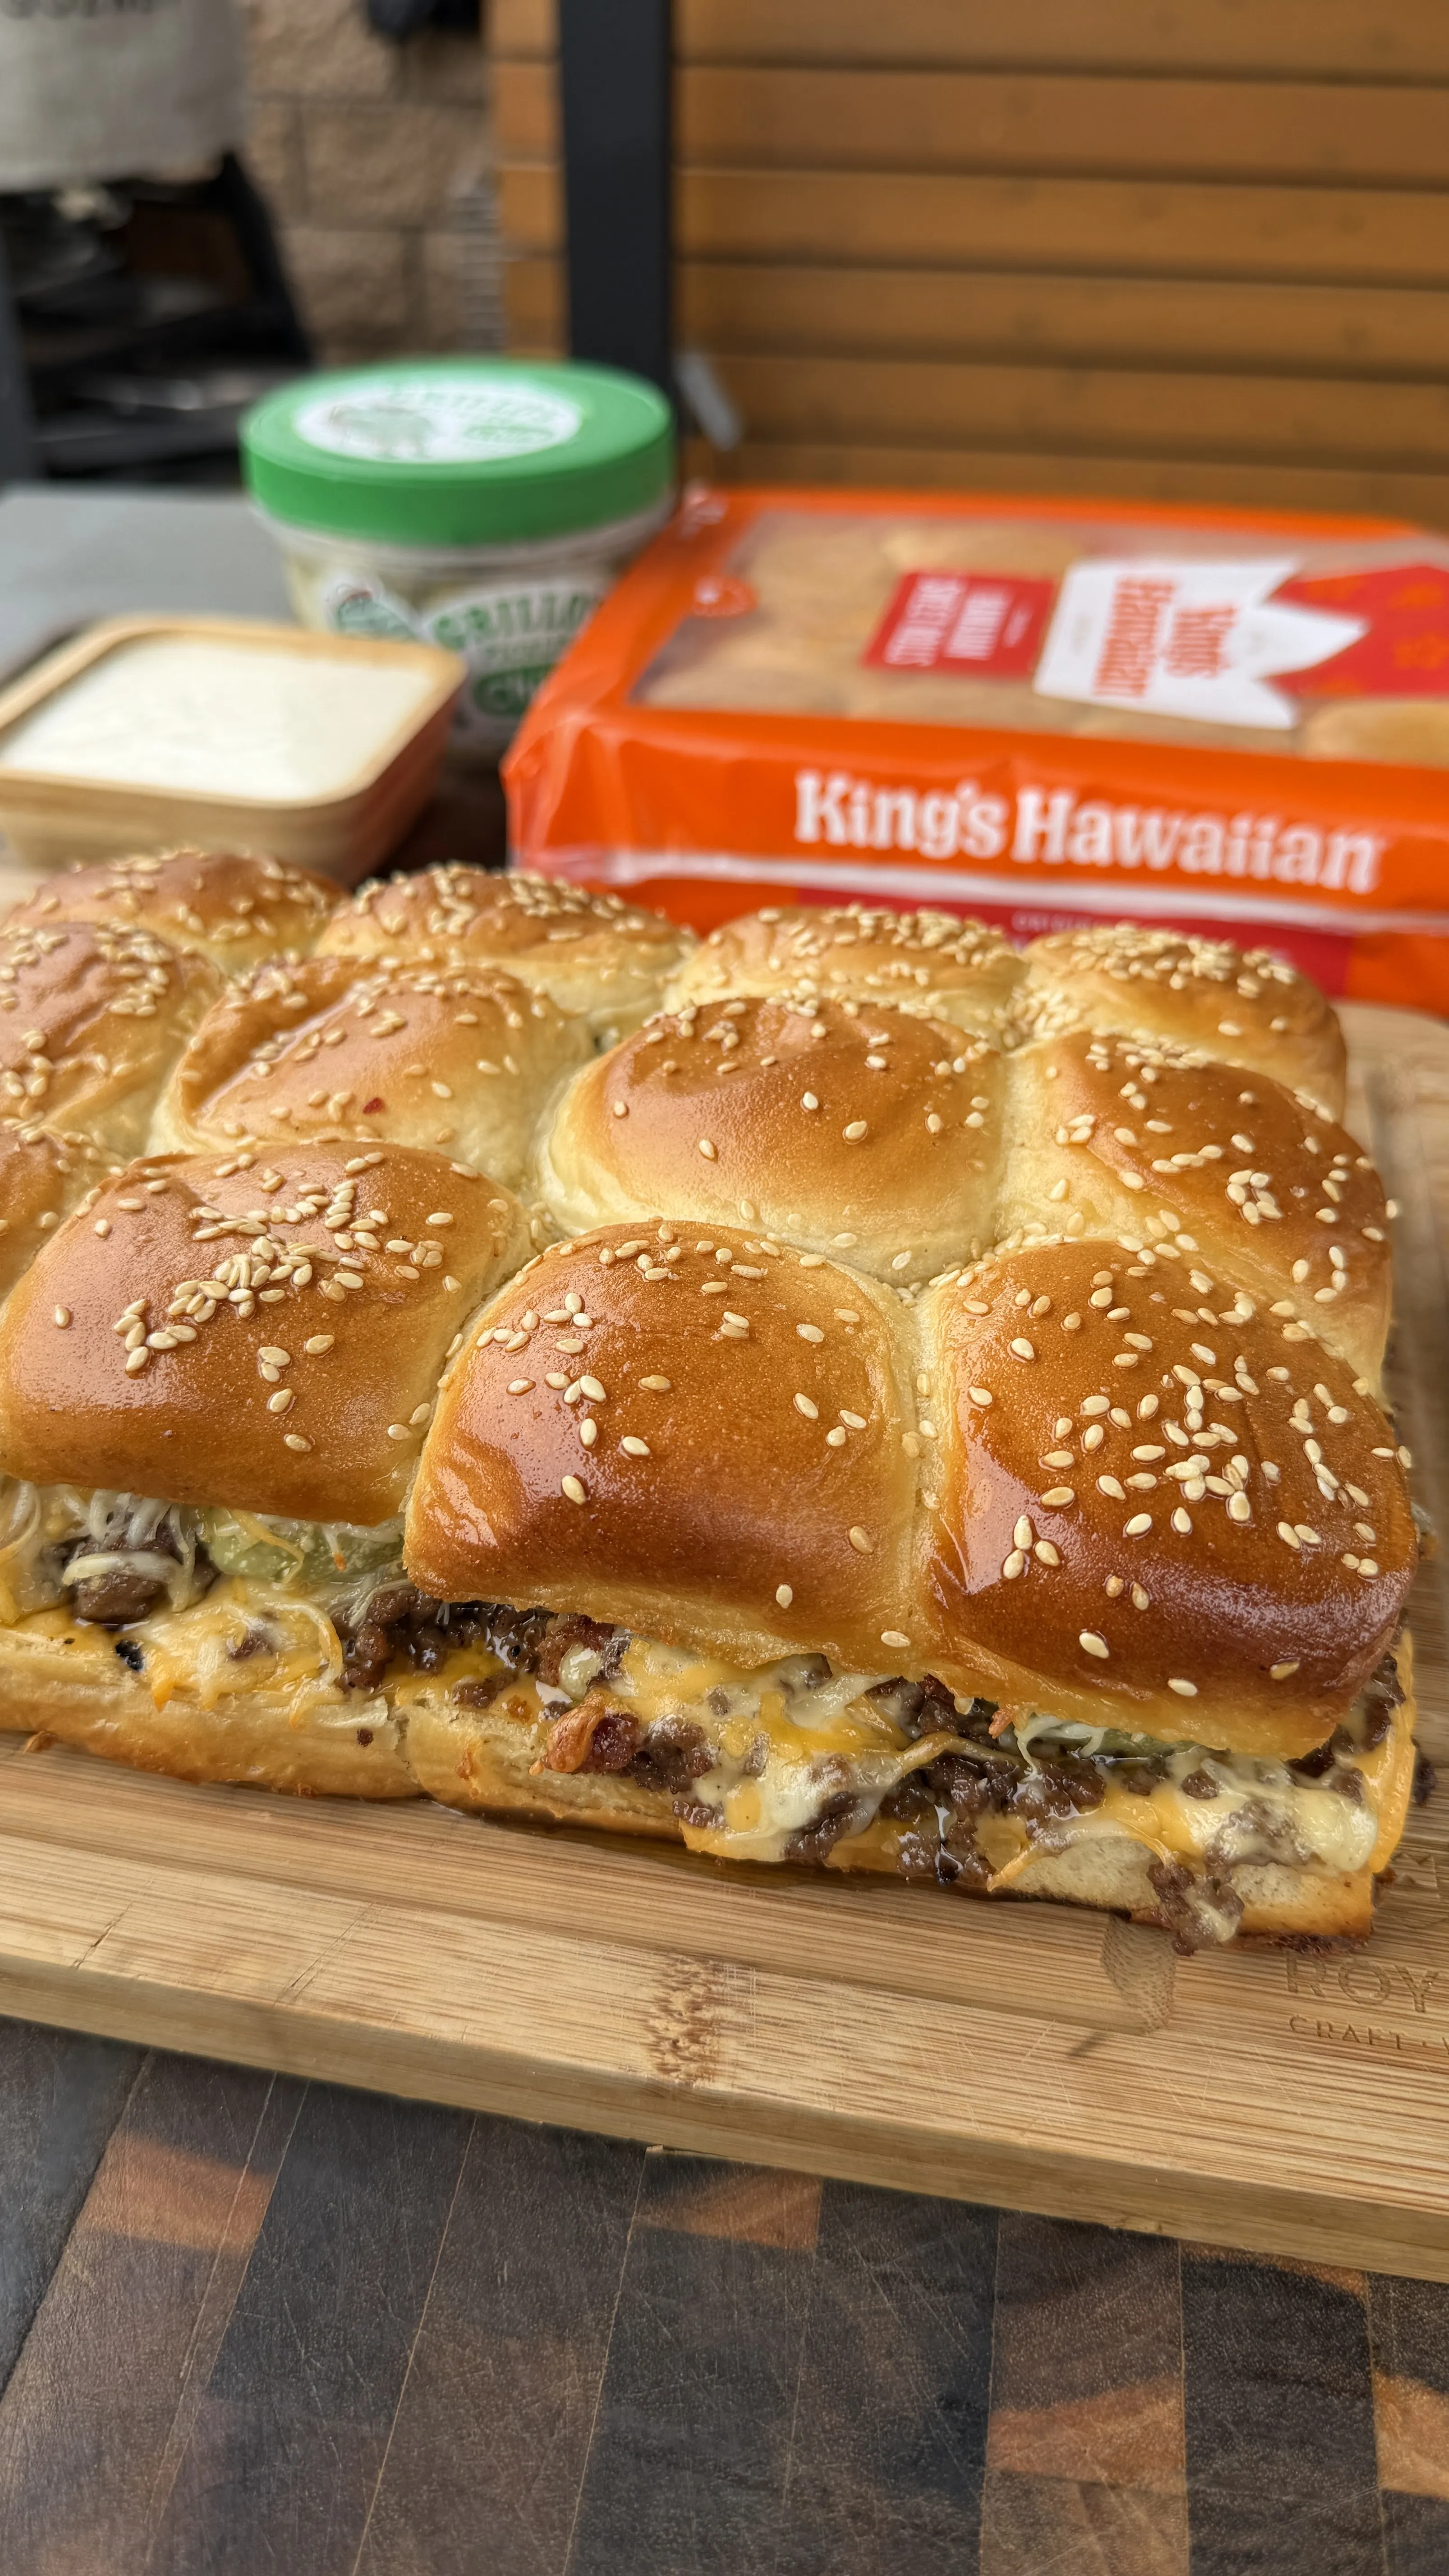
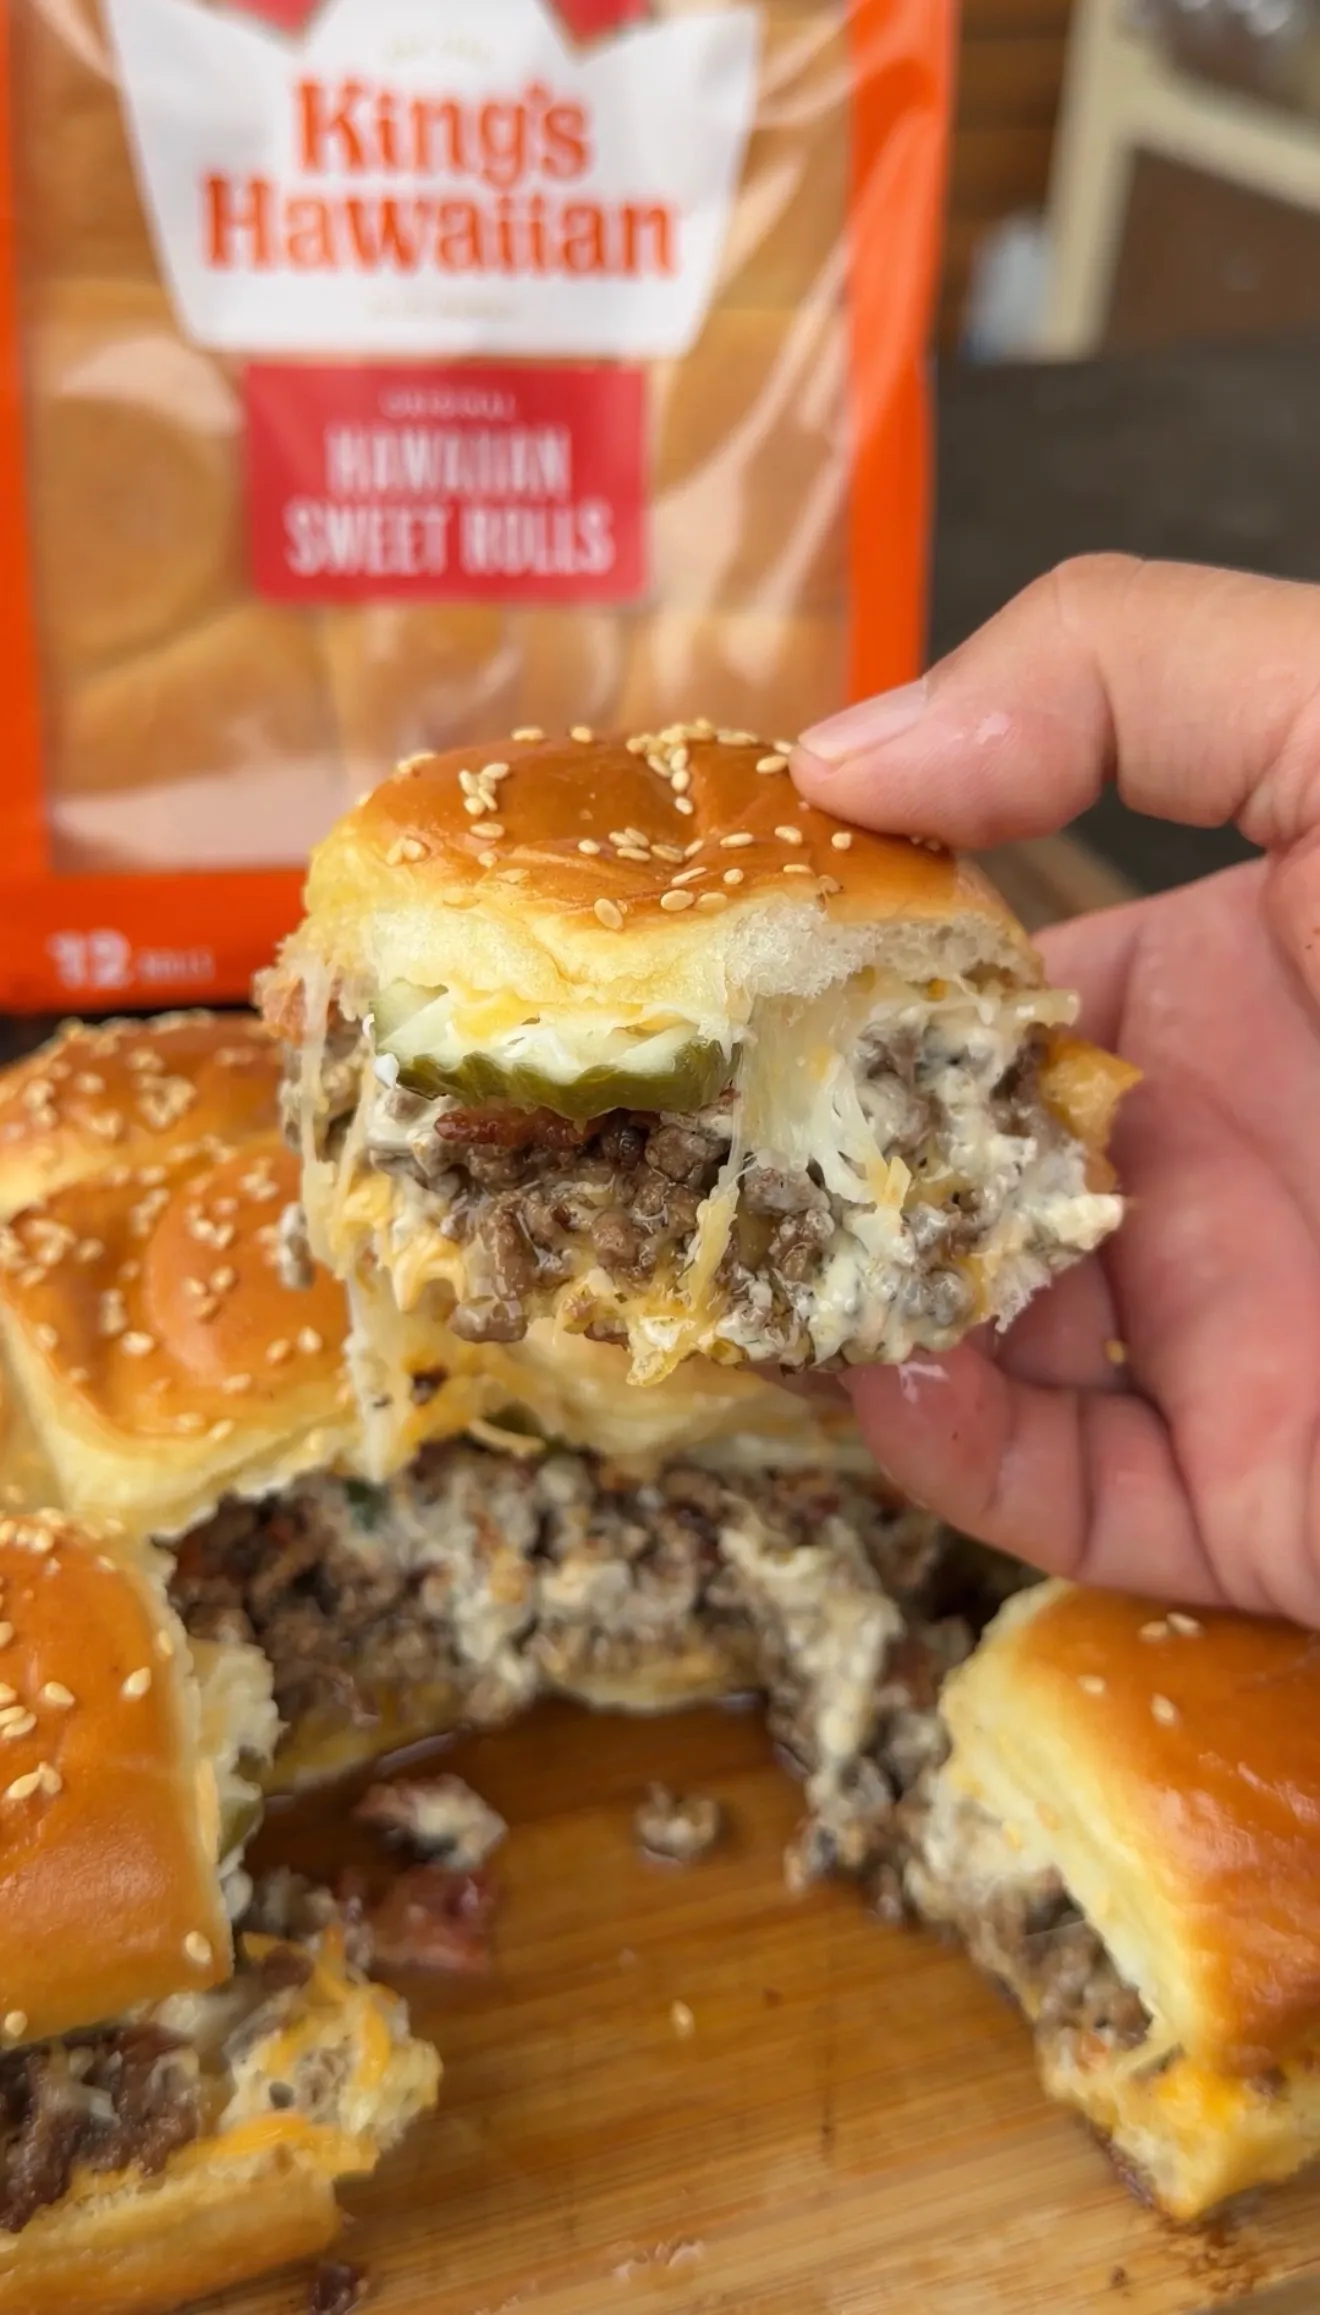
Bacon Cheeseburger Sliders
These bacon cheeseburger sliders stack pre-cooked seasoned ground beef, American cheese, crispy bacon, pickles, and a homemade pickle ranch on King’s Hawaiian Sweet Slider Rolls, then get topped with Colby Jack and baked at 350°F for 15 to 20 minutes until the cheese is fully melted and the buns are golden. The pickle ranch made from mayo, milk, ranch seasoning, chopped pickles, and pickle juice is the differentiator — it adds a tangy, briny layer that regular ranch can’t match. The recipe yields 12 sliders in about 40 minutes total and works as a game day appetizer, party tray, weeknight family meal, or potluck contribution.
Why Pickle Ranch Is the Game-Changer Here
The Pickle Juice + Chopped Pickle Combination
Most cheeseburger slider recipes call for plain ranch or no sauce at all. This recipe builds a pickle ranch using mayonnaise, milk, ranch seasoning, 1 tablespoon of finely chopped pickles, and 2 tablespoons of pickle juice. Specifically, the pickle juice is what separates this sauce from regular ranch with pickles thrown in. The brine acidity penetrates the entire ranch instead of just sitting on top in pickle chunks. As a result, every bite carries the briny tang rather than concentrating it where the pickle pieces land.
Why It Pairs With Beef Better Than Regular Ranch
Beef and pickle is one of the oldest flavor pairings in burger culture, and there’s a chemical reason why. The acidity from the pickles cuts through the fat in the beef and resets the palate between bites. Regular ranch adds creamy fat to creamy fat, which makes the slider feel heavier than it needs to. Therefore, the pickle juice in this ranch does double duty: it adds the briny flavor AND provides the acid that prevents the slider from feeling overwhelming after the third or fourth bite.

Choosing the Right Rolls and Beef
Why King’s Hawaiian Rolls Work Best
King’s Hawaiian Sweet Slider Rolls have three specific qualities that make them ideal for this recipe. First, the sweetness of the bread contrasts against the savory beef, salty bacon, and tangy pickle ranch instead of competing with them. Second, the dense, slightly buttery texture holds up to the moisture from the cheese and beef without going soggy. Third, the rolls come pre-attached in a 12-pack that fits exactly into a standard 9×13 baking dish, which makes the slice-and-build process predictable. Furthermore, other Hawaiian-style sweet roll brands (Pepperidge Farm, store brand) work too, but the King’s Hawaiian shape and consistency are most reliable.
80/20 Ground Beef vs Leaner Blends
Use 80/20 ground beef for this recipe. The 20% fat content provides the juiciness and flavor that lean ground beef (90/10 or higher) lacks. Specifically, you brown the beef in a skillet first and drain off most of the fat anyway, so the higher-fat blend gives you better flavor without making the finished sliders greasy. Moreover, leaner beef tends to dry out during the 15 to 20 minute bake, while 80/20 stays juicy. Avoid 70/30 or anything fattier since the extra fat pools in the bottom of the baking dish and makes the rolls soggy underneath.

Building the Slider Stack in the Right Order
Why American Cheese Goes on the Bottom
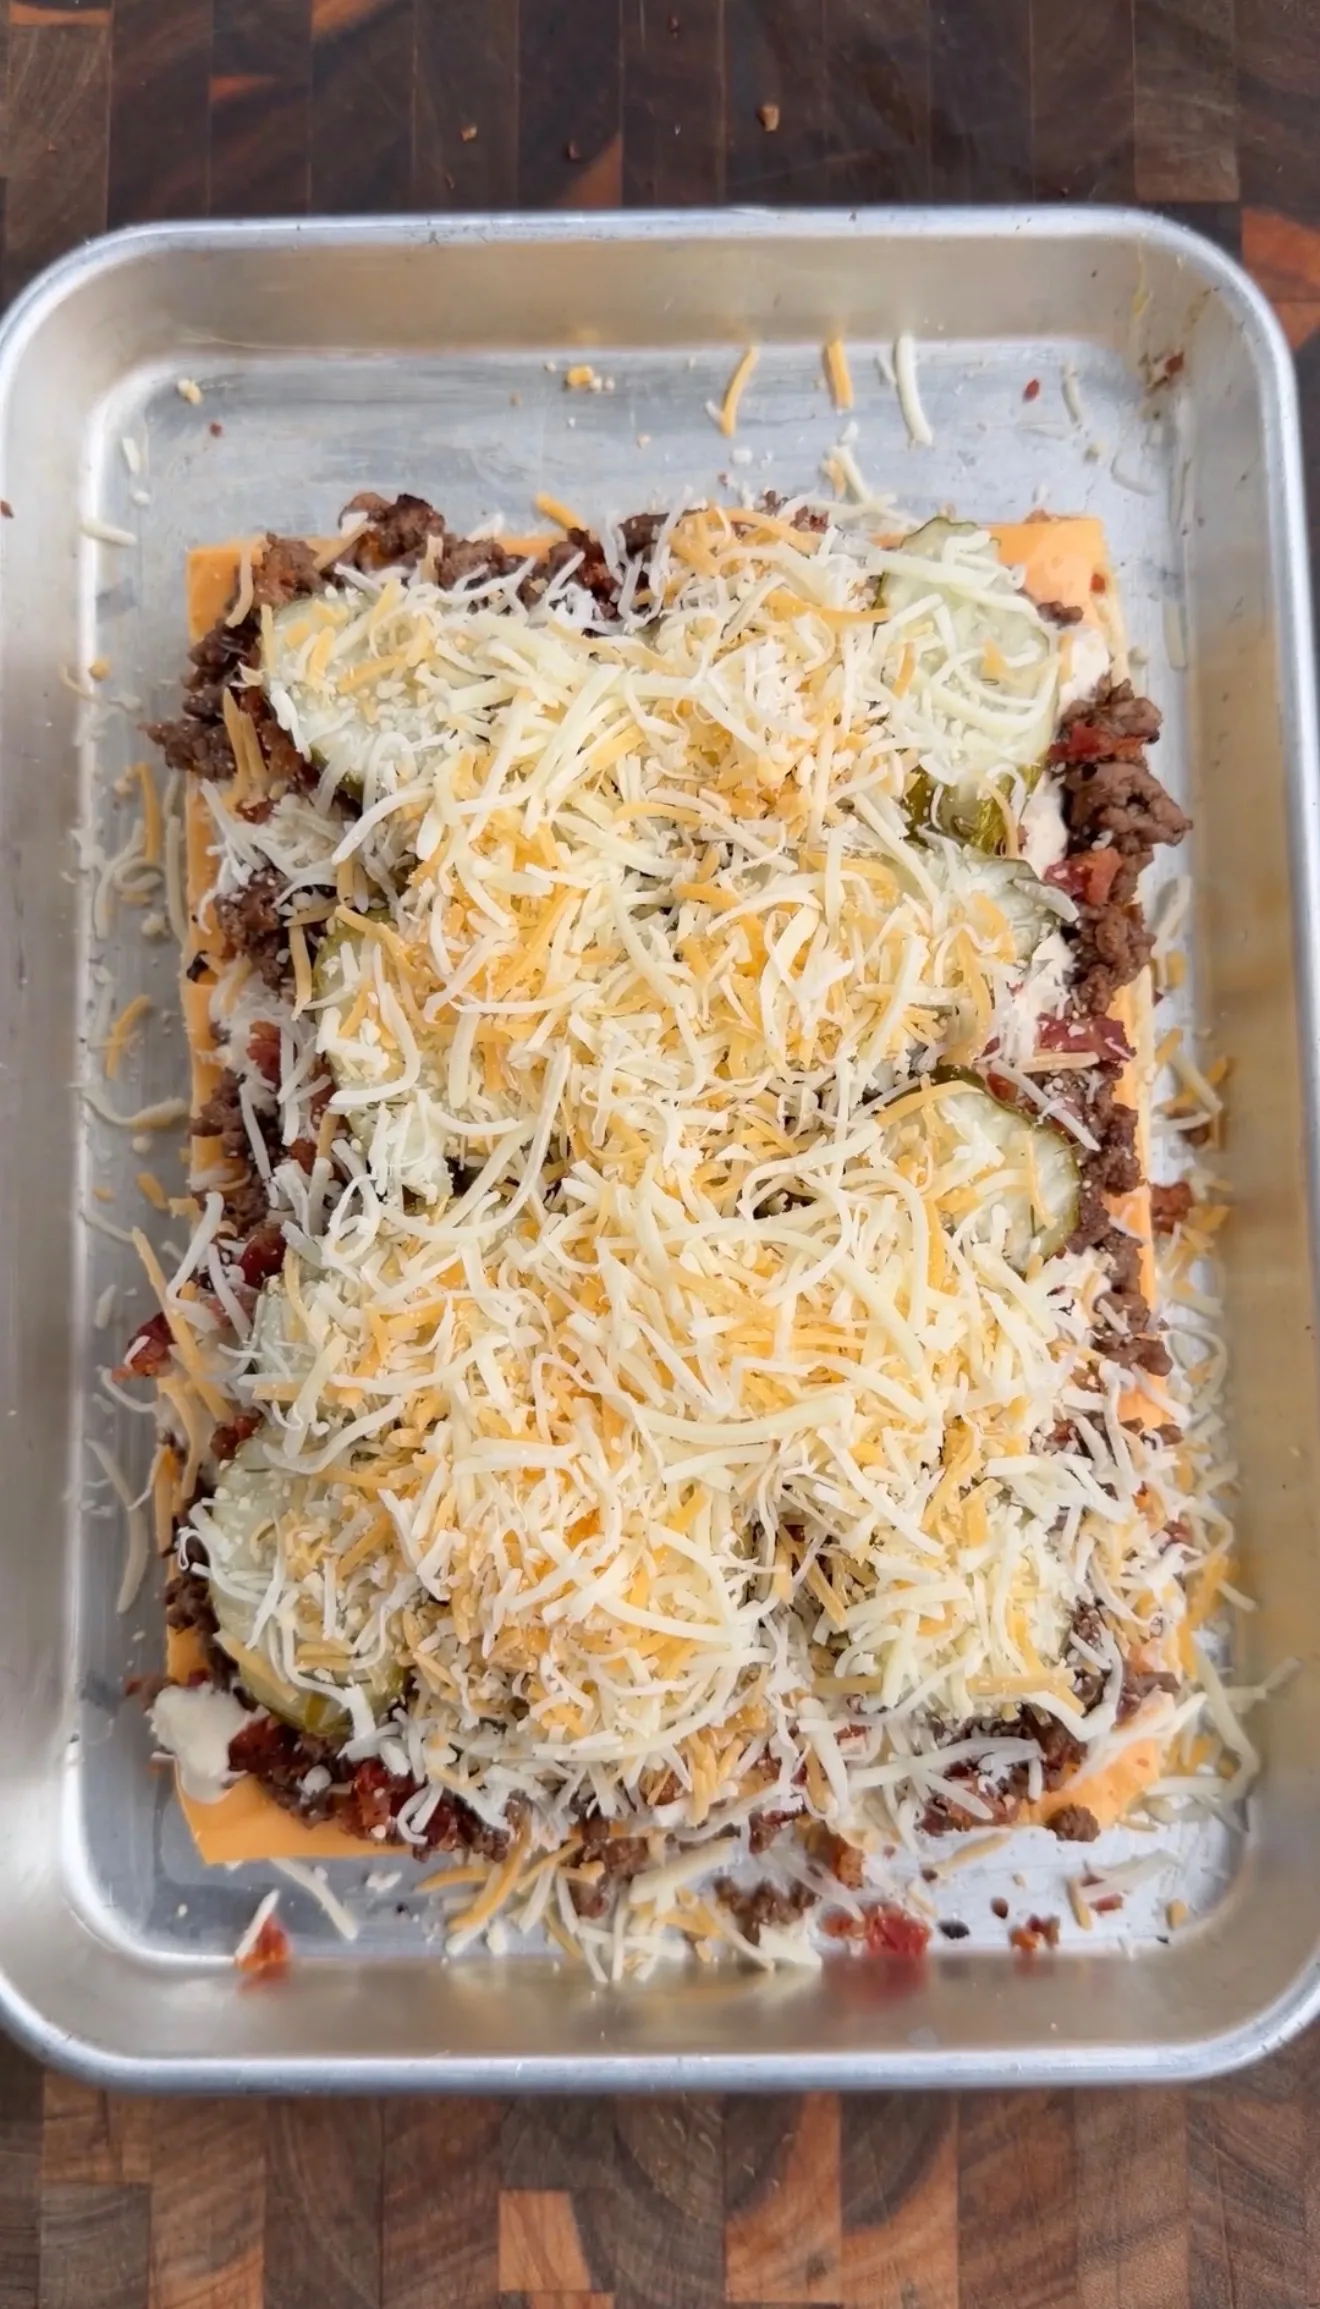
The build order matters more than people expect. American cheese goes directly on the bottom buns for two reasons. First, American melts smoother and more evenly than any other cheese, creating a glossy moisture-resistant layer. Second, that smooth melted layer acts as a barrier between the bun and the beef juices, which prevents the bottom from going soggy. Consequently, do not skip the American cheese or substitute a different variety on the bottom layer. The 6 slices form the structural foundation that keeps the sliders intact.
Colby Jack on Top for Browning
The 1 cup of freshly grated Colby Jack goes on top of the beef and bacon and ranch layer, just under the top buns. This cheese plays a different role than the American below. The mix of Colby and Monterey Jack gives a sharper flavor and browns nicely when exposed to the oven heat through the gaps in the top buns. Moreover, freshly grating from a block (rather than using pre-shredded bagged Colby Jack) gives you a cleaner melt since pre-shredded cheese contains anti-caking agents like cellulose that prevent smooth melting. Therefore, take the extra minute to grate fresh.
Baking at 350°F for 15-20 Minutes
Why the Lower Bake Temp Matters
The 350°F bake temperature is intentionally moderate. Higher temperatures (400°F or above) brown the tops of the buns too quickly while the cheese underneath stays only partially melted. At 350°F, the heat penetrates evenly through the stack, the cheese melts fully across the entire tray, and the tops crisp up to golden without scorching. As a result, all 12 sliders finish at the same time with consistent cheese pull and bun color. Watch the tray around the 15-minute mark since oven calibration varies.
The Butter and Sesame Seed Finish
Brushing the tops of the buns with 2 tablespoons of melted butter before baking does two things. First, the butter helps the buns brown to a deep golden color rather than just toasting pale. Second, the butter acts as glue for the 1 tablespoon of sesame seeds sprinkled on top, which add a nutty flavor and the visual finish that makes sliders look professional. Specifically, salted butter works well here since the salt amplifies the savory beef-and-cheese flavors below. Unsalted butter is fine too if that’s what you have.

Serving and Storage for Game Day Crowds
How to Keep Sliders Warm for a Crowd
Sliders are best served within 15 to 20 minutes of coming out of the oven while the cheese is still melty and the bun tops are still crispy. For game day or party situations where you need to hold them longer, transfer the baked tray to a 200°F oven and tent loosely with foil to maintain warmth without continued cooking. Furthermore, slice the sliders into individual portions only when you’re ready to serve since slicing too early lets the cheese cool and lose its melty texture. Keep the extra pickle ranch on the side in a small bowl for dipping.
Make-Ahead and Reheat Tips
You can assemble the sliders up to 24 hours in advance, cover the unbaked tray tightly with plastic wrap, and refrigerate until ready to bake. When you pull from the fridge, let the tray sit at room temperature for 20 minutes before baking to take the chill off and add 3 to 5 minutes to the bake time. As a result, leftover baked sliders reheat best wrapped in foil at 300°F for 8 to 10 minutes — this revives the cheese without drying the meat or burning the buns. Microwaving works but turns the buns rubbery.
Step-by-Step: How to Make Bacon Cheeseburger Pickle Ranch Sliders
Step 1: Mix the Pickle Ranch
In a small bowl, combine the 1/2 cup mayonnaise, 1/2 cup milk, packet of ranch seasoning (about 1.5 tablespoons), 1 tablespoon finely chopped pickles, and 2 tablespoons pickle juice. Whisk until smooth and the ranch seasoning is fully dissolved. Cover and refrigerate while you prepare the rest of the sliders so the flavors meld together.
Step 2: Cook the Ground Beef
Heat a skillet over medium-high heat. Add the 1 pound of ground beef and season with 1 tablespoon of your favorite steak or burger seasoning. Cook for 7 to 10 minutes, breaking up the meat with a wooden spoon, until fully browned with no pink remaining. Drain off the excess fat and remove from the heat.

Step 3: Slice the Slider Rolls
Preheat the oven to 350°F. Keep the 12 King’s Hawaiian rolls attached as a single slab. Use a serrated knife to slice the slab horizontally in half, keeping the tops and bottoms intact. Place the bottom half in a 9×13 baking dish or sheet pan.

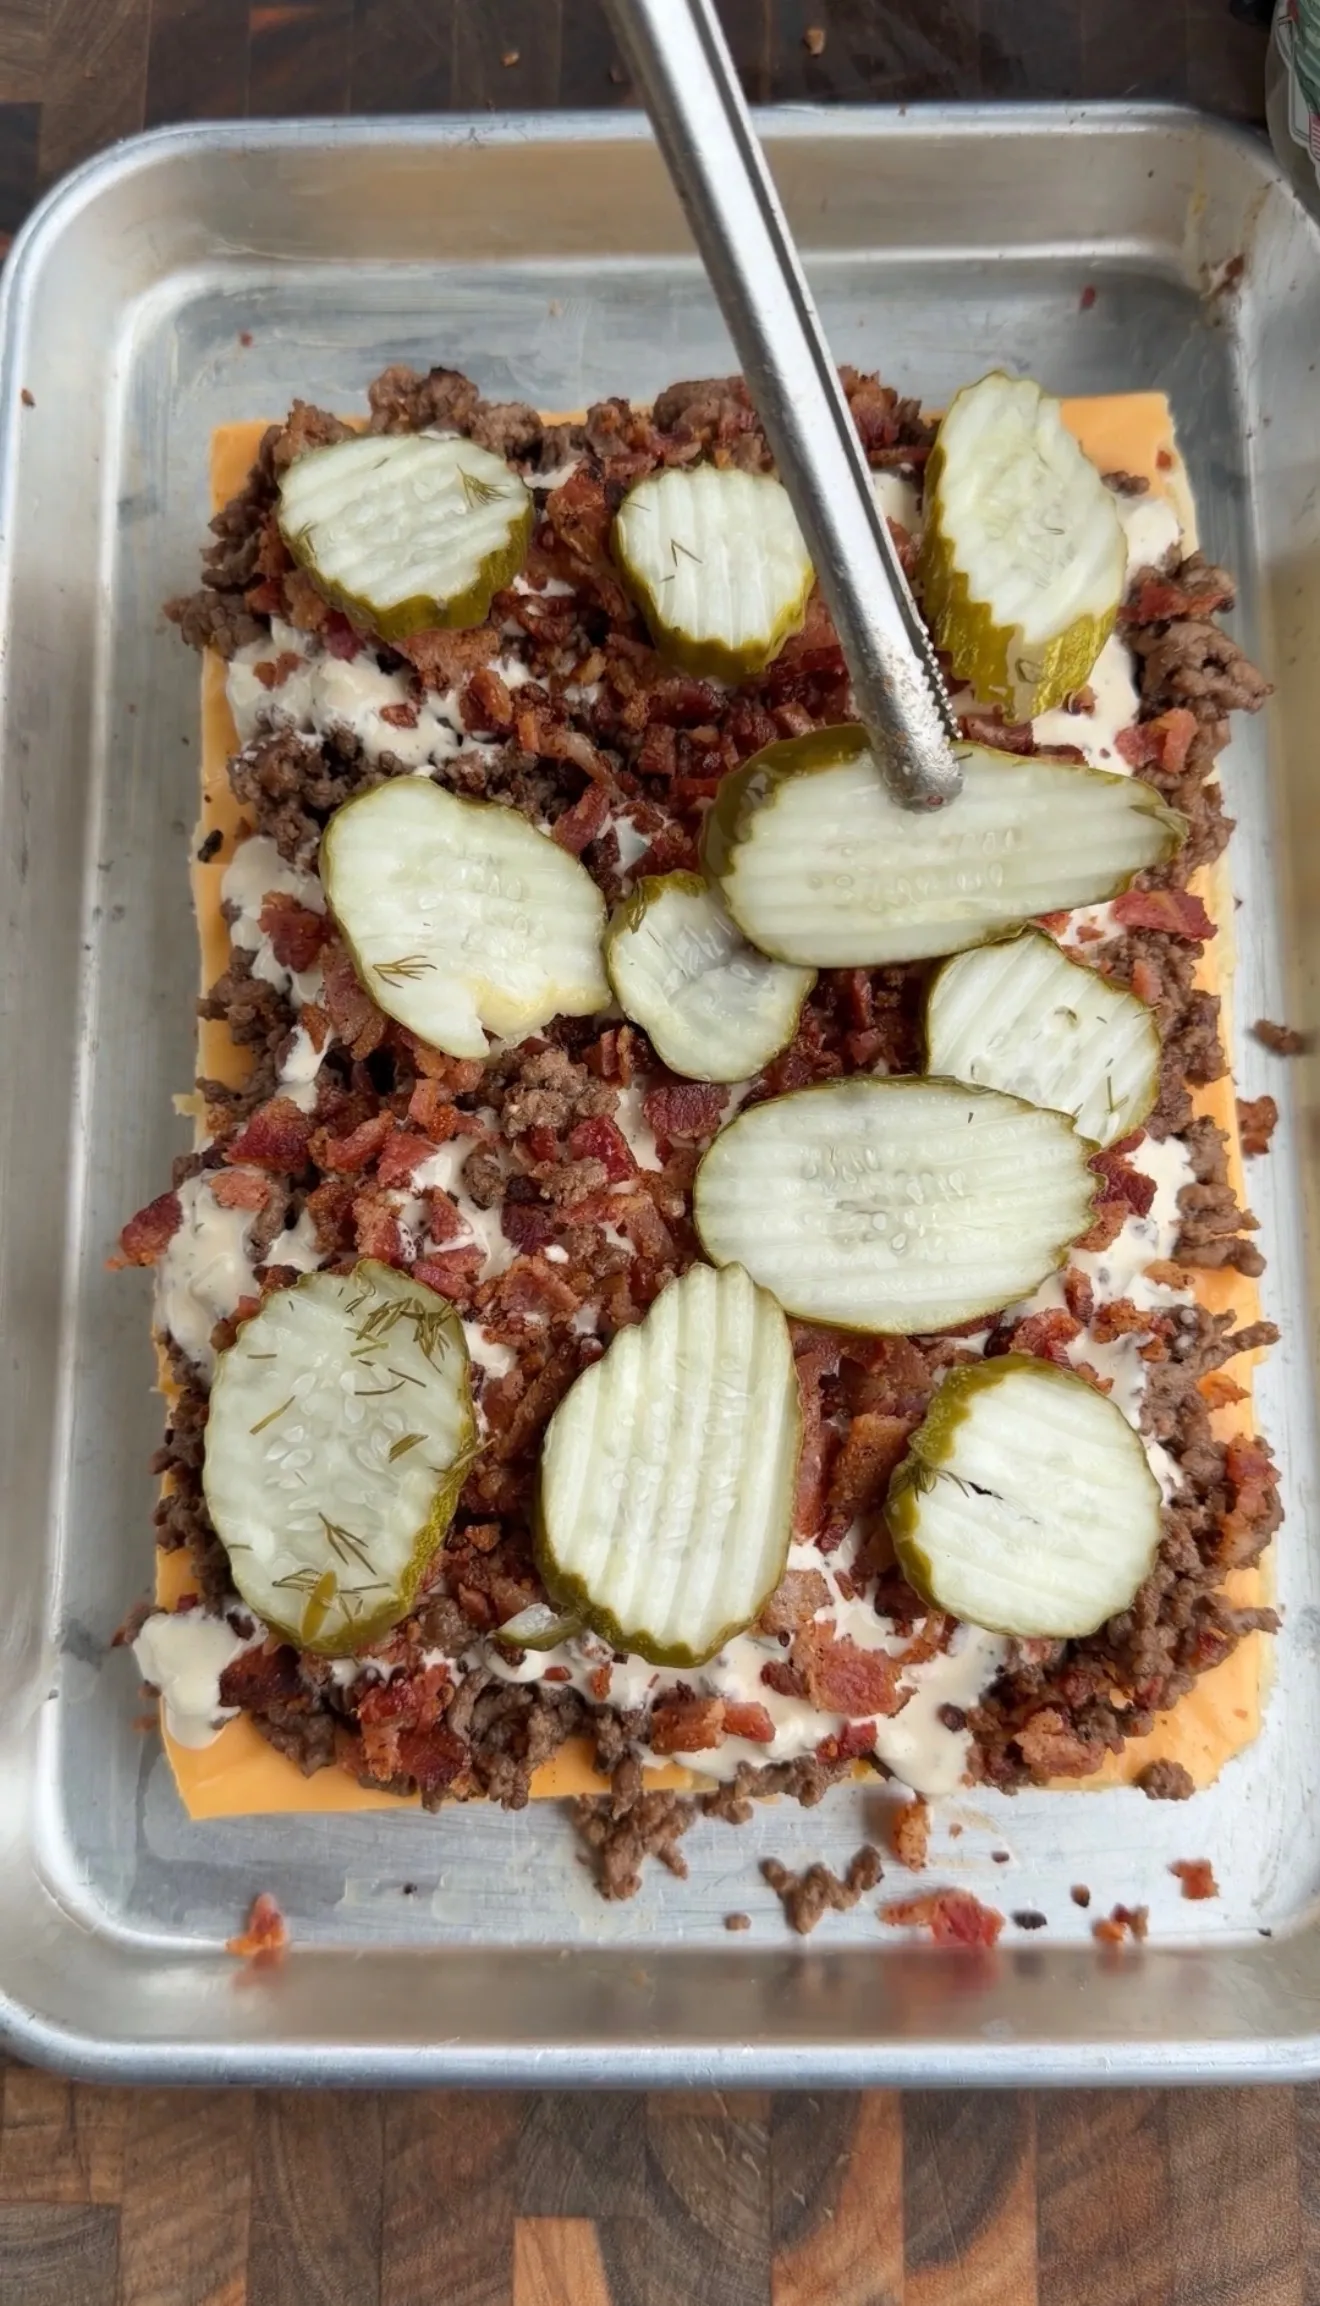
Step 4: Layer the Slider Components
Layer the 6 slices of American cheese over the bottom buns to cover them edge to edge. Spread the cooked ground beef evenly over the cheese. Drizzle a generous layer of pickle ranch over the beef (save the remainder for dipping). Sprinkle the crumbled bacon over the ranch, then add a pickle slice on top of each slider position. Finally, sprinkle the 1 cup of freshly grated Colby Jack evenly across the top.
Step 5: Top With Buns, Butter, and Sesame Seeds
Place the top half of the rolls over the assembled filling. Brush the tops generously with the 2 tablespoons of melted butter, making sure to cover the entire surface evenly. Sprinkle the 1 tablespoon of sesame seeds across the buttered tops.
Step 6: Bake at 350°F for 15-20 Minutes
Bake in the preheated 350°F oven for 15 to 20 minutes, until the cheese is fully melted and the bun tops are golden brown and slightly crispy. Check around the 15-minute mark to gauge browning since oven calibration varies. If the tops are browning too quickly, tent with foil for the final 5 minutes.

Step 7: Slice and Serve With Extra Pickle Ranch
Remove the sliders from the oven and let them rest for 2 to 3 minutes to let the cheese set slightly before slicing. Use a sharp knife to cut between each slider, following the natural divisions of the King’s Hawaiian rolls. Serve immediately with the remaining pickle ranch in a small bowl on the side for dipping.
Bacon Cheeseburger Pickle Ranch Sliders
Ingredients
Equipment
Method
- In a small bowl, combine the mayonnaise, milk, ranch seasoning, finely chopped pickles, and pickle juice. Whisk until smooth and the ranch seasoning is fully dissolved. Cover and refrigerate while you prepare the rest.
- Heat a skillet over medium-high heat. Add the ground beef and season with steak or burger seasoning. Cook for 7 to 10 minutes, breaking up the meat with a wooden spoon, until fully browned with no pink remaining. Drain off the excess fat.
- Preheat the oven to 350°F. Keep the King’s Hawaiian rolls attached as a single slab and slice horizontally in half with a serrated knife, keeping tops and bottoms intact. Place the bottom half in a 9×13 baking dish.
- Layer the 6 slices of American cheese over the bottom buns to cover them edge to edge. Spread the cooked ground beef evenly over the cheese.
- Drizzle a generous layer of pickle ranch over the beef (save the remainder for dipping). Sprinkle the crumbled bacon over the ranch, then add one pickle slice on top of each slider position. Sprinkle the freshly grated Colby Jack evenly across the top.
- Place the top half of the rolls over the assembled filling. Brush the tops generously with melted butter, covering the entire surface evenly. Sprinkle sesame seeds across the buttered tops.
- Bake in the preheated 350°F oven for 15 to 20 minutes, until the cheese is fully melted and the bun tops are golden brown and slightly crispy. If tops brown too quickly, tent with foil for the final 5 minutes.
- Let the sliders rest for 2 to 3 minutes after pulling from the oven to let the cheese set slightly. Slice between each slider with a sharp knife and serve immediately with the remaining pickle ranch in a small bowl on the side for dipping.
Notes
Tried this recipe?
Let us know how it was!Bacon Cheeseburger Pickle Ranch Sliders — FAQ
Everything you need to nail the build, the bake, and the pickle ranch.
Setup & Basics
Yes. King’s Hawaiian is the recommended choice because of the sweet-savory contrast, dense texture, and 12-pack format that fits a 9×13 pan exactly. Strong alternatives include Pepperidge Farm Sweet Hawaiian Slider Buns, Walmart’s Great Value Hawaiian Sweet Rolls, or Costco’s Kirkland Hawaiian Rolls. If using regular dinner rolls (not Hawaiian-style), the sliders work but lose the signature sweet-savory balance. Avoid pretzel rolls or brioche slider buns for this recipe \u2014 they’re too dense and don’t absorb the cheese-ranch combination as well.
Pickle juice is what defines this ranch, so substituting changes the flavor noticeably. If you have to skip it, the closest substitutes are 2 tablespoons of white vinegar + 1/4 teaspoon of dried dill, which mimics the tang and herbal notes. Otherwise, plain white vinegar (2 tbsp) or apple cider vinegar (2 tbsp) work but won’t quite replicate the briny pickle flavor. Best advice: if you have pickles in the fridge for the chopped pickle and pickle slice ingredients, you already have pickle juice in the jar \u2014 just use that.
Yes, but expect different results. Ground turkey works as a 1-to-1 substitute, though the flavor is significantly milder. Use the dark meat blend (85/15 ground turkey) for more flavor and juiciness, and add an extra teaspoon of seasoning to compensate. Ground chicken works too but is leanest of the three and tends to dry out \u2014 add a tablespoon of olive oil to the skillet when browning. For either substitute, cook to 165°F internal (USDA poultry requirement). The bacon, cheeses, and pickle ranch carry plenty of flavor either way, so the substitution still produces a great-tasting slider, just less “cheeseburger” and more general “savory.”
Three options layered from mild to bold. Mild heat: Add 1/4 teaspoon of cayenne pepper to the beef seasoning when browning. Medium heat: Swap regular pickles for spicy dill pickles (Wickles, Mt. Olive Hot & Spicy) and use the spicy pickle juice in the ranch. Bold heat: Add 1 to 2 tablespoons of diced pickled jalapeños to the beef layer along with the bacon, and drizzle 1 tablespoon of your favorite hot sauce (Frank’s, Cholula, Crystal) over the beef before adding the pickle ranch. All three modifications keep the pickle ranch as the base flavor while building heat on top.
Technique & Troubleshooting
Three likely causes. First and most common, you didn’t drain the cooked beef thoroughly enough. 80/20 ground beef releases significant fat during browning. Drain in a colander or pour off the fat from the skillet before assembling. Second, you skipped the American cheese layer between the bun and beef. That cheese acts as a moisture barrier \u2014 without it, the bun absorbs beef juice directly and goes soggy. Third, you used pre-cooked frozen ground beef without draining or used a fattier blend like 70/30. Stick to 80/20 and drain well. Once these three are right, the bottom buns stay structured through serving.
Make-ahead: Yes \u2014 assemble the sliders completely (everything but the butter/sesame topping), cover the unbaked tray tightly with plastic wrap, and refrigerate up to 24 hours. Pull from the fridge 20 minutes before baking and brush the butter/sesame topping on right before they go in the oven. Add 3 to 5 minutes to the bake time. Freezing: Assembled but unbaked sliders freeze well for up to 1 month. Wrap tightly in plastic wrap, then foil. Thaw overnight in the fridge before baking as directed. Reheating leftovers: Wrap in foil and warm at 300°F for 8 to 10 minutes \u2014 never microwave (the buns turn rubbery and the cheese breaks).
Ready to Level Up?
Take your backyard cooking from good to legendary.
This is where I keep all my most-used smokers, knives, and favorite cooking tools.
Shop My Gear CollectionExplore More Recipes
Find more diverse flavors at CWFeats.com
