Homemade fried chicken is bone-in chicken thighs brined in tangy pickle juice and buttermilk, coated in a crispy cornstarch-flour blend, then deep-fried in high-heat oil at 325-350°F for 14-16 minutes until golden brown and reaching an internal temperature of 175-185°F. The pickle juice brine tenderizes the meat through acidity while adding subtle tangy flavor, and the buttermilk continues the tenderizing process while creating a sticky base for the breading to adhere. The cornstarch in the coating creates an extra-crispy, shatteringly crunchy exterior that stays crisp even as it cools. This fried chicken recipe delivers restaurant-quality results at home with juicy, flavorful meat and a perfectly seasoned, ultra-crispy crust.
The whole process takes about 8-24 hours for marinating, plus 20 minutes of prep and 15 minutes of active frying time. You marinate the chicken overnight in the pickle juice-buttermilk mixture, dredge each piece thoroughly in the seasoned flour-cornstarch blend, let the coating set for 10-15 minutes, then fry in batches until perfectly crispy. The extended marination time allows the acids to break down tough muscle fibers while the salt penetrates deep into the meat. These buttermilk fried chicken thighs are perfect for weekend dinners, game day spreads, or any time you’re craving crispy, flavorful fried chicken that rivals your favorite restaurant.
Why Pickle Juice Creates the Most Tender Fried Chicken
Pickle juice transforms ordinary chicken into exceptionally tender meat through a combination of acidity, salt, and natural brining compounds. The vinegar-based brine contains acetic acid that breaks down protein structures in the chicken, making tough muscle fibers more tender without turning the meat mushy. Unlike aggressive marinades that can make chicken mealy, pickle juice works slowly and gently, requiring 8-24 hours to achieve optimal results.
The salt content in pickle juice penetrates deep into the meat, seasoning it from the inside out rather than just coating the surface. This creates flavor throughout every bite instead of just on the exterior. The brine also helps the chicken retain moisture during frying by altering the protein structure so it holds onto water more effectively. When you fry brined chicken, you get juicy meat that stays moist even at the higher internal temperatures needed for bone-in thighs.
Pickle juice also adds a subtle tangy undertone that enhances but doesn’t overpower the chicken’s natural flavor. You won’t taste “pickles” in the finished product, you’ll taste well-seasoned, complex chicken with a slight brightness that cuts through the richness of fried food. The dill and spices in most pickle brines add another layer of flavor complexity that plain salt water simply can’t match.
This technique works particularly well with bone-in chicken thighs because the darker meat has more fat and connective tissue that benefits from extended brining. The acids break down collagen into gelatin, creating that melt-in-your-mouth texture you associate with the best fried chicken. White meat can become too soft with extended pickle juice brining, but thighs hit the perfect balance of tender yet substantial texture.
What Makes Buttermilk Essential for Crispy Fried Chicken

Buttermilk serves multiple critical functions in fried chicken that go beyond simple moisture. The lactic acid in buttermilk continues the tenderizing process started by the pickle juice, working in tandem to break down proteins while adding a subtle tangy richness to the meat. This dual-acid approach creates chicken that’s remarkably tender without any chemical or artificial tenderizers.
The thick, slightly viscous texture of buttermilk creates a sticky coating on the chicken that helps the breading adhere much better than water or regular milk. When you pull chicken from the buttermilk marinade, it’s coated in a thin layer that the flour mixture grabs onto, creating that thick, craggy coating you want on fried chicken. Thin liquids like water just slide off the meat, leaving you with a sparse, uneven coating that falls off during frying.
Buttermilk’s fat content also contributes to flavor and moisture retention. Full-fat buttermilk adds richness that complements the chicken without making it greasy, and the milk proteins help form a better crust during frying. The Maillard reaction between milk proteins and the heat of the oil creates deeper browning and more complex flavors than you’d get with a water-based marinade.
If you don’t have buttermilk, you can make a substitute by mixing regular milk with lemon juice or vinegar (1 tablespoon of acid per cup of milk, let sit 5-10 minutes), but real buttermilk gives superior results. The commercial buttermilk fermentation creates specific compounds that enhance both flavor and texture in ways that quick acidified milk can’t fully replicate.
How Cornstarch Creates Extra-Crispy Fried Chicken Coating
Cornstarch mixed into the flour creates a coating that’s significantly crispier than flour alone, and the texture stays crunchy even as the chicken cools. Pure wheat flour contains gluten that, when hydrated by the buttermilk, forms stretchy networks that can make the coating tough or chewy rather than crisp. Cornstarch contains no gluten, so it fries up into delicate, shattery shards that provide maximum crunch with minimal toughness.
The starch granules in cornstarch absorb less moisture than wheat flour, which means the coating stays drier and crisper during and after frying. When you bite into chicken with a cornstarch coating, you get that audible crunch followed by tender, juicy meat. The ratio of 3 cups flour to ¾ cup cornstarch (about 20% cornstarch) hits the sweet spot where you get structure from the flour and crispness from the cornstarch without the coating becoming too delicate or fragile.
Cornstarch also browns more quickly and evenly than flour alone, giving you that beautiful golden color at lower frying temperatures. This matters because you need to fry bone-in chicken at a moderate temperature (325-350°F) to cook the meat through without burning the exterior. The cornstarch helps you achieve deep golden browning in the same time it takes the chicken to cook internally.
The combination works because the flour provides the bulk and structure of the coating while the cornstarch provides the texture. You get a thick, substantial crust that doesn’t fall off the chicken, but instead of being dense or doughy, it’s light and crispy. This is the same principle behind Korean fried chicken and Japanese karaage, both of which rely heavily on starch-based coatings for superior crunch.
Should You Rest Breaded Chicken Before Frying
Resting the breaded chicken for 10-15 minutes before frying makes a substantial difference in how well the coating adheres during cooking. When you first coat the chicken, the breading sits loosely on the surface, held only by the sticky buttermilk underneath. During the rest period, moisture from the buttermilk begins to hydrate the flour and cornstarch, creating a more cohesive coating that bonds to the chicken.
This hydration process also allows the seasoning in the breading to start dissolving and dispersing throughout the coating, creating more evenly flavored chicken. If you fry immediately after breading, you’ll have pockets of intense seasoning and bland spots, but resting lets the salt, pepper, and spices distribute evenly. The coating also becomes slightly tacky as the starches absorb moisture, which helps prevent the dreaded situation where the breading slides off the chicken in the fryer.
The rest period gives excess breading time to settle and adhere rather than falling off as loose flour that can burn in the oil. When you pick up freshly breaded chicken, you’ll see loose flour clinging to it that will immediately float off into the oil if you fry right away. After resting, that loose coating has either adhered to the chicken or fallen off naturally, leaving you with just the coating that’s actually stuck to the meat.
Resting on a wire rack rather than a plate is important because it allows air circulation around the entire piece of chicken. A plate would create a wet spot on the bottom where the coating gets soggy, but a rack keeps every surface exposed to air so the coating can set evenly. You don’t need more than 15 minutes; longer rest times can actually make the coating too wet if the buttermilk keeps saturating the flour.
What’s the Best Oil Temperature for Bone-In Fried Chicken
The ideal frying temperature for bone-in chicken thighs is 325-350°F, which is lower than many fried chicken recipes recommend but critical for cooking the meat through without burning the exterior. Bone-in dark meat needs about 14-16 minutes of frying time to reach the optimal internal temperature of 175-185°F, and if your oil is too hot, the coating will burn before the meat cooks.
You need an accurate thermometer to monitor oil temperature throughout frying because adding cold chicken will drop the temperature by 25-50°F depending on how much you add at once. Start at 350°F so when you add the chicken, the temperature drops to 325°F, then gradually climbs back toward 340-350°F as the chicken fries. If you start at 325°F and add chicken, your oil temperature might drop to 300°F or lower, resulting in greasy, oil-soaked chicken instead of crispy coating.
The lower temperature also prevents the extreme bubbling and spitting you get with higher-heat frying. At 375°F or above, the moisture inside the chicken creates violent bubbling that can cause oil to spatter dangerously and makes it difficult to maintain consistent temperature. The moderate 325-350°F range gives you a vigorous but controlled fry that cooks the chicken evenly while building a golden, crispy crust.
High-heat oils with smoke points above 400°F are essential for safe, effective frying. Avocado oil (smoke point ~520°F), peanut oil (~450°F), vegetable oil (~400-450°F), and canola oil (~400°F) all work well. Avoid olive oil (smoke point ~375°F) or butter, which will smoke and break down at frying temperatures. The neutral flavor of these oils also lets the chicken’s seasoning shine through without adding competing flavors.
Step-by-Step Instructions
Step 1: Prepare the Pickle Juice and Buttermilk Marinade
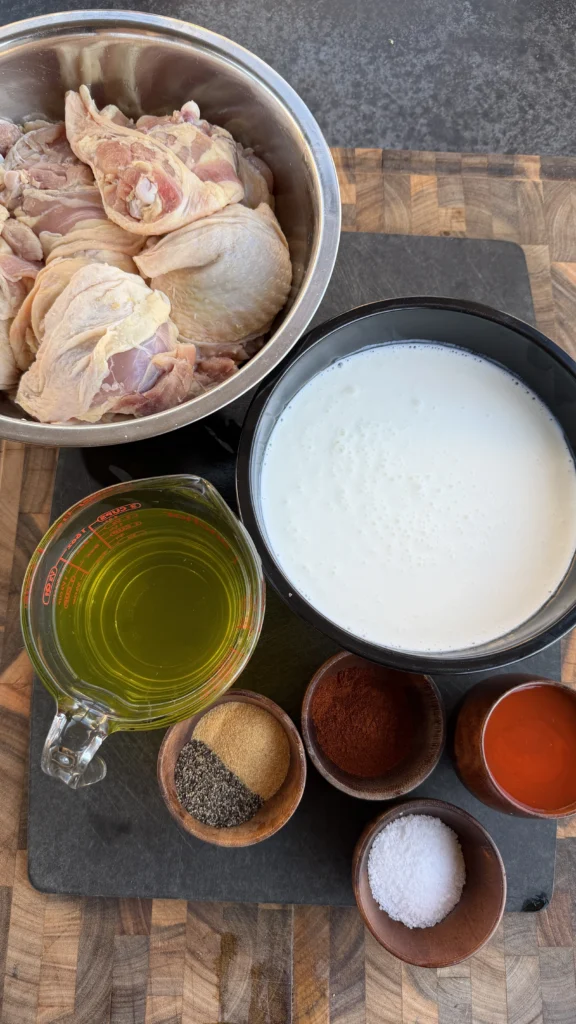
Combine 1¼ cups dill pickle juice, 2½ cups buttermilk, ¼ cup hot sauce (if using), 2 tsp kosher salt, 2 tsp black pepper, 2 tsp paprika, 1½ tsp garlic powder, and cayenne pepper to taste in a large bowl or container with a lid. Whisk everything together until the spices are fully dissolved and the marinade is uniform in color. The pickle juice should blend completely into the buttermilk, creating a tangy, slightly pink liquid from the paprika.
Add your 4 lbs of bone-in chicken thighs to the marinade, making sure every piece is fully submerged. Press the chicken down into the liquid and move it around to eliminate any air pockets where the marinade isn’t touching the meat. If you have thighs stacked on top of each other, rearrange them so the marinade can reach all surfaces.
Cover the container tightly with a lid or plastic wrap and refrigerate for 8-24 hours. The minimum marinade time is 8 hours, but 12-24 hours gives you the most tender, flavorful results. Turn the chicken once or twice during marinating if you remember, but it’s not critical if you forget. The acids and salt will penetrate regardless.
Don’t marinade longer than 24 hours or the texture can become too soft and almost mushy. The acids break down proteins effectively, but too much time can over-tenderize the meat. If you need to marinade longer due to schedule constraints, reduce the pickle juice by half and increase the buttermilk to maintain moisture without as much acid.
Step 2: Mix the Cornstarch Breading
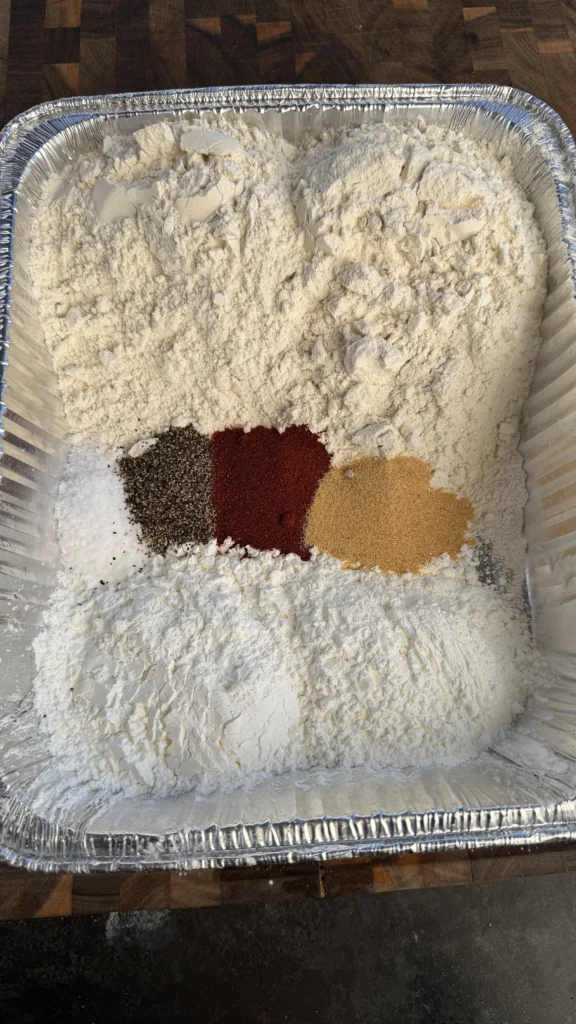
In a large, wide bowl or baking dish, combine 3 cups all-purpose flour, ¾ cup cornstarch, 2 tsp kosher salt, 2 tsp black pepper, 2 tsp paprika, 1½ tsp garlic powder, and cayenne pepper if you want heat. Whisk everything together thoroughly to distribute the cornstarch and seasonings evenly throughout the flour. You want no clumps of cornstarch or pockets of concentrated seasoning.
The flour mixture should look slightly lighter and silkier than plain flour due to the cornstarch. Run your fingers through it to make sure there are no lumps and the seasoning is distributed uniformly. If you see clumps, break them up with your fingers or whisk more vigorously.
Use a wide, shallow dish for breading rather than a deep bowl. You need room to lay chicken pieces flat and coat them thoroughly without the breading getting too compacted. A 9×13-inch baking dish or large pie plate works perfectly. You want at least 2 inches of breading depth so you can completely cover each piece of chicken.
Keep this breading mixture dry until you’re ready to coat the chicken. Don’t add any liquid to it or try to make it into a wet batter. The dry coating will hydrate from the buttermilk clinging to the chicken, creating the perfect texture for crispy fried chicken.
Step 3: Bread the Chicken and Let It Rest
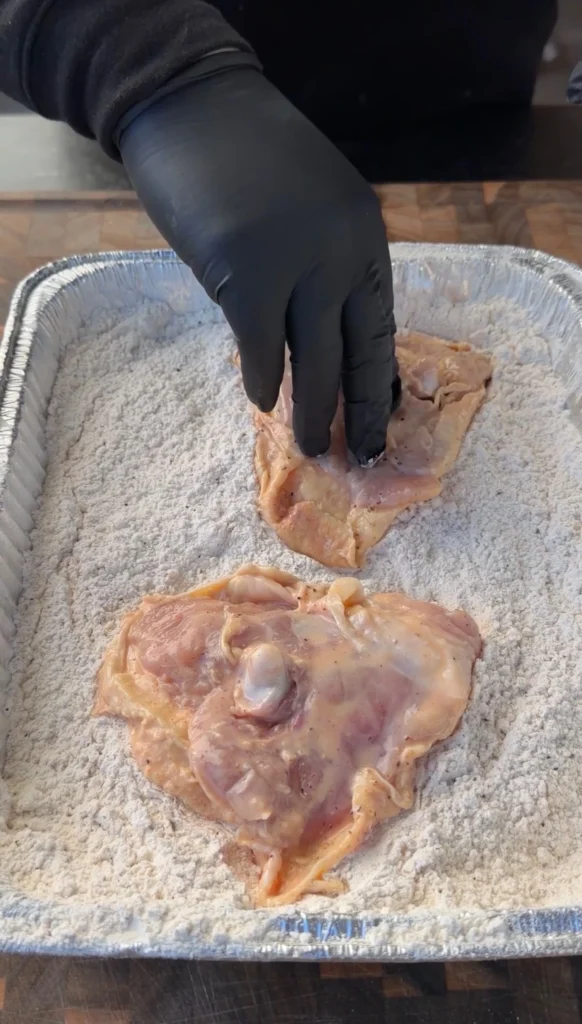
Pull the chicken thighs from the marinade one at a time, letting excess buttermilk mixture drip off back into the bowl, but don’t shake or wipe the chicken dry. You want a good coating of wet marinade still clinging to the meat because that’s what makes the breading stick. The chicken should look heavily coated and wet.
Press each piece firmly into the flour-cornstarch mixture, turning it and pressing down to coat all surfaces. Use your hands to press breading onto any spots that aren’t fully covered, especially around bones and in crevices. The coating should look thick and shaggy, with lots of texture and no bare spots. Don’t be afraid to really pack the breading onto the chicken.
As you finish coating each piece, transfer it to a wire rack set over a baking sheet. Arrange the breaded chicken in a single layer with space between pieces so air can circulate. This prevents the coating from getting soggy where pieces touch each other.
Let the breaded chicken rest at room temperature for 10-15 minutes before frying. You’ll see the coating change from powdery and dry to slightly damp and cohesive as the buttermilk hydrates the flour. This rest is critical for coating adhesion, so don’t skip it.
Step 4: Heat the Oil and Prepare for Frying
Pour 2-3 quarts of high-heat oil into a heavy-bottomed pot or Dutch oven, or fill your electric fryer according to manufacturer instructions. The oil should be at least 3 inches deep, but don’t fill the pot more than halfway to allow room for the oil to bubble up when you add chicken. A 5-6 quart Dutch oven works perfectly for frying chicken in batches.
Heat the oil to 350°F over medium-high heat, using a deep-fry or instant-read thermometer to monitor the temperature. Oil temperature will climb slowly at first, then accelerate rapidly as it approaches 350°F, so watch it carefully to avoid overshooting. If the oil reaches 375°F or higher, remove the pot from heat and let it cool slightly.
Set up your frying station before you start: wire rack for draining, tongs or a spider strainer for handling chicken, thermometer for monitoring oil, and paper towels under the rack to catch drips. Have everything within arm’s reach so you can focus on maintaining oil temperature and timing without scrambling for equipment.
Keep a lid nearby (but don’t cover the pot while frying) in case of oil splatter or the extremely rare event of an oil fire. Never pour water on hot oil; if you have an emergency, turn off the heat and use the lid to smother any flames.
Step 5: Fry the Chicken in Batches
Carefully lower 3-4 chicken thighs into the 350°F oil, sliding them in gently to minimize splashing. Don’t drop them from a height or you’ll get dangerous oil splatter. The oil temperature will immediately drop when you add the cold chicken; this is normal and expected.
The oil should settle at 325-340°F once the chicken is in. Adjust your burner heat to maintain this range throughout cooking. If the temperature drops below 320°F, increase the heat slightly. If it climbs above 350°F, reduce the heat. You want a steady, vigorous bubble around each piece of chicken, but not violent, aggressive bubbling that indicates the oil is too hot.
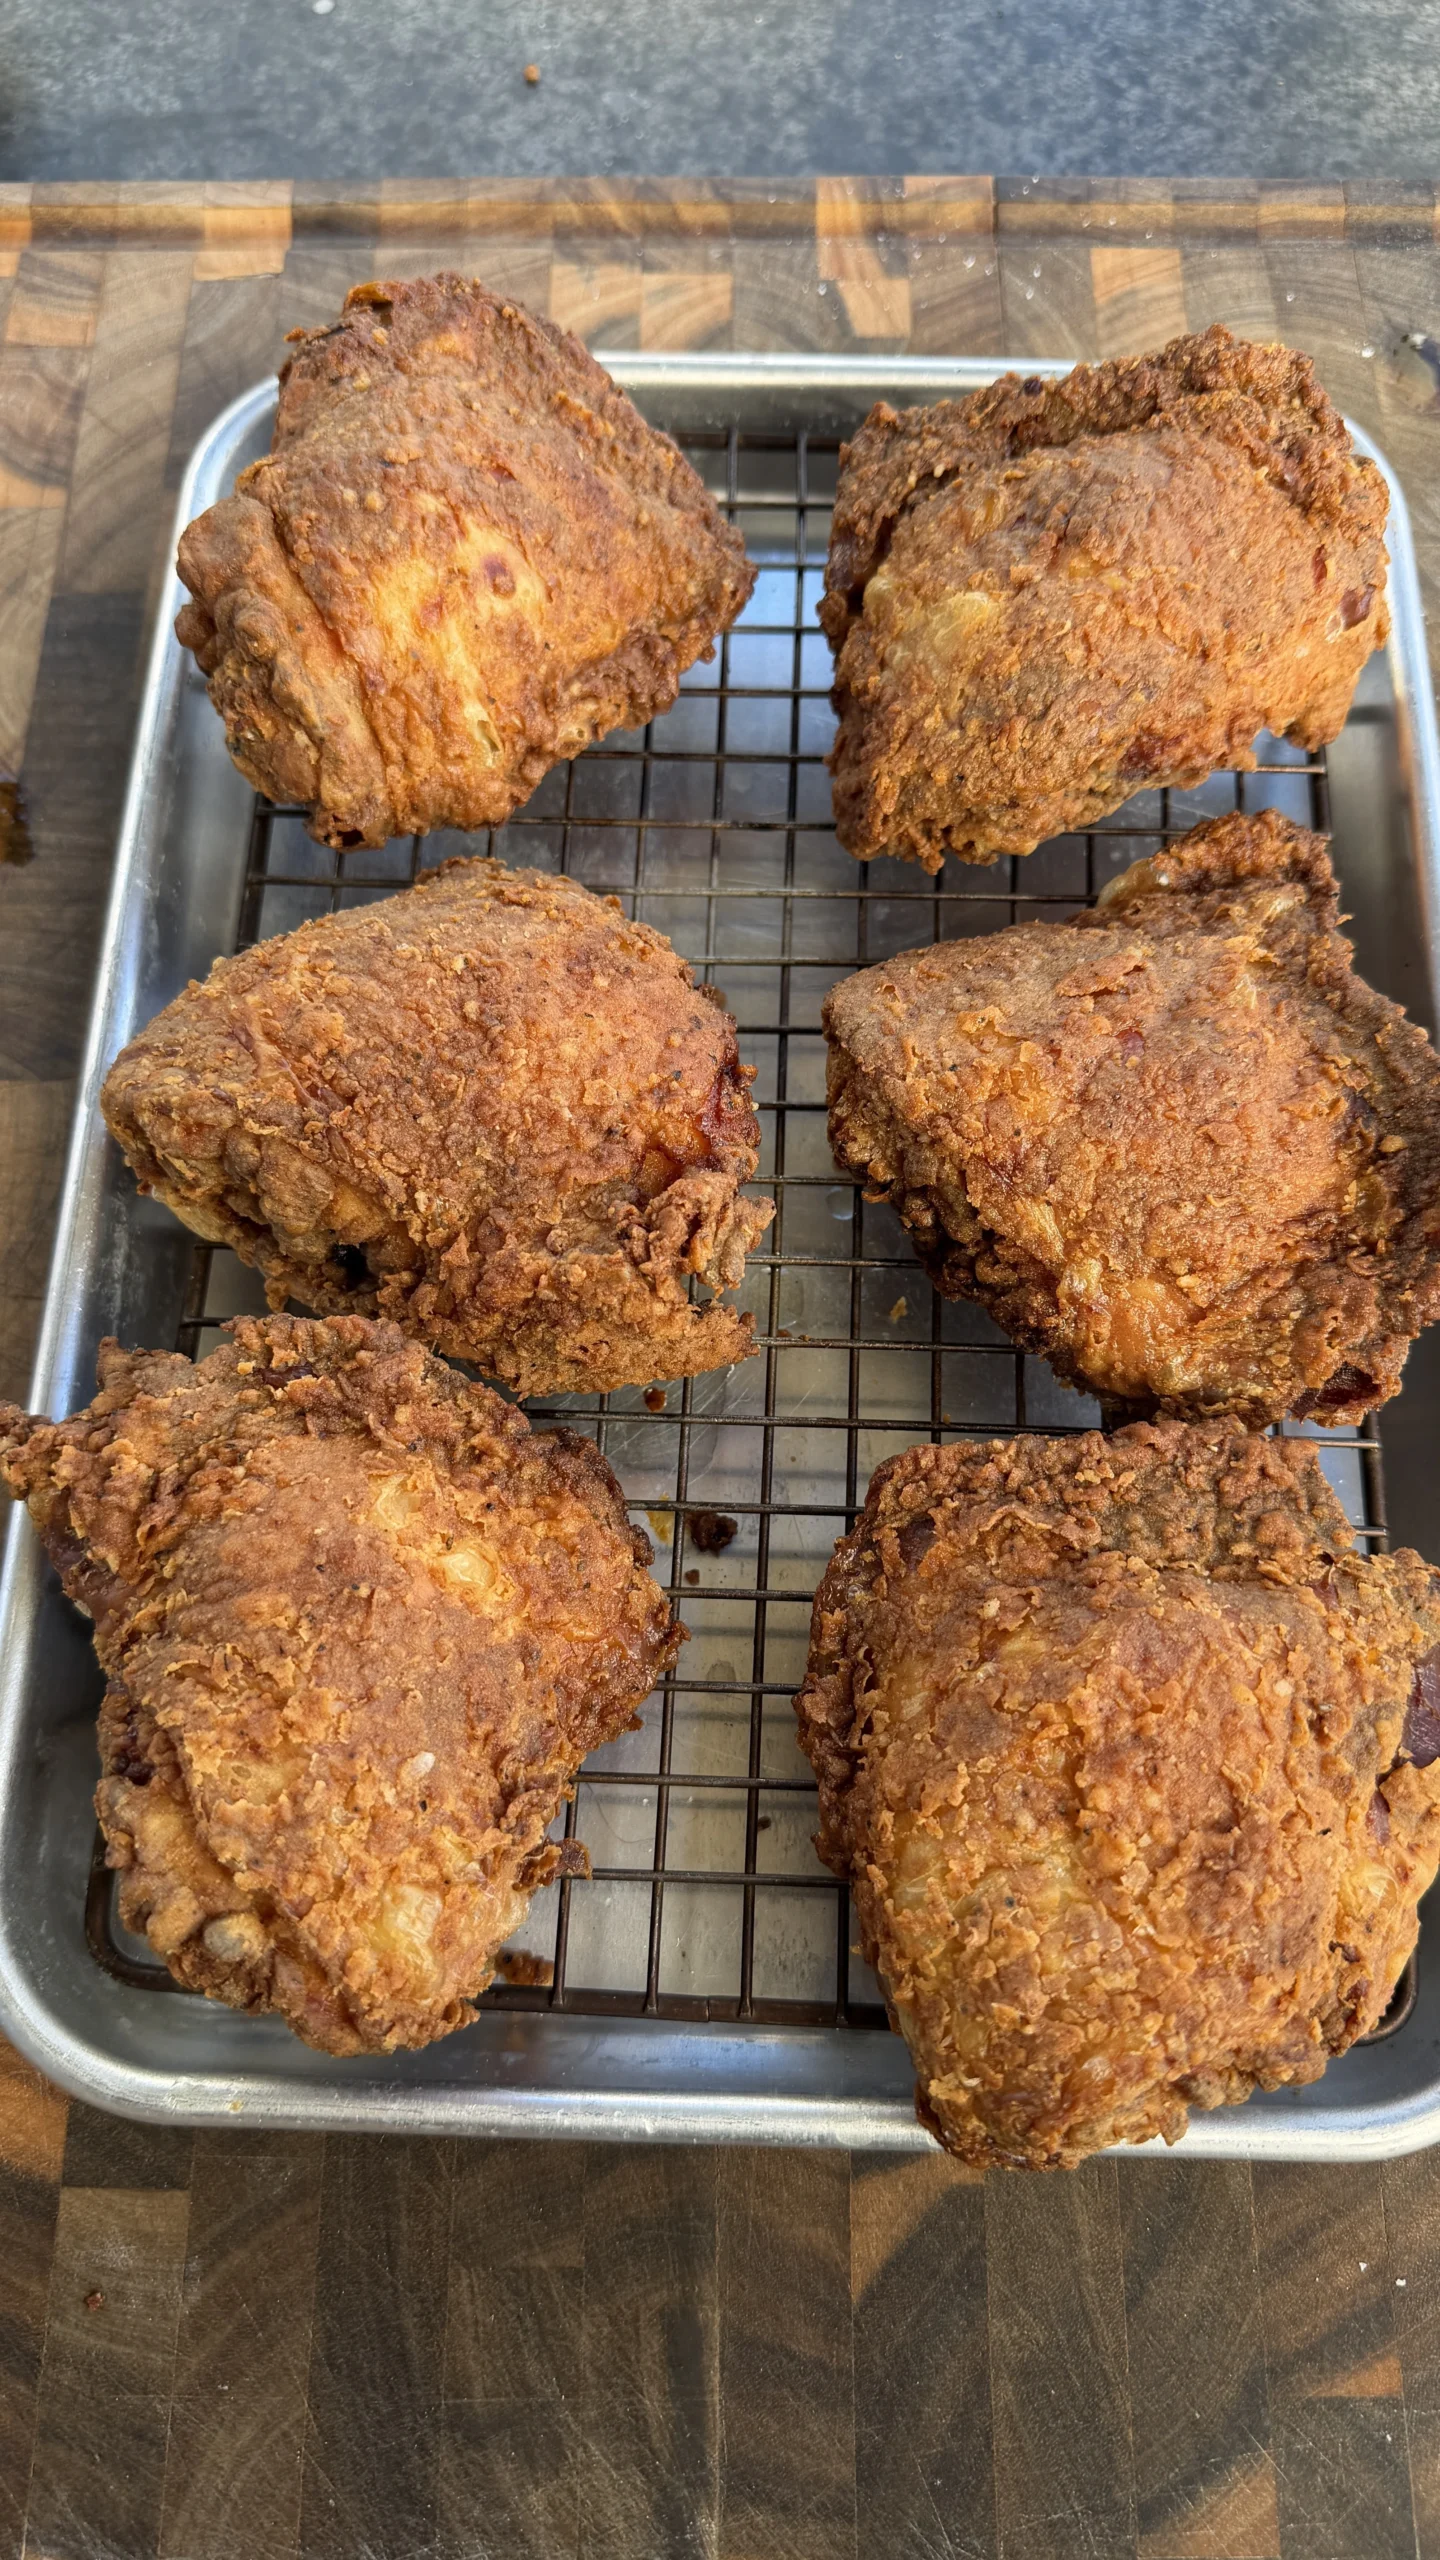
Fry bone-in thighs for 14-16 minutes total, flipping them halfway through at the 7-8 minute mark. Use tongs or a spider strainer to turn each piece, being careful not to knock off the coating. The chicken should be deep golden brown on all surfaces, and the coating should look crispy and set rather than pale or doughy.
Check internal temperature with an instant-read thermometer inserted into the thickest part of the meat, avoiding the bone. You’re looking for 175-185°F, which is higher than the USDA minimum of 165°F but gives you the best texture for dark meat. At this temperature, the connective tissue has fully broken down and the meat is tender and juicy rather than tough.
Step 6: Drain and Season the Fried Chicken
Transfer the cooked chicken to a wire rack set over a baking sheet, allowing excess oil to drip off. Don’t pile the chicken on top of each other or set it on paper towels initially; the rack keeps air circulating around all surfaces so the coating stays crispy. Paper towels can make the bottom of the chicken soggy by trapping steam.
While the chicken is still hot (within the first 60 seconds out of the oil), sprinkle it lightly with a pinch of kosher salt if desired. The heat helps the salt adhere and the seasoning penetrates slightly while the chicken is hot. This final seasoning boost brings all the flavors together, though the chicken is already well-seasoned from the marinade and breading.
Let the chicken rest on the rack for at least 5 minutes before serving. This allows the coating to fully set and lets the internal juices redistribute throughout the meat. Chicken served immediately after frying will be extremely hot and the coating might still be slightly soft inside; resting gives you the perfect texture.
Bring the oil back to 350°F between batches and repeat the frying process with remaining chicken. The second and subsequent batches often cook slightly faster because the oil retains heat better, so check internal temperature starting at 13 minutes rather than waiting the full 14-16 minutes.
Homemade Fried Chicken
Ingredients
Equipment
Method
- Whisk together pickle juice, buttermilk, hot sauce, salt, pepper, paprika, garlic powder, and cayenne in a large container. Add chicken thighs, ensuring all pieces are fully submerged. Cover and refrigerate 8-24 hours, turning occasionally.
- Mix flour, cornstarch, salt, pepper, paprika, garlic powder, and cayenne in a wide, shallow dish until evenly combined. Whisk thoroughly to eliminate clumps and distribute cornstarch throughout.
- Remove chicken from marinade one piece at a time, letting excess drip off but keeping meat well-coated. Press each piece firmly into breading mixture, coating all surfaces thoroughly. Transfer breaded chicken to a wire rack and rest 10-15 minutes.
- Heat oil to 350°F in a heavy pot or Dutch oven (oil should be at least 3 inches deep). Prepare a wire rack over a baking sheet for draining.
- Carefully add 3-4 chicken thighs to hot oil, maintaining temperature at 325-340°F. Fry 14-16 minutes, flipping halfway through, until deep golden brown and internal temperature reaches 175-185°F in the thickest part.
- Transfer fried chicken to wire rack to drain. Sprinkle lightly with salt while hot if desired. Rest 5 minutes before serving. Return oil to 350°F and repeat with remaining chicken.
Nutrition
Notes
Tried this recipe?
Let us know how it was!Frequently Asked Questions
Can You Make Fried Chicken Without Pickle Juice?
You can make fried chicken without pickle juice, though you’ll lose the distinctive tangy flavor and some of the tenderizing benefits that make this recipe special. The best substitute is a standard buttermilk marinade with added vinegar to mimic the acidity. Mix 3½ cups buttermilk with 2-3 tablespoons white vinegar or lemon juice, plus the same seasonings listed in the pickle juice marinade (salt, pepper, paprika, garlic powder, and optional hot sauce and cayenne).
The vinegar-buttermilk combination will still tenderize the chicken through acidity and create a sticky base for the breading to adhere to, but you’ll miss the subtle briny, dill-forward notes that pickle juice provides. If you have pickle brine from any kind of pickles (dill, bread and butter, even pickled jalapeños), it will work in this recipe, though sweeter pickle varieties will add sugar that can cause the coating to brown too quickly during frying.
For best results with a non-pickle marinade, extend the marinating time to the full 24 hours rather than the minimum 8 hours. Without the higher salt content of pickle juice, the buttermilk needs more time to penetrate and tenderize the meat. You can also add an extra teaspoon of salt to the marinade to help with both flavor and texture.
What’s the Best Way to Reheat Fried Chicken?
The best way to reheat fried chicken is in a 375°F oven for 10-12 minutes on a wire rack, which allows hot air to circulate around all surfaces and re-crisp the coating without making it soggy. Place the rack over a baking sheet to catch drips, and avoid covering the chicken with foil since trapped steam will make the coating soft. Start checking the chicken at 10 minutes; it should be hot throughout and the coating should sound crispy when tapped.
An air fryer also works excellently for reheating fried chicken, giving you crispy results in less time than a conventional oven. Preheat the air fryer to 375°F, place chicken in a single layer in the basket (don’t stack or crowd), and heat for 6-8 minutes. The circulating hot air crisps the coating beautifully while heating the meat through.
Never reheat fried chicken in the microwave if you care about texture. Microwaves heat through trapped moisture, which turns a crispy coating into a soggy, rubbery mess in under 60 seconds. If you absolutely must use a microwave for convenience, place the chicken on a microwave-safe rack or plate, heat in 30-second intervals, and expect significantly degraded texture no matter how careful you are.
For best storage before reheating, refrigerate fried chicken in a container with paper towels lining the bottom to absorb excess moisture. Don’t seal it in an airtight container while still warm; let it cool to room temperature first or the trapped steam will soften the coating. Properly stored fried chicken will keep 3-4 days refrigerated, though the coating quality degrades each day.
Can You Fry Chicken at a Higher Temperature to Cook It Faster?
You should not fry bone-in chicken thighs at higher temperatures than 325-350°F, even though it’s tempting to speed up the process. Higher temperatures (375-400°F) will burn the coating long before the meat near the bone cooks through to a safe temperature. You’ll end up with gorgeous golden-brown exterior hiding raw or undercooked meat inside, which is both unsafe and unappetizing.
Bone-in dark meat simply needs time to cook through. The bone acts as an insulator that slows heat transfer to the center of the meat, and the connective tissue in dark meat needs to reach higher temperatures (175-185°F rather than just 165°F) to break down properly and become tender. Trying to rush this process by increasing temperature just creates burnt coating and tough, undercooked chicken.
If you want faster-cooking fried chicken, switch to boneless thighs or chicken breast tenders, which can handle higher frying temperatures (350-375°F) and cook in 6-8 minutes. The smaller mass and lack of bones mean heat can penetrate quickly without risk of burning the exterior. You can use the exact same marinade and breading from this recipe with boneless cuts.
The one adjustment you can make to speed up bone-in chicken is to partially cook it before frying. Some cooks parboil or bake chicken thighs to 140-150°F internal temperature, then finish in the fryer at 350-375°F for 6-8 minutes to crisp the coating and bring the meat to final temperature. This method works but adds an extra step and can compromise moisture if you overcook during the initial cooking phase.
Why Is My Fried Chicken Coating Falling Off?
Fried chicken coating falls off for several preventable reasons, with the most common being insufficient marinade on the chicken when you bread it. The buttermilk acts as glue between the meat and the breading; if you shake or wipe the chicken too dry before coating, the breading has nothing to adhere to and will slide right off in the fryer. You want chicken that’s dripping wet with marinade when it goes into the flour mixture.
Not pressing the breading firmly onto the chicken also leads to loose coating that separates during frying. You need to actively pack the flour-cornstarch mixture onto every surface, pressing down firmly and making sure you coat crevices around bones and skin folds. Gently tossing chicken in breading or lightly dusting it won’t create enough contact for proper adhesion.
Skipping the 10-15 minute rest period after breading means the coating hasn’t had time to hydrate and bond to the chicken. During this rest, moisture from the buttermilk penetrates the flour and creates a more cohesive coating that fuses to the meat. If you fry immediately after breading, the dry flour hasn’t had time to absorb moisture and form a solid crust.
Oil temperature issues can also cause coating to separate. If the oil is too cool (below 300°F), the chicken will absorb oil instead of crisping quickly, making the coating soggy and prone to sliding off. If the oil is too hot (above 375°F), the exterior crust will form so quickly that it shrinks and pulls away from the chicken as it fries. Maintain steady 325-350°F oil temperature and use a thermometer to monitor it constantly.
Ready to Level Up?
Take your backyard cooking from good to legendary.
This is where I keep all my most-used smokers, knives, and favorite cooking tools.
Shop My Gear CollectionExplore More Recipes
Find more diverse flavors at CWFeats.com