
Wet Lemon Pepper Chicken Thighs Recipe
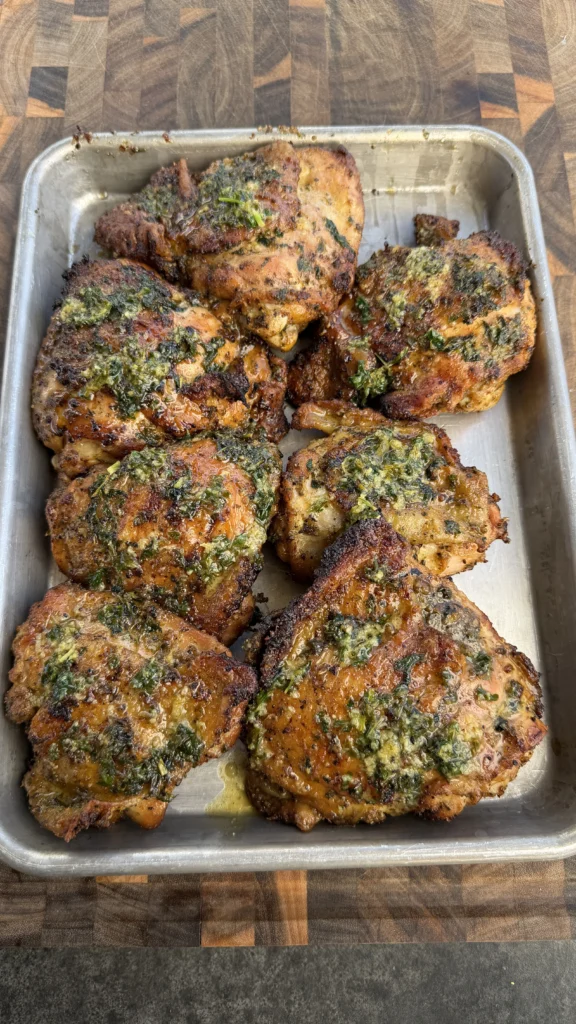
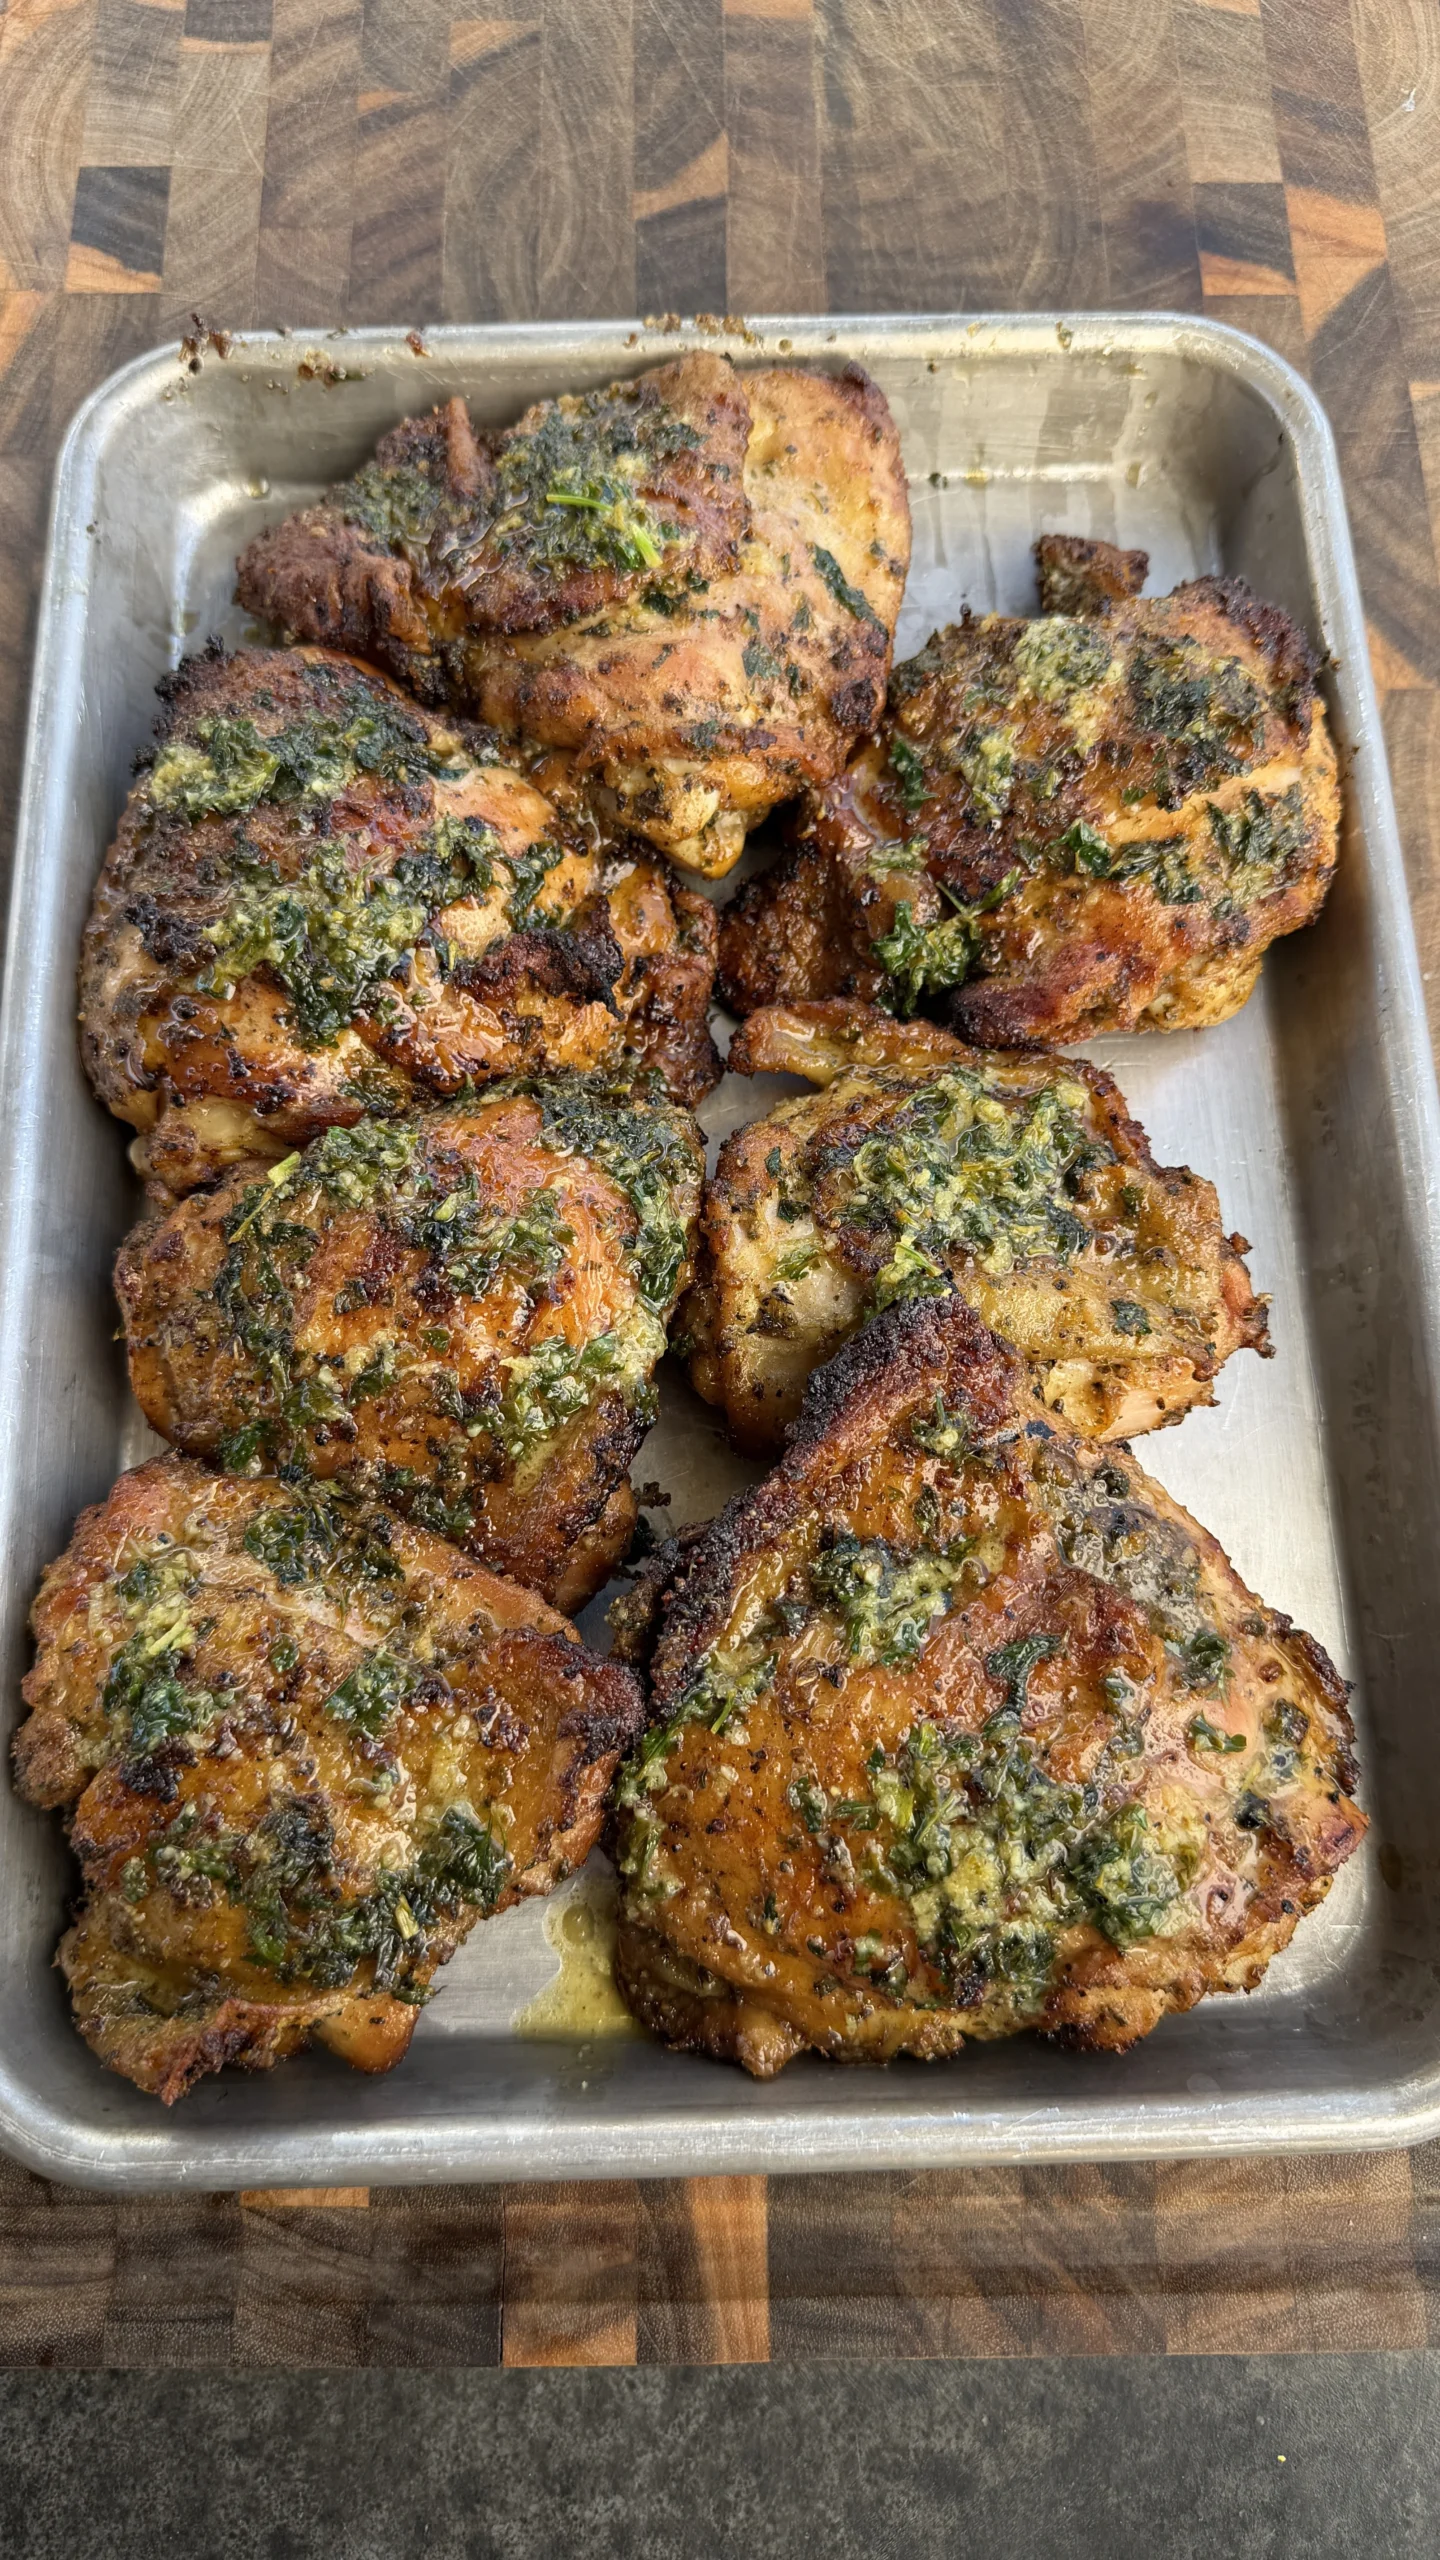
Wet lemon pepper chicken thighs is bone-in, skin-on dark meat grilled over indirect heat at 350°F. The chicken gets seasoned with a lemon pepper oil mixture rubbed directly under and over the skin. During the final 10 minutes, you baste it with melted butter infused with fresh lemon zest, lemon juice, and chopped parsley. This creates a glossy, flavor-packed coating on crispy golden skin.
The chicken cooks for 40 to 50 minutes. It reaches an internal temperature of 175 to 185°F. This breaks down the collagen in the dark meat. You get fall-off-the-bone tenderness while the fat renders out of the skin for maximum crispiness.
This technique produces restaurant-quality grilled chicken thighs with bright citrus flavor and rich butter finish. It works perfectly for cookouts, game day gatherings, or weeknight dinners where you want to impress.
The whole process takes about 1 hour from start to finish. This includes 15 minutes of prep to mix the oil rub and prepare the chicken. You get 45 minutes of hands-off grilling time where you can focus on side dishes or relax with guests. A 5-minute rest period lets the juices redistribute through the meat.
You set up your grill for indirect heat so the chicken cooks gently. There are no flare-ups from dripping fat. You apply the lemon pepper oil rub under the skin where it seasons the actual meat. Then you finish with multiple butter bastes that create the signature wet coating.
The combination of the oil-based rub for deep seasoning and the butter-based finish for glossy richness gives you layers of flavor. The seasonings penetrate the meat while keeping the exterior moist and shiny. These lemon butter chicken thighs deliver more flavor than plain grilled chicken. They stay juicy even if you slightly overcook them. This makes them forgiving for grillers at any skill level.
Jump to RecipeWhy Indirect Heat Creates Crispier Skin Than Direct Grilling
The Science Behind Slow Fat Rendering
Indirect heat at 350°F produces crispier chicken skin than direct grilling. It gives the subcutaneous fat enough time to render out slowly. The skin dehydrates and crisps without burning.
When you place chicken directly over flames or hot coals, the exterior chars before the fat layer under the skin has time to melt and drip away. This leaves you with rubbery, chewy skin that looks crispy. There’s a wet, fatty layer underneath. The high heat also causes the proteins in the skin to contract rapidly. They squeeze out moisture too fast. This creates tough, leathery texture instead of delicate crispness.
How Moderate Temperature Improves Texture
With indirect heat, the chicken sits next to the heat source rather than directly over it. The temperature stays moderate and consistent around 350°F. It doesn’t spike to 500°F or higher.
This gentler heat allows the fat to slowly liquefy over 40 to 50 minutes. It drips down through the skin without the proteins tightening up too aggressively. As the fat renders, the skin gradually dehydrates. The proteins rearrange into a crispy structure with tiny air pockets. These create that satisfying crunch when you bite into it.
The lower temperature also prevents the Maillard reaction from happening too quickly. You get even golden-brown color across the entire surface. No burnt spots mixed with pale, undercooked areas.
Preventing Flare-Ups and Uneven Cooking
Another benefit of indirect grilling is that it prevents flare-ups from melting fat dripping onto hot coals or burners. When fat hits direct flames, it ignites. Bursts of fire char the outside of the chicken. They deposit sooty, acrid flavors on the skin.
These flare-ups also create uneven hot spots. Some parts of the thigh cook faster than others. You end up with portions that are overdone while other sections are still raw.
By keeping the chicken away from the direct heat source, the dripping fat falls onto cooler parts of the grill. It can’t ignite. You get clean, controlled cooking from start to finish.
Adjusting for Temperature Variations
If your grill is struggling to maintain 350°F in the indirect zone, you can add more coals or turn up the burners on the direct side. This raises the ambient temperature.
You can also finish the chicken over direct heat for the last 2 to 3 minutes if the skin needs extra crisping. Watch it closely and move it immediately if you see any charring or flames. The rendered fat and butter coating make it prone to flare-ups during this final stage.
Why Dark Meat Chicken Needs 175 to 185°F Instead of 165°F
Understanding Collagen Breakdown in Dark Meat
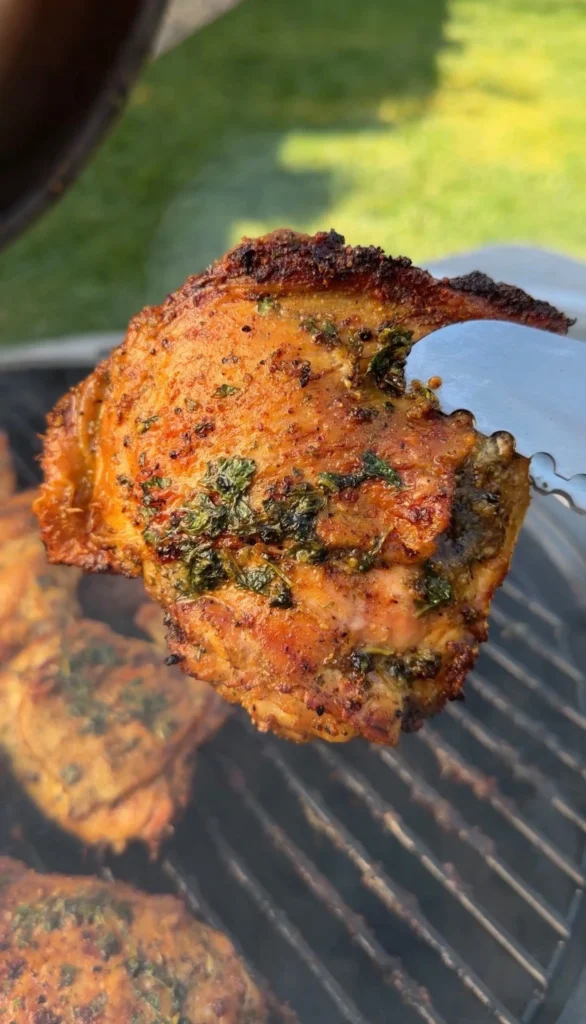
Dark meat chicken thighs should be cooked to 175 to 185°F instead of the standard 165°F. The higher heat breaks down tough collagen fibers in the leg muscles. It converts them into gelatin. This makes the meat tender, juicy, and easy to pull apart with a fork.
Chicken thighs contain significantly more collagen than breast meat. The leg muscles do more work during the bird’s lifetime. They develop dense connective tissue that holds the muscle fibers together.
At 165°F, this collagen is still intact. It gives the meat a chewy, stringy texture that feels undercooked even though it’s technically safe to eat. The collagen starts breaking down around 160°F. But it needs sustained exposure to heat between 175 and 185°F. This fully converts it into soft, silky gelatin that lubricates the muscle fibers.
How Fat Rendering Affects Texture and Flavor
The extra cooking time and higher temperature also allow more intramuscular fat to render out of the dark meat. This contributes to the rich, succulent texture. It prevents the meat from tasting greasy or heavy.
Chicken thighs have about three times more fat than chicken breasts. Much of this fat is distributed between the muscle fibers. It needs time and heat to melt.
At 165°F, a significant portion of this fat remains solid and waxy. It coats your mouth with an unpleasant greasy film when you eat it. By cooking to 175 to 185°F, you give the fat enough time to fully liquefy. It either drips away or integrates into the meat as moisture. You get clean, meaty flavor without the fatty mouthfeel.
Why Dark Meat Won’t Dry Out at Higher Temps
You might worry about drying out the chicken by cooking it past 165°F. But dark meat is incredibly forgiving compared to white meat. This is because of its higher fat content and dense muscle structure.
White meat like chicken breasts has very little fat. The delicate muscle fibers squeeze out moisture rapidly when overcooked. Breasts become chalky and dry at temperatures above 165°F.
Thighs retain moisture even at 185°F. The gelatin from broken-down collagen holds water in the meat. The higher fat content keeps everything lubricated. As long as you cook the thighs with indirect heat at a moderate temperature like 350°F, they’ll stay moist and tender throughout the process. Don’t blast them with high heat.
Visual and Textural Cues for Doneness
To check doneness without a thermometer, you can look for visual and textural cues. The meat should pull away from the bone slightly. The juices should run clear when you pierce the thickest part with a knife.
The meat should also feel firm but yielding when you press it with your finger. Not soft and squishy like raw chicken. Not hard and rigid like overcooked breast meat.
However, using an instant-read thermometer is the most reliable method. This is especially important when you’re cooking for a crowd. You need every piece to turn out right.
What Makes Wet Lemon Pepper Different from Dry Lemon Pepper Seasoning
The Two-Step Flavor Layering Technique
Wet lemon pepper chicken gets its name from the glossy butter coating applied during the final minutes of cooking. This creates a rich, sauce-like finish that clings to the crispy skin. Traditional dry lemon pepper is just dehydrated lemon zest mixed with cracked black pepper and salt. It provides decent seasoning but sits on the surface. It doesn’t penetrate the meat or create any visual appeal.
The dry granules also tend to burn when exposed to high heat. This leaves bitter, acrid spots on the chicken. They overpower the bright lemon flavor you’re trying to achieve.
How the Oil Rub Penetrates the Meat
The wet version uses a two-step approach that layers flavor and creates multiple textures. First, you mix lemon pepper seasoning with neutral oil to create a loose paste. You rub it all over the chicken and work it under the skin. This allows the seasoning to make direct contact with the meat rather than just coating the exterior.
The oil acts as a carrier for the fat-soluble flavor compounds in the lemon zest and pepper. It helps them absorb into the chicken as it cooks. It prevents the spices from burning because the oil creates a protective barrier. This sits between the seasonings and the hot grill grates.
This oil rub also promotes even browning. It helps the skin crisp up faster by conducting heat more efficiently than air alone.
Creating the Signature Glossy Butter Finish
During the last 10 minutes of cooking, you baste the chicken repeatedly with melted butter. It’s been infused with fresh lemon zest, lemon juice, and chopped parsley. This creates the signature wet coating.
The butter adds richness. It helps the bright lemon flavors stick to the crispy skin. The fresh zest and juice provide much more vibrant citrus character. This beats the dried, somewhat stale flavor of bottled lemon pepper seasoning.
The parsley adds a fresh, herbaceous note and bright green color. This makes the dish look restaurant-quality. It doesn’t look like something you shook out of a jar.
As the butter cools slightly after you pull the chicken off the grill, it thickens into a glossy glaze. It coats every ridge and crevice of the crispy skin. You get little pockets of concentrated lemon-butter flavor in every bite.
Why Fresh Ingredients Make a Difference
You can achieve similar results by making your own dry lemon pepper rub with freshly grated lemon zest. But you’ll still miss the richness and visual appeal of the butter finish.
The combination of the oil rub for deep seasoning and the butter baste for surface flavor gives you complexity. Neither technique can deliver this on its own. You get layers of lemon that hit you immediately when you bite through the buttery crust. They continue to develop as you chew into the oil-seasoned meat.
Why You Should Apply the Oil Rub Under the Skin
How Chicken Skin Blocks Seasoning Penetration
Applying the lemon pepper oil rub directly under the chicken skin rather than just on the surface allows the seasoning to make contact with the actual meat. This creates deeper flavor that permeates every bite. It doesn’t just provide a surface coating that washes away with the butter baste.
Chicken skin acts as a protective barrier. It prevents seasonings from penetrating into the meat. When you sprinkle rub on top of intact skin, most of the flavor stays in that thin outer layer. The meat underneath remains relatively bland.
You end up with intensely seasoned skin and underseasoned meat. This gives you uneven flavor distribution. Some bites are too salty and peppery while others taste plain.
The Mechanics of Under-Skin Seasoning
By gently loosening the skin with your fingers and rubbing the oil mixture directly onto the meat, you season the protein itself. The skin crisps up and seals everything in.
The oil helps the fat-soluble compounds in the lemon pepper penetrate into the muscle tissue as the chicken heats up. This works similar to how a marinade works but without requiring hours of refrigeration time.
The seasonings also have constant contact with the meat during the entire 45-minute cook. The flavors have plenty of time to absorb and develop complexity as the chicken reaches temperature.
When you bite into a piece of properly seasoned chicken, you taste lemon and pepper in both the crispy skin and the tender meat. This creates harmony instead of contrast.
Step-by-Step Technique for Loosening Skin
The technique of loosening the skin is easier than it sounds. It doesn’t require any special skills.
Start at the thickest part of the thigh where the skin naturally separates from the meat. Gently work your fingers underneath while being careful not to tear the skin. You want to create a pocket between the skin and the meat. Don’t completely detach the skin. This would cause it to shrink away during cooking and leave exposed meat that dries out.
Once you’ve created the pocket, spoon about a tablespoon of the oil mixture into the opening. Use your fingers on the outside of the skin to spread it around evenly. Cover the entire surface of the meat. You can repeat this process on both sides of the thigh if needed to ensure complete coverage.
Finishing the Exterior
After seasoning under the skin, you should also rub the remaining oil mixture on the outside of the skin. Cover any exposed meat surfaces too. This ensures every part of the chicken gets seasoned.
This creates a protective coating that prevents the skin from sticking to the grill grates. It promotes even browning.
The oil also helps the skin render its fat more efficiently by conducting heat into the subcutaneous fat layer. This speeds up the crisping process. You don’t end up with rubbery, undercooked skin by the time the meat reaches 175 to 185°F.
How to Get Butter to Stick to Grilled Chicken Instead of Sliding Off
Finding the Perfect Temperature Window
Getting the wet lemon pepper butter to stick to grilled chicken instead of sliding off requires applying it during the final 10 minutes of cooking. The skin temperature should be between 165 and 175°F. It’s hot enough to melt the butter on contact. But it’s not so hot that it instantly liquefies and drips away before it can set.
If you baste too early when the chicken is still below 150°F, the butter stays liquid. It runs off the skin into the drip pan below. You waste most of your flavorful coating.
If you wait until the chicken reaches 180°F or higher, the intense surface heat vaporizes the butter’s water content immediately. The milk solids brown too quickly. You get a burnt butter taste instead of the fresh, bright lemon flavor you want.
The Multi-Layer Basting Method
The key is to start basting when the chicken is about 10 degrees below your target temperature of 175°F. This gives you a 10 to 15-minute window. The butter can partially set between bastes while the chicken finishes cooking.
Apply the first coat of butter with a silicone basting brush or spoon. Make sure to cover every inch of the skin. Then wait 2 to 3 minutes before applying the second coat.
The first layer will mostly run off. But it leaves behind a thin film that creates a tacky surface for the second layer to grip onto. By the third or fourth baste, you’ll notice the butter starting to thicken. It clings to the skin instead of immediately sliding away. This tells you the temperature is in the sweet spot.
Managing Heat Retention During Basting
You should also keep the grill lid closed between bastes. This maintains consistent temperature around the chicken. It prevents the butter from cooling too quickly.
If you leave the lid open, heat escapes. The surface temperature of the skin drops. The butter solidifies before it spreads evenly. You get thick, uneven patches instead of a smooth glaze.
The closed environment also creates a humid atmosphere. This prevents the butter from drying out. It stays glossy and fluid enough to coat the skin completely.
Just make sure you work quickly when opening the lid to baste. Spend no more than 30 seconds with it open. Close it again to trap the heat.
Maintaining Proper Butter Consistency
Another factor that affects how well the butter sticks is the consistency of the butter mixture itself. If you make the butter too far in advance and let it sit off heat for more than 5 minutes, the milk solids can separate from the butterfat. The mixture becomes grainy and difficult to brush on smoothly.
Keep the butter warm on the coolest part of the grill or on the stove over the absolute lowest heat. Stir occasionally to keep it emulsified.
The butter should be fully melted. It should have the consistency of heavy cream. Thin enough to brush on easily but not so hot that it’s bubbling or starting to brown.
If you see any browning or smell a nutty aroma, your butter is too hot. Remove it from heat immediately. Browned butter will give you a completely different flavor profile that conflicts with the bright lemon and parsley.
Using Seasoning Particles for Extra Grip
For maximum adhesion, you can also add a small amount of extra lemon pepper seasoning to the butter mixture. This creates tiny particles that help the butter grip the skin mechanically. It adds to the temperature-based adhesion.
The seasoning particles settle into the microscopic crevices and ridges of the crispy skin. They act like tiny anchors that hold the butter in place. Some of it still melts and drips away.
This also intensifies the lemon pepper flavor in the final coating. You get a more pronounced hit of citrus and spice in every bite.
Wet Lemon Pepper Chicken Thighs
Crispy skin, lemon pepper oil rub, glossy butter finish
Ingredients
Chicken
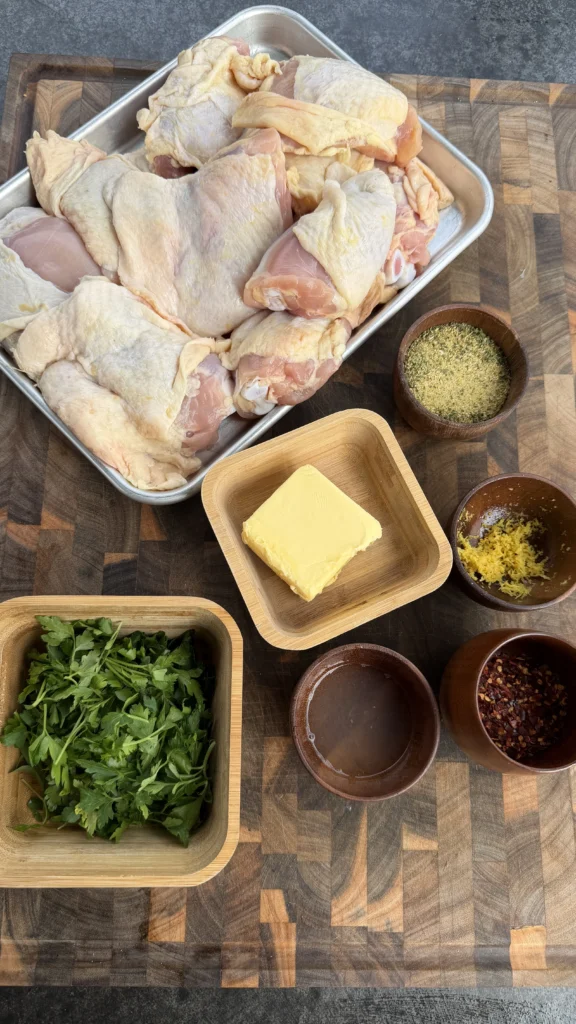
- 8 bone-in, skin-on chicken thighs (about 3 lbs total)
Lemon Pepper Oil Rub
- 2 tablespoons lemon pepper seasoning
- ½ cup neutral oil (avocado, canola, or vegetable oil)
Wet Lemon Pepper Butter
- 8 oz (2 sticks) unsalted butter
- Zest of 1 large lemon
- 2 tablespoons fresh lemon juice
- 2 tablespoons fresh parsley, finely chopped
- ½ teaspoon lemon pepper seasoning (optional, for extra punch)
Pat the chicken completely dry with paper towels before applying the oil rub. Surface moisture creates steam on the grill. This prevents the skin from crisping properly. The drier the skin, the crispier the result.
Step-by-Step Instructions
Step 1: Set Up Your Grill for Indirect Heat at 350°F
Prepare your grill for two-zone indirect cooking. Light one side of the grill and leave the other side completely off.
For a gas grill, turn the burners on one side to medium-high heat. Leave the burners on the opposite side turned off completely.
For a charcoal grill, arrange hot coals in a pile on one side of the grill. Leave the other side empty. Or use a charcoal basket to contain the coals on one half of the grill.
The goal is to create a hot zone where the temperature reaches 400 to 450°F. You also want a cooler zone where the temperature hovers around 350°F from the ambient heat radiating across the grill.
Close the lid and let the grill preheat for 10 to 15 minutes. Adjust the vents or burners as needed. Stabilize the temperature in the indirect zone at 350°F.
Use an oven thermometer or the grill’s built-in thermometer if you have one. But verify the temperature at grate level where the chicken will actually sit. The dome thermometer can be 25 to 50 degrees higher than the actual cooking surface.
If you don’t have a thermometer, you should be able to hold your hand 6 inches above the indirect zone grates for 7 to 8 seconds. The heat should become uncomfortable at that point. This corresponds to roughly 350°F.
While the grill preheats, make sure you have all your tools ready. You need long-handled tongs for flipping the chicken. Get a silicone basting brush for applying the butter. Have an instant-read thermometer for checking doneness. Prepare a clean platter for resting the finished chicken.
Position these tools near the grill so you can work efficiently. You won’t have to run back into the kitchen mid-cook. This would let heat escape and cause temperature fluctuations.
Step 2: Prepare the Chicken and Apply the Lemon Pepper Oil Rub
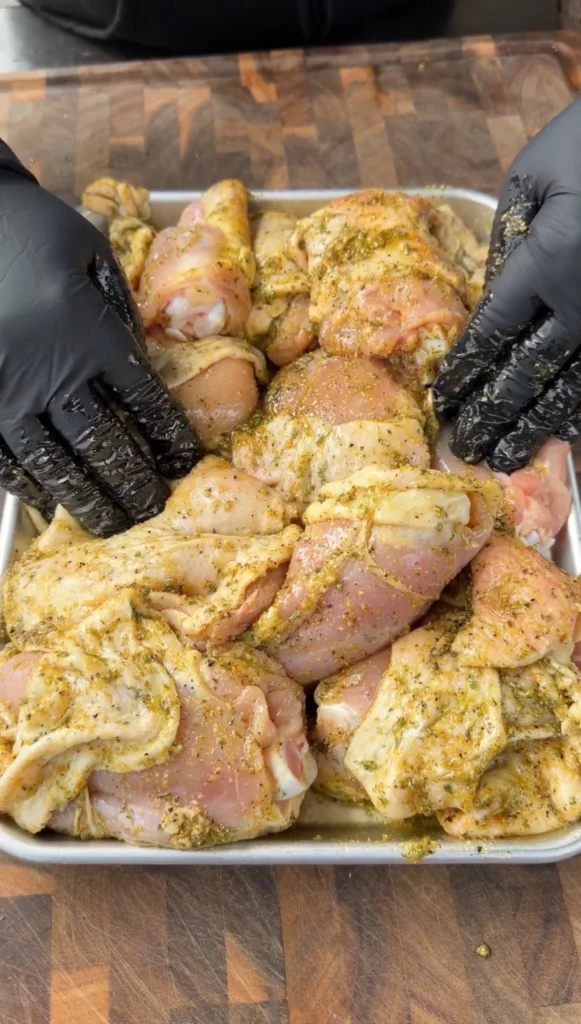
Remove the chicken thighs from the refrigerator. Let them sit at room temperature for 15 to 20 minutes while the grill preheats. This allows the meat to warm up slightly. It promotes more even cooking. It reduces the total time needed on the grill.
Pat each thigh completely dry with paper towels. Press firmly to remove as much surface moisture as possible from both the skin side and the underside.
Pay special attention to any crevices or folds where water tends to collect. Even small amounts of moisture will create steam. This prevents the skin from crisping.
In a small bowl, combine 2 tablespoons of lemon pepper seasoning with ½ cup of neutral oil. Stir until you have a loose, pourable paste. The mixture should be thin enough to drizzle but thick enough that the seasonings don’t immediately settle to the bottom.
If it seems too thick, add another tablespoon of oil. If it’s too thin, add another teaspoon of lemon pepper seasoning.
Working with one thigh at a time, gently slide your fingers under the skin. Start at the thickest part of the thigh and work your way around. Create a pocket between the skin and meat.
Be careful not to tear the skin or completely detach it from the meat. You want it to stay connected at the edges.
Spoon about 1 tablespoon of the oil mixture into this pocket. Use your fingers on the outside of the skin to massage it around. Spread the seasonings evenly over the entire surface of the meat.
The skin should look slightly bumpy and uneven from the oil underneath. This is exactly what you want.
After seasoning under the skin, rub the remaining oil mixture all over the outside of the skin. Cover any exposed meat surfaces too. Make sure every part of the chicken is coated with a thin layer of oil.
The thighs should look glossy and wet. You should see visible flecks of black pepper and lemon zest stuck to the surface.
Place the seasoned thighs on a plate or cutting board while you finish preparing the rest. Don’t stack them on top of each other. The oil will pool and create uneven distribution.
Step 3: Grill the Chicken Over Indirect Heat for 40 to 50 Minutes
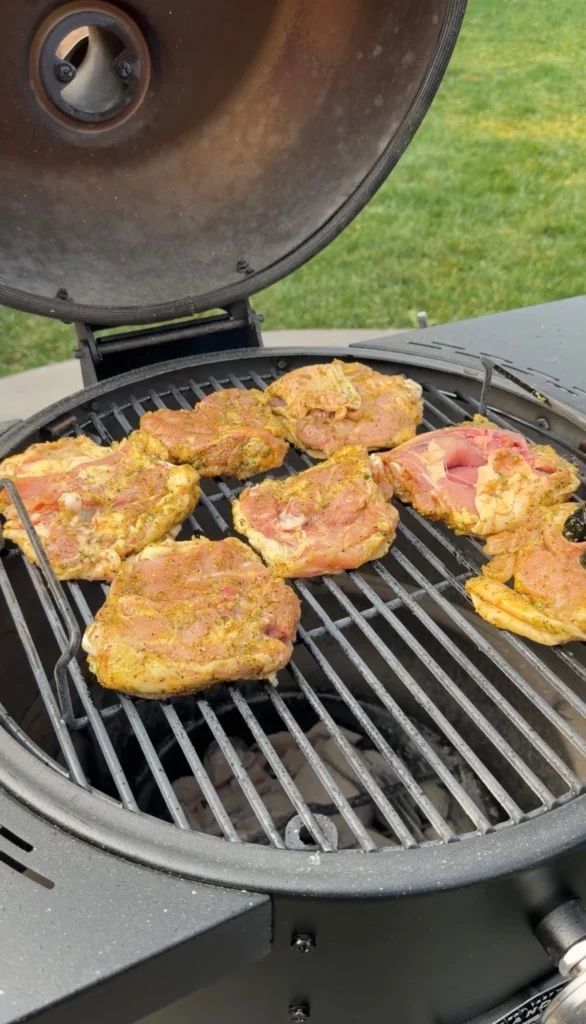
Arrange the chicken thighs skin-side up in the indirect zone of your preheated grill. Space them at least 1 inch apart so hot air can circulate around each piece.
Position them with the thickest part facing the heat source. This ensures more even cooking. Thicker sections need more time to come up to temperature.
Close the lid and cook undisturbed for 20 minutes. Resist the temptation to peek or flip the chicken. Opening the lid releases heat and extends the total cooking time.
After 20 minutes, open the lid and flip each thigh skin-side down. The underside should have some light browning. The skin should look slightly tightened and dried out.
Close the lid and cook for another 15 minutes. Then flip the thighs back to skin-side up for the final cooking phase.
At this point, insert an instant-read thermometer into the thickest part of one of the larger thighs. Make sure to avoid hitting the bone. The bone can give you a false high reading.
You’re looking for an internal temperature of 165°F. This means the chicken is about 10 degrees away from your target. It’s ready for the butter basting stage.
If the temperature is lower than 165°F after 35 minutes of total cooking time, leave the chicken on the grill. Check again in 5-minute intervals until it reaches 165°F.
If the temperature is already at 165°F or higher, you can start basting immediately.
The chicken should look golden brown on the skin side. You should see visible rendered fat. There should be the beginning of crispy texture. It won’t be fully crispy until it reaches the final temperature. The last of the fat needs to render out.
Step 4: Make the Wet Lemon Pepper Butter While the Chicken Cooks
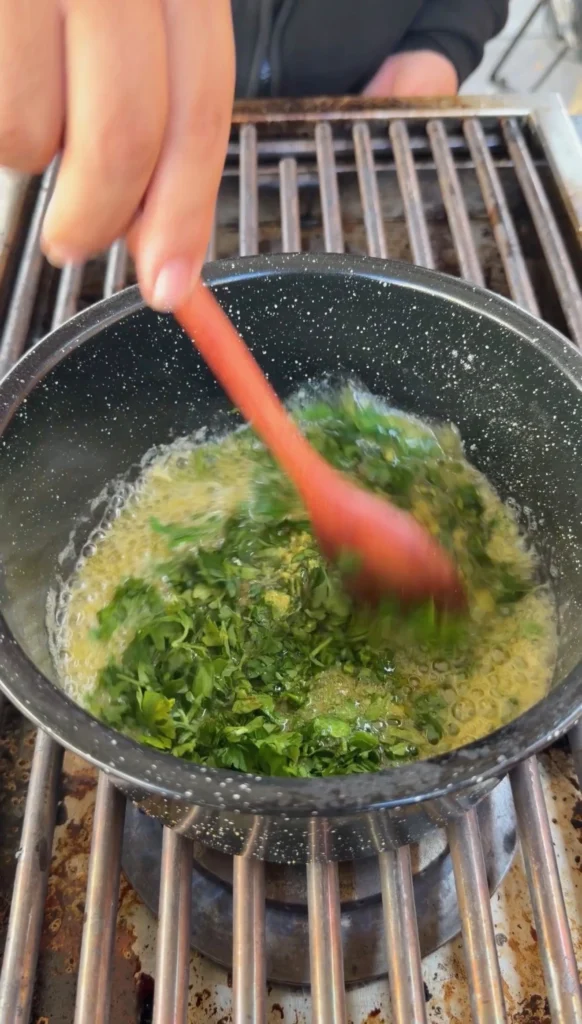
About 15 minutes before you expect the chicken to reach 165°F, melt 8 ounces of unsalted butter. Use a small saucepan over low heat on your stovetop. Or place it on the coolest part of your grill grate.
Don’t rush this step by using high heat. Butter can break and separate if heated too aggressively.
Stir occasionally. Remove from heat as soon as the butter is completely melted. No solid pieces should remain.
Add the zest of 1 large lemon to the melted butter. Use a microplane or fine grater to remove only the bright yellow outer layer of the peel. Avoid the white pith underneath. It tastes bitter.
Stir in 2 tablespoons of fresh lemon juice and 2 tablespoons of finely chopped fresh parsley. Mix until everything is evenly distributed throughout the butter.
If you want extra lemon pepper intensity, you can add an additional ½ teaspoon of lemon pepper seasoning to the butter at this point. This is optional. The chicken already has plenty of seasoning from the oil rub.
Keep the butter mixture warm on the side of the grill or over very low heat on the stovetop. Stir every few minutes to prevent the milk solids from settling to the bottom.
The butter should stay fully melted. It should have the consistency of heavy cream. Liquid enough to brush on easily but not so hot that it’s bubbling or browning.
If you notice any browning or smell a nutty aroma, remove the butter from heat immediately. Let it cool for 2 to 3 minutes before using. Browned butter will change the flavor profile completely.
Step 5: Baste the Chicken with Lemon Butter During the Final 10 Minutes
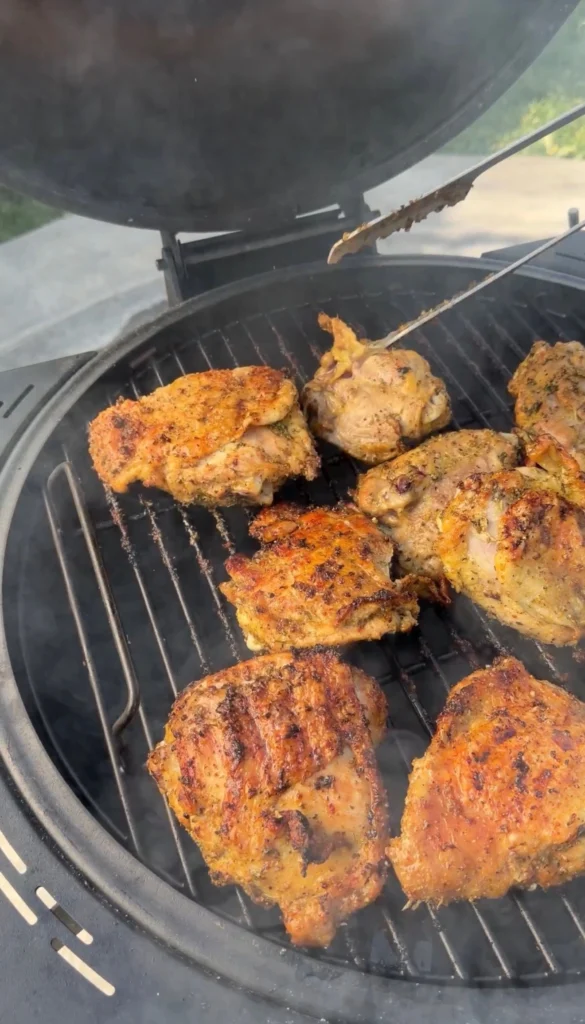
When the chicken reaches an internal temperature of 165°F in the thickest part, begin the basting process. This creates the wet lemon pepper coating.
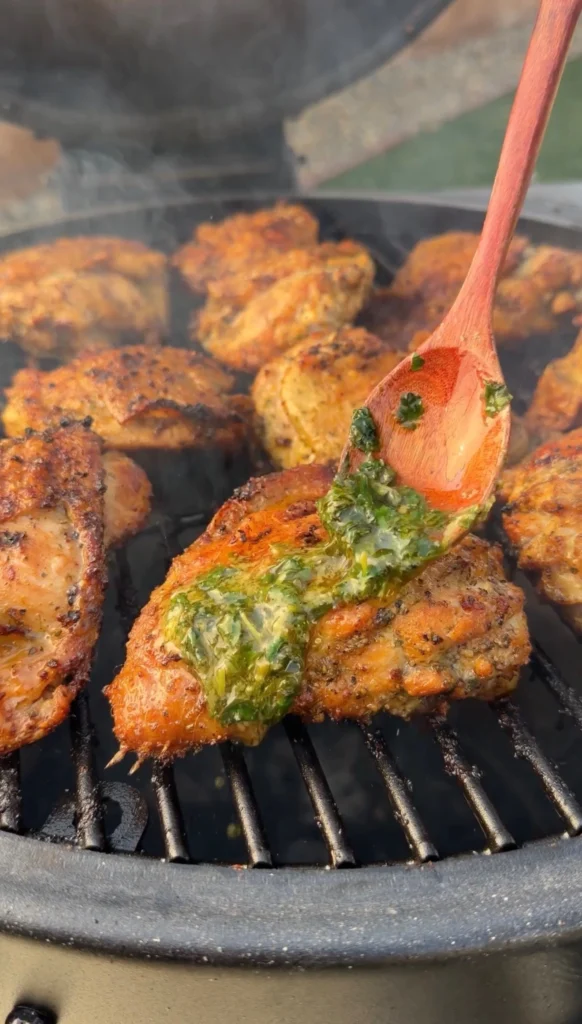
Open the grill lid. Use a silicone basting brush to apply a generous coat of the warm lemon butter. Cover every inch of the skin-side surface. Make sure to get into all the crevices. Get around the edges where the skin meets the meat.
Work quickly but thoroughly. Spend no more than 30 seconds with the lid open to minimize heat loss.
Close the lid and wait 2 to 3 minutes. Let the butter partially set. The chicken will continue cooking. The temperature should climb about 2 to 3 degrees during this time.
Open the lid again and apply a second coat of butter. This time use even more generous amounts. Pay special attention to any dry spots that didn’t get fully covered in the first baste.
Close the lid. Repeat this process 2 to 3 more times over the next 10 minutes. Apply fresh butter every 2 to 3 minutes. Continue until the chicken reaches an internal temperature of 175 to 185°F.
With each successive basting, you’ll notice the butter coating getting thicker and glossier. It builds up in layers on the crispy skin.
The skin should transform from matte golden-brown to shiny and lacquered. You should see visible flecks of green parsley and yellow lemon zest caught in the butter.
By the final baste, the butter should cling to the skin instead of running off immediately. You should see small pools of melted butter collecting in the natural indentations and ridges of the chicken’s surface.
Check the temperature one final time. Confirm you’ve reached at least 175°F in the thickest part. Then remove all the chicken from the grill. Transfer to a clean serving platter.
Spoon any remaining lemon butter from the saucepan over the top of the chicken while it’s still hot. This creates an extra layer of glossy coating. It ensures every piece gets maximum butter coverage.
Step 6: Rest the Chicken and Serve
Let the chicken rest on the platter for 5 minutes before serving. This brief rest period allows the muscle fibers to relax. They reabsorb some of the juices that were forced toward the center during cooking. This makes each bite more moist and flavorful.
The internal temperature will continue to rise by about 5 degrees during this time. This is due to carryover cooking. A chicken that was 180°F on the grill will end up around 185°F after resting.
While the chicken rests, you’ll see the butter coating thicken and set into a glossy glaze as it cools slightly. The skin will also continue to crisp from the residual heat. You get an even more pronounced crunch when you bite into it.
Don’t cover the chicken with foil during this rest period. The trapped steam will soften the crispy skin. It undoes all your careful work.
After 5 minutes, the chicken is ready to serve. Transfer the thighs to individual plates or a serving platter. Make sure to scrape up any butter that has pooled on the resting platter. Drizzle it over the top for extra flavor and visual appeal.
The finished chicken should have deeply golden, crispy skin with a glossy wet coating that catches the light. When you cut into a thigh, you should see moist, tender meat. It should easily pull away from the bone.
Wet Lemon Pepper Chicken Thighs (Grilled)
Ingredients
Equipment
Method
- Set up your grill for two-zone indirect cooking and preheat to 350°F in the indirect zone. For gas grills, light burners on one side only. For charcoal, pile coals on one side. Let preheat for 10 to 15 minutes with the lid closed.
- Pat chicken thighs completely dry with paper towels. Mix 2 tablespoons lemon pepper seasoning with ½ cup oil in a bowl. Gently loosen the skin on each thigh and rub about 1 tablespoon of the oil mixture directly onto the meat under the skin. Rub remaining oil mixture over the outside of all thighs until every surface is coated.
- Place thighs skin-side up in the indirect zone, spacing them 1 inch apart. Close lid and cook for 20 minutes undisturbed. Flip skin-side down, close lid, and cook 15 minutes. Flip back to skin-side up and check internal temperature, looking for 165°F in the thickest part.
- While chicken cooks, melt 8 oz butter in a small saucepan over low heat. Stir in lemon zest, lemon juice, and chopped parsley. Add optional ½ teaspoon lemon pepper if desired. Keep warm but not bubbling.
- When chicken reaches 165°F internal temperature, begin basting with lemon butter every 2 to 3 minutes. Apply 4 to 5 coats over the next 10 minutes as the chicken climbs to 175 to 185°F internal temperature. The butter should build up into a thick, glossy coating.
- Remove chicken from grill when it reaches 175 to 185°F. Spoon remaining butter over the top. Rest for 5 minutes uncovered, then serve immediately.
Nutrition
Notes
Tried this recipe?
Let us know how it was!Frequently Asked Questions
Can You Use Boneless, Skinless Chicken Thighs for This Recipe?
You can use boneless, skinless chicken thighs. But you’ll lose the crispy skin that makes this recipe special. You’ll need to reduce the cooking time significantly to prevent the meat from drying out.
Without the protective layer of skin and the insulating bone, boneless thighs cook much faster. They reach their target temperature in 25 to 30 minutes instead of 40 to 50 minutes.
The lack of skin also means the lemon pepper oil rub has nowhere to go. It sits directly on the surface of the meat. It can burn and turn bitter if you’re not careful about temperature control.
If you decide to use boneless, skinless thighs anyway, reduce your grill temperature to 325°F. Pull the chicken when it reaches 165 to 170°F instead of 175 to 185°F. There’s no collagen-rich skin. There’s less connective tissue to break down in boneless cuts.
You should still baste with the lemon butter during the final 5 to 7 minutes of cooking. But the butter won’t have crispy skin to cling to. It will mostly pool on the surface of the meat or drip off into the grill.
The finished dish will taste good. But it won’t have the same textural contrast or visual appeal as the bone-in, skin-on version.
For the best possible results with boneless, skinless thighs, consider finishing them with the wet lemon pepper butter in a skillet on the stovetop after grilling. Transfer the grilled thighs to a hot cast iron skillet with the melted butter. Cook for 2 to 3 minutes. Spoon the butter over the top constantly to create a glossy coating. This has a better chance of sticking to the meat. This stovetop butter-basting technique is borrowed from French cooking. It creates a similar effect to what you get on the grill with skin-on thighs.
What Temperature Should Your Grill Be for Lemon Pepper Chicken Thighs?
Your grill should maintain 350°F in the indirect cooking zone. This is perfect for lemon pepper chicken thighs. It’s hot enough to render the fat and crisp the skin within 40 to 50 minutes. But it’s gentle enough to prevent burning or drying out the meat.
This temperature sits in the sweet spot. It’s between low-and-slow smoking at 225 to 275°F and high-heat direct grilling at 450°F and above. You get the benefits of both techniques without the drawbacks of either extreme.
At 350°F, the subcutaneous fat has plenty of time to slowly melt and drip away. The proteins in the skin gradually tighten and crisp. But the moderate heat prevents the tough, leathery texture you get from cooking too hot. It also prevents the flabby, undercooked skin you get from cooking too low.
If your grill runs hotter than 350°F and consistently stays around 375 to 400°F in the indirect zone, you can still make the recipe. But you’ll need to watch the chicken more closely. You may need to reduce the cooking time by 5 to 10 minutes.
Higher heat speeds up the rendering process. It can give you crispier skin in less time. But it also increases the risk of the exterior overcooking before the center reaches 175°F. This is especially true if you’re working with particularly thick thighs.
You should also move the chicken farther away from the direct heat source if possible. Position it at the very edge of the indirect zone where the ambient temperature is coolest.
If your grill runs cooler than 350°F and hovers around 300 to 325°F, you’ll need to extend the cooking time to 50 to 60 minutes. You may need to finish the thighs over direct heat for 2 to 3 minutes at the end. This fully crisps the skin.
Lower temperatures are more forgiving. They give you a wider margin for error. This makes them ideal if you’re new to grilling. Or if you’re managing multiple dishes at once and can’t babysit the chicken constantly.
The trade-off is longer cooking time. You may get less dramatic skin crisping. But you can compensate for this by increasing the oven temperature when reheating leftovers.
For charcoal grills where temperature control is more challenging, use the hand test to verify your heat level before adding the chicken. Hold your palm 6 inches above the grate in the indirect zone. Count how many seconds you can keep it there before the heat becomes uncomfortable.
At 350°F, you should be able to hold your hand for 7 to 8 seconds. If you can only hold it for 5 to 6 seconds, your grill is too hot. You need to close the bottom vents partially or wait a few minutes for the coals to die down.
If you can hold your hand for 9 to 10 seconds or longer, your grill is too cool. You need to add more coals or open the vents to increase airflow.
How Do You Store and Reheat Leftover Wet Lemon Pepper Chicken?
Store leftover wet lemon pepper chicken in an airtight container in the refrigerator for up to 3 days. Make sure the pieces don’t overlap or stack on top of each other. This would trap moisture and make the skin soggy.
Let the chicken cool to room temperature for no more than 1 hour before refrigerating. This prevents bacterial growth. But don’t leave it out longer than that. The butter coating can spoil if held at room temperature for extended periods.
The butter will solidify and turn opaque when cold. It coats the chicken in a thick white layer. This looks unappetizing but doesn’t affect the flavor or safety of the meat.
To reheat leftover chicken and restore the crispy skin, place the pieces on a wire rack set over a rimmed baking sheet. Heat in a 350°F oven for 10 to 15 minutes. Continue until the internal temperature reaches 165°F and the skin crisps back up.
The wire rack is important. It allows hot air to circulate all around the chicken. It prevents the bottom from sitting in any rendered fat or moisture that drips out during reheating. This would make the underside soggy.
The butter coating will melt and turn glossy again as the chicken heats up. You’ll lose some of it to the pan below. You may want to drizzle a little extra melted butter over the top right before serving. This refreshes the wet coating.
Never reheat this chicken in the microwave if you care about texture. Microwaves heat through steam. They will turn the crispy skin into a rubbery, soggy mess within seconds.
The microwave also heats unevenly. It can create hot spots where parts of the chicken are scorching hot while other sections are still cold. This increases the risk of bacterial growth if you don’t heat it thoroughly.
If you absolutely must use a microwave due to time constraints or lack of oven access, place the chicken on a microwave-safe plate lined with paper towels. This absorbs moisture. Heat on 50% power in 1-minute intervals. Accept that the skin will be soft instead of crispy.
You can also reheat the chicken on the grill if you’re already firing it up for another meal. Set up the grill for indirect heat at 350°F just like the original cooking method. Place the cold chicken in the indirect zone skin-side up. Close the lid for 8 to 10 minutes until heated through.
This method gives you results almost identical to the original fresh-cooked chicken. You get perfectly crispy skin and a refreshed butter coating. But it requires more effort than simply throwing the chicken in the oven.
Can You Make This Recipe in the Oven Instead of on the Grill?
You can make wet lemon pepper chicken thighs in the oven. You’ll get very similar results to grilling. But you’ll miss the subtle smoke flavor that comes from cooking over charcoal or wood-fired gas burners.
Preheat your oven to 400°F. Arrange the seasoned chicken thighs skin-side up on a wire rack set over a rimmed baking sheet. This mimics the indirect heat setup of a grill. Hot air circulates all around the chicken while the fat drips away into the pan below.
The wire rack is critical for crispy skin. It prevents the chicken from sitting in its own rendered fat. This would steam the underside. You’d get crispy skin on top but soggy skin on the bottom.
Roast the chicken for 35 to 40 minutes until it reaches an internal temperature of 165°F. Then begin basting with the lemon butter. Baste every 2 to 3 minutes for the next 10 minutes. Continue as the temperature climbs to 175 to 185°F.
If the skin isn’t as crispy as you’d like by the time the chicken reaches temperature, turn on the broiler. Move the rack to the upper third of the oven for the final 2 to 3 minutes. Watch closely to prevent burning.
The intense top-down heat from the broiler will finish crisping any remaining soft spots on the skin. You get results nearly identical to what you’d get from a grill.
The main difference between oven-roasted and grilled lemon pepper chicken is the lack of char marks and smoky flavor. This comes from cooking over live fire.
If you want to approximate this flavor, you can add ½ teaspoon of smoked paprika to the lemon pepper oil rub. Or use a small amount of liquid smoke in the butter mixture. These substitutions will never perfectly replicate the real thing.
The oven method is more convenient for indoor cooking. It works when weather prevents outdoor grilling. It gives you more precise temperature control. This makes it ideal if you’re cooking for a crowd. You need consistent results across multiple batches.
One advantage of the oven method is that you can cook other dishes simultaneously on different racks. You maximize your oven space and energy efficiency.
Just make sure anything else you’re cooking can tolerate 400°F heat. It shouldn’t release strong odors or flavors. These could transfer to the chicken through the circulating air.
What’s the Best Side Dish to Serve with Wet Lemon Pepper Chicken Thighs?
The best side dishes for wet lemon pepper chicken thighs are those that complement the bright citrus and rich butter flavors. They shouldn’t compete for attention. Focus on simple vegetables, grains, or starches that can soak up the extra butter that drips off the chicken.
Grilled or roasted vegetables like asparagus, zucchini, bell peppers, or broccolini work particularly well. They pick up similar char marks and smoky notes if you cook them on the same grill. Their natural sweetness balances the sharp lemon and pepper flavors.
You can toss the vegetables with olive oil, salt, and pepper. Grill them in the direct heat zone while the chicken cooks in the indirect zone. Time everything to finish at the same moment.
Starchy sides like roasted potatoes, rice pilaf, or creamy polenta provide a neutral base. They absorb the lemon butter. They give you textural contrast against the crispy chicken skin.
Roasted fingerling potatoes or baby potatoes work especially well. You can coat them with some of the leftover lemon pepper oil before roasting. This creates a cohesive flavor profile across the entire meal.
For rice pilaf, cook the rice in chicken stock with a bay leaf. Finish it with a pat of butter and some fresh parsley. This echoes the herbs in the butter baste. Or use the actual leftover lemon butter from the chicken to add instant flavor to plain white rice.
Ready to Level Up?
Take your backyard cooking from good to legendary.
This is where I keep all my most-used smokers, knives, and favorite cooking tools.
Shop My Gear CollectionExplore More Recipes
Find more diverse flavors at CWFeats.com