Hot honey chicken drumsticks are chicken drumsticks butterflied by cutting lengthwise along the bone to open the meat flat, seasoned generously with poultry seasoning, grilled at 350°F for 20-25 minutes until they reach 165°F internal temperature, then coated in a sticky hot honey wing sauce made from butter, honey, wing sauce, red chili flakes, and granulated garlic, and returned to the grill for 5-10 minutes to let the sauce set into a glossy, caramelized glaze. The butterflying technique exposes the bone and creates a larger, flatter surface area that develops crispy, charred edges while allowing heat to penetrate evenly for perfectly cooked meat throughout. The sweet and spicy sauce balances honey’s floral sweetness against wing sauce’s tangy heat and butter’s richness, creating an addictive glaze that clings to every crevice of the butterflied drumsticks. This grilled chicken drumsticks recipe delivers restaurant-quality results with minimal prep and maximum flavor.
The whole process takes about 45 minutes from start to finish, including 20 minutes of prep to butterfly the drumsticks and 25 minutes of grilling time. You butterfly the raw drumsticks, season them, grill until cooked through while making the sauce on the stovetop, then brush the sauce on and let it tack up on the grill before tossing everything together for final coating. These hot honey wings style drumsticks work perfectly for game day parties, summer cookouts, or any time you want sticky, finger-licking chicken that combines sweet and spicy in perfect balance.
Why Butterflying Drumsticks Creates Better Grilled Chicken

Butterflying chicken drumsticks transforms them from awkward, unevenly cooking pieces into flat, grill-friendly cuts that cook faster and develop more flavorful crust. When you cut along the bone lengthwise and open the meat like a book, you nearly double the surface area exposed to heat and seasoning. This means more of the chicken gets direct contact with the hot grill grates, creating those desirable char marks and crispy edges that whole drumsticks can’t achieve.
The flattened shape cooks more evenly because heat reaches all parts of the meat at the same rate. Whole drumsticks have thick sections near the joint and thin sections near the end, making it nearly impossible to cook them perfectly throughout without overcooking the thin parts or undercooking the thick parts. Butterflied drumsticks lay flat with relatively uniform thickness, so the entire piece reaches 165°F at roughly the same time.
Butterflying also solves the common problem of raw meat near the bone. The bone acts as an insulator that slows heat transfer to the meat directly touching it, which is why you often bite into a drumstick that looks done but has pink, undercooked areas near the bone. By exposing the bone and opening the meat around it, you allow heat to reach those formerly protected areas directly, ensuring the chicken cooks completely through without extended grilling that dries out the exterior.
The increased surface area created by butterflying gives sauce more places to cling and caramelize, creating better flavor coverage and texture contrast. Instead of sauce just coating the smooth exterior of a whole drumstick, butterflied pieces have crevices, edges, and the exposed bone area where sauce can pool, thicken, and develop concentrated spots of sweet-spicy glaze. This creates more complex flavor in every bite rather than just coating on the outside.
What Makes Hot Honey Sauce Perfect for Grilled Chicken
Hot honey sauce combines three powerful flavor components in perfect balance: sweet honey, tangy-spicy wing sauce, and rich butter that ties everything together into a glossy, clingable glaze. The honey provides viscosity that helps the sauce stick to chicken rather than dripping off, while also adding floral sweetness that tempers the aggressive heat from chili flakes and hot sauce. This sweet-heat combination creates addictive flavor that makes you reach for another piece even though your mouth is tingling.
Wing sauce (like Frank’s RedHot) brings acidity and fermented pepper flavor that cuts through the richness of grilled chicken skin and prevents the honey from tasting cloying or one-dimensional. The vinegar base in hot sauce also helps the glaze set and caramelize on the grill without burning as quickly as pure honey would. The combination of acids and sugars creates complex Maillard reactions during the final grilling stage that develop deep, savory-sweet flavors you can’t achieve with sauce applied off-heat.
Butter acts as an emulsifier that binds the water-based hot sauce with the sugar-based honey, preventing separation and creating a smooth, cohesive sauce. The milk solids in butter also brown beautifully when exposed to grill heat, adding nutty, toasted notes that complement the sweet and spicy elements. A whole stick of butter (½ cup) for 2½-3 pounds of chicken creates the right ratio of richness without making the sauce greasy.
Red chili flakes and granulated garlic add layers of flavor complexity beyond just heat. The chili flakes provide visible spice and texture in the glaze, along with slow-building heat that develops across your palate rather than hitting all at once like cayenne would. Granulated garlic adds savory depth and aromatic notes that make the sauce taste intentional and balanced rather than just sweet-hot. Together, these five ingredients create a sauce that tastes restaurant-quality while requiring less than 10 minutes to make.
How to Butterfly Chicken Drumsticks Properly
Butterflying chicken drumsticks requires a sharp fillet knife or boning knife and a confident cutting motion along the bone’s length. Place the drumstick on a cutting board with the meatiest side facing up, then locate the bone running through the center by pressing your fingers along its length. Start at the thicker end near the joint and cut straight down alongside the bone, using the bone as a guide to keep your knife on track.
Apply steady, even pressure as you cut, letting the sharp knife do the work rather than sawing back and forth aggressively. You’re cutting through muscle and connective tissue, not bone, so a sharp knife should slice cleanly without much resistance. Cut all the way through to the cutting board, creating a split that runs the entire length of the drumstick from joint to the thin end.
Once you’ve made the cut, open the drumstick like a book, pressing the two halves of meat outward to lay flat. You’ll see the bone fully exposed down the middle with meat on both sides. Use your knife to trim any stubborn connective tissue that prevents the meat from laying completely flat, but leave the bone attached rather than trying to remove it. The bone adds flavor during grilling and makes the drumstick easier to handle and eat.
Press down firmly on the butterflied drumstick with your palm to flatten it as much as possible. The more uniformly flat you can make it, the more evenly it will cook. Some drumsticks will lay completely flat while others resist slightly depending on how they were cut at the processing plant, but even partially flattened drumsticks cook much better than whole ones. Repeat this process with all drumsticks, working in a production line to make the process faster.
What Grill Temperature Works Best for Chicken Drumsticks
The ideal grill temperature for butterflied chicken drumsticks is 350°F, which provides moderate heat that cooks the meat through to 165°F internal temperature in 20-25 minutes while developing good char and color without burning the exterior. This temperature is hot enough to create Maillard browning and caramelization on the flattened surfaces, but not so hot that the outside chars before the meat near the bone reaches safe temperature.
Higher temperatures (400°F and above) work better for thin cuts like chicken breast or boneless thighs that cook quickly, but drumsticks have more mass and density that needs time for heat to penetrate. At 400°F or higher, you’ll get beautiful grill marks in 5 minutes but the internal temperature will still be at 140°F or lower, forcing you to move the chicken to indirect heat or reduce temperature mid-cook. Starting at 350°F lets you leave the chicken in one zone for the entire cook.
Lower temperatures (300°F and below) take too long to cook butterflied drumsticks and can dry them out as moisture evaporates during the extended cooking time. You also miss out on the char and crispy skin texture that makes grilled chicken craveable. The 350°F sweet spot gives you the best balance of cooked-through meat with crispy, flavorful exterior in a reasonable timeframe.
Maintaining consistent 350°F requires monitoring your grill’s temperature with a built-in thermometer or an oven thermometer placed on the grate. Gas grills make this easy with adjustable burners, but charcoal grills require more attention. For charcoal, arrange coals in an even layer across half the grill and let them ash over until the temperature stabilizes at 350°F, adjusting your intake and exhaust vents to maintain heat. You can cook the butterflied drumsticks over this moderate heat zone, flipping regularly for even cooking.
Should You Sauce Chicken Before or After Grilling
You should sauce butterflied chicken drumsticks after they’ve grilled to 165°F internal temperature rather than before or during the initial cooking, because the sugars in honey and hot sauce burn quickly when exposed to direct heat for extended periods. If you coat the drumsticks with sauce before grilling, the honey will caramelize into black, bitter char in the first 10 minutes while the meat is still raw inside. This forces you to either scrape off the burnt sauce or serve chicken that looks and tastes burnt despite being properly cooked.
The correct technique is cooking the seasoned, unsauced chicken to 165°F internal temperature first (about 20-25 minutes at 350°F), then brushing or spooning sauce on both sides and returning the drumsticks to the grill for an additional 5-10 minutes. This brief sauce-grilling period allows the glaze to heat through, thicken, and develop some caramelization without burning. The sauce “tacks up” into a sticky, glossy coating that clings to the chicken rather than dripping off.
During those final 5-10 minutes with sauce on the grill, you’re looking for the glaze to go from wet and shiny to slightly tacky and concentrated. It should bubble gently and darken slightly from caramelization, but if you see black spots forming or smell burning sugar, the heat is too high or the chicken has been on too long. Pull it immediately before the sauce burns.
The final step of tossing the grilled, sauced chicken in a bowl with any remaining sauce ensures complete coverage and intensifies the glaze. This technique creates layers of sauce: a tacked-up, caramelized layer from the grill that provides texture and concentrated flavor, plus a fresh, glossy layer from the final toss that adds visual appeal and ensures every bite has sauce. Restaurant-style wings and sticky grilled chicken both use this same building approach for maximum sauce impact.
Step-by-Step Instructions
Step 1: Butterfly the Chicken Drumsticks
Place chicken drumsticks on a clean cutting board, arranging them with the meatiest side facing up for easier cutting. Use a sharp fillet knife or boning knife to locate the bone running through the center of each drumstick by pressing along its length with your fingers. Starting at the thick end near the joint, cut straight down alongside the bone using a confident, steady motion.
Let the knife do the work as you slice through muscle and connective tissue along the entire length of the bone from the joint to the thin end. You should feel the knife moving smoothly through meat, using the bone as a guide to keep your cut straight. Apply consistent pressure without sawing back and forth, and cut all the way through to the cutting board.
Once you’ve made the lengthwise cut, open the drumstick like a book by pressing the two halves of meat outward to lay flat. The bone should be fully exposed running down the middle with meat spread on both sides. Press down firmly with your palm to flatten the butterflied drumstick as much as possible, creating an even thickness that will cook uniformly.
Repeat this butterflying process with all remaining drumsticks, working efficiently through the batch. After butterflying all the drumsticks, season them generously on all sides with your favorite poultry seasoning, using approximately 2-3 tablespoons total and pressing the seasoning into the meat so it adheres. Set the seasoned, butterflied drumsticks aside while you preheat the grill.
Step 2: Preheat the Grill and Prepare for Cooking
Preheat your gas grill to 350°F by setting all burners to medium, or prepare a charcoal grill by arranging an even layer of lit charcoal across half the grill grate and letting it ash over until it reaches steady 350°F temperature. Use a grill thermometer to verify the temperature, adjusting burners or vents as needed to maintain consistent moderate heat.
Clean the grill grates thoroughly with a grill brush to remove any debris or residue from previous cooking sessions. Oil the grates lightly by dipping a folded paper towel in vegetable oil and using tongs to rub it across the hot grates. This prevents the butterflied chicken from sticking and helps create clean grill marks.
Arrange your workspace with everything you’ll need within arm’s reach: the seasoned butterflied drumsticks, tongs for flipping, a meat thermometer for checking doneness, and a clean plate for the finished chicken. Having everything ready before you start cooking prevents scrambling mid-cook and ensures you can focus on monitoring the chicken.
The grill is ready when it maintains a steady 350°F temperature and the grates are hot, clean, and lightly oiled. This preparation takes about 10-15 minutes for gas grills and 20-30 minutes for charcoal grills, during which time the seasoned drumsticks can sit at room temperature, allowing the seasoning to penetrate the surface.
Step 3: Grill the Butterflied Drumsticks
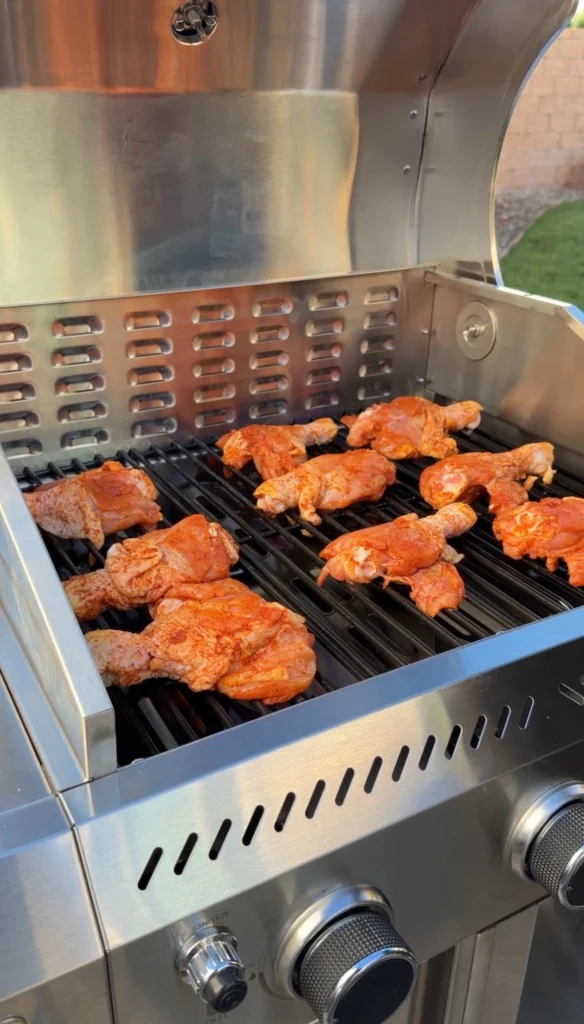
Place the butterflied drumsticks on the preheated 350°F grill, laying them flat with the opened side facing up so maximum surface area contacts the grates. Arrange them with some space between pieces to allow heat circulation and prevent steaming. Close the grill lid to maintain consistent temperature and create an oven-like environment that cooks the chicken evenly from all sides.
Grill for 5-6 minutes on the first side without moving them, allowing the meat to develop grill marks and release naturally from the grates. When you try to flip them, they should lift easily; if they stick, they’re not ready yet. Give them another minute and try again.
Flip the drumsticks using tongs and continue grilling, flipping every 4-5 minutes to ensure even cooking on all surfaces. The butterflied shape cooks faster than whole drumsticks, but you still need to flip regularly to prevent any one side from overcooking. Watch for the meat to turn from pink to white and the skin to become golden brown with visible char marks.
Check the internal temperature after about 20 minutes by inserting an instant-read thermometer into the thickest part of the meat, avoiding the bone which conducts heat differently. You’re looking for 165°F internal temperature. If the chicken hasn’t reached temperature yet, continue grilling and checking every 2-3 minutes until it does. Total grill time will be 20-25 minutes depending on the size of your drumsticks and your grill’s actual temperature.
Step 4: Make the Hot Honey Wing Sauce
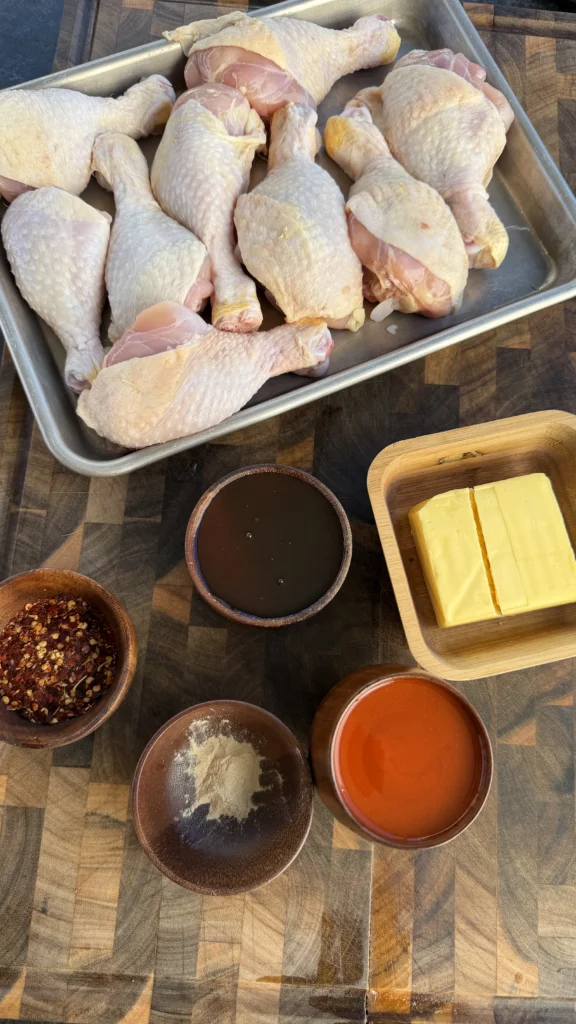
While the chicken grills, prepare the hot honey sauce on your stovetop. Melt 1 stick (½ cup) unsalted butter in a medium saucepan over low to medium-low heat, swirling the pan occasionally until the butter is completely liquified. Don’t rush this step with high heat or the butter can separate or scorch.
Add 2 teaspoons red chili flakes, ½ cup honey, ¾ cup wing sauce (or Frank’s RedHot), and 1 teaspoon granulated garlic to the melted butter. Whisk everything together continuously for 1-2 minutes until the ingredients are fully combined into a smooth, emulsified sauce. The mixture should be glossy and uniform in color without any separated butter pooling on top.
Let the sauce simmer gently over low heat for 2-3 minutes, whisking occasionally, to allow the flavors to meld and the chili flakes to infuse their heat into the butter. Taste the sauce and adjust seasoning if needed, though it should have balanced sweet-spicy-tangy flavor as written. The sauce will thicken slightly as it simmers but should remain pourable.
Keep the sauce warm over very low heat until the chicken is ready, whisking occasionally to prevent separation. If the sauce gets too thick from extended warming, whisk in a tablespoon of water to return it to the right consistency. The sauce should be warm and fluid when you apply it to the chicken, not cold and thick.
Step 5: Sauce and Set the Chicken on the Grill
Once the butterflied drumsticks reach 165°F internal temperature, use a basting brush or spoon to coat them generously with the hot honey sauce on all sides. Make sure to get sauce into the crevices created by the butterflying and around the exposed bone where sauce can pool. Use about two-thirds of the total sauce for this initial coating, reserving the remaining one-third for the final toss.
Return the sauce-coated drumsticks to the grill and continue cooking for 5-10 minutes, flipping every 2-3 minutes to prevent burning. You’re not trying to cook the chicken more at this stage since it’s already at 165°F; you’re letting the sauce tack up, thicken, and caramelize into a sticky glaze. Watch carefully for the sauce to bubble gently and darken slightly without turning black.
The sauce is properly set when it looks glossy but slightly tacky rather than wet and runny, and you can see some caramelization and slight charring on the edges. If you notice black spots forming or smell burning sugar, remove the chicken immediately as the sauce has gone too far. The moderate 350°F heat should allow proper sauce development without burning if you stay attentive.
Remove the drumsticks from the grill once the sauce has set into an appealing glaze. The exterior should look sticky, shiny, and slightly caramelized with visible grill marks showing through the glaze. Transfer them to a large bowl for the final sauce toss.
Step 6: Toss in Remaining Sauce and Serve
Add the grilled, glazed drumsticks to a large mixing bowl and pour the remaining one-third of the hot honey sauce over them. Toss everything together using tongs or by gently shaking the bowl until every drumstick is thoroughly coated with an additional layer of sauce. This final toss ensures maximum sauce coverage and creates that glossy, finger-licking appearance you want.
The combination of the tacked-up grilled sauce layer and the fresh sauce layer creates ideal texture and flavor. You get caramelized, concentrated glaze from the grilling stage plus fresh, bright sauce flavor from the final toss. If you have any extra sauce beyond what you used for coating, reserve it as a dipping sauce on the side.
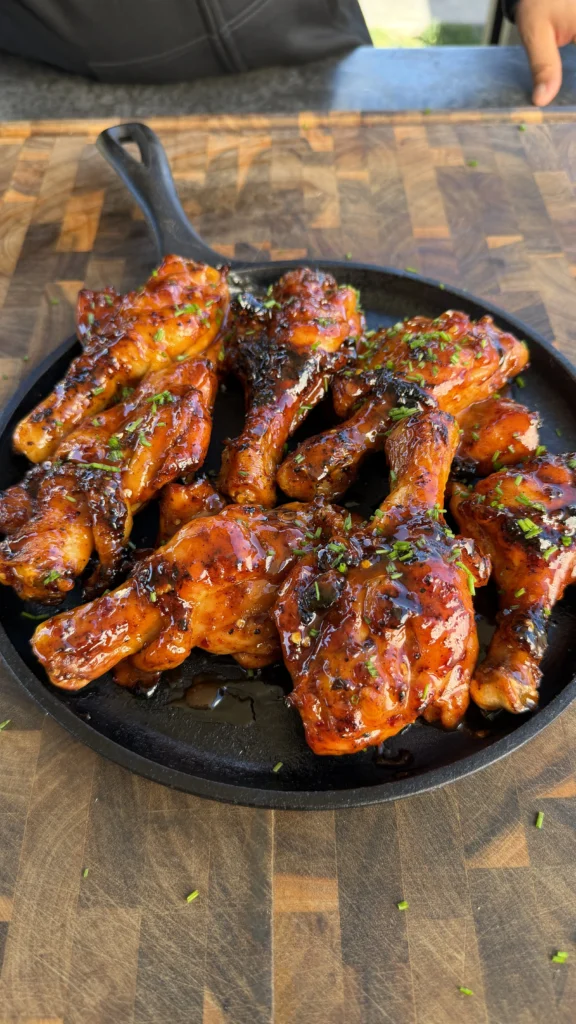
Transfer the sauced drumsticks to a serving platter, arranging them in a single layer or slightly overlapping. Sprinkle freshly chopped chives over the top as garnish, which adds a pop of color and mild onion flavor that complements the sweet-spicy sauce. The green chives against the deep orange-red glaze creates appealing visual contrast.
Serve the hot honey butterflied chicken drumsticks immediately while they’re hot and the sauce is still warm and sticky. Provide plenty of napkins or wet wipes since these are intentionally messy, finger-licking chicken. The sauce should be thick enough to cling to the chicken but will still drip slightly when you bite in, which is exactly what you want.

Grilled Hot Honey Butterflied Chicken Drumsticks
Ingredients
Equipment
Method
- Butterfly the drumsticks by cutting lengthwise along the bone with a sharp knife, then opening the meat flat like a book. Press down to flatten as much as possible. Season generously on all sides with poultry seasoning.
- Preheat grill to 350°F. Clean and oil the grates.
- Place butterflied drumsticks on the grill and cook for 20-25 minutes, flipping every 4-5 minutes, until internal temperature reaches 165°F in the thickest part.
- While chicken grills, make the sauce. Melt butter in a saucepan over low heat, then whisk in chili flakes, honey, wing sauce, and granulated garlic until smooth and combined. Keep warm.
- Once chicken reaches 165°F, brush or spoon sauce generously over all sides. Return to grill for 5-10 minutes, flipping every 2-3 minutes, until sauce tacks up and caramelizes without burning.
- Transfer sauced drumsticks to a bowl, add remaining sauce, and toss to coat thoroughly. Transfer to a serving platter, garnish with fresh chives, and serve immediately.
Nutrition
Notes
Tried this recipe?
Let us know how it was!Frequently Asked Questions
Can You Make This Recipe Without Butterflying the Drumsticks?
You can make hot honey chicken drumsticks without butterflying them, though the cooking time will increase to 35-45 minutes and you’ll lose some of the crispy surface area that makes this recipe special. Whole drumsticks need longer to reach 165°F internal temperature because heat has to penetrate through more mass to reach the meat near the bone. You’ll also get less char and fewer crispy edges since only the exterior surface contacts the grill grates.
If you skip butterflying, increase the total grill time to 35-45 minutes at 350°F, turning the drumsticks every 5-7 minutes to cook evenly on all sides. Use a meat thermometer to check doneness in the thickest part near the joint, where the meat takes longest to cook. Don’t rely on visual cues alone since the exterior can look perfectly done while the interior is still undercooked.
The sauce application technique stays the same whether you butterfly or not: grill to 165°F unsauced, then brush with sauce and return to the grill for 5-10 minutes to let it set. However, whole drumsticks have less surface area for sauce to cling to, so you might have leftover sauce that works great as a dipping sauce.
Butterflying takes an extra 10-15 minutes of prep time but saves 10-20 minutes of grill time while creating better texture and flavor. If you’re uncomfortable with the butterflying technique or don’t have a sharp knife, whole drumsticks work fine, just adjust your expectations for the final result and increase cooking time accordingly.
What’s the Best Way to Prevent the Sauce from Burning?
The best way to prevent hot honey sauce from burning on the grill is applying it only after the chicken reaches 165°F internal temperature, then grilling at moderate 350°F heat for just 5-10 minutes while watching carefully for caramelization without charring. The sugars in honey and hot sauce burn quickly at high temperatures, so you need precise timing and temperature control during the sauce-grilling phase.
Keep the grill at 350°F rather than cranking it higher to “set” the sauce faster. Higher heat (400°F and above) burns the honey before it has time to caramelize properly, creating bitter, black spots instead of glossy glaze. If your grill runs hot and you can’t maintain 350°F, move the sauced chicken to indirect heat or a cooler zone to finish without direct flame contact.
Flip the drumsticks every 2-3 minutes after saucing to prevent any one side from sitting on the hot grates long enough to burn. This frequent flipping helps the sauce set evenly on all surfaces while preventing hot spots from developing. Watch for the sauce to bubble gently and darken slightly from caramelization; if you see black forming or smell burning sugar, pull the chicken immediately.
If you’re nervous about burning the sauce or your grill runs unpredictably hot, you can skip the sauce-grilling step entirely and just toss the cooked drumsticks in warmed sauce off-heat. You’ll lose some caramelization and texture that grilling the sauce provides, but you’ll get the full sweet-spicy flavor without any risk of burning. The sauce will still cling to the hot chicken and create an appealing glaze.
Can You Use Chicken Wings or Thighs Instead of Drumsticks?
You can use chicken wings or boneless thighs instead of drumsticks with this hot honey sauce, though cooking times and preparation techniques will differ. Chicken wings don’t need butterflying and cook faster at 350°F, taking about 20-25 minutes total to reach 165°F. Grill them whole, flipping every 5 minutes, then sauce and return to the grill for 5-10 minutes just like the drumsticks. Wings have more surface area relative to their mass, so they pick up sauce beautifully and crisp well.
Bone-in chicken thighs can be butterflied using the same technique as drumsticks, cutting alongside the bone to open them flat. They’ll cook in roughly the same time as butterflied drumsticks (20-25 minutes to 165°F) and work excellently with the hot honey sauce. Boneless, skinless thighs don’t need butterflying and cook even faster, in about 15-18 minutes at 350°F, making them the quickest option if you want to skip the butterflying step.
The hot honey sauce works universally well on any chicken cut because it’s designed for grilled chicken in general. Wings might need slightly less sauce due to their smaller size, while large thighs might benefit from a bit more. Make the full sauce recipe regardless and adjust the amount you use based on the chicken pieces you’re cooking.
If using wings, consider separating them into drums and flats before grilling for more even cooking. If using boneless thighs, pound them to even thickness before seasoning and grilling so they cook uniformly. The same sauce-after-cooking technique applies to all cuts: grill unsauced to proper temperature first, then sauce and return to the grill briefly to set the glaze.
Ready to Level Up?
Take your backyard cooking from good to legendary.
This is where I keep all my most-used smokers, knives, and favorite cooking tools.
Shop My Gear CollectionExplore More Recipes
Find more diverse flavors at CWFeats.com