Open Fire Beef Ribs – Santa Maria Style
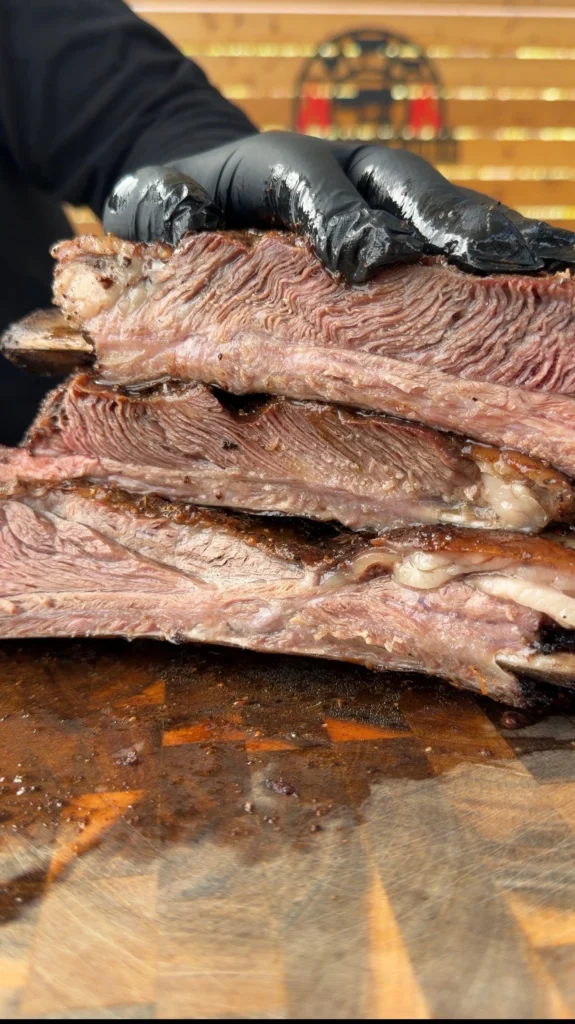
Open fire beef ribs represent the purest form of live-fire cooking – thick, meaty plate ribs seasoned simply with salt and pepper, then cooked directly over lump charcoal until they develop a dark crust and tender, juicy interior. This Santa Maria grill beef ribs recipe strips away all the complexity of modern barbecue and focuses on what matters: quality meat, proper fire management, and perfect timing. These beef plate ribs are what barbecue looked like before sauces and complicated rubs took over.
What makes beef ribs over open fire so special is how the direct heat and wood smoke create flavors you simply can’t replicate in a closed smoker. The Santa Maria style of cooking keeps the ribs close to the coals, allowing the fat to render and drip onto the fire, creating aromatic smoke that flavors the meat from below. The constant heat exposure develops a thick, peppery bark that contrasts beautifully with the tender meat underneath.
This simple beef ribs recipe proves that great barbecue doesn’t require a dozen ingredients or complicated techniques. The key is understanding fire management, knowing when to flip your ribs, and having the patience to let them rest properly in foil. When done right, these open fire beef ribs deliver bold, beefy flavor with a texture that falls somewhere between steak and traditional low-and-slow ribs.
Open Fire Beef Ribs – Santa Maria Style
Thick beef plate ribs seasoned with salt and pepper, cooked over lump charcoal for bold, smoky flavor and perfect tenderness
Ingredients
- 1 rack plate beef ribs (6-10 lbs)
- Coarse salt (kosher or sea salt)
- Freshly cracked black pepper
- Lump charcoal (any brand works)
- Optional: wood chunks (oak, mesquite, or your favorite)
Understanding Beef Plate Ribs
Beef plate ribs, also called beef short ribs or dino ribs, come from the lower portion of the cow’s rib cage. These are massive bones with thick layers of meat and fat – a single rack can weigh 6-10 pounds and contains 3-4 bones. Unlike back ribs which are leaner, plate ribs have the marbling and connective tissue needed to handle direct heat without drying out.
The meat on plate ribs is continuation of the same muscle that makes up ribeye steaks, which explains their rich, beefy flavor. This high-quality meat can handle simple seasoning because it doesn’t need help tasting good. Salt and pepper are all you need to let the natural beef flavor shine through the smoke.
Plate ribs require different cooking than pork ribs. You’re not looking for fall-off-the-bone tenderness – that means overcooked. Instead, you want the meat to pull cleanly from the bone with a bite, similar to a perfectly cooked steak. This is why the target temperature of 200°F is crucial – it’s hot enough to render fat and break down connective tissue, but not so hot that the meat becomes mushy.
When shopping for beef ribs, look for racks with good meat coverage and a thick fat cap. The bones should be substantial, and there should be visible marbling throughout the meat. Avoid ribs that look dried out or have been trimmed too aggressively – you want that fat for flavor and moisture.
Why Santa Maria Style Works
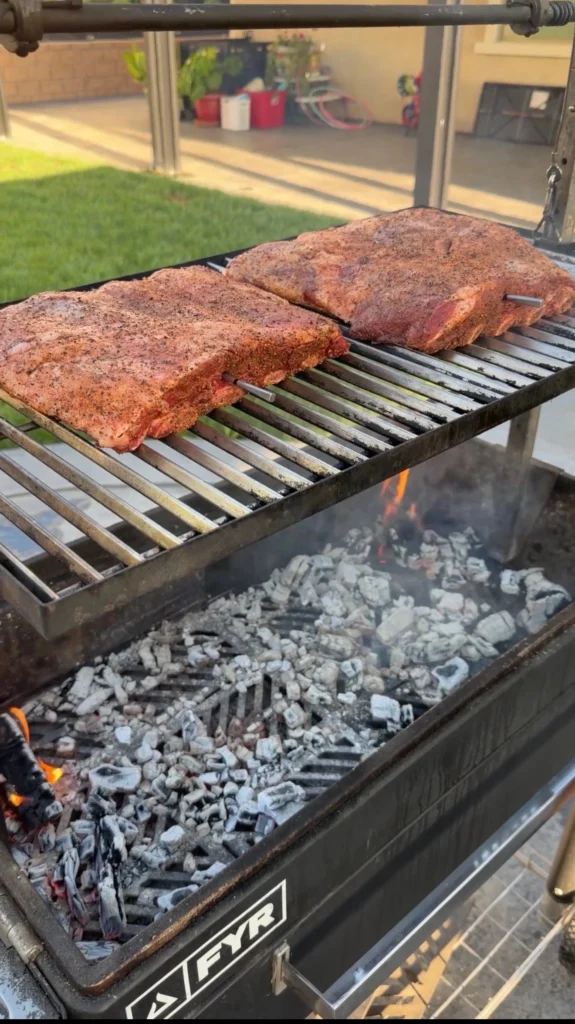
Santa Maria style grilling originated in California’s Central Coast, where ranchers developed this method of cooking beef over red oak coals. The signature element is the adjustable grate that lets you control distance from the fire without moving the coals. This gives you precise heat control while maintaining the direct-heat cooking method.
The beauty of cooking beef ribs on a Santa Maria grill is how the adjustable grate lets you manage flare-ups without losing the benefits of direct heat. When fat drips onto the coals and flames up, you can raise the grate temporarily instead of moving the meat or dousing the fire. This keeps the cooking process consistent and prevents burnt spots.
Direct heat at medium temperatures (around 300°F) is the sweet spot for beef plate ribs. This temperature is hot enough to render fat and develop bark quickly, but not so hot that the outside burns before the inside cooks through. The constant exposure to heat from below creates even cooking and proper bark development on the bone side first.
The open fire environment means your ribs get genuine wood smoke flavor, not just heat. As fat renders and drips onto the coals, it vaporizes and rises back up as flavorful smoke. This is the kind of complex, layered flavor that makes open fire cooking special – you’re tasting the beef, the charcoal, any wood you added, and the rendered fat all at once.
Fire Management Fundamentals
Lump charcoal is essential for Santa Maria beef ribs because it burns cleaner and hotter than briquettes. It also produces less ash, which means better airflow and more consistent temperatures. Any brand works, but larger chunks are better because they burn longer and more evenly than small pieces.
Building your fire correctly sets up the entire cook for success. You want a solid bed of hot coals spread evenly under the cooking area. Don’t pile them in the center – distribute them so the entire rack of ribs gets consistent heat. The coals should be fully lit and ashed over before you start cooking, which takes about 20-30 minutes.
Adding wood chunks is optional but recommended for extra smoke flavor. Oak is traditional for Santa Maria style and provides mild, clean smoke that doesn’t overpower the beef. Mesquite works if you like stronger smoke flavor, but use it sparingly as it can turn bitter. Add wood chunks when the coals are fully lit so they smolder and smoke rather than flame up.
Temperature control on an open fire is about grate height, not fuel adjustment. Start with the grate at medium height – you should be able to hold your hand over the fire for 4-5 seconds before pulling away. If it’s too hot, raise the grate. If it’s too cool, lower it closer to the coals. Make adjustments gradually and give them time to take effect.
The Salt and Pepper Philosophy
Keeping seasoning simple isn’t laziness – it’s confidence in your ingredients. Beef plate ribs have enough natural flavor that complex rubs just get in the way. Coarse salt and freshly cracked black pepper is all you need to enhance the meat without masking it.
Use coarse salt like kosher or sea salt rather than fine table salt. The larger crystals stick better to the meat and provide texture in the finished bark. The salt should coat the surface evenly but not so heavily that you can’t see the meat underneath. Season all sides including the bone side – even though you can’t eat the bones, the seasoning contributes to overall flavor.
Freshly cracked black pepper makes a real difference compared to pre-ground. Crack it coarsely so you get pieces of various sizes – the smaller bits integrate into the bark while the larger chunks provide pops of peppery heat. Don’t be shy with the pepper – beef ribs can handle aggressive seasoning because of their size and fat content.
Pat the ribs dry before seasoning so the salt and pepper stick properly. Any surface moisture will prevent good adhesion and interfere with bark formation. Let the seasoned ribs sit at room temperature for 30-60 minutes before cooking so the salt has time to penetrate and the meat comes closer to room temperature for more even cooking.
The Two-Position Cooking Method
Starting bone side down is crucial for proper beef rib cooking. The bones act as a heat shield for the meat, preventing it from cooking too fast on the first side. This position also allows the fat cap on the meat side to slowly render without burning, while the exposed bone side develops color and char marks.
Maintaining 300°F at grate level gives you the right balance of searing and cooking through. This isn’t low and slow, but it’s not screaming hot either. The ribs need time for the internal fat and connective tissue to break down, which doesn’t happen if you cook too fast. Check the temperature with an infrared thermometer if you have one, or use the hand test – 4-5 seconds before pulling away indicates medium heat.
The 185°F internal temperature milestone signals when to flip. At this point, the bones have protected the meat while it cooked through, and the fat has rendered significantly. Flipping to meat side down for the final push exposes the fat cap directly to heat, helping it crisp up and brown while the interior finishes cooking to 200°F.
Probe tenderness is as important as temperature. When the ribs hit 200°F, test them with a probe or skewer – it should slide in and out smoothly with little resistance. If you feel tough spots, continue cooking even if the temperature is right. Every rack of ribs is different, so trust the feel more than the numbers.
The Foil Rest Secret
Wrapping beef ribs tightly in foil for resting is non-negotiable. The foil traps heat and creates a mini-sauna that continues to tenderize the meat without additional cooking. The trapped steam also helps redistribute juices throughout the meat, so when you slice into them, every bite is moist rather than the juices pooling on the cutting board.
Thirty minutes is the minimum rest time, but longer is better if you can manage it. The ribs will stay hot for up to 2 hours when wrapped tightly in foil. Some pitmasters rest beef ribs in a cooler lined with towels, which can extend the hold time even further. This flexibility makes timing easier when coordinating sides or serving multiple dishes.
The texture transformation that happens during the rest is remarkable. Ribs that feel slightly tough when they come off the fire will be perfectly tender after resting. The residual heat continues to break down any remaining connective tissue while the meat fibers relax and reabsorb moisture. Skipping this step or cutting it short means tougher, drier ribs.
Remove the ribs from foil just before slicing and serving. If they sit out too long after unwrapping, they’ll cool down and some of that perfect texture will be lost. Have your cutting board ready and slice between the bones with a sharp knife – clean cuts show off the smoke ring and make for better presentation.
Ingredients
For the Beef Ribs:
- 1 rack plate beef ribs (6-10 lbs)
- Coarse salt (kosher or sea salt)
- Freshly cracked black pepper
- Lump charcoal (any brand works)
- Optional: wood chunks (oak, mesquite, or your favorite)
Step-by-Step Instructions
Prepare the Beef Ribs for Cooking
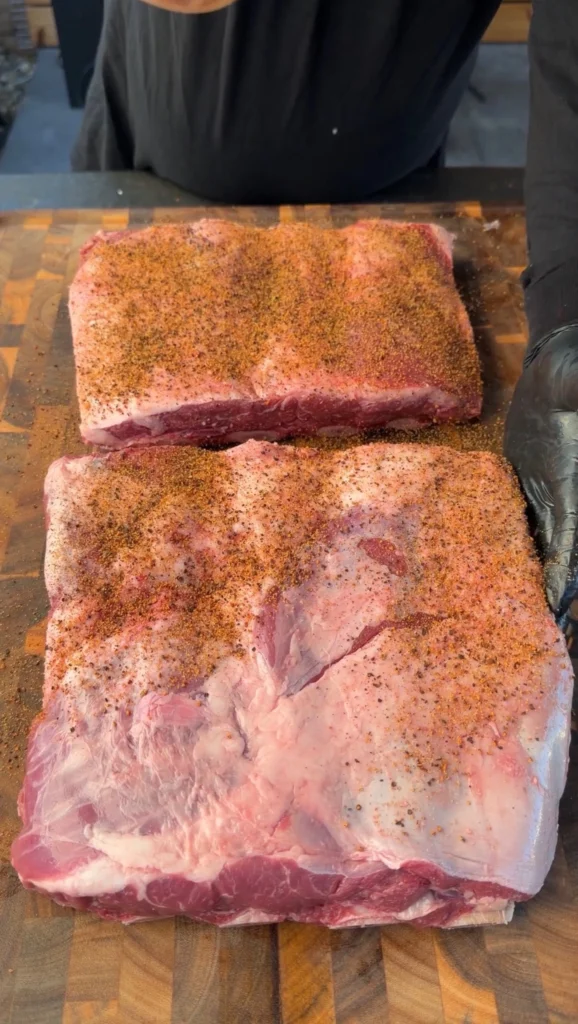
Start by examining your rack of beef plate ribs and removing any loose pieces of fat or meat that might burn, but keep the main fat cap intact. Keep the rack whole without scoring or separating the bones – this method works best with an intact rack for even cooking. Take paper towels and thoroughly pat the entire rack dry on all surfaces including the meat side, bone side, and edges. Surface moisture prevents proper seasoning adhesion and interferes with bark formation.
Once completely dry, generously season all sides with coarse kosher salt or sea salt, coating the surface evenly but not so heavily you can’t see the meat. Apply freshly cracked black pepper liberally to all surfaces – crack it coarsely so you get various sized pieces that create texture in the bark. Season the bone side too even though you won’t eat it. Let the seasoned ribs sit at room temperature for 30-60 minutes to allow salt penetration and bring the meat closer to room temperature for even cooking.
Build and Prepare Your Open Fire
Fill a chimney starter with lump charcoal and light it using newspaper or fire starters. Let the charcoal burn for 20-30 minutes until all coals are fully lit and covered with gray ash – you’ll see glowing red embers throughout. Dumping coals too early results in uneven heat and bitter smoke that affects meat flavor.
Once ready, dump the hot coals into your Santa Maria grill and spread them evenly across the entire cooking area using a long tool. This even distribution is critical for consistent cooking across the whole rack. If using wood chunks for extra smoke (oak is traditional, mesquite for stronger flavor), add 2-3 chunks directly onto the hot coals now. Set your grate to medium height – about 8-10 inches above coals. Test by holding your hand over the grate for 4-5 seconds before pulling away, which indicates the right 300°F temperature.
Cook the Beef Ribs Bone Side Down
Place the entire rack of beef ribs bone side down directly on the cooking grate, positioning evenly over the coals. The bones act as a natural heat shield for the meat, preventing it from cooking too fast while the bone side develops color and char. Once positioned, resist moving them – every time you lift or shift the meat, you interrupt the cooking process and slow bark development.
As the ribs cook, fat will render and drip onto the coals, vaporizing into flavorful smoke. Small flare-ups are normal and add flavor, but if sustained flames threaten to burn the meat, raise the grate temporarily. Start checking internal temperature after 2 hours by inserting a thermometer into the thickest part without touching bone. You’re looking for 185°F, which signals it’s time to flip. Continue cooking bone side down until you reach this target temperature, checking every 20-30 minutes.
Flip the Ribs and Finish Cooking
Once your beef ribs reach 185°F internal temperature, carefully flip the entire rack using sturdy tongs so the meat side faces down toward the coals. With the fat cap now facing direct heat, remaining fat renders aggressively and the meat surface develops a deep, dark crust. Continue cooking at 300°F, watching more closely now since the meat is exposed to direct heat.
Target 200°F internal temperature, but the true test is probe tenderness. When the thermometer reads 200°F, insert a probe or skewer into multiple spots – it should slide in and out smoothly like warm butter with very little resistance. If you feel tough spots, continue cooking even at 200°F since every rack differs. The bark should be dark mahogany, almost black in spots, with deeply embedded pepper creating incredible flavor. This final phase typically takes 45 minutes to 1.5 hours.
Rest the Ribs in Foil
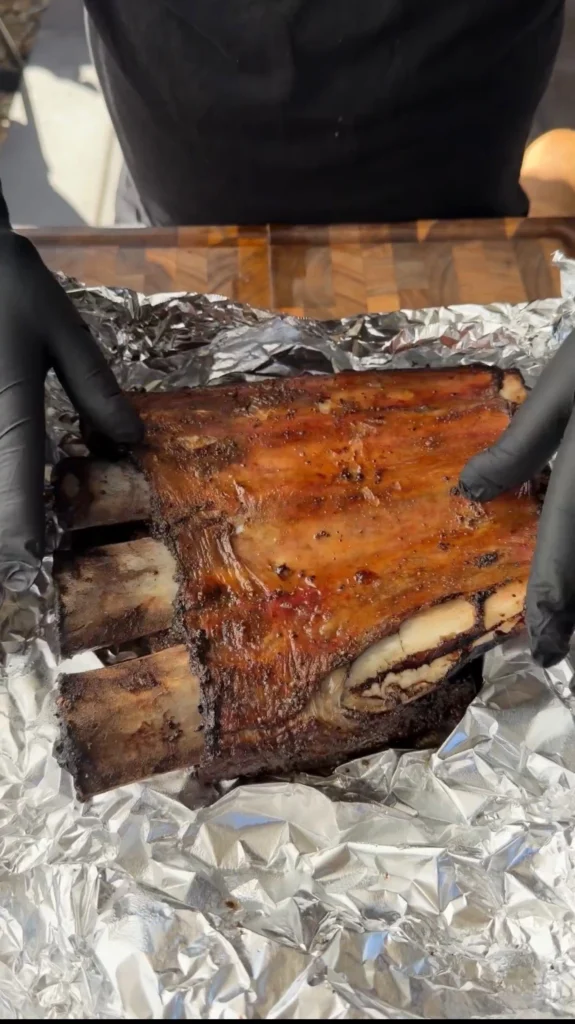
Once the beef ribs are probe tender at 200°F, immediately remove them from the grill. Tear off a large sheet of heavy-duty aluminum foil and place the entire rack in the center. Wrap the ribs tightly, ensuring no gaps where steam can escape – the foil creates a mini-sauna that continues tenderizing without additional cooking. This trapped steam redistributes juices throughout the meat so every bite is moist rather than juices pooling on your cutting board.
Let the wrapped ribs rest for a minimum of 30 minutes, though 45 minutes to 1 hour is even better. The ribs will stay hot for up to 2 hours when wrapped tightly – you can even place them in a cooler lined with towels to extend hold time. During this rest, the texture transforms remarkably as residual heat breaks down remaining connective tissue while meat fibers relax and reabsorb moisture. Ribs that feel slightly tough coming off the fire will be perfectly tender after resting. Don’t skip or cut short this critical step.
Slice and Serve
Just before serving, unwrap the foil and let any steam escape. Transfer the rack to a large cutting board meat side up – if they sit out too long after unwrapping, they’ll cool and lose that perfect texture. Using a sharp chef’s knife or boning knife, slice between each bone with clean, confident cuts. The knife should glide through easily if the ribs are properly cooked.
Arrange the individual bones on a serving platter, showing off the dark bark and pink smoke ring inside. The meat should pull cleanly from the bone with a bite but not fall off – that steak-like texture is what separates great beef ribs from overcooked ones. Serve immediately while hot, letting guests pick up the bones and enjoy that primal eating experience. Any juices that collected in the foil can be drizzled over the sliced ribs for extra moisture and flavor.

Open Fire Beef Ribs – Santa Maria Style
Ingredients
Method
- Pat the beef ribs completely dry with paper towels. Keep the rack whole without scoring. Season all sides generously with coarse salt and freshly cracked black pepper. Let sit at room temperature for 30-60 minutes.
- Fill chimney starter with lump charcoal and light. Let burn 20-30 minutes until fully ashed over. Dump coals into grill and spread evenly across cooking area.
- Add 2-3 wood chunks to hot coals if using. Set grate 8-10 inches above coals (should be able to hold hand over fire for 4-5 seconds). Target 300°F.
- Place ribs bone side down on grate. Cook undisturbed, maintaining 300°F temperature.
- After 2 hours, start checking internal temperature. Continue cooking bone side down until ribs reach 185°F internal.
- Flip ribs so meat side faces down toward coals. Continue cooking at 300°F.
- Cook until internal temperature reaches 200°F. Test probe tenderness – probe should slide in and out smoothly like butter with little resistance.
- Remove ribs from grill when probe tender at 200°F. Wrap entire rack tightly in heavy-duty foil.
- Rest wrapped ribs for minimum 30 minutes, up to 1 hour is better. Ribs will stay hot and continue to tenderize.
- Unwrap and slice between bones with sharp knife. Serve immediately while hot.
Notes
Trust probe tenderness over exact temperature
The foil rest is critical for proper texture
Oak is traditional wood, mesquite for stronger smoke
Tried this recipe?
Let us know how it was!Conclusion
Open fire beef ribs prove that the best barbecue doesn’t require complicated techniques or long ingredient lists. By keeping the seasoning simple with just salt and pepper, you let the quality of the beef and the flavor of wood smoke take center stage. The two-position cooking method – starting bone side down then flipping to finish meat side down – ensures even cooking and proper bark development on both sides of the ribs.
What makes this Santa Maria style approach special is how accessible it is for home cooks. You don’t need expensive equipment or hard-to-find ingredients – just good beef plate ribs, basic seasoning, lump charcoal, and an understanding of fire management at 300°F. The foil rest at the end transforms good ribs into great ones, allowing the meat to reach that perfect texture between steak and traditional fall-off-the-bone tenderness.
These beef ribs over open fire deliver restaurant-quality results that will impress anyone at your table. The dark, peppery bark contrasts beautifully with the tender, juicy meat underneath, while the smoke from the charcoal and wood adds layers of flavor you simply can’t replicate in a closed smoker. Once you master this straightforward technique, you’ll have a go-to recipe for special occasions or anytime you want to create something memorable over live fire.
Ready to Take Your Cooking to the Next Level?
This is where I keep all my most-used products, gear, and favorite cooking tools — check it out:
🔥 View My Cooking Gear & ToolsRecipe Categories
If you loved this recipe, you’ll find more to savor across our diverse categories. From beef to pork, chicken to turkey, seafood to appetizers, there’s a wealth of flavors waiting for you. Explore them all at CWFeats.