
Stingray-Style Tomahawk Steak with Cowboy Butter
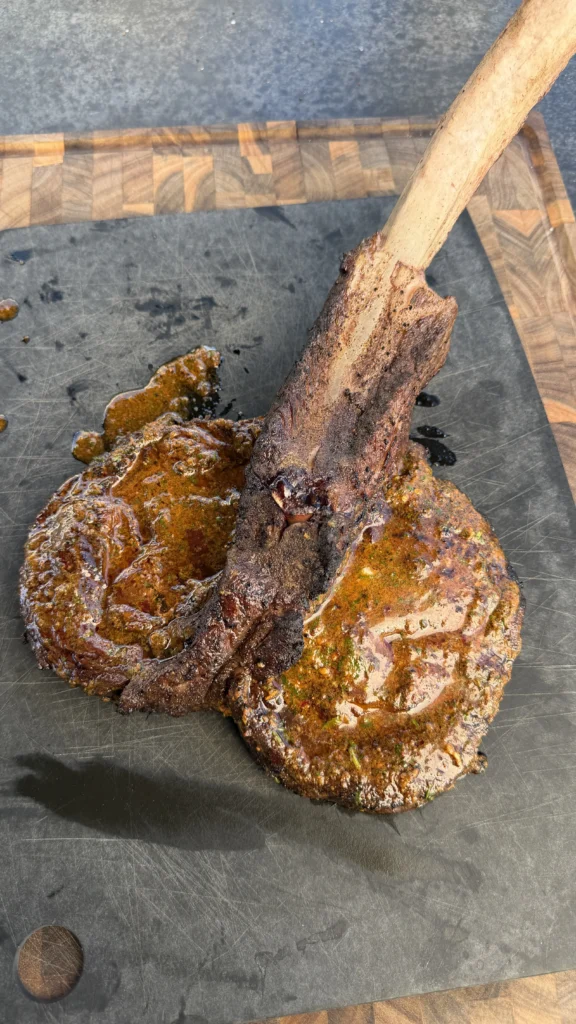
Stingray-style tomahawk steak is a 3-inch thick ribeye or tomahawk that’s been butterflied horizontally. It opens flat like a stingray. You coat it with oil and season generously before searing over high heat. It creates a deep crust in 2-3 minutes per side.
The steak then finishes on indirect heat until it reaches your target temperature. A pad of cowboy butter melts on top during the final minutes of cooking. The butterflying technique cuts the cooking time in half. You get even doneness throughout without overcooking the exterior.
This butterflied tomahawk steak solves the biggest problem with thick steaks. You avoid the classic mistake of burnt outside and raw center. The stingray shape increases surface area for more crust. You get that perfect char on both sides. The thinner profile means heat penetrates evenly from top to bottom.
Cowboy butter is a compound butter loaded with garlic, fresh herbs, lemon, and spices. It melts into the hot steak and creates a luxurious sauce. The butter catches in all the nooks and crannies of the meat. Every bite gets that rich, garlicky flavor.
The whole process takes about 90 minutes from start to finish. This includes 15 minutes of prep to butterfly the steak and make the cowboy butter. You rest the steak for 30-45 minutes at room temperature. Then 25-30 minutes of actual cooking time split between searing and indirect grilling.
You simply butterfly the steak, season it, and let it come to temperature. Sear it hard on both sides over high heat. Move it to the cool side of your grill to finish. The resting period after cooking is critical. It allows juices to redistribute throughout the meat. This grilled tomahawk ribeye delivers steakhouse quality at home without any special equipment beyond a two-zone grill setup.
Why Butterflying a Thick Steak Changes Everything
Solves the Thick Steak Problem
Thick steaks present a fundamental cooking challenge. You need high heat to develop a proper crust. But that same high heat overcooks the exterior before the center comes to temperature. With a standard 3-inch tomahawk, you’d need 45-60 minutes of cooking time. The outside becomes gray and overcooked by the time the center reaches medium-rare.
Butterflying cuts the thickness in half while maintaining the same total weight of meat. Your 3-inch steak becomes about 1.5 inches thick when opened flat. This allows heat to penetrate from both sides simultaneously. The cooking time drops to 25-30 minutes total. You can use higher heat for better crust without burning the exterior.
Increases Surface Area for More Crust
The Maillard reaction that creates steak crust happens on the surface. More surface area means more crust development. When you butterfly a thick steak, you expose the interior meat to direct heat. This creates additional surfaces that can caramelize and develop flavor.
A standard tomahawk has two sides for searing. The butterflied stingray shape has those same two sides plus increased width. You get more crispy, charred edges per pound of meat. Those crispy bits are where most of the flavor concentrates. More crust equals more flavor per bite.
Promotes Even Cooking Throughout
Heat moves through meat slowly. A thick steak develops temperature gradients with a hot exterior and cool center. This creates a “bulls-eye” effect where you have well-done outer layers. You transition through medium-well and medium before reaching the medium-rare center you wanted.
The Tomahawk steak cooks more like a thin steak. Heat travels through the reduced thickness quickly and evenly. You get consistent doneness from top to bottom. The result is edge-to-edge pink throughout the steak. You avoid that overcooked gray band entirely.
Maintains Juiciness Despite Faster Cooking
You might worry that thinner steak dries out faster. The butterflied steak actually retains moisture better than cooking a thick steak traditionally. The shorter cooking time means less total moisture loss. Less time on heat means less water evaporates from the surface.
The increased surface area also works in your favor. More area means more space for the cowboy butter to melt and penetrate. The butter bastes the meat during the final cooking phase. This adds fat and flavor while helping to lock in existing moisture.
What Makes Cowboy Butter Different from Regular Compound Butter
Balanced Acid Cuts Through Richness
Cowboy butter includes both lemon zest and lemon juice. This provides brightness that regular garlic butter lacks. The acid cuts through the fat of both the butter and the ribeye. It prevents the finished steak from tasting heavy or greasy.
The Dijon mustard adds another layer of acidity. It also provides a subtle tang and slight heat. Together, the lemon and mustard balance the richness. Each bite tastes clean despite the generous butter application.
Fresh Herbs Add Complexity
The combination of parsley and chives provides fresh, green flavors. These complement beef without overpowering it. Parsley has a bright, slightly peppery taste. Chives offer mild onion flavor that’s more delicate than garlic.
Fresh herbs matter more than dried in compound butter. They release aromatic oils when chopped. These oils distribute throughout the softened butter. Dried herbs don’t have the same impact. They taste flat compared to fresh.
Spices Provide Depth and Heat
Smoked paprika adds earthy, smoky notes that complement grilled meat. It reinforces the charcoal or wood smoke flavor from your grill. Cayenne pepper provides adjustable heat. You can dial it up or down based on preference.
The combination of garlic, paprika, and cayenne creates layers of flavor. You get aromatic garlic up front. Smoky paprika in the middle. Gentle heat from cayenne on the finish. This complexity makes every bite more interesting.
Versatility Beyond Steak
Cowboy butter works on more than just steak. It’s excellent on grilled chicken, pork chops, or lamb. You can toss it with grilled vegetables or corn on the cob. It melts into baked potatoes or spread on warm bread.
The compound butter stores well in the refrigerator for up to 2 weeks. You can freeze it for up to 3 months. Make a double batch and keep it on hand. You’ll find yourself reaching for it constantly once you taste how it elevates simple grilled foods.
How Two-Zone Grilling Creates Perfect Doneness
Direct Heat Builds Crust
The direct heat zone on your grill should be as hot as possible. Aim for 500-600°F on a gas grill. For charcoal, you want the coals glowing red-orange. This extreme heat triggers the Maillard reaction instantly. You get deep brown crust in just 2-3 minutes per side.
The high heat also renders some of the surface fat. This creates additional flavor and helps the crust develop. Don’t move the steak during searing. Let it sit undisturbed so the proteins can bond with the grill grates. Moving it prevents proper crust formation.
Indirect Heat Finishes Gently
After searing, the steak moves to the cool side of the grill. This zone has no direct flame underneath. Heat reaches the meat through convection and radiant heat from the hot side. Temperature in the indirect zone should be around 300-350°F.
This gentler heat allows the interior to cook without burning the crust. The steak essentially roasts in the covered grill. The temperature rises slowly and predictably. You have much better control than trying to cook entirely over direct heat.
Lid Traps Heat Like an Oven
Closing the grill lid is critical during the indirect cooking phase. The lid traps heat and creates an oven-like environment. Heat circulates around the steak from all sides. This promotes even cooking better than just bottom heat.
The trapped heat also reduces cooking time compared to lid-open grilling. The ambient temperature stays high and consistent. You get predictable results every time once you learn your grill’s behavior.
Temperature Control Prevents Mistakes
Two-zone cooking gives you an escape route if things get too hot. If your steak is browning too quickly on the indirect side, move it farther from the heat. If it’s cooking too slowly, move it closer to the direct heat zone.
This flexibility is impossible with single-zone cooking. You’re stuck with one temperature. Two zones let you adjust on the fly. You can adapt to weather conditions, fuel variations, or differences in steak thickness.
Step-by-Step Instructions
Step 1: Butterfly the Tomahawk Steak (Stingray Style)
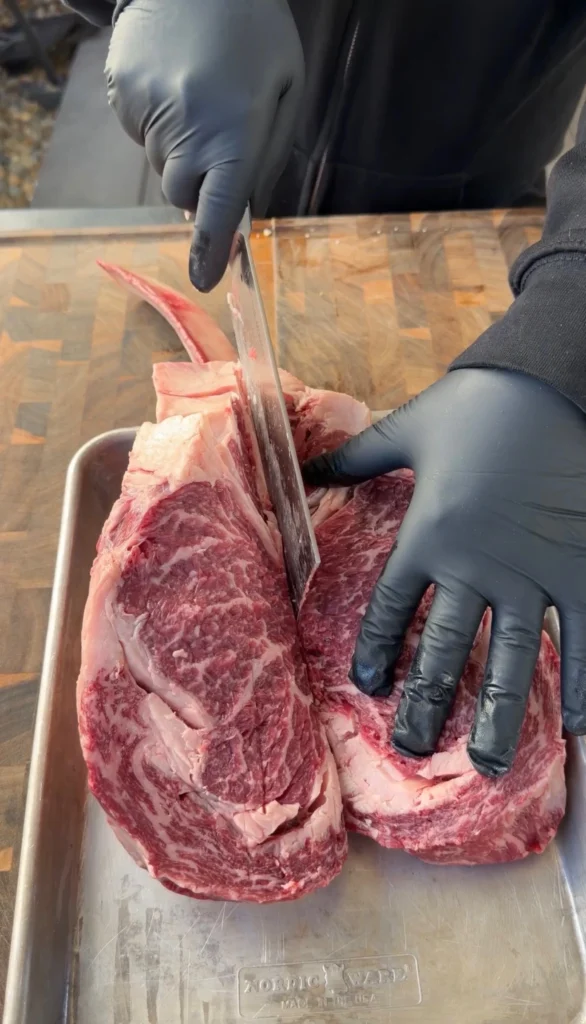
Place your tomahawk steak on a large cutting board. Position it so the bone points away from you. Use a long, sharp boning knife or chef’s knife. The blade should be at least 10 inches long. Shorter knives make clean cuts difficult.
Place your non-knife hand flat on top of the steak. Apply gentle downward pressure to stabilize it. Position your knife blade parallel to the cutting board. Start cutting horizontally through the thickest part of the meat. Begin at the side opposite the bone.
Use long, smooth strokes rather than sawing back and forth. Keep the knife parallel to the board throughout. Cut almost all the way through the steak. Stop about 1 inch before you reach the far edge. This creates a hinge.
Open the steak like a book. It should lay flat in one continuous piece. The meat should be roughly equal thickness on both sides. If one side is noticeably thicker, you can carefully trim it.
Pat the entire surface dry with paper towels. Moisture prevents proper browning during searing. A dry surface is critical for crust development.
Step 2: Season and Rest the Steak
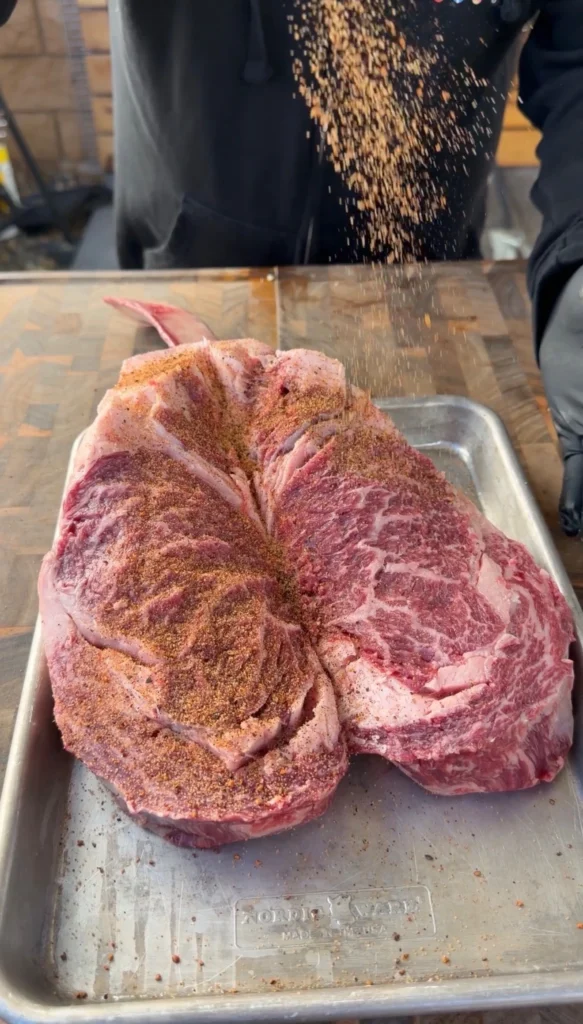
Lightly coat both sides of the butterflied steak with neutral oil. Use your hands to rub it evenly across the surface. The oil helps seasoning stick. It also prevents the meat from sticking to grill grates.
Season generously with your chosen steak seasoning. SPG (salt, pepper, garlic) works perfectly. Apply more than you think you need. Much of it will fall off during cooking. You want visible coverage across the entire surface.
Press the seasoning into the meat with your palms. This helps it adhere better. Season both sides evenly. Don’t forget the edges.
Let the seasoned steak sit at room temperature for 30-45 minutes. This allows the meat to warm slightly. Cold steak straight from the refrigerator cooks unevenly. The exterior overcooks before the interior warms up.
The resting period also allows salt to penetrate the meat. It starts breaking down proteins. This improves tenderness and helps the steak retain moisture during cooking.
Step 3: Make the Cowboy Butter
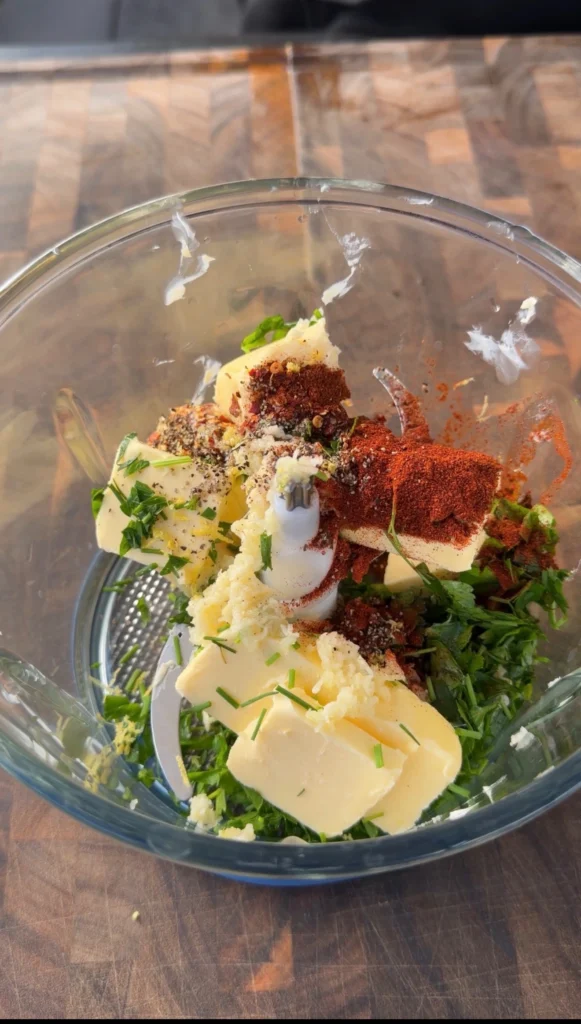
Combine all cowboy butter ingredients in a medium bowl. Your butter should be softened to room temperature. It should be easily mashable but not melted. If it’s too hard, microwave it for 5-10 seconds.
Use a fork to mash and mix everything together. Work the butter until all ingredients are fully incorporated. You shouldn’t see streaks of plain butter. The mixture should be uniformly colored from the herbs and spices.
Taste the cowboy butter and adjust seasoning. Add more salt if needed. Increase cayenne if you want more heat. Add extra lemon juice for more brightness.
Set the bowl aside at room temperature if using within the hour. If making ahead, cover and refrigerate. Bring it back to room temperature before using. You want it soft enough to melt easily on the hot steak.
Step 4: Set Up Two-Zone Grilling
Preheat your grill for two-zone cooking. For a gas grill, turn one side to high. Leave the other side completely off. For a charcoal grill, pile all the coals on one side. Leave the other side empty.
Let the grill preheat for 10-15 minutes with the lid closed. You want the direct heat side screaming hot. Aim for 500-600°F on that side. The indirect side should settle around 300-350°F.
Clean the grill grates thoroughly with a grill brush. Oil the grates lightly using a paper towel dipped in vegetable oil. Use tongs to wipe it across the grates. This prevents sticking during the initial sear.
Step 5: Sear the Steak
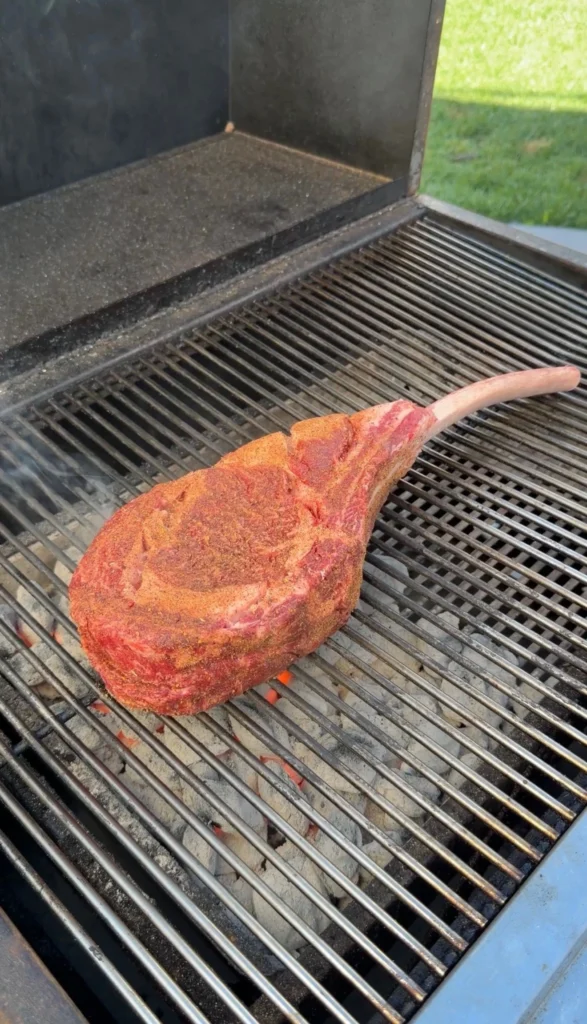
Place the butterflied steak directly over the high heat zone. Position it so the entire surface makes contact with the grates. You should hear an immediate sizzle. If you don’t, your grill isn’t hot enough.
Close the lid and set a timer for 2-3 minutes. Don’t open the lid. Don’t move the steak. Let it sit undisturbed. Movement prevents proper crust formation.
After 2-3 minutes, open the lid and check the bottom. You want a deep brown crust. If it looks pale or blonde, give it another minute. Once you see good color, flip the steak.
Flip only once. Close the lid again and sear the second side for 2-3 minutes. You’re building crust, not cooking the interior yet. The center should still be completely raw.
Step 6: Finish on Indirect Heat
Move the seared steak to the cool side of the grill. Position it away from direct flames. The meat should be over the empty side. Close the lid to trap heat.
Insert a meat thermometer into the thickest part of the steak. Make sure it’s not touching bone. Monitor the temperature as it climbs. Different target temps create different doneness levels.
For medium-rare, pull the steak at 125-130°F. For medium, pull at 135-140°F. Remember that temperature rises 5-10 degrees during resting. Pull the steak 5 degrees before your final target.
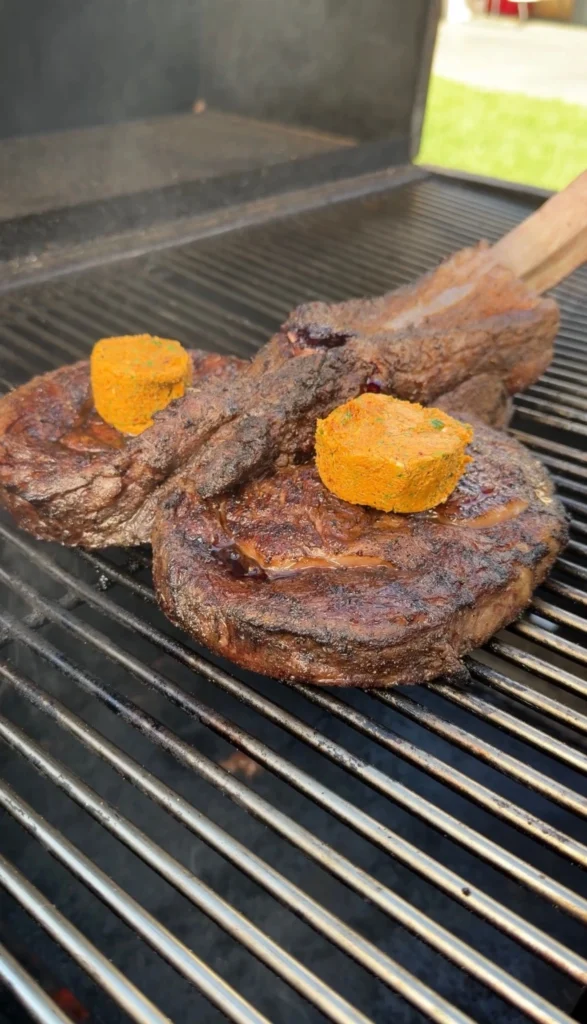
During the last 5 minutes of cooking, add a generous pat of cowboy butter on top. Use about 2-3 tablespoons. The butter will melt and pool on the surface. It bastes the meat as it finishes cooking.
Total indirect cooking time varies based on your target temperature. Expect 15-20 minutes for medium-rare. Add 5-10 minutes for each additional level of doneness.
Step 7: Rest and Slice
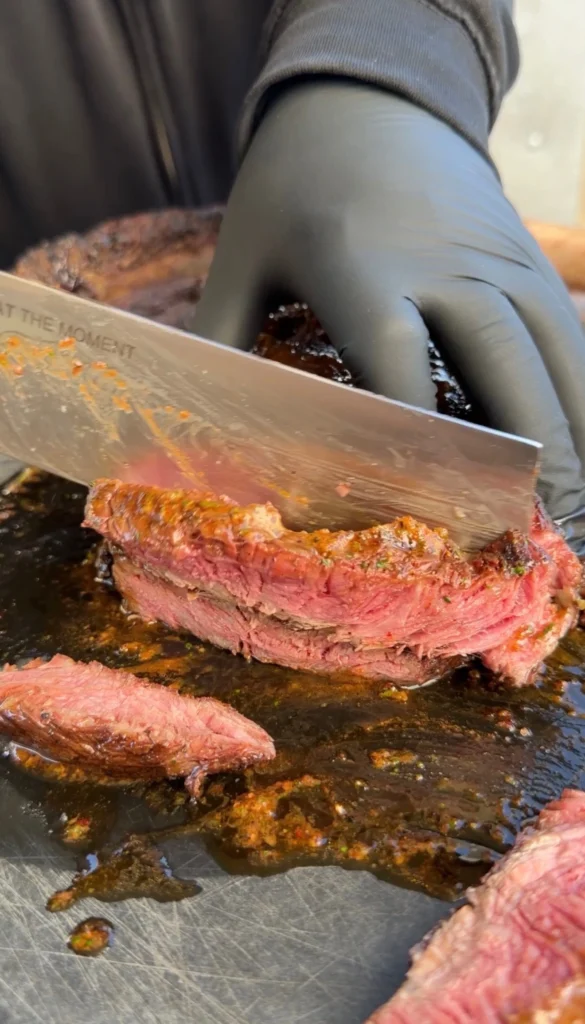
Remove the steak from the grill once it reaches your target temperature. Transfer it to a cutting board. Tent it loosely with aluminum foil. This keeps it warm without trapping too much steam.
Let the steak rest for 10-15 minutes. This is not optional. Resting allows juices to redistribute throughout the meat. If you slice immediately, those juices run out onto the board. You lose flavor and moisture.
During resting, the temperature will rise another 5-10 degrees. This carryover cooking is why you pull the steak early. Factor this into your target temperature.
After resting, slice the steak against the grain. Look for the direction the muscle fibers run. Cut perpendicular to those fibers. This shortens the fibers and makes each bite more tender.
Cut slices about ½ inch thick. Arrange them on a serving platter. Drizzle any remaining cowboy butter over the top. Serve immediately while still warm.
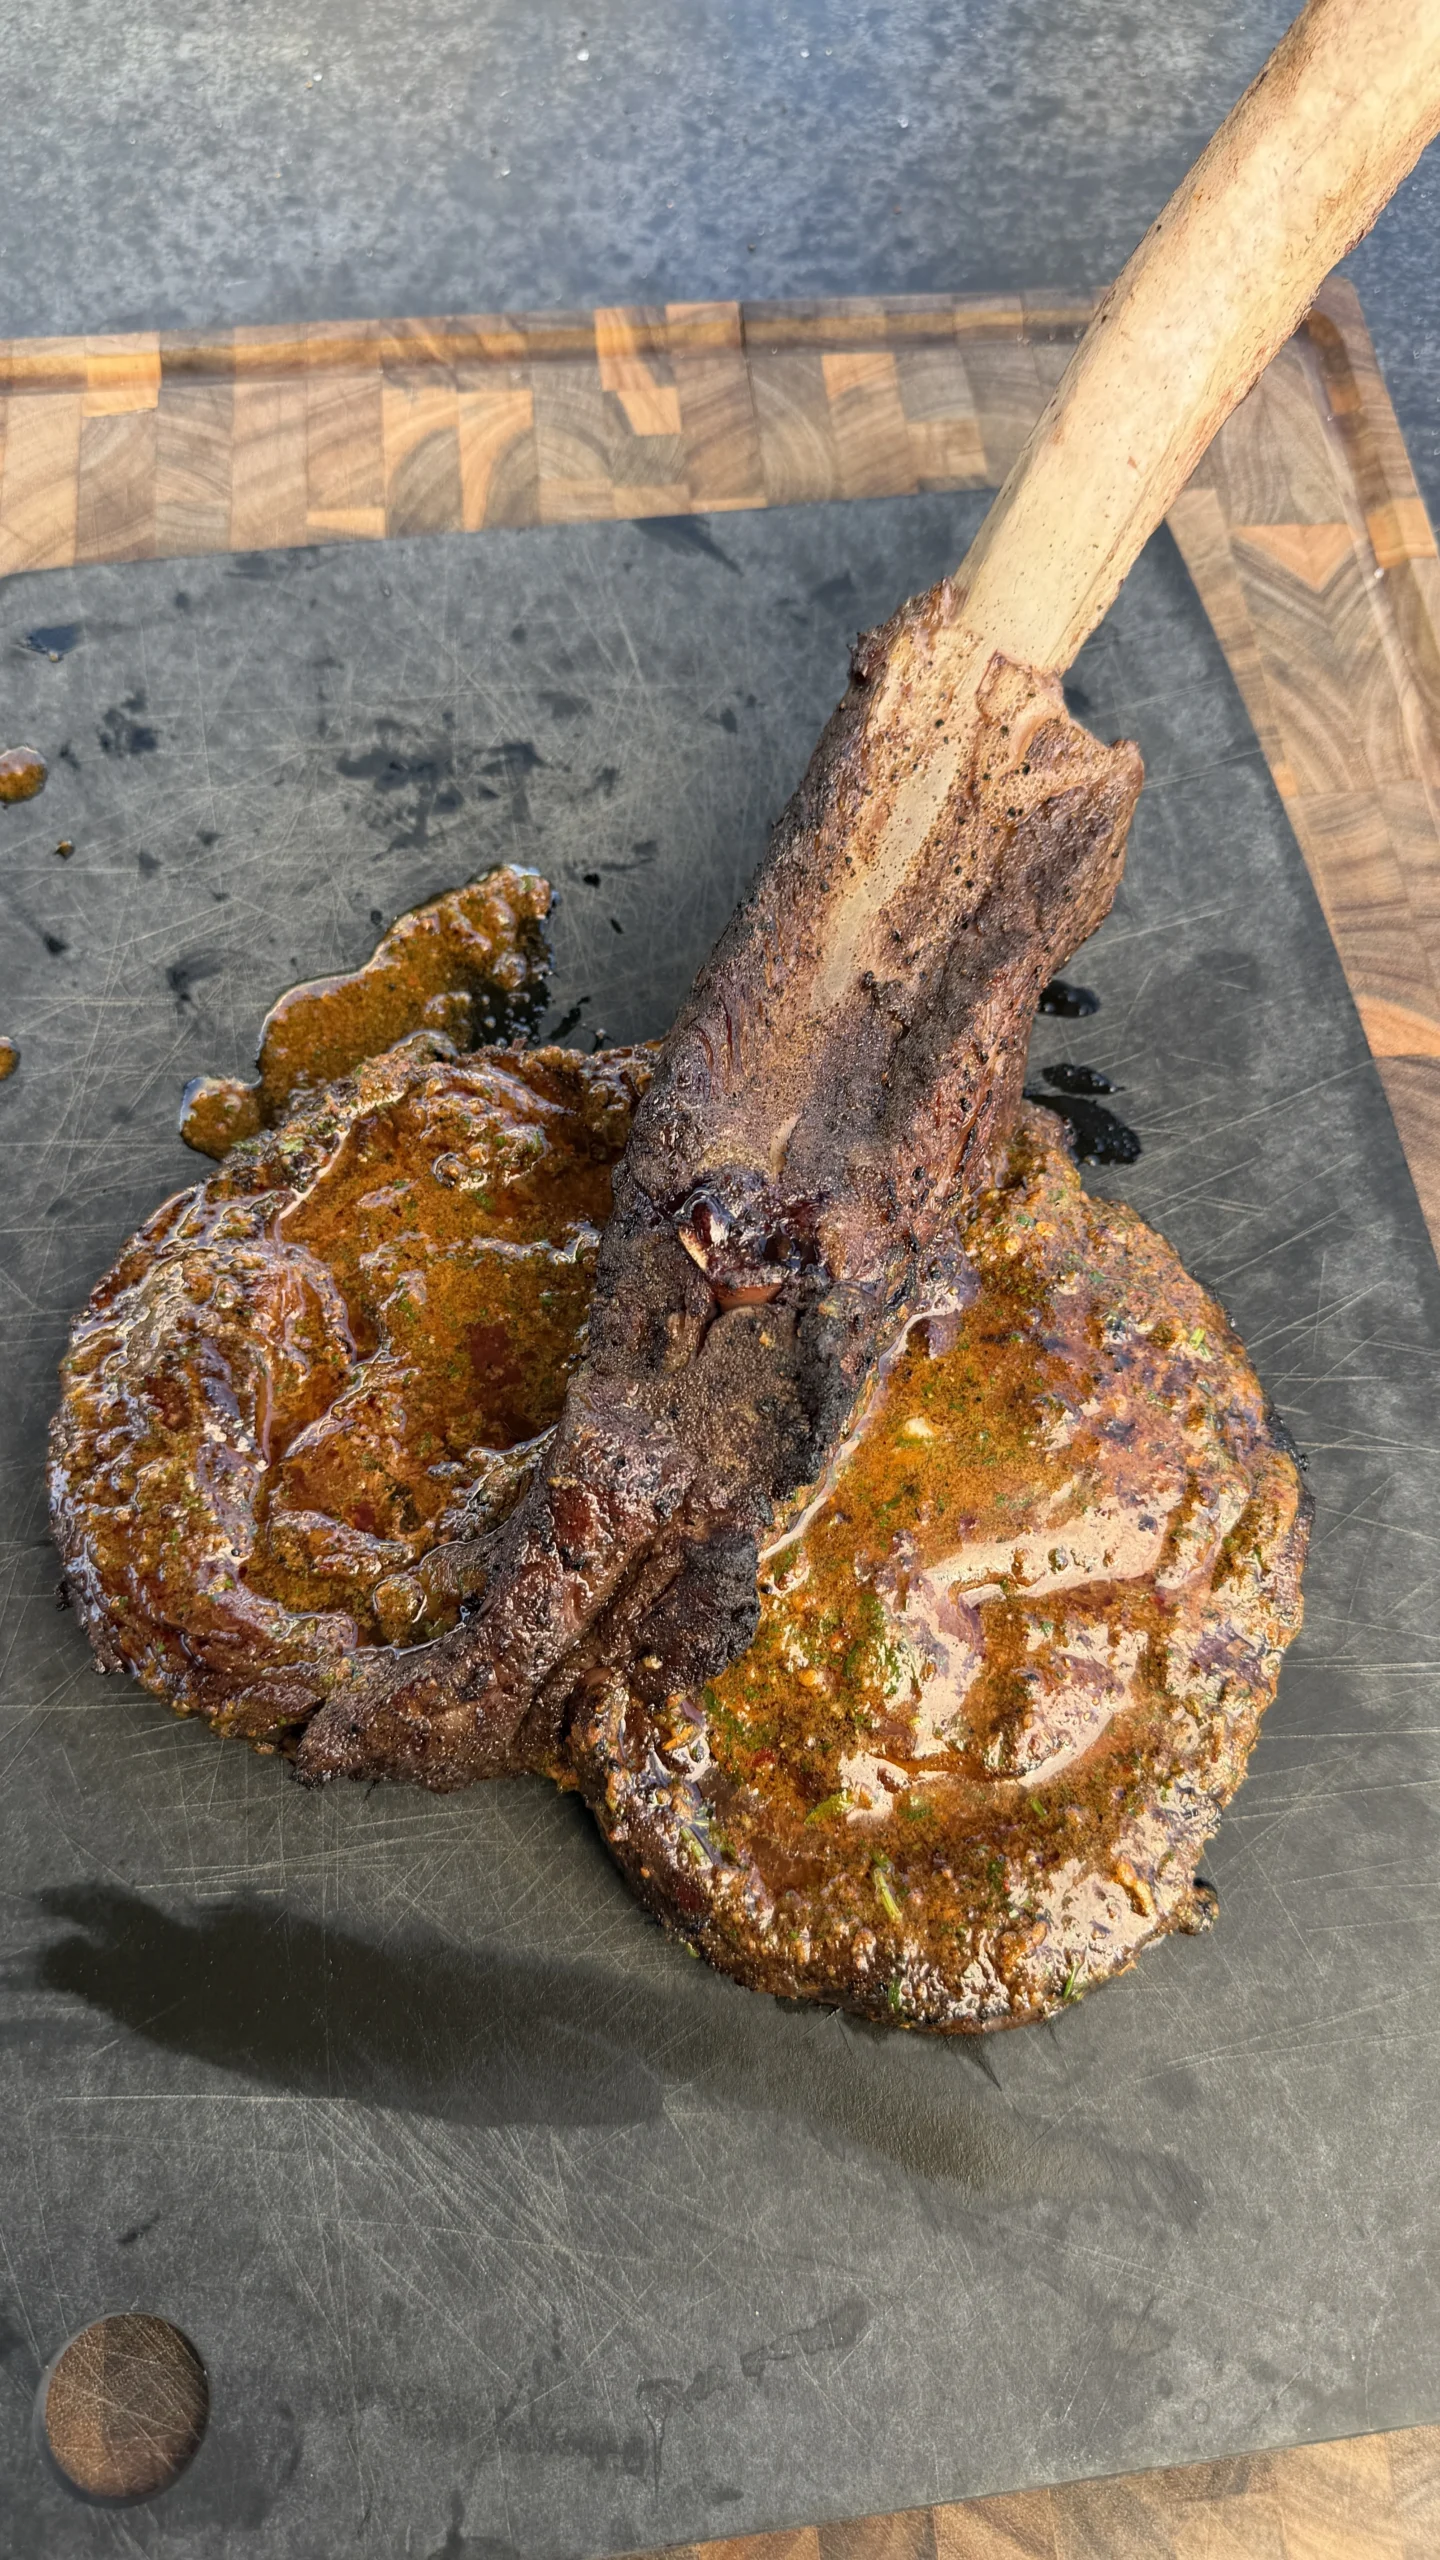
Stingray-Style Tomahawk Steak with Cowboy Butter
Ingredients
Equipment
Method
- Place the tomahawk steak on a large cutting board with the bone pointing away from you. Using a long sharp knife, cut horizontally through the thickest part of the meat, keeping the blade parallel to the cutting board. Cut almost all the way through, stopping about 1 inch from the far edge to create a hinge. Open the steak flat like a book and pat both sides completely dry with paper towels.
- Lightly coat both sides of the butterflied steak with neutral oil and rub it evenly across the surface. Season generously with your steak seasoning on both sides, pressing it into the meat with your palms. Let the seasoned steak sit at room temperature for 30-45 minutes to allow the meat to warm and the salt to penetrate.
- Combine all cowboy butter ingredients in a medium bowl. Use a fork to mash and mix until all ingredients are fully incorporated and the mixture is uniformly colored. Taste and adjust seasoning as needed. Set aside at room temperature if using within an hour, or refrigerate and bring back to room temperature before use.
- Preheat your grill for two-zone cooking. For gas grills, turn one side to high and leave the other side off. For charcoal grills, pile all coals on one side. Let the grill preheat for 10-15 minutes with the lid closed until the direct heat side reaches 500-600°F. Clean and lightly oil the grill grates.
- Place the butterflied steak directly over the high heat zone. Close the lid and sear for 2-3 minutes without moving it. Check for a deep brown crust, then flip once and sear the second side for 2-3 minutes. You should hear an immediate sizzle when the steak hits the grates.
- Move the seared steak to the cool side of the grill away from direct flames. Insert a meat thermometer into the thickest part and close the lid. Cook until the steak reaches 125-130°F for medium-rare (or your preferred temperature minus 5 degrees for carryover cooking). During the last 5 minutes, add 2-3 tablespoons of cowboy butter on top to melt and baste the meat. Total indirect cooking time is typically 15-20 minutes for medium-rare.
- Remove the steak from the grill and transfer to a cutting board. Tent loosely with aluminum foil and rest for 10-15 minutes to allow juices to redistribute. After resting, slice against the grain in ½-inch thick pieces. Arrange on a serving platter and drizzle with any remaining cowboy butter. Serve immediately.
Nutrition
Notes
Tried this recipe?
Let us know how it was!Tomahawk Steak Recipe Frequently Asked Questions
What If You Don’t Have a Tomahawk Steak?
The tomahawk presentation is impressive, but the long bone doesn’t affect cooking or flavor. You’re paying premium price for the visual impact. A regular bone-in ribeye works identically for this recipe. Look for one that’s 2.5-3 inches thick. The bone-in cut is important because it adds flavor during cooking and helps the steak retain moisture better than boneless.
If you can only find boneless ribeye, the recipe still works with some adjustments. Boneless steaks cook slightly faster since there’s no bone conducting heat. Reduce your indirect cooking time by about 5 minutes and watch your thermometer closely. The butterflying technique actually works better on boneless cuts since you don’t have to navigate around the bone with your knife.
Strip steaks or sirloin can substitute if ribeye isn’t available, though you’ll sacrifice some of the rich, beefy flavor and marbling that makes ribeye special. These leaner cuts benefit even more from the cowboy butter since they have less internal fat to keep them moist. Just remember that leaner cuts also cook faster, so pull them from heat about 5 degrees earlier than you would with ribeye.
The key is finding a thick cut, preferably 2.5 inches or more. Thin steaks don’t need butterflying and won’t benefit from this technique. If you can only find 1.5-2 inch steaks, skip the butterflying step entirely and just use the two-zone grilling method and cowboy butter as written.
Can You Cook This Steak in the Oven Instead of a Grill?
Absolutely, and the technique translates perfectly to indoor cooking with a few modifications. You’ll use a combination of stovetop searing and oven finishing, which is essentially the same two-zone principle. Preheat your oven to 400°F while you prepare and season the butterflied steak.
Heat a large cast iron skillet or heavy-bottomed pan over high heat until it’s smoking hot. Add a small amount of high-smoke-point oil like avocado or grapeseed oil. Sear the butterflied steak for 2-3 minutes per side until you get that deep brown crust. The stovetop provides the intense direct heat you need for proper Maillard reaction.
After searing both sides, add a large pat of cowboy butter to the pan and immediately transfer the entire skillet to your preheated oven. The residual heat from the pan and the surrounding oven heat will finish cooking the steak gently, just like the indirect zone on a grill. Check the internal temperature after 10-12 minutes and continue cooking until you reach your target temp minus 5 degrees for carryover.
One major advantage of the oven method is consistency. Your oven maintains steady temperature better than most grills, especially in windy or cold weather. The disadvantage is you miss the smoky flavor from the grill, but the cowboy butter’s smoked paprika helps compensate. If you want smoke flavor indoors, add a small amount of liquid smoke to the cowboy butter or use a smoking gun to add smoke to the meat before it goes in the oven.
How Do You Know When to Flip During Searing?
The tomahawk steak will tell you when it’s ready to flip through several visual and physical cues. First, watch for moisture beading on the top surface. As the bottom sears, heat drives moisture upward through the meat. When you see droplets forming on top, the bottom has developed good crust. This usually takes 2-3 minutes over proper high heat.
Second, the steak should release easily from the grill grates when it’s ready. If you try to flip too early, the proteins are still bonded to the metal and will tear. Give the corner a gentle lift with your tongs. If it sticks and resists, give it another 30-60 seconds. When it releases cleanly with minimal effort, it’s ready to flip.
Third, check the color of the seared side by lifting one edge slightly. You’re looking for deep mahogany brown, not blonde or pale tan. The darker the crust without burning, the better. If you see black spots or smell acrid smoke, you’ve gone too far and need to flip immediately.
Don’t flip based on time alone because every grill runs different temperatures. A grill at 650°F will sear faster than one at 500°F. Weather conditions affect cooking time too. Wind and cold slow everything down. Trust the visual and tactile cues more than the clock.
One flip is ideal for steak this thick. Multiple flips are a technique for thin steaks where you’re trying to build crust while cooking the interior. With your butterflied tomahawk, you’re only building crust during the sear. The interior cooks later during indirect heat, so there’s no benefit to flipping multiple times.
Why Does the Steak Need to Rest, and What Happens If You Skip It?
Resting is about juice retention and even temperature distribution, and skipping it ruins an otherwise perfect steak. During cooking, heat drives moisture from the cooler center toward the hot exterior. Muscle fibers contract and squeeze out liquid. If you cut into the steak immediately after cooking, all that accumulated moisture runs out onto your cutting board instead of staying in the meat.
When you rest the steak, the temperature gradient equalizes. The hot exterior cools slightly while residual heat continues cooking the center. The muscle fibers relax as they cool. They reabsorb the moisture they expelled during cooking. This reabsorption takes time, which is why the resting period matters.
A properly rested steak retains about 25-30% more juice than one that’s cut immediately. You’ll see the difference visually. A rested steak releases just a small puddle of juice when sliced. An un-rested steak floods the cutting board with liquid. That liquid on the board is flavor and moisture that should be in your mouth.
The resting period also allows carryover cooking to finish the steak to your exact target temperature. Thick steaks retain heat and continue cooking after leaving the grill. The internal temperature typically rises 5-10 degrees during the first 10 minutes of rest. If you skip resting and hit your target temp exactly on the grill, you’ll end up 10 degrees over when you eat it.
Tent the steak loosely with foil during rest, but don’t wrap it tightly. Tight wrapping traps too much steam and softens your hard-earned crust. Loose tenting keeps the steak warm without creating a sauna environment. If your kitchen is very cold, you can rest it on a warm plate or near a warm oven, but this usually isn’t necessary for steaks this thick.
Ready to Level Up?
Take your backyard cooking from good to legendary.
This is where I keep all my most-used smokers, knives, and favorite cooking tools.
Shop My Gear CollectionExplore More Recipes
Find more diverse flavors at CWFeats.com