
Garlic Herb Butter Basted Filet Mignon
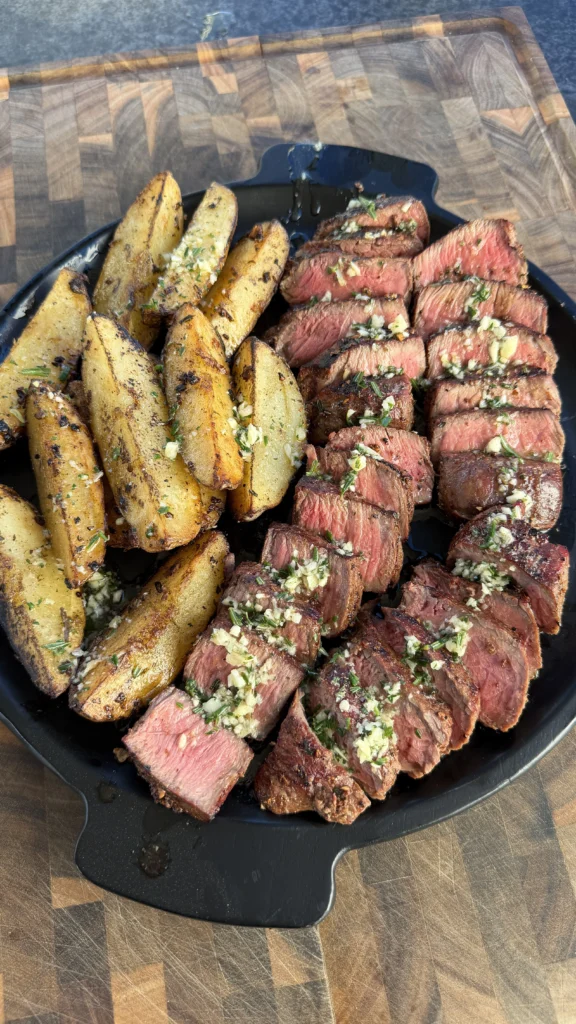
Garlic herb butter basted filet mignon is tender 6-ounce beef filets grilled over high heat until they develop a crust. They’re pulled at 110°F internal temperature. The steaks then get butter-basted in a screaming hot cast iron skillet. Garlic herb compound butter melts around them.
Fresh thyme and rosemary infuse the butter. The herbs create an aromatic sauce that coats every surface. Crispy potato wedges serve alongside the steaks. The potatoes are parboiled first, then finished until golden and crunchy.
This butter basted filet mignon combines grilling and pan-searing techniques. You get smoke flavor from the grill. You get butter richness from the cast iron finish. The two-step cooking method prevents overcooking. Filet mignon has minimal fat marbling. It needs careful temperature control to stay tender and juicy.
The compound butter does double duty. It flavors the meat during basting. It also serves as a finishing sauce when you plate. The olive oil in the butter prevents it from burning. It helps the butter flow smoothly in the hot pan. The garlic mellows during cooking. It becomes sweet and aromatic rather than harsh.
The whole meal takes about 45 minutes from start to finish. You spend 20 minutes on prep work. This includes making the compound butter and parboiling the potatoes. The actual cooking time is just 25 minutes. You grill the steaks for 15 minutes. Then, baste them for 2 minutes. You finish the potatoes for 8-10 minutes.
These grilled filet mignon steaks taste like high-end steakhouse food. You’re making them in your backyard. The technique works on any cut, but filet mignon benefits most. Its mild flavor lets the herb butter shine. Its tender texture pairs perfectly with crispy potatoes.
What Makes Filet Mignon Different from Other Steaks

The Most Tender Cut Available
Filet mignon comes from the tenderloin, a muscle that does almost no work during the animal’s life. The psoas major muscle runs along the spine. It provides stability rather than movement. Muscles that move frequently develop tough connective tissue. The tenderloin stays exceptionally soft and buttery.
You can cut filet mignon with a fork when cooked properly. Other cuts like ribeye or strip steak have more chew. They require a sharp knife. The tenderloin’s fine grain and lack of connective tissue create that signature melt-in-your-mouth texture.
This extreme tenderness comes with a tradeoff. The tenderloin has minimal intramuscular fat. It lacks the rich, beefy flavor of well-marbled cuts. This is why filet mignon pairs so well with compound butters and rich sauces. The added fat compensates for what the meat lacks naturally.
Requires Careful Temperature Control
The low fat content makes filet mignon unforgiving when overcooked. Ribeye and strip steak have enough marbling to stay relatively juicy even at medium or medium-well. Filet mignon dries out quickly past medium-rare. The muscle fibers contract and squeeze out moisture.
Pulling the steak at 110°F and finishing with butter basting is critical. The hot skillet adds 10-15 degrees rapidly. The butter creates a protective coating that slows moisture loss. You end up with 120-125°F after the baste. This hits perfect medium-rare after resting.
Commands Premium Pricing
Filet mignon costs significantly more per pound than other steaks. Each tenderloin produces only 4-6 pounds of usable meat. A single cow yields maybe 8-12 filet mignon portions. Compare that to ribeye, where you can get 20+ steaks from the rib section.
The limited supply combined with high demand drives prices up. You’re paying for tenderness and the prestige of serving filet. The butter basting technique helps justify that expense. It elevates a simple piece of meat into something truly special.
Works Best with Bold Flavors
The mild beef flavor of filet mignon makes it an ideal canvas for strong seasonings and sauces. Cuts like ribeye can stand alone with just salt and pepper. Their fat content provides plenty of flavor. Filet mignon needs enhancement.
Garlic herb butter provides the flavor intensity filet lacks. The butter melts into the meat during basting. Fresh herbs add aromatic complexity. The garlic contributes savory depth. Together, they transform the mild tenderloin into a complete flavor experience.
Why Parboiling Potatoes Creates Crispier Results
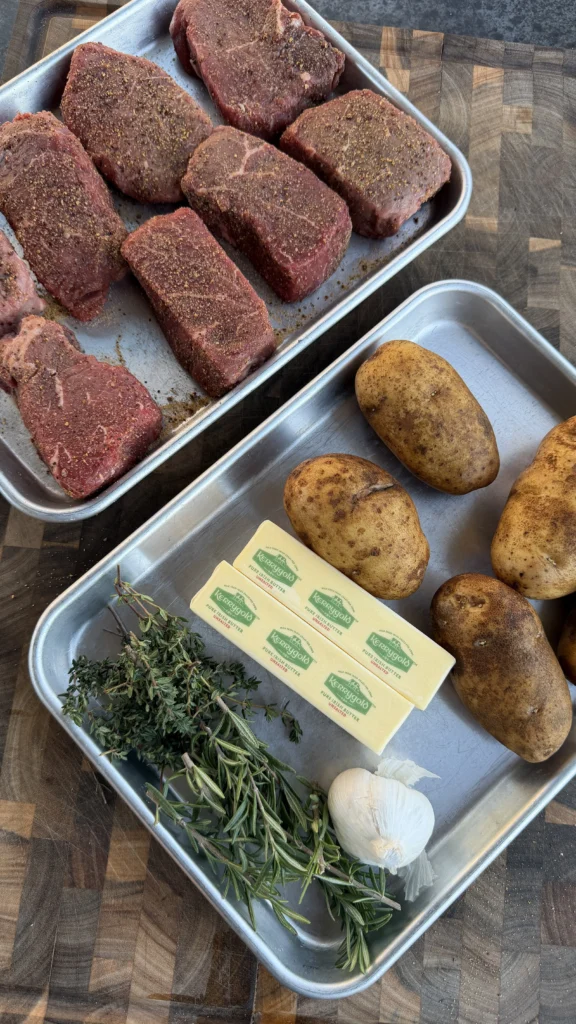
Gelatinizes Surface Starch
When you drop potato wedges into boiling water, the surface starch absorbs water and swells. This gelatinization process happens at around 150-160°F. The starch granules burst and release their contents. This creates a sticky, pasty layer on the potato exterior.
That sticky layer is exactly what you want for crispy potatoes. When you dry the parboiled potatoes and hit them with high heat, the gelatinized starch dehydrates rapidly. It forms a crispy, golden crust that stays crunchy. Raw potatoes can’t develop this same texture. Their starch remains locked inside the cells.
Pre-Cooks the Interior
Parboiling brings the potato interior to about 85-90% doneness. The center becomes tender and fluffy. When you finish them in the skillet or on the grill, you’re only crisping the outside. You’re not trying to cook the middle.
This prevents the common problem of burnt exterior and raw center. Raw potatoes need 30-40 minutes at high heat to cook through. The outside turns dark brown or black before the inside softens. Parboiled potatoes need just 8-10 minutes to crisp. The interior is already cooked.
Allows for Aggressive Seasoning
The parboiling step lets you season the potatoes throughout. Add salt to your boiling water. The potatoes absorb it as they cook. This seasons the interior, not just the surface. When you add more seasoning before the final crisping, you get layers of flavor.
Raw potatoes only get surface seasoning. The interior tastes bland. Parboiled potatoes taste seasoned in every bite. The difference is especially noticeable with thick wedges where the interior makes up most of the volume.
Shortens Final Cooking Time
The reduced final cooking time means less time for things to go wrong. You’re not babysitting potatoes for 40 minutes. You’re crisping them for under 10 minutes. This makes timing easier when you’re also managing steaks.
You can parboil potatoes hours ahead. Let them cool completely. Hold them in the refrigerator. When you’re ready to serve, they crisp up in minutes. This advance prep makes dinner service smoother and less stressful.
Should You Grill or Pan-Sear Filet Mignon
Grilling Adds Smoke and Char
Grilling filet mignon over direct heat creates distinct smoke flavor. Wood or charcoal grills contribute the most. Even gas grills add some char and grill marks. These visual and flavor elements signal “outdoor cooking” to diners.
The high dry heat of a grill promotes excellent crust formation. The grates create those classic crosshatch marks. These aren’t just aesthetic. The dark grill marks contain concentrated Maillard reaction products. They’re pockets of intense flavor.
Grilling works best when you want that classic steakhouse presentation. The smoke complements the herb butter nicely. The outdoor cooking method pairs naturally with the rustic potato wedges.
Pan-Searing Offers More Control
Pan-searing in cast iron gives you better temperature control. You can watch the steak develop crust. You can adjust heat instantly. There are no flare-ups. The entire surface makes contact with the hot pan.
Cast iron retains heat better than grill grates. It transfers that heat more evenly. You get consistent browning across the entire surface. No cool spots or hot spots. This precision matters with expensive filet mignon.
Pan-searing works better indoors or when weather doesn’t cooperate. You get excellent results year-round. No need to fire up the grill in winter or rain.
The Hybrid Approach Works Best
This recipe uses both methods to capture benefits of each. Grilling provides smoke flavor and visual appeal. The butter basting in cast iron adds richness and creates the pan sauce. You get outdoor flavor with restaurant-quality finish.
The grill does most of the cooking. This frees up your stovetop for the potatoes. The brief cast iron finish happens right at the end. It brings everything together. This combination delivers better results than either method alone.
The Best Internal Temperature for Filet Mignon
Medium-Rare is the Sweet Spot
Filet mignon reaches its ideal texture at 125-130°F. This corresponds to medium-rare doneness. The center appears bright pink. The muscle fibers have contracted enough to firm up the meat. They haven’t squeezed out all the moisture yet.
Above 135°F, filet starts to dry out noticeably. The low fat content means there’s no marbling to keep it juicy. The proteins expel water as they tighten. You end up with meat that’s tender but dry. That’s a waste of an expensive cut.
Below 120°F, the meat feels too soft and slippery. Some people enjoy this texture, but most find it unpleasant. The proteins haven’t set enough. The steak lacks structure.
Account for Carryover Cooking
Internal temperature continues rising after you remove the steak from heat. This is carryover cooking or resting rise. For filet mignon, expect 5-10 degrees of increase during rest. Thicker steaks carry over more than thin ones.
Pulling the steak at 110°F for butter basting is strategic. The hot cast iron adds another 10-15 degrees rapidly. You hit 120-125°F right after basting. Then the steak rests and climbs to 125-130°F. This lands you perfectly in the medium-rare zone.
If you wait until the steak reads 130°F on the grill, it will overshoot to 140°F or higher. That’s medium to medium-well. The meat becomes dry and disappointing.
Use an Instant-Read Thermometer
Guessing doneness by touch or time is unreliable. Different grills run different temperatures. Weather affects cooking time. Steak thickness varies. An instant-read thermometer removes all guesswork.
Insert the probe horizontally into the center of the steak. Make sure you’re reading the middle, not near the surface. Pull the steak when it hits your target minus 15 degrees. That accounts for both the butter basting and the resting carryover.
Adjust for Personal Preference
Some people prefer their filet at true rare, around 120°F final temperature. Others like medium at 135-140°F. The technique adapts easily. Just adjust when you pull the steak from the grill.
For rare, pull at 95-100°F. For medium, pull at 115-120°F. The butter basting and resting will bring it to your target. Always pull early and let carryover finish the job. You can’t uncook an overcooked steak.
Garlic Herb Butter Filet Mignon
Grilled tender beef with compound butter and crispy potato wedges
Ingredients
Steaks
- 4 filet mignon steaks, about 6 ounces each
- Olive oil for grilling
- Steak seasoning of choice (or salt, pepper, and garlic)
Garlic Herb Butter
- 1 cup (2 sticks) unsalted butter, softened
- 4 cloves garlic
- 1-2 teaspoons fresh thyme
- 1-2 teaspoons fresh rosemary
- ¼ cup olive oil
Potato Wedges
- 3 large russet potatoes
- Olive oil for roasting
- Salt, pepper, and garlic to taste
Pull your steaks from the grill at 110°F for the butter basting step. The cast iron skillet adds another 10-15 degrees of heat. This brings the final temperature to 120-125°F for perfect medium-rare after resting. The butter not only adds flavor but also creates a glossy crust that looks restaurant-quality.
Step-by-Step Instructions
Step 1: Make the Garlic Herb Butter
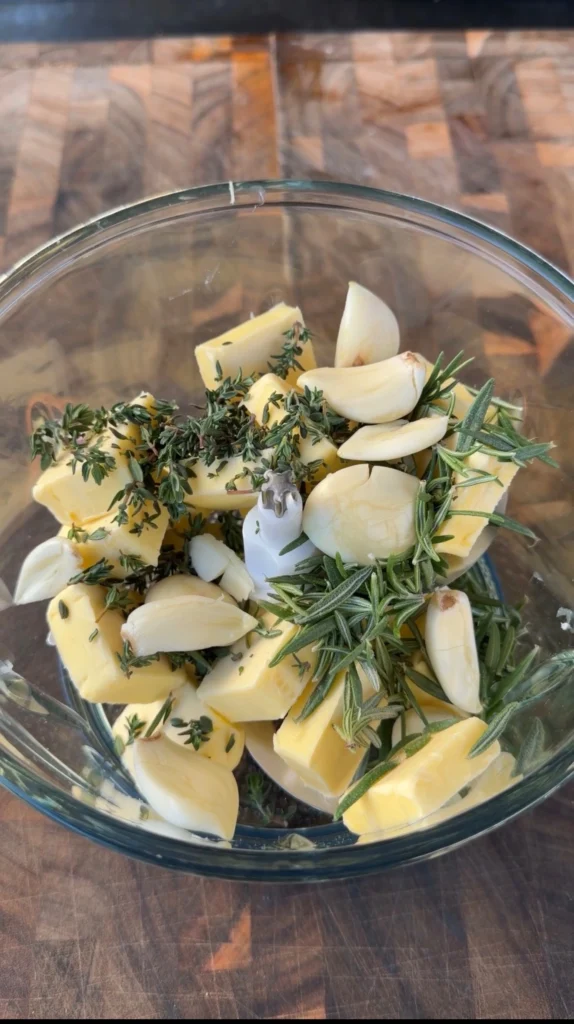
Add the softened butter to a food processor. It should be room temperature, not melted. Cold butter won’t blend properly. Melted butter won’t form a cohesive compound butter.
Add the garlic cloves, fresh thyme, fresh rosemary, and olive oil to the food processor. Pulse several times to break up the garlic. Then blend continuously for 30-45 seconds. The mixture should be smooth and uniform. You shouldn’t see chunks of garlic or herb stems.
Scrape down the sides of the food processor bowl. Blend for another 10-15 seconds. Taste the compound butter and adjust seasoning if needed. Add a pinch of salt if it tastes flat.
Transfer the butter onto a large piece of plastic wrap. Form it into a rough log shape. Roll the plastic wrap tightly around the butter. Twist the ends to seal. Roll the log on the counter to smooth it out and make it uniform.
Refrigerate the butter log for at least 1 hour until firm. You can make this days ahead. It keeps in the refrigerator for up to 2 weeks. For longer storage, freeze it for up to 3 months.
When ready to use, slice the butter log into medallions about ½ inch thick. You’ll need 3-4 medallions for the butter basting step. Save the rest for other uses.
Step 2: Prep the Steaks
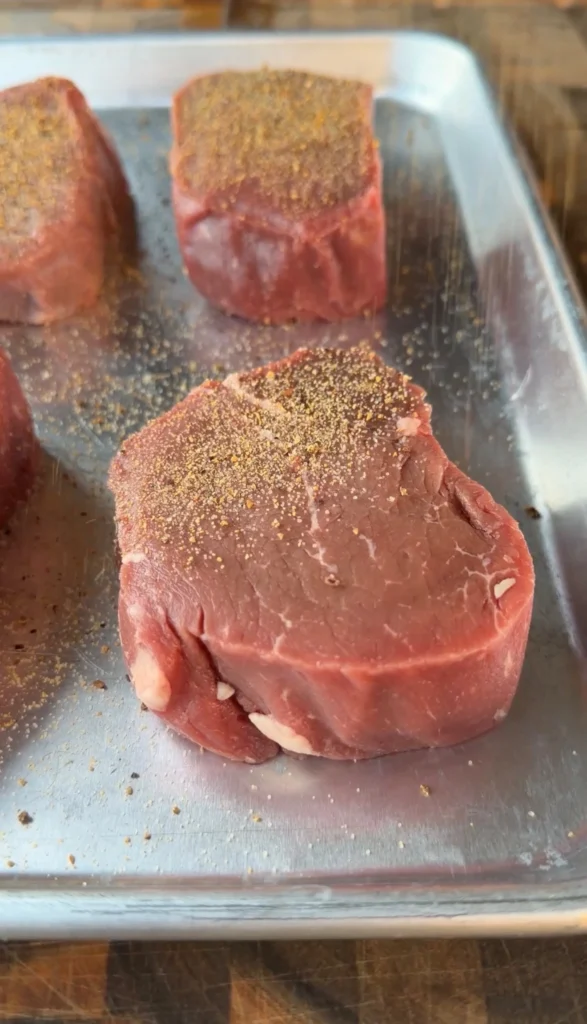
Remove the filet mignon from the refrigerator 30-45 minutes before cooking. Let it come to room temperature. Cold steaks cook unevenly. The outside overcooks before the inside warms up.
Pat each steak completely dry with paper towels. Moisture prevents proper browning. Dry surface is critical for developing a good crust.
Drizzle a small amount of olive oil on each steak. Rub it evenly over all surfaces. The oil helps seasoning stick. It also prevents the meat from sticking to grill grates.
Season each steak generously with your chosen steak seasoning. If using plain salt, pepper, and garlic, apply more than you think you need. Much of it will fall off during cooking. You want visible coverage across the entire surface.
Press the seasoning into the meat with your palms. This helps it adhere better. Season all sides, not just top and bottom. Set the seasoned steaks aside while you prep the potatoes.
Step 3: Prepare the Potato Wedges
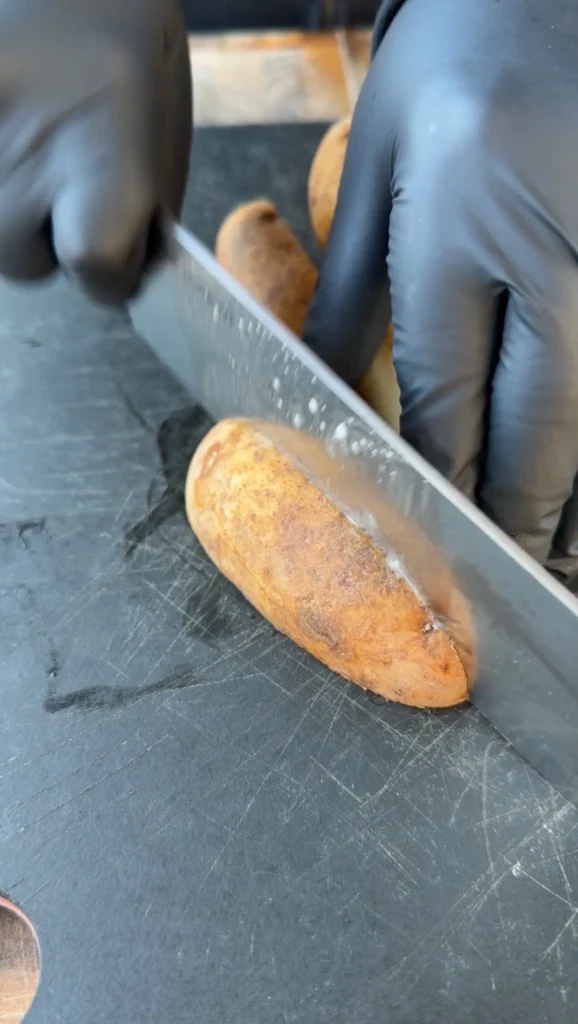
Scrub the russet potatoes under cold water. You can peel them if you prefer, but the skin adds texture and flavor. Cut each potato in half lengthwise. Cut each half into 3-4 wedges depending on potato size. Aim for uniform thickness so they cook evenly.
Fill a large pot with water. Add enough salt so the water tastes like the ocean. About 2 tablespoons of salt per gallon of water. Bring the water to a rolling boil over high heat.
Add the potato wedges to the boiling water. Set a timer for 6-7 minutes. You want them just slightly tender when pierced with a fork. They should offer some resistance. Don’t cook them until they’re completely soft. They’ll fall apart during the final crisping.
Drain the potatoes in a colander. Spread them out on a baking sheet in a single layer. Let them cool completely to room temperature. This takes 15-20 minutes. The cooling step is critical. It allows the surface to dry. Wet potatoes won’t crisp properly.
You can parboil potatoes several hours ahead. Cover and refrigerate until ready to use. Bring them back to room temperature before the final cooking step.
Step 4: Grill the Filets
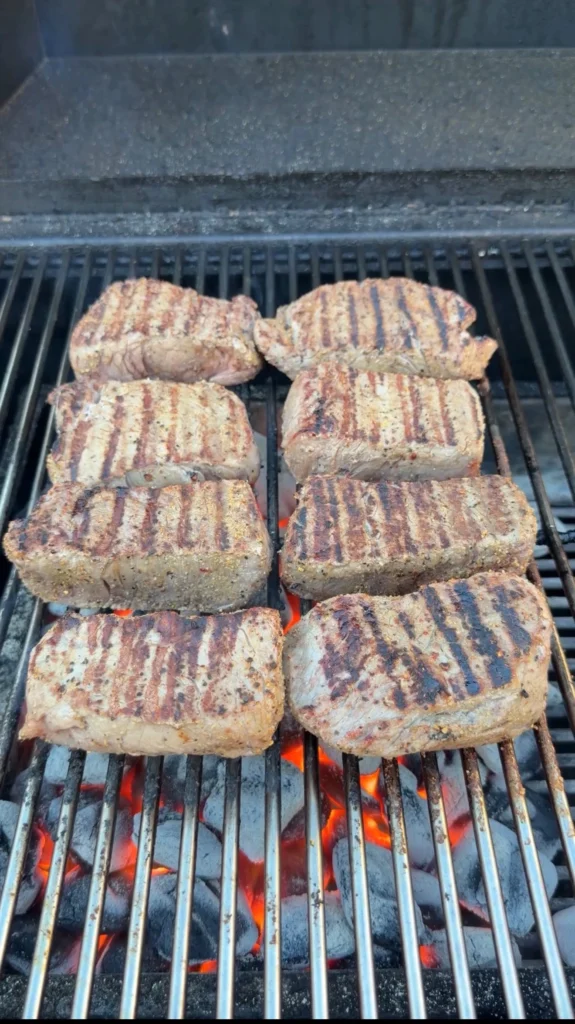
Preheat your grill to high heat. For gas grills, turn all burners to high and close the lid. Let it heat for 10-15 minutes. For charcoal grills, wait until the coals are glowing and covered with white ash. You want the grill as hot as possible.
Clean the grill grates thoroughly with a grill brush. Oil the grates by dipping a paper towel in vegetable oil. Use tongs to wipe it across the grates. This prevents sticking.
Place the seasoned filets directly over the hottest part of the grill. Position them so they make full contact with the grates. You should hear an immediate sizzle. Close the lid.
Sear for 3-4 minutes without moving them. Resist the urge to check them constantly. Let the crust develop undisturbed. After 3-4 minutes, flip the steaks using tongs. Sear the second side for another 3-4 minutes with the lid closed.
After both sides are seared, move the steaks to a cooler part of the grill. Set up indirect heat by turning off burners under the steaks. For charcoal, move steaks away from coals. Insert an instant-read thermometer into the thickest part of one steak.
Close the lid and monitor the temperature. Pull the steaks from the grill when they reach 110°F internal temperature. This usually takes 5-8 minutes on indirect heat. Transfer the steaks to a plate.
Step 5: Butter Baste the Steaks
Heat a large cast iron skillet over high heat. Let it get screaming hot. You want it so hot that a drop of water dances and evaporates immediately. This takes 5-7 minutes over high heat.
Add 3-4 medallions of the garlic herb butter to the hot skillet. The butter will melt and foam immediately. Swirl the pan to coat the bottom evenly.
Add the grilled steaks to the butter. They should sizzle aggressively. Tilt the pan slightly toward you. Use a large spoon to scoop up the melted butter. Pour it over the steaks repeatedly. This is the basting motion.
Baste continuously for 1-2 minutes. The steaks will brown further. The butter will pick up fond from the pan bottom. Fresh herbs in the butter will crisp and release their aromatics. The garlic will mellow and sweeten.
Flip the steaks once during basting. Make sure both sides get coated with the herb butter. The internal temperature will climb to 120-125°F during this step.
Remove the steaks from the skillet. Transfer them to a cutting board. Reserve the herb butter left in the skillet. This becomes your pan sauce.
Step 6: Finish the Potatoes
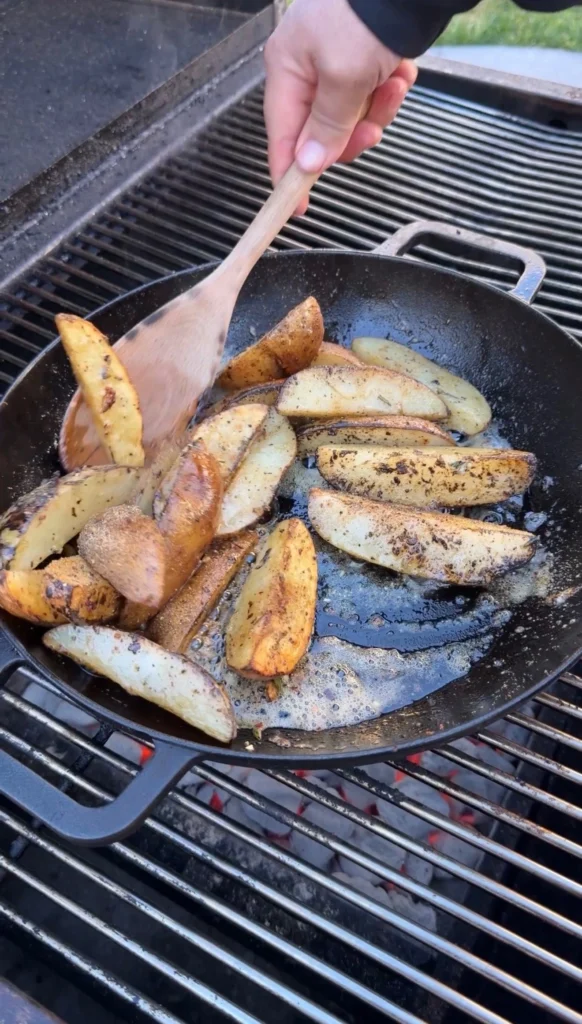
While the steaks rest, finish the potato wedges. You can use the same skillet after removing most of the butter. You can also use the grill if it’s still hot.
For skillet method, add the parboiled potato wedges to the hot pan. Drizzle with olive oil. Season generously with salt, pepper, and garlic powder. Toss to coat evenly.
Cook over medium-high heat for 8-10 minutes. Flip the wedges every 2-3 minutes. You want golden brown on all sides. The edges should be crispy and crunchy. The interior should be fluffy.
For grill method, toss the parboiled wedges with olive oil and seasoning. Place them directly on the grill grates over medium-high heat. Grill for 8-10 minutes, turning frequently. Watch for char marks and crispy edges.
The potatoes are done when they’re golden brown and crispy outside. They should offer slight resistance when you bite them. Not hard, but not mushy either.
Step 7: Rest and Serve
Let the steaks rest on the cutting board for 5 minutes after butter basting. Tent them loosely with aluminum foil. This allows juices to redistribute. The temperature will rise another 5 degrees to 125-130°F for perfect medium-rare.
Slice the steaks if desired, or serve them whole. Arrange them on plates alongside the crispy potato wedges. Spoon the reserved herb butter from the skillet over the steaks. This adds a final hit of richness and flavor.
Garnish with fresh thyme or rosemary sprigs if you want. Serve immediately while everything is hot.
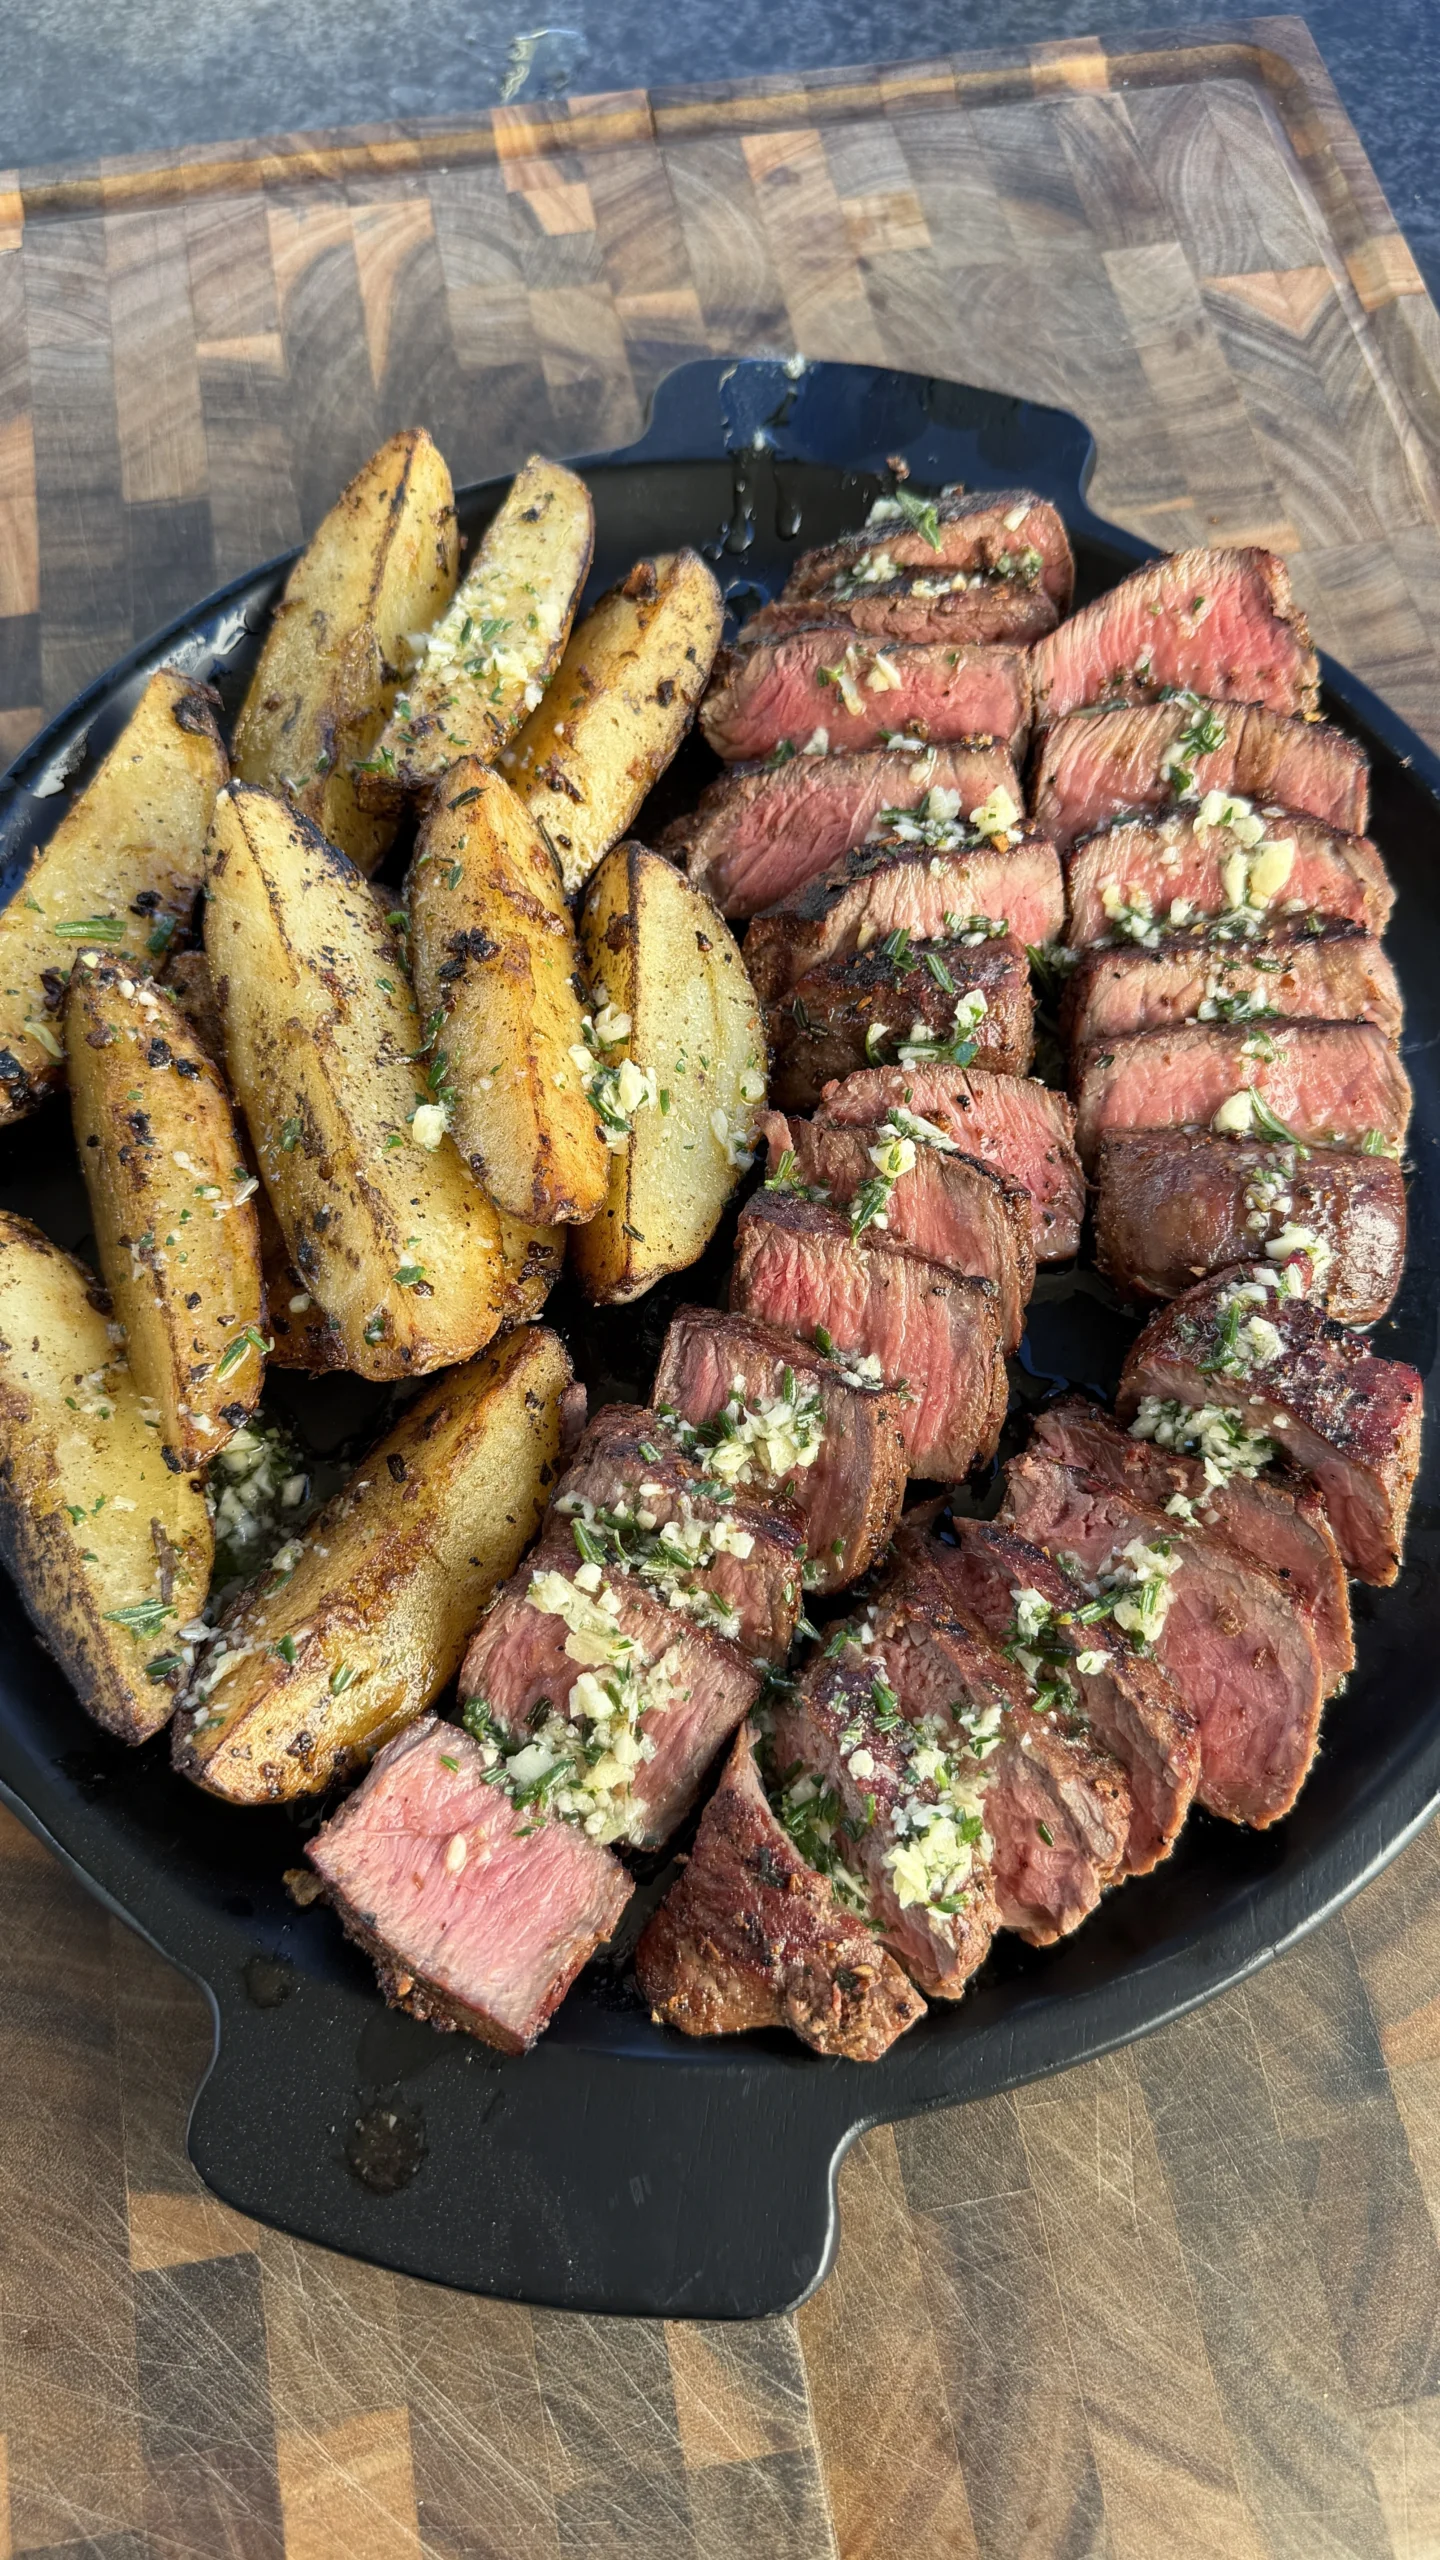
Garlic Herb Butter Basted Filet Mignon
Ingredients
Equipment
Method
- Add softened butter, garlic cloves, fresh thyme, fresh rosemary, and olive oil to a food processor. Blend for 30-45 seconds until smooth and uniform. Transfer the butter onto plastic wrap and roll into a log shape. Refrigerate for at least 1 hour until firm. Slice into medallions when ready to use.
- Remove filet mignon from refrigerator 30-45 minutes before cooking and let come to room temperature. Pat each steak completely dry with paper towels. Drizzle with olive oil and rub evenly over all surfaces. Season generously with steak seasoning and press into the meat. Set aside while you prep the potatoes.
- Cut russet potatoes into uniform wedges. Fill a large pot with salted water and bring to a rolling boil. Add potato wedges and parboil for 6-7 minutes until just slightly tender when pierced with a fork. Drain and spread on a baking sheet in a single layer. Let cool completely to room temperature, about 15-20 minutes.
- Preheat grill to high heat. Clean and oil the grates. Place seasoned filets directly over the hottest part of the grill. Close lid and sear for 3-4 minutes. Flip and sear second side for 3-4 minutes. Move steaks to indirect heat and insert instant-read thermometer. Close lid and cook until internal temperature reaches 110°F, about 5-8 minutes.
- Heat a cast iron skillet over high heat until screaming hot. Add 3-4 medallions of garlic herb butter. When melted and foaming, add the grilled steaks. Tilt the pan and use a spoon to continuously baste the steaks with butter for 1-2 minutes, flipping once. Internal temperature will rise to 120-125°F. Remove steaks and reserve the herb butter in the pan.
- Add parboiled potato wedges to the hot skillet or grill. Drizzle with olive oil and season with salt, pepper, and garlic. Cook for 8-10 minutes, flipping every 2-3 minutes, until golden brown and crispy on all sides.
- Let steaks rest for 5 minutes tented with foil. Temperature will rise to 125-130°F for perfect medium-rare. Arrange steaks on plates with crispy potato wedges. Spoon reserved herb butter over the steaks and serve immediately.
Nutrition
Notes
Tried this recipe?
Let us know how it was!Frequently Asked Questions
What Other Cuts Can You Use This Technique On?
This butter basting technique works beautifully on any tender steak cut, though the exact timing will vary based on thickness and fat content. Ribeye steaks are an excellent choice because their high marbling means they stay juicy even if you slightly overcook them. Pull ribeyes at 115-120°F for the butter baste, and they’ll finish at a perfect medium-rare with plenty of rich, beefy flavor enhanced by the herb butter.
New York strip steaks work equally well with this method. They have moderate marbling between the lean filet and fatty ribeye, which gives you good beefy flavor without excessive richness. The strip’s firmer texture holds up well to the aggressive butter basting. Use the same temperature guidelines as filet, pulling at 110°F for medium-rare results.
Flat iron steaks are an underrated budget-friendly option that responds exceptionally well to butter basting. This cut comes from the shoulder and has excellent marbling and beefy flavor at a fraction of filet’s cost. Because flat irons are typically thinner than filet, reduce grill time by 2-3 minutes and watch your thermometer closely.
Even leaner cuts like sirloin benefit from the butter basting finish, though they require extra care to avoid drying out. The herb butter compensates for sirloin’s lack of internal fat, adding moisture and richness the meat lacks naturally. Pull sirloin steaks at 105°F to account for their tendency to overcook quickly.
For bone-in cuts like T-bone or porterhouse, which include both strip and filet sections, use the same technique but expect slightly longer cooking times. The bone conducts heat and helps the meat cook more evenly, but it also means you need an extra 5-10 minutes on the grill. Insert your thermometer into the strip side (the larger section) since it’s less tender than the filet side and needs more heat.
Can You Make Compound Butter Without a Food Processor?
Absolutely, and many chefs actually prefer making compound butter by hand for better texture control. The manual method requires nothing more than a bowl and a fork, though it takes a bit more arm work. Start with your butter at true room temperature so soft you can easily press a finger through it. Cold butter won’t incorporate other ingredients properly, and melted butter won’t hold its shape when you try to roll it into a log.
Mince your garlic as finely as possible before adding it to the butter. Large chunks won’t distribute evenly and will create pockets of intense garlic flavor rather than even distribution. Use a microplane grater for even finer garlic paste that disperses better. Chop your fresh herbs finely too, removing any woody stems that would create tough bits in the finished butter.
Place the softened butter in a medium bowl and add your minced garlic, chopped herbs, olive oil, and any seasonings. Use a fork to mash and fold everything together, working in a folding motion like you’re making whipped cream. This incorporates air and makes the butter lighter. Keep mashing and folding for 3-5 minutes until you no longer see streaks of plain butter.
The manual method actually gives you more control over texture. You can leave the herbs in larger pieces if you want more visual impact, or mash them into a smooth paste for elegant presentation. Food processors sometimes over-blend and turn everything into a uniform green paste that, while tasty, lacks the rustic appeal of hand-mixed compound butter with visible herb flecks.
How Do You Know When Potatoes Are Properly Parboiled?
Proper parboiling is all about that sweet spot between raw and fully cooked, and there are several reliable ways to test doneness without cutting potatoes open. The most reliable method is the fork test. Insert a fork or the tip of a paring knife into the thickest part of a potato wedge. You should feel initial resistance, then the utensil should slide through with moderate pressure, but it shouldn’t go through effortlessly like it would with a fully cooked potato.
Visual cues help too. Properly parboiled potatoes lose their raw, chalky appearance around the edges. You’ll notice the very outer surface starting to look slightly translucent or glossy compared to the stark white of raw potato. The edges might start to round very slightly as surface starch gelatinizes, but they shouldn’t be falling apart or looking mushy.
Timing is a good guideline but not foolproof since potato size and variety affect cooking time. Russet potatoes cut into 1-inch thick wedges typically need 6-7 minutes in rapidly boiling water. Smaller wedges might only need 5 minutes, while very thick wedges could need 8 minutes. Red or Yukon gold potatoes have different starch contents and might parboil faster than russets.
The biggest mistake people make is overparboiling, which leads to potatoes that fall apart during the final crisping step. If your potatoes are breaking apart in the colander when you drain them, you’ve gone too far. They should hold their shape completely when drained, with maybe the tiniest bit of crumbling at sharp edges. Underparboiling is actually better than overparboiling because you can always cook them longer during the final crisping, but you can’t undo mushy potatoes.
Is It Better to Use Fresh or Dried Herbs in Compound Butter?
Fresh herbs deliver significantly better flavor and aroma in compound butter, making them worth the extra effort and cost for a dish this special. Fresh thyme and rosemary contain volatile essential oils that dried herbs lack or have lost during the drying process. These oils are fat-soluble, meaning they dissolve beautifully into butter and transfer directly to your steak during basting.
When you chop fresh herbs, you rupture their cell walls and release aromatic compounds immediately. These compounds are at their peak potency right after chopping. In compound butter, they have hours to infuse the fat with flavor as the butter sits in your refrigerator. Dried herbs have already lost most of their volatile oils during the drying process, and what remains doesn’t rehydrate well in solid butter.
The texture difference matters too. Fresh herbs add visual appeal with bright green flecks distributed through the butter. When this butter melts over your steak, those herb pieces soften and become part of the sauce. Dried herbs tend to stay tough and chewy even after cooking, creating an unpleasant texture in the finished dish.
That said, dried herbs can work in a pinch if you adjust quantities and expectations. Use about one-third the amount of dried herbs compared to fresh since dried herbs have more concentrated flavor. So if a recipe calls for 2 teaspoons of fresh thyme, use only ⅔ teaspoon dried. Let the compound butter sit refrigerated for at least 24 hours before using to give dried herbs time to rehydrate slightly in the butter’s moisture.
What Wine Pairs Best with Butter-Basted Filet Mignon?
The rich, buttery preparation of this filet mignon calls for full-bodied red wines with enough structure to cut through the fat while complementing the beef’s mild flavor. Cabernet Sauvignon is the classic pairing and for good reason. Its high tannin content helps cleanse your palate between bites of rich, butter-coated meat, while its dark fruit flavors and hints of cedar or tobacco complement the herbs in the compound butter without overpowering the delicate filet.
Malbec offers a slightly different profile that works beautifully with the garlic and herbs. Argentine Malbecs in particular have plummy fruit flavors and softer tannins than Cabernet, making them approachable and food-friendly. The wine’s natural earthiness echoes the thyme and rosemary in your herb butter, creating a harmonious pairing where wine and food enhance each other.
For a more elegant, Old World approach, try a Bordeaux blend from the Left Bank where Cabernet Sauvignon dominates. These wines have the structure to stand up to rich beef but also possess refinement that matches filet mignon’s tender, subtle character. Look for wines from Pauillac or Saint-Julien appellations, though these can be pricey.
If you prefer domestic wines, California Cabernets from Napa Valley deliver the power and fruit concentration this dish needs. They tend to be riper and more fruit-forward than Bordeaux, with flavors of blackberry and cassis that complement charred, grilled meat. The buttery texture many California Cabs develop from oak aging mirrors the richness of your herb butter.
Ready to Level Up?
Take your backyard cooking from good to legendary.
This is where I keep all my most-used smokers, knives, and favorite cooking tools.
Shop My Gear CollectionExplore More Recipes
Find more diverse flavors at CWFeats.com