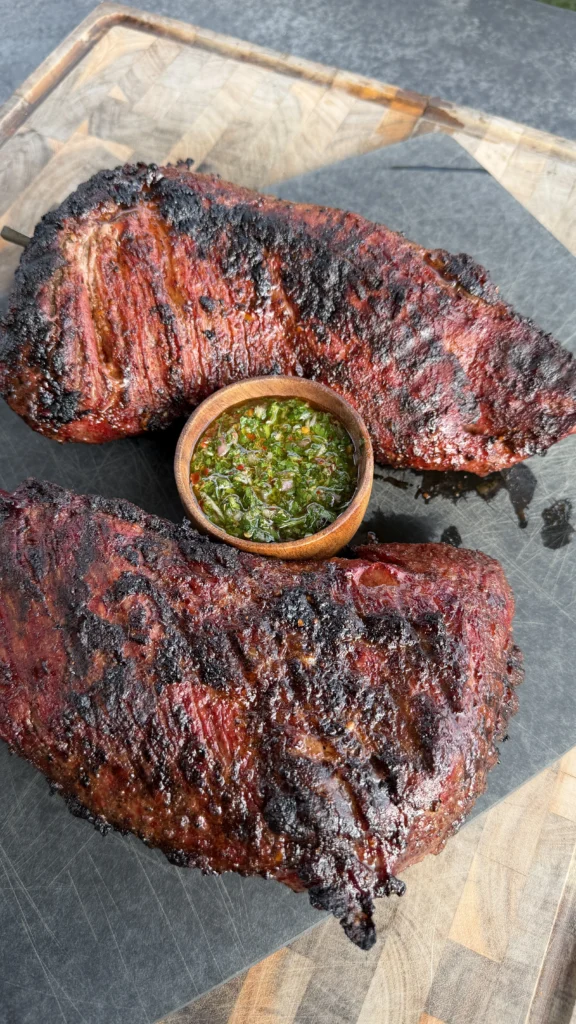
Forward-seared tri-tip with chimichurri uses 2 tri-tip roasts (2-3 lbs each) lightly coated with olive oil or beef tallow, seasoned generously with steak or BBQ seasoning, then seared directly over high heat for 2-3 minutes per side until deep crust forms. Move seared tri-tips to the cool side of the grill opposite the heat, close lid, and continue cooking indirect until internal temperature reaches 125°F for medium-rare, approximately 15-25 additional minutes depending on thickness. Rest loosely tented for 10-15 minutes before slicing against the grain. Serve topped with fresh chimichurri made from 1 cup finely chopped parsley, 1/2 cup finely chopped cilantro, 4 minced garlic cloves, 1/2 cup olive oil, 2 tablespoons red wine vinegar, 1 teaspoon red pepper flakes, salt and pepper, combined while tri-tip finishes cooking. This grilled tri-tip with chimichurri delivers crusty exterior from intense forward searing, perfectly medium-rare interior, and bright herbaceous sauce with garlic punch and vinegar tang that cuts through the rich beef, creating California-style BBQ perfect for slicing, tacos, or sandwiches.
The whole process takes about 1 hour from start to finish including rest. Spend 10 minutes oiling and seasoning tri-tips. Sear for 6 minutes total (2-3 minutes per side). Cook indirect for 15-25 minutes to 125°F. Rest for 10-15 minutes. Make chimichurri in 5 minutes during the indirect cook. The forward searing method is faster than reverse searing while creating more dramatic crust since you’re searing cold meat at maximum temperature differential. The chimichurri’s acidity and fresh herbs balance the rich, beefy tri-tip.
What Makes Tri-Tip Different from Other Beef Cuts?
Tri-tip comes from the bottom sirloin subprimal, specifically the tensor fasciae latae muscle at the bottom of the sirloin. This triangular-shaped cut weighs 2-3 lbs and has distinct characteristics that set it apart from other steaks and roasts. The tri-tip has relatively even thickness throughout (1.5-2.5 inches) which makes it ideal for grilling, unlike unevenly-shaped roasts that create hot and cold spots.
The grain direction in tri-tip changes throughout the cut, running in different directions from one end to the other. This unique grain pattern requires careful attention when slicing – you must identify the grain direction and slice against it in sections rather than making uniform cuts across the entire roast. Proper slicing technique is critical for tender bites since tri-tip is moderately lean and slicing with the grain creates chewy, stringy texture.
Tri-tip has minimal fat marbling compared to ribeyes or strip steaks but more marbling than very lean cuts like eye of round. This moderate marbling provides enough flavor and moisture without being excessively fatty. The cut also has a fat cap on one side that renders during cooking, basting the meat while adding beefy flavor. The balance of leanness and fat makes tri-tip suitable for both slicing as steak and using for sandwiches or tacos.
This cut was traditionally considered a budget option, popular primarily in California’s Santa Maria BBQ tradition. Tri-tip has gained popularity nationwide but remains more affordable than prime cuts like ribeye or tenderloin. The combination of beefy flavor, relative tenderness when cooked and sliced properly, and reasonable price makes tri-tip excellent value for feeding crowds.
Why Forward Sear Instead of Reverse Sear?
Forward searing means searing meat first over high heat, then finishing with gentle indirect heat – the opposite of reverse searing which cooks slowly first then sears at the end. Forward searing creates more dramatic crust development because you’re searing cold meat straight from the refrigerator. The temperature differential between cold meat surface (around 40°F) and screaming hot grill grates (500°F+) creates intense Maillard reaction that develops deep brown crust quickly.
The cold meat surface during forward searing also means the interior stays cool while the exterior browns. This creates sharper gradient between crusty exterior and raw interior, allowing you to develop serious crust without overcooking a thick band beneath the surface. Reverse searing warms the entire roast first, so when you sear at the end, the meat is already warm and the sear penetrates deeper, potentially creating more overcooked grey band.
Forward searing is also faster and more practical for many cooks. Total cook time is 25-35 minutes versus 45-60 minutes for reverse searing. You don’t need to carefully monitor low-and-slow cooking for an hour – just sear hard and finish quickly. The method is more intuitive for people familiar with traditional grilling techniques. Many backyard cooks instinctively sear first anyway.
The forward sear method does require more attention during the transition from direct to indirect heat. You must move the meat immediately after searing to prevent overcooking. Reverse searing is more forgiving since you can take your time with the final sear. However, for experienced grillers, forward searing provides superior crust with less total time investment.
How Does Chimichurri Complement Grilled Tri-Tip?
Chimichurri’s bright acidity from red wine vinegar cuts through the rich, fatty beef, providing palate-cleansing contrast. Grilled tri-tip is intensely beefy and can be heavy on its own. The vinegar sharpness and citrusy parsley notes lighten each bite, preventing palate fatigue. This acid balance is why chimichurri pairs so well with grilled meats in Argentine and South American cuisine where it originates.
The fresh herbs in chimichurri also add complexity that simple seasoned beef lacks. Parsley provides fresh, slightly peppery flavor. Cilantro adds citrus-herbal notes. Together they create herbaceous layer that complements beef’s savory depth without overpowering it. The herbs taste clean and bright, especially against charred, smoky beef from the grill.
The raw garlic in chimichurri provides pungent bite that stands up to heavily seasoned, crusted tri-tip. Cooked garlic would be too mellow. Raw garlic’s sharp, spicy quality punches through the beef’s richness. The red pepper flakes add heat that enhances rather than masks the beef flavor. The combination of garlic and chile creates savory-spicy dimension.
Chimichurri’s olive oil base also adds richness without heaviness. The oil carries flavors and creates smooth mouthfeel, but its fruity quality is lighter than butter-based sauces. The sauce clings to meat slices, coating each piece with herbs and garlic. Unlike thick, creamy sauces, chimichurri enhances beef without masking its natural flavor.
What Internal Temperature Should Tri-Tip Reach?
Pull tri-tip from indirect heat at 125°F internal temperature for perfect medium-rare after resting. The meat will carry over to 130-135°F during the 10-15 minute rest as residual heat continues cooking. Medium-rare is ideal for tri-tip because it maximizes tenderness while maintaining juicy texture. The moderate marbling and relatively lean composition of tri-tip means it can become dry if cooked beyond medium.
At 125-130°F, the meat’s myosin proteins have denatured enough to be tender but haven’t contracted so much that they squeeze out excessive moisture. The fat has melted throughout, creating juicy, flavorful bites. The meat will be warm red to pink throughout with no raw appearance. This temperature provides the best balance between tenderness, juiciness, and safety.
Cooking tri-tip to higher temperatures like 145°F (medium) or 160°F (medium-well) results in noticeably drier, tougher meat. The lean sections become chalky and the overall texture turns from tender to chewy. Since tri-tip lacks the extensive marbling of ribeye or the connective tissue of chuck roast, it has no internal moisture reserves to withstand overcooking. The narrow window between perfect and overcooked makes accurate temperature monitoring essential.
Use an instant-read thermometer inserted into the thickest part of the tri-tip, avoiding fat pockets which can give false readings. Check temperature after moving to indirect heat and monitor every 5 minutes as you approach 125°F. Pull immediately when it hits target – tri-tip cooks faster than you think due to its relatively uniform thickness.
Why Slice Tri-Tip Against the Grain?
Slicing tri-tip against the grain is crucial because it cuts through the muscle fibers, making each bite more tender. When you slice with the grain (parallel to the fibers), you create long, intact muscle strands that are chewy and difficult to bite through. Against-the-grain slicing severs these fibers into short segments that are easier to chew, transforming the same piece of meat from tough to tender.
Tri-tip presents unique slicing challenges because the grain direction changes throughout the cut. Unlike steaks where grain runs uniformly in one direction, tri-tip’s triangular shape means fibers run different directions from one end to the other. You must identify the grain pattern and adjust your knife angle as you work through the roast, sometimes cutting in different directions for different sections.
The traditional approach is to cut the tri-tip in half lengthwise where the grain changes direction, creating two sections. Rotate each section so you’re slicing perpendicular to the grain direction for that particular piece. This method ensures every slice is against the grain, maximizing tenderness throughout. Slicing the entire roast in one direction without adjusting for grain changes leaves some slices with the grain.
Thin slicing also enhances tenderness. Cut tri-tip into 1/4 to 1/2 inch slices rather than thick steaks. The thinner slices have less distance for your teeth to work through, making even moderately tender meat feel very tender. Thin slices also showcase the gradient from crusty exterior to pink interior beautifully. The slices should be thin enough to slightly flop when picked up.
Tri-Tip with Chimichurri
Forward-seared, finished indirect, fresh herb sauce
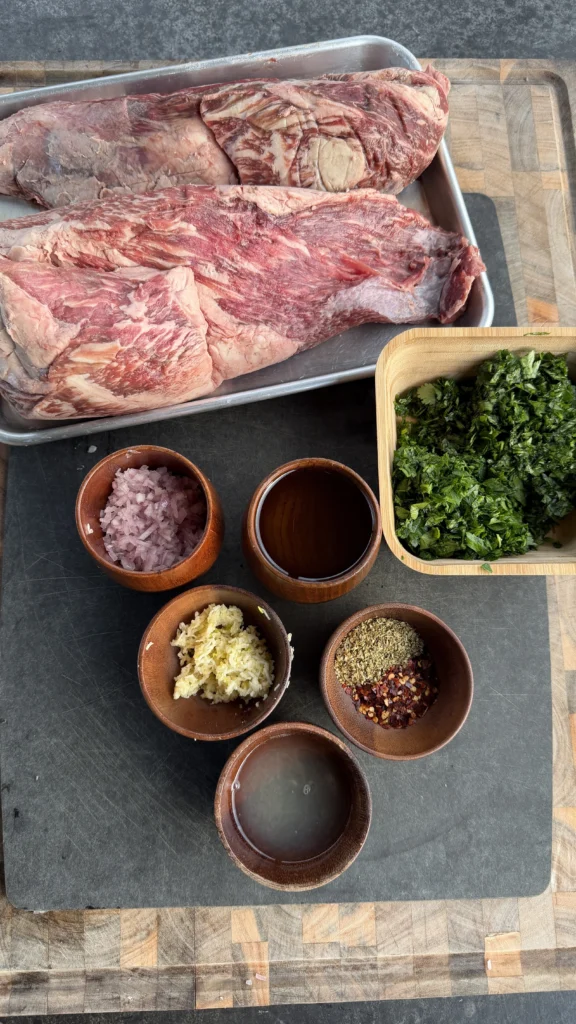
Ingredients
Tri-Tip
- 2 tri-tip roasts (2-3 lbs each)
- Olive oil or beef tallow
- Your favorite steak or BBQ seasoning
Chimichurri
- 1 cup fresh parsley, finely chopped
- ½ cup fresh cilantro, finely chopped
- 4 cloves garlic, minced
- ½ cup olive oil
- 2 tablespoons red wine vinegar
- 1 teaspoon red pepper flakes (to taste)
- Salt and pepper to taste
Forward searing creates maximum crust through intense high-heat contact before the meat’s interior warms up. Sear tri-tip at highest grill temp for 2-3 minutes per side to develop deep brown crust via Maillard reaction, then move to indirect heat to finish to 125°F medium-rare. This method is faster than reverse searing and creates more dramatic crust contrast since you’re searing cold meat rather than warm meat. The key is moving to indirect heat immediately after searing to prevent overcooking.
Step-by-Step Instructions
Step 1: Prep Tri-Tip and Preheat Grill
Remove 2 tri-tip roasts (2-3 lbs each) from packaging and pat them completely dry with paper towels. Surface moisture prevents proper searing and creates steam. The tri-tips should feel dry to the touch on all surfaces. Let them sit at room temperature for 15-20 minutes to remove refrigerator chill, which promotes more even cooking.
Lightly coat both tri-tips with olive oil or beef tallow. Use just enough to create thin layer – about 1 tablespoon per roast. Rub the oil all over using your hands, ensuring even coverage on all surfaces including the fat cap. The oil promotes browning and helps seasoning adhere.
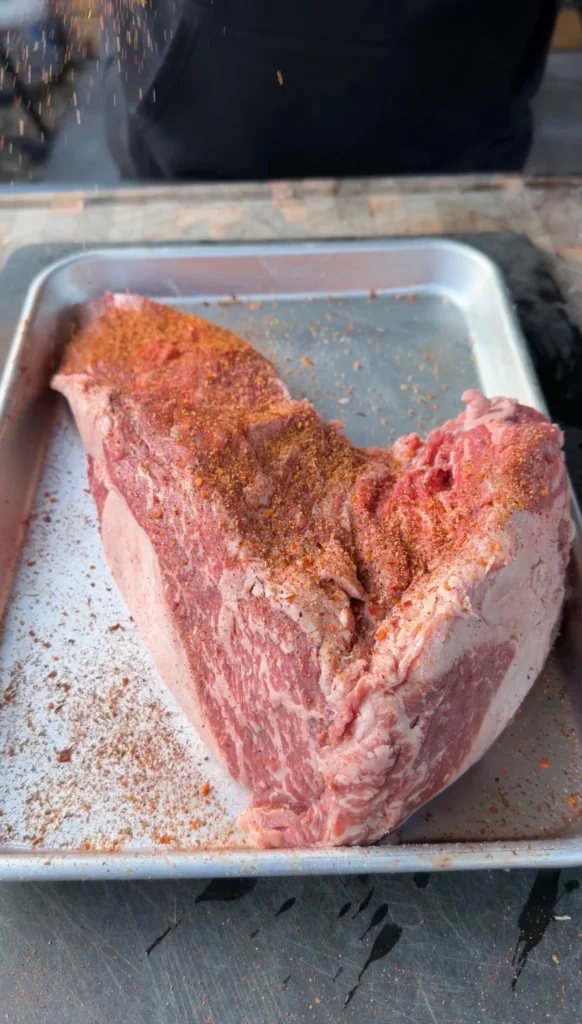
Season both tri-tips generously on all surfaces with your favorite steak or BBQ seasoning. Use approximately 2-3 tablespoons total seasoning per roast. The tri-tips should have visible coating of seasoning. Press the seasoning into the meat so it adheres firmly. Don’t skimp – the large surface area needs heavy seasoning.
Preheat your grill to high heat with a two-zone setup: direct heat on one side, no heat on the other side. For gas grills, turn burners on one side to high and leave the other side off. For charcoal, bank all hot coals on one side. You want screaming hot direct heat zone (500°F+) for searing and cool indirect zone for finishing. Clean and oil the grill grates.
Step 2: Sear the Tri-Tip

When the grill reaches high heat (500°F+ on the direct side), place both seasoned tri-tips directly over the hot zone. They should sizzle loudly on contact. Position them fat cap up if they have a significant fat cap. Don’t move them after placing – let them develop crust undisturbed.
Sear for 2-3 minutes on the first side. You’re looking for deep brown crust to develop. The Maillard reaction creates hundreds of flavor compounds during this intense searing. Resist the urge to flip early – the crust needs time to form. If you try to flip too soon, the meat will stick. When proper crust develops, it releases easily.
After 2-3 minutes, flip the tri-tips using tongs and sear the second side for another 2-3 minutes. Again, don’t move them – let the crust develop. The second side should also develop deep brown color and crusty texture. The seared surfaces should look almost charred in spots, but not black and burnt.
Sear the edges briefly if desired, using tongs to hold tri-tips on their sides for 30-60 seconds per edge. This creates crust on all surfaces. However, edge searing is optional since the main focus is the two large flat surfaces. Total searing time is 6-8 minutes for top, bottom, and optional edges.
Step 3: Move to Indirect Heat and Finish

Immediately after searing, move both tri-tips to the cool side of the grill – the zone with no heat underneath. This is critical – leaving them over direct heat would burn the crust and overcook the meat. Position them as far from the direct heat as possible. The tri-tips will finish cooking via indirect convection heat with the lid closed.
Close the grill lid. The closed environment creates oven-like conditions where hot air circulates around the meat, cooking it evenly to the target temperature. Opening the lid releases heat and extends cooking time. Maintain grill temperature around 350-400°F on the cool side by adjusting vents or burners.
Insert an instant-read thermometer probe into the thickest part of one tri-tip if your thermometer allows for continuous monitoring. Otherwise, check temperature every 5 minutes after the first 10 minutes of indirect cooking. You’re targeting 125°F internal temperature. Cooking time varies based on thickness and starting temperature but typically takes 15-25 minutes.
When tri-tip reaches 125°F internal, remove both roasts from the grill immediately. They’ll continue cooking from residual heat during rest. If one tri-tip reaches temperature before the other due to size differences, remove it and let the other continue. Don’t overcook one waiting for the other to catch up.
Step 4: Make Chimichurri Sauce
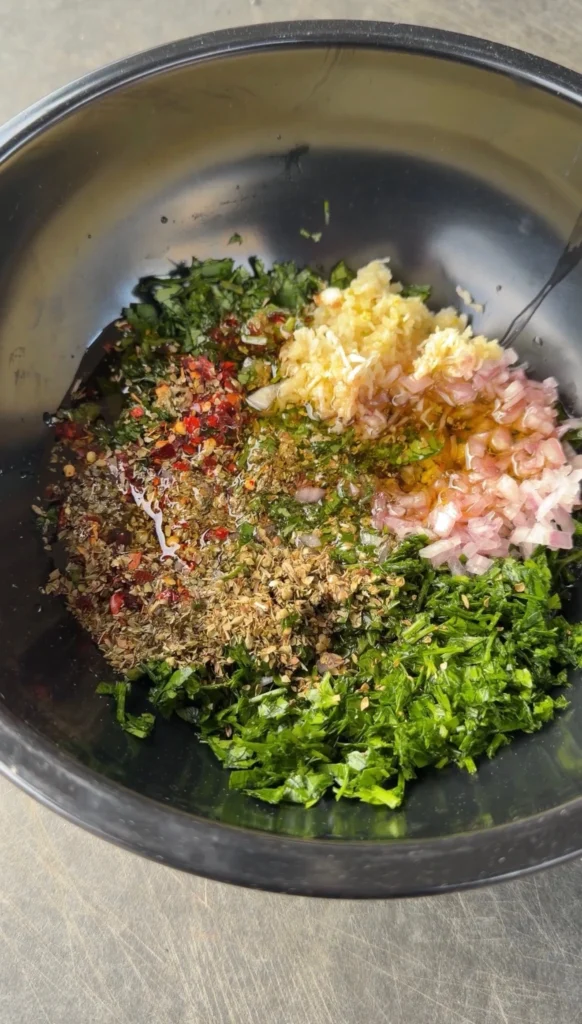
While tri-tips cook indirectly (around the 10-15 minute mark), make the chimichurri. Finely chop 1 cup fresh flat-leaf parsley. The finer the chop, the better the sauce consistency. Remove thick stems but fine stems are okay. Finely chop 1/2 cup fresh cilantro, again removing thick stems. Place chopped herbs in a bowl.
Mince 4 garlic cloves very finely. You want tiny pieces that distribute throughout the sauce, not large chunks. Add minced garlic to the herbs. Add 1 teaspoon red pepper flakes (adjust to taste if you want more or less heat), salt, and freshly ground black pepper.
Pour in 1/2 cup extra virgin olive oil and 2 tablespoons red wine vinegar. Stir everything together thoroughly until combined. The oil should coat all the herbs and the mixture should look glossy and cohesive. Taste and adjust seasoning – add more salt, pepper, or vinegar as needed.
Let the chimichurri sit at room temperature while the tri-tip finishes cooking and resting. This allows flavors to meld and bloom. The garlic will mellow slightly and the herbs will release their essential oils into the oil. Chimichurri can be made up to 2 hours ahead and held at room temperature, though it’s best fresh. For longer storage, refrigerate and bring to room temperature before serving.
Step 5: Rest, Slice, and Serve
Transfer the 125°F tri-tips to a cutting board and tent loosely with aluminum foil. Don’t wrap tightly – you want air circulation to prevent the crust from steaming and softening. Rest for 10-15 minutes. During rest, the internal temperature will rise to 130-135°F from carryover cooking while juices redistribute throughout the meat.
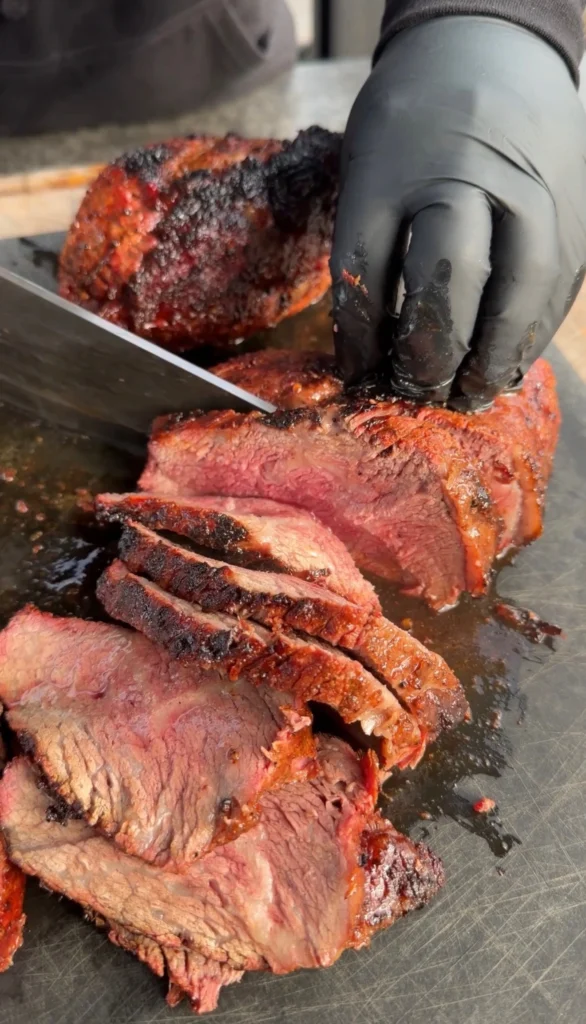
After resting, identify the grain direction in the tri-tip. Look at the muscle fibers – they run in visible parallel lines. The grain direction typically changes partway through the triangular cut. Many people cut the tri-tip in half lengthwise where the grain changes, creating two sections with different grain directions.
Rotate the cutting board so you’re cutting perpendicular to the grain direction. Using a sharp knife, slice the tri-tip against the grain into 1/4 to 1/2 inch thick slices. Continue slicing, adjusting knife angle if grain direction changes. Each slice should show short severed muscle fibers, not long intact strands.
Arrange sliced tri-tip on a serving platter. Spoon chimichurri generously over the slices or serve it on the side for guests to add their own. The bright green sauce should be visible on the pink-red meat slices. Serve immediately while tri-tip is still warm. The combination of crusty seared exterior, tender medium-rare interior, and fresh chimichurri creates complete flavor experience. Leftovers work excellently in sandwiches, tacos, or salads.

Forward-Seared Tri-Tip with Chimichurri
Ingredients
Equipment
Method
- Pat 2 tri-tip roasts (2-3 lbs each) completely dry. Let sit at room temperature 15-20 minutes. Lightly coat with olive oil or beef tallow. Season generously on all surfaces with steak or BBQ seasoning.
- Preheat grill to high heat with two-zone setup: direct high heat on one side, no heat on the other. Clean and oil grates.
- Place tri-tips directly over high heat. Sear 2-3 minutes per side until deep brown crust forms. Sear edges briefly if desired. Total searing time 6-8 minutes.
- Immediately move seared tri-tips to cool side of grill (indirect zone). Close lid and cook until internal temperature reaches 125°F, about 15-25 minutes. Check temperature every 5 minutes.
- While tri-tip cooks, make chimichurri: Combine 1 cup finely chopped parsley, 1/2 cup finely chopped cilantro, 4 minced garlic cloves, 1 tsp red pepper flakes, salt, and pepper. Stir in 1/2 cup olive oil and 2 tbsp red wine vinegar. Let sit at room temperature.
- Remove tri-tip at 125°F and rest loosely tented with foil for 10-15 minutes. Temperature will rise to 130-135°F.
- Slice tri-tip against the grain into 1/4 to 1/2 inch slices, adjusting knife angle as grain direction changes. Arrange on platter and spoon chimichurri over slices or serve on side.
Nutrition
Notes
Tried this recipe?
Let us know how it was!Frequently Asked Questions
Can I reverse sear tri-tip instead of forward sear?
Yes, reverse searing works excellently for tri-tip. Cook at 225-250°F indirect heat to 115-120°F internal (about 45-60 minutes), then sear over high heat 1-2 minutes per side. Reverse searing creates more even doneness throughout but takes longer and produces slightly less dramatic crust than forward searing.
Forward searing is faster and creates sharper crust-to-interior contrast. Choose based on your priorities – time efficiency and maximum crust (forward sear) versus perfectly even doneness (reverse sear).
What if I don’t have a two-zone grill setup?
You can sear tri-tip on a cast iron skillet or grill pan over high heat, then transfer to a 350°F oven to finish to 125°F internal. This achieves the same forward sear result. Sear 2-3 minutes per side in the hot pan, then move the whole pan (if oven-safe) or transfer meat to a baking sheet for oven finishing.
Alternatively, on a single-zone grill, sear briefly over high heat then reduce heat to medium-low and continue cooking with lid closed, monitoring temperature closely.
How long does chimichurri last?
Fresh chimichurri is best within 2-4 hours at room temperature. Refrigerate leftovers up to 3 days in an airtight container. The vinegar preserves the herbs somewhat, though they’ll lose some vibrancy. Bring to room temperature before serving for best flavor and texture.
The olive oil will solidify when cold, so letting chimichurri warm up is important. Stir well before serving refrigerated chimichurri. For longer storage, freeze in ice cube trays for up to 3 months.
Can I use different herbs in chimichurri?
Traditional Argentine chimichurri uses only parsley and oregano. The parsley-cilantro blend in this recipe is a variation popular in some regions. You can use all parsley if you dislike cilantro. Fresh oregano can replace some cilantro. Avoid dried herbs which taste dull compared to fresh.
Some variations add fresh mint or basil, though these diverge from traditional chimichurri. The key is using fresh, bright herbs that complement beef without overpowering it.
What other cuts work with forward searing?
Ribeye, New York strip, sirloin steak, flank steak, skirt steak, and flat iron steak all work excellently with forward searing. Any steak 1-2 inches thick benefits from this method. Thicker cuts (2+ inches) are better reverse seared since they need more time to reach proper internal temperature.
Thin cuts under 1 inch don’t need the two-zone approach – just sear them over direct heat and they’ll cook through. Forward searing is ideal for 1-2 inch thick cuts that need substantial crust and medium-rare interior.
Ready to Level Up?
Take your backyard cooking from good to legendary.
This is where I keep all my most-used smokers, knives, and favorite cooking tools.
Shop My Gear CollectionExplore More Recipes
Find more diverse flavors at CWFeats.com