Prime Rib Sliders with Red Wine Onions and Horseradish Mayo
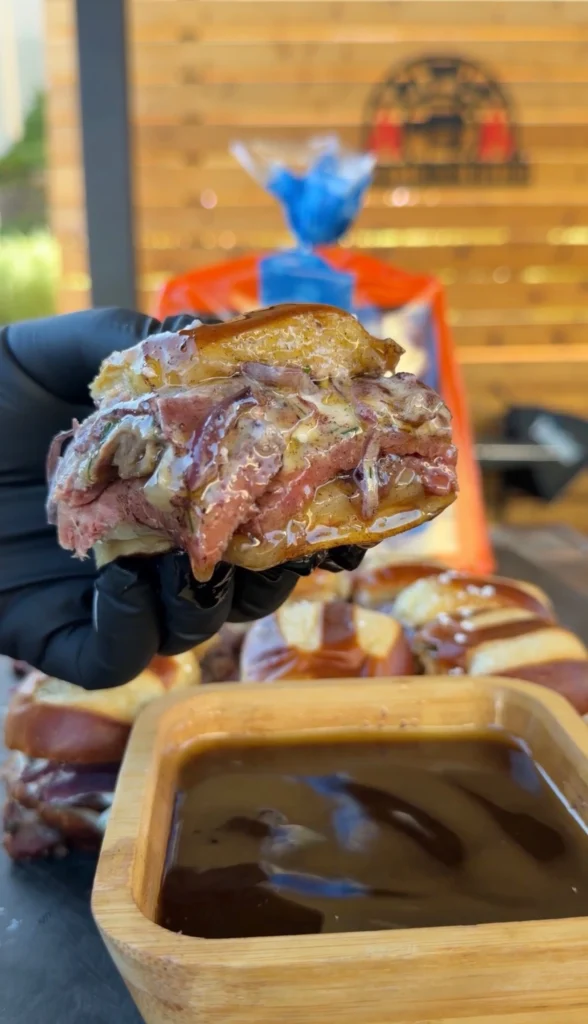
Prime rib sliders use a 4 lb boneless prime rib tied with butcher’s twine and coated with wet rub made from McCormick steak seasoning and olive oil, smoked at 275°F over a drip pan filled with thinly sliced onions, rosemary, thyme, beef broth, red wine, and butter until internal temperature reaches 125-130°F for medium-rare. Rest for 15 minutes, then slice thin for building sliders on King’s Hawaiian sweet pretzel buns with horseradish mayo (mayo, prepared horseradish, chives), red wine onions from the drip pan, and provolone cheese. Warm assembled sliders on the grill for 10 minutes to melt cheese. Serve with au jus made by straining and reducing the liquid from the drip pan until rich and glossy. These smoked prime rib sliders deliver steakhouse quality in handheld form, perfect for parties, game day, or anytime you want impressive beef sliders that feed a crowd.
The whole process takes about 3 hours from start to finish. Spend 20 minutes tying the roast, making the wet rub, and preparing the drip pan. Smoke for 2-3 hours depending on exact size and desired doneness. Rest for 15 minutes while you reduce the au jus and prepare other components. Assemble sliders and warm for 10 minutes to melt cheese. The drip pan technique is brilliant because it prevents flare-ups, slowly caramelizes onions in wine and beef drippings, and creates your serving sauce simultaneously. Every component serves multiple purposes, making this recipe efficient despite seeming complex.
Why Tie Boneless Prime Rib with Butcher’s Twine
Tying boneless prime rib with butcher’s twine creates uniform thickness that cooks evenly from end to end. Boneless prime rib naturally tapers from thick to thin, creating uneven cooking where thin portions overcook while thick portions reach desired doneness. Tying compresses the roast into a consistent cylindrical shape. This uniform diameter ensures the entire roast reaches target temperature at the same rate, producing edge-to-edge medium-rare without overcooked ends.
The twine also holds the roast together during smoking and slicing. Boneless cuts can separate or fall apart, especially when slicing thin for sliders. The tied roast maintains structural integrity throughout cooking and resting. When you slice, the twine keeps everything compact, producing clean slices rather than ragged pieces. Remove the twine after resting but before slicing for easiest handling.
Tying creates better smoke ring development and bark formation by creating a more compact, rounded surface. Irregular shapes have valleys and crevices that accumulate moisture and don’t develop bark properly. The tied, cylindrical roast has consistent surface area that gets even smoke exposure and bark development. This creates better flavor and appearance across the entire roast.
The technique is simple. Cut 4-5 pieces of butcher’s twine about 18 inches long. Slide one piece under the roast near one end. Pull both ends up and tie a square knot on top, pulling tight to compress the meat. Repeat every 2-3 inches along the length. The tied roast should be uniformly thick throughout. Trim excess twine close to the knots. The roast is now ready for the wet rub application.
What Is a Wet Rub and Why Use It for Prime Rib?
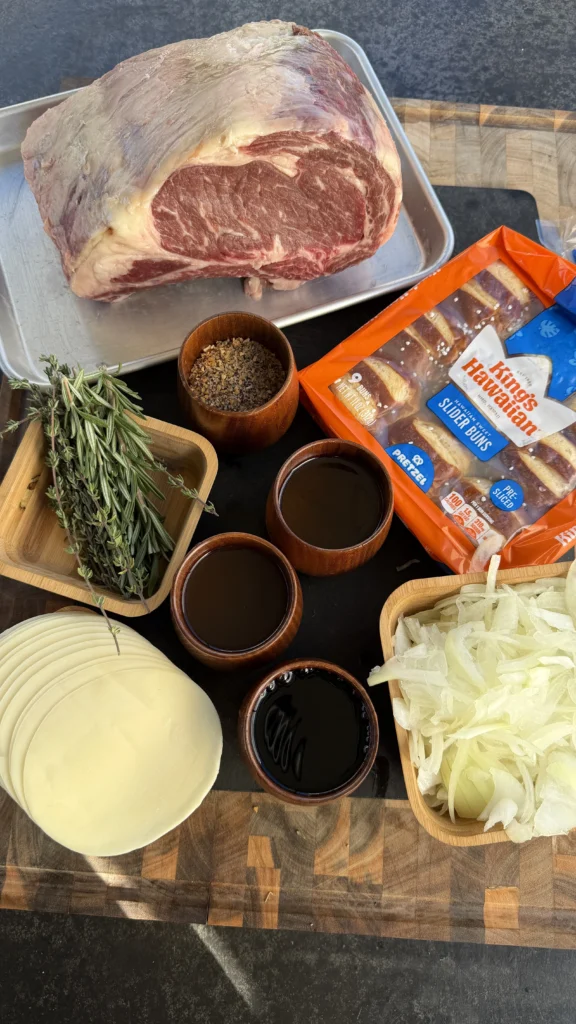
A wet rub is seasoning mixed with oil or other liquid to form a paste that adheres better to meat than dry rub alone. For prime rib sliders, mixing McCormick steak seasoning with olive oil creates a mud-like consistency that coats the roast completely. The oil helps the seasoning stick during the long smoking time while preventing it from falling off during handling. Dry rub alone can shake loose, leaving bare spots that lack flavor.
The oil in wet rub also conducts heat more efficiently than dry rub, promoting better bark development. The oil heats and helps the spices toast and brown, creating more complex flavors. It also prevents the seasoning from burning during the 2-3 hour smoking time. Dry rubs can char and become bitter, especially with sugary seasonings. The oil protects the spices while they develop flavor.
Wet rubs create a seal on the meat surface that helps retain moisture. The oil layer prevents excessive moisture loss during smoking. This is particularly important for leaner cuts like boneless prime rib that don’t have fat cap protection. The thin oil coating acts as a barrier, keeping juices in while allowing smoke to penetrate. The result is juicier meat with better flavor retention.
Making the wet rub is straightforward. In a small bowl, combine 3 tablespoons McCormick steak seasoning with 3-4 tablespoons olive oil. Stir until you achieve paste-like consistency similar to wet mud. It should be thick enough to cling to the meat but thin enough to spread easily. Adjust oil amount as needed. Apply the wet rub generously to all surfaces of the tied roast, pressing it into the meat with your hands.
What Internal Temperature Should Prime Rib Reach?
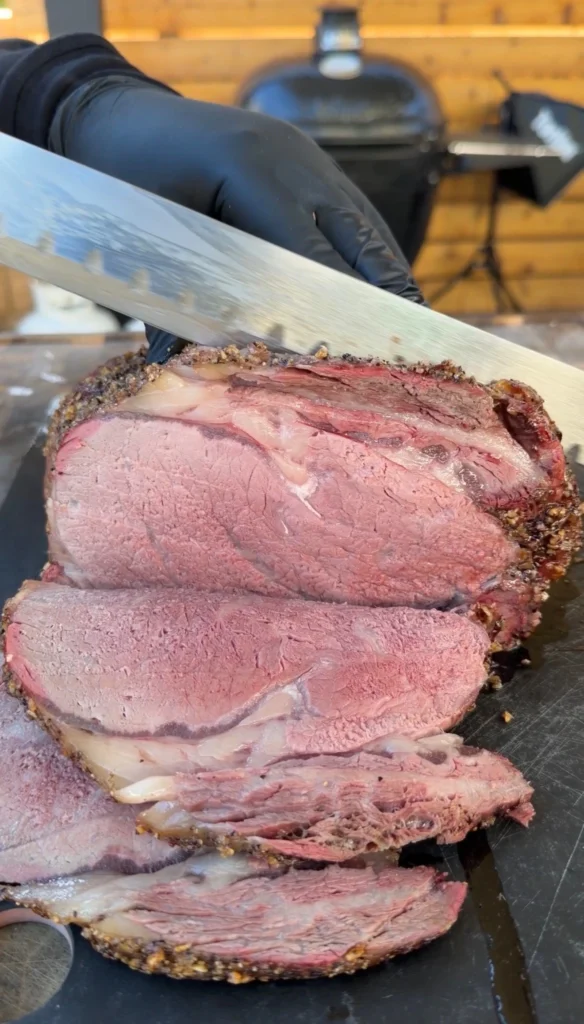
For medium-rare prime rib (the gold standard for this cut), remove from the smoker when internal temperature reaches 125-130°F. The temperature will rise another 5-10 degrees during the 15-minute rest through carryover cooking, bringing the final temperature to 130-135°F. This produces beautiful pink throughout with a thin band of gray around the edges. Medium-rare is the ideal doneness for prime rib since the cut is tender and well-marbled enough to be enjoyed at lower temperatures.
For medium doneness, pull at 135°F for a final temperature of 140-145°F after rest. The meat will be mostly pink with less intense red color in the center. Medium is acceptable for people who prefer less rare meat, though the cut begins losing optimal tenderness at this level. For medium-well, pull at 145°F for final 150-155°F. Beyond this, prime rib becomes progressively drier and tougher since the marbling renders out without the connective tissue structure of slow-cook cuts.
Insert an instant-read thermometer into the thickest part of the roast, avoiding contact with the twine which can give false readings. Check in 2-3 spots since boneless roasts can have uneven thickness despite tying. The thickest area should reach your target temperature. Start checking at 1.5 hours for a 4 lb roast at 275°F. Temperature rises quickly in the final 30 minutes, so check every 15 minutes once you’re within 10 degrees of target.
Never cook prime rib past 145°F pull temperature (150-155°F final) or you waste the expensive, well-marbled meat by drying it out. The cut’s value comes from its tenderness and juiciness at medium-rare to medium. Well-done prime rib defeats the purpose of using this premium cut. If your guests prefer well-done beef, use a different cut and save prime rib for those who appreciate proper doneness.
Should You Rest Prime Rib Before or After Slicing?
Always rest prime rib before slicing to allow juices to redistribute and proteins to relax. Cutting immediately after removing from the smoker causes juices to run out onto the cutting board, leaving the meat drier. The resting period allows proteins that contracted during cooking to loosen and reabsorb moisture. The 15-minute rest is minimum for a 4 lb roast. Larger roasts can rest 20-30 minutes without cooling too much.
During rest, the internal temperature continues rising through carryover cooking. Residual heat in the outer portions continues penetrating inward. A roast pulled at 125°F reaches 130-135°F during rest. This is why you pull before your target final temperature. If you waited until 135°F to pull for medium-rare, it would end up at 140-145°F medium after rest, which is overcooked.
Rest the prime rib loosely tented with foil to retain some heat without steaming the bark. Don’t wrap tightly or the trapped moisture softens the exterior crust you developed during smoking. Just drape foil over the top without sealing edges. The roast will stay warm enough for slicing and serving. If you’re concerned about temperature loss, rest in a warm spot like a turned-off oven with the door cracked or near (not on) the warm grill.
Slice the prime rib thin after resting for optimal slider construction. Remove the butcher’s twine carefully using kitchen shears or a knife, cutting each string and pulling it away. Place the roast on a cutting board and slice against the grain into pieces about 1/4 inch thick. Thin slices are easier to eat in slider form and create better texture when layered. Each slider needs 2-3 thin slices to create proper meat-to-bun ratio.
Step-by-Step Instructions
Step 1: Tie and Season the Prime Rib
Remove the 4 lb boneless prime rib from packaging and pat dry with paper towels. Place it on a large cutting board. Cut 4-5 pieces of butcher’s twine about 18 inches long. Slide the first piece of twine under the roast near one end. Pull both ends up over the top and tie a tight square knot, compressing the meat. The roast should cinch together noticeably.
Repeat tying every 2-3 inches along the length of the roast. Each tie should pull the meat into a uniform cylindrical shape. The goal is creating consistent thickness from end to end. When finished, the roast should look like a tied cylinder rather than an irregular, tapered cut. Trim the excess twine close to each knot. The tied roast is now ready for seasoning.
In a small bowl, mix 3 tablespoons McCormick steak seasoning with 3-4 tablespoons olive oil. Stir until you have a thick paste with consistency similar to wet mud. The mixture should be spreadable but not runny. Adjust oil amount as needed to achieve proper consistency. Too little oil and it won’t spread or stick. Too much and it runs off.
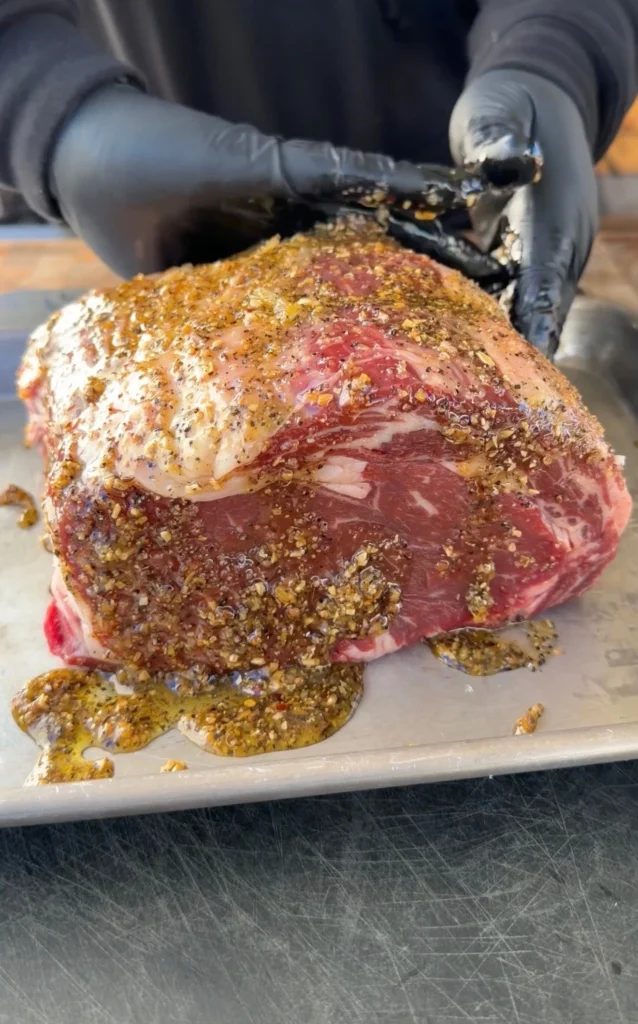
Using your hands, coat the entire tied prime rib with the wet rub. Spread it generously over all surfaces, pressing it into the meat. Make sure complete coverage with no bare spots. The wet rub should be visible as a thick coating. Don’t be shy with application since this is the only seasoning the roast gets. Let the seasoned roast sit at room temperature while you prepare the drip pan.
Step 2: Prepare the Drip Pan
Take a large disposable aluminum foil pan that fits under your prime rib with space around all sides. Using a mandolin slicer set to thin setting (1/8 inch or thinner), slice 2 large onions. The mandolin creates uniformly thin slices that cook evenly. If you don’t have a mandolin, slice as thin as possible with a sharp knife. Separate the onion slices into individual rings.
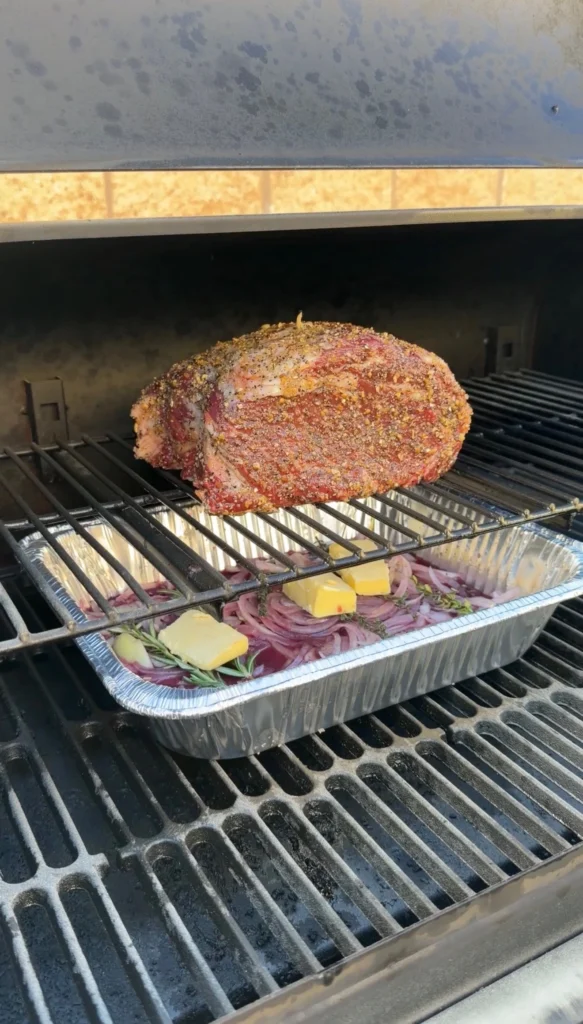
Place the sliced onions in the foil pan, spreading them in an even layer. Add 2-3 sprigs of fresh rosemary and 2-3 sprigs of fresh thyme on top of the onions. Pour 2 cups of beef broth over everything. Add 1 cup of red wine. Use a decent wine you’d drink, not cooking wine. The wine flavor concentrates during cooking, so quality matters. Cut 1 stick of butter into tablespoons and distribute throughout the pan.
Stir everything together gently. The onions should be mostly submerged in the liquid. The herbs, butter, wine, and broth create a braising liquid that will slowly cook the onions while collecting prime rib drippings. Place this prepared drip pan on the smoker grate below where the prime rib will sit. Make sure it’s positioned to catch all drippings from the roast above.
Step 3: Smoke the Prime Rib
Preheat your smoker to 275°F using oak, cherry, or pecan wood. Avoid mesquite or hickory which are too strong for prime rib. Let the smoker stabilize at 275°F with thin blue smoke before adding meat. Place the drip pan on the lower grate or directly on the smoker floor, depending on your smoker configuration. The pan should be positioned where the prime rib will sit above it.
Place the tied, seasoned prime rib directly on the smoker grate above the drip pan. The roast should be centered over the pan to catch all drippings. Insert a leave-in probe thermometer into the thickest part of the roast if you have one. Close the lid and smoke undisturbed for the first 1.5 hours. Don’t open to check or baste. Consistent heat and smoke are essential for proper cooking.
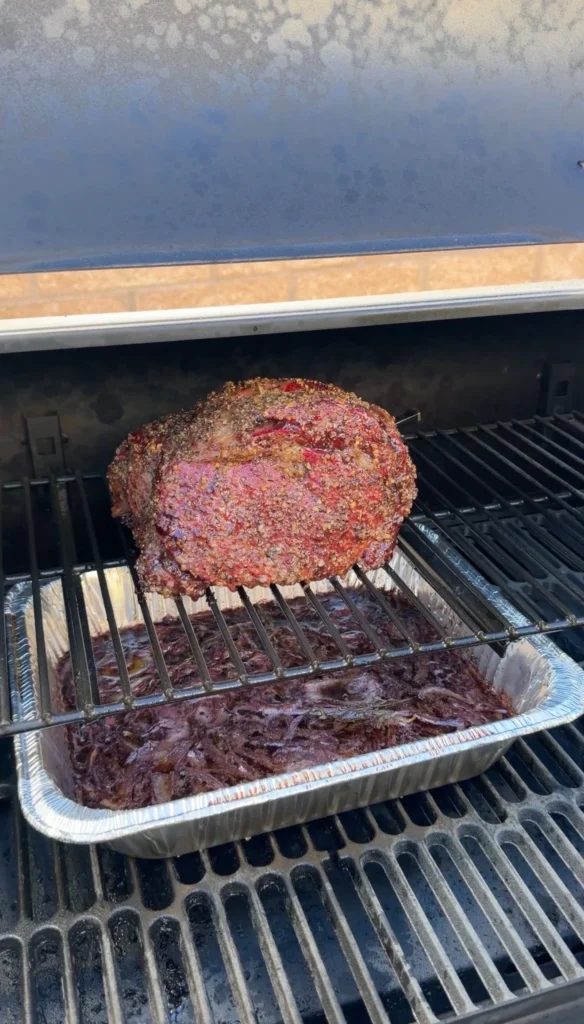
During smoking, the wet rub develops into bark while the smoke ring forms around the perimeter. The beef drippings fall into the pan below, enriching the wine-onion mixture. The onions slowly soften and caramelize in the flavorful liquid. The rosemary and thyme infuse everything with aromatic flavor. The butter adds richness. All of this happens simultaneously without any additional work.
Start checking internal temperature at 1.5 hours with an instant-read thermometer if you don’t have a leave-in probe. Insert into the thickest part of the roast. You’re looking for 125-130°F for medium-rare. If it reads below 120°F, close the lid and check again in 15-20 minutes. Once it reaches 120°F, check every 10-15 minutes. When it hits exactly 125-130°F (depending on your preference), remove immediately.
Step 4: Rest the Prime Rib and Make Au Jus
When the prime rib reaches 125-130°F internal temperature, remove it from the smoker and place on a cutting board. Tent loosely with aluminum foil. Let rest for 15 minutes minimum. During rest, the temperature will rise to 130-135°F final through carryover cooking. The juices redistribute and the meat firms up slightly for easier slicing.
While the prime rib rests, carefully remove the drip pan from the smoker. The liquid will be very hot and the pan heavy, so use sturdy gloves or pot holders. Place a fine-mesh strainer over a medium saucepan. Pour the contents of the drip pan through the strainer. The onions, rosemary, and thyme will be caught by the strainer. The liquid (au jus base) flows into the saucepan below.
Transfer the strained onions to a bowl, discarding the rosemary and thyme sprigs. These are your red wine onions for the sliders. They should be soft, translucent, and deeply caramelized from cooking in wine, broth, butter, and beef drippings for 2-3 hours. Set aside and keep warm.
Place the saucepan with the strained liquid over medium-high heat. Bring to a boil, then reduce to simmer. Cook for 8-12 minutes, stirring occasionally, until the liquid reduces by half. It should become glossy, rich, and slightly thickened. This concentrated reduction is your au jus for dipping. The flavor should be intensely beefy with notes of wine, herbs, and caramelized onions. Keep warm until serving.
Step 5: Make Horseradish Mayo and Slice Prime Rib
In a small bowl, combine 1/2 cup mayo, 2 tablespoons prepared horseradish, and 1 teaspoon chopped chives. Stir until well mixed. The horseradish should be distributed evenly throughout the mayo. Taste and adjust horseradish amount if you want more or less kick. The prepared horseradish already contains vinegar, so it provides both heat and tanginess. Set aside or refrigerate until ready to assemble sliders.
After the prime rib has rested for 15 minutes, remove the foil. Using kitchen shears or a sharp knife, cut each piece of butcher’s twine and pull it away from the roast. Work carefully to avoid tearing the bark. Once all twine is removed, place the roast on a cutting board. Using a very sharp knife, slice the prime rib thin against the grain.
Cut slices about 1/4 inch thick. Thinner slices work better for sliders since they’re easier to bite through and layer nicely on small buns. Each slider will use 2-3 slices depending on size. Continue slicing until you have enough for all your sliders. You should get 16-20 good slices from a 4 lb roast, enough for 8-10 sliders with 2 slices per slider.
Step 6: Assemble and Warm the Sliders
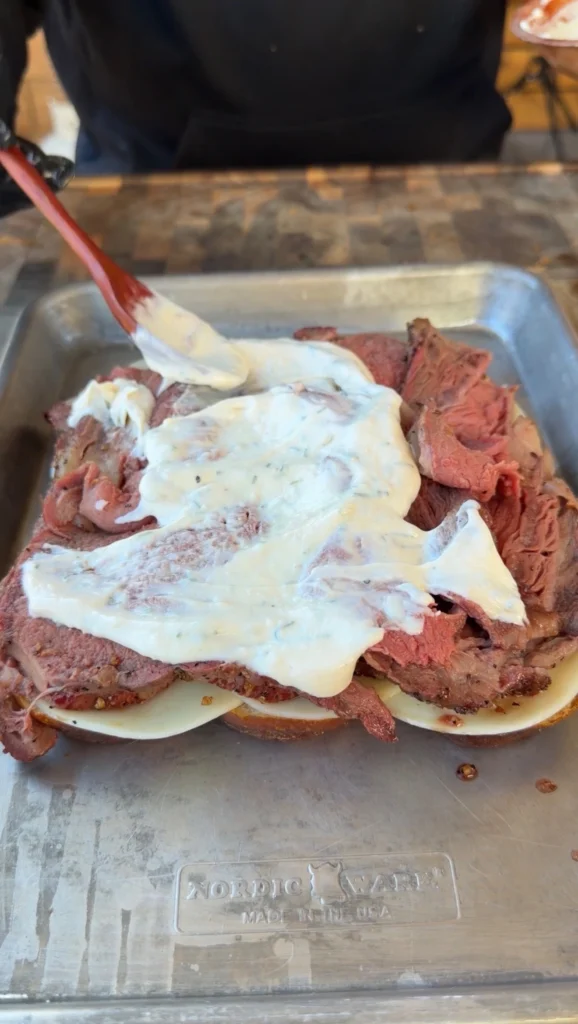
Preheat your grill or oven to 275-300°F. Slice the King’s Hawaiian sweet pretzel slider buns in half. These buns are perfect for prime rib sliders because the slight sweetness balances the savory beef and the pretzel texture adds interest. Arrange the bottom buns on a large baking sheet.
Spread horseradish mayo on the bottom half of each bun. Use about 1 tablespoon per slider. Layer 2-3 slices of thinly sliced prime rib on top of the mayo. Top the beef with a generous portion of the red wine onions from the drip pan. Place one slice of provolone cheese over the onions. The cheese will melt and hold everything together.
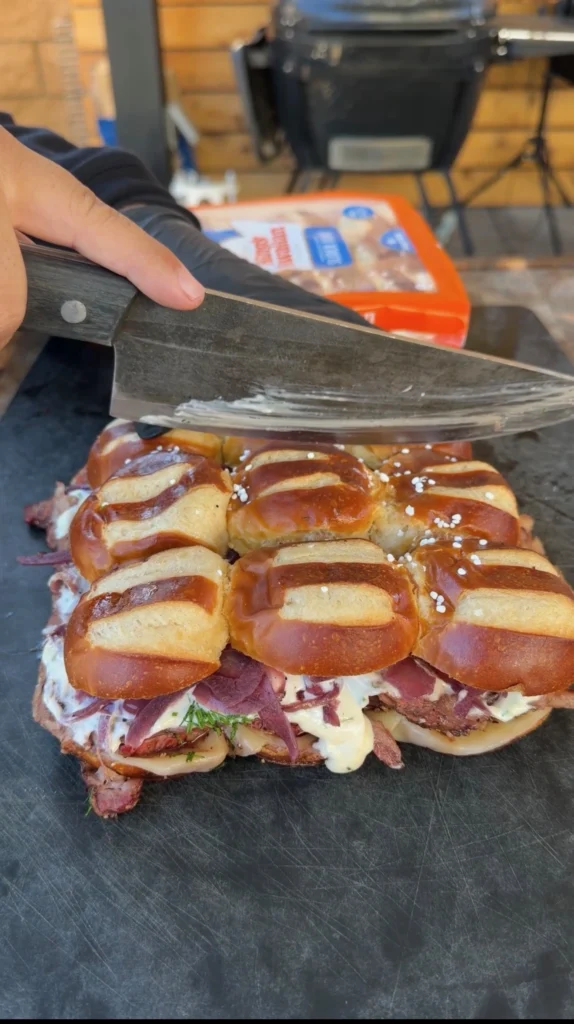
Place the top buns on each slider. At this point, the sliders are fully assembled and ready for warming. Place the baking sheet with all assembled sliders on the grill or in the oven. Cook at 275-300°F for 10 minutes. The goal is melting the provolone cheese and warming everything through without drying out the beef or burning the buns.
Check at 8 minutes. The cheese should be completely melted and the sliders warmed throughout. The buns may have slight toast on the bottom, which adds texture. If the cheese isn’t fully melted, continue warming for another 2-3 minutes. Remove when the cheese is gooey and the sliders are hot. Serve immediately.
Step 7: Serve with Au Jus
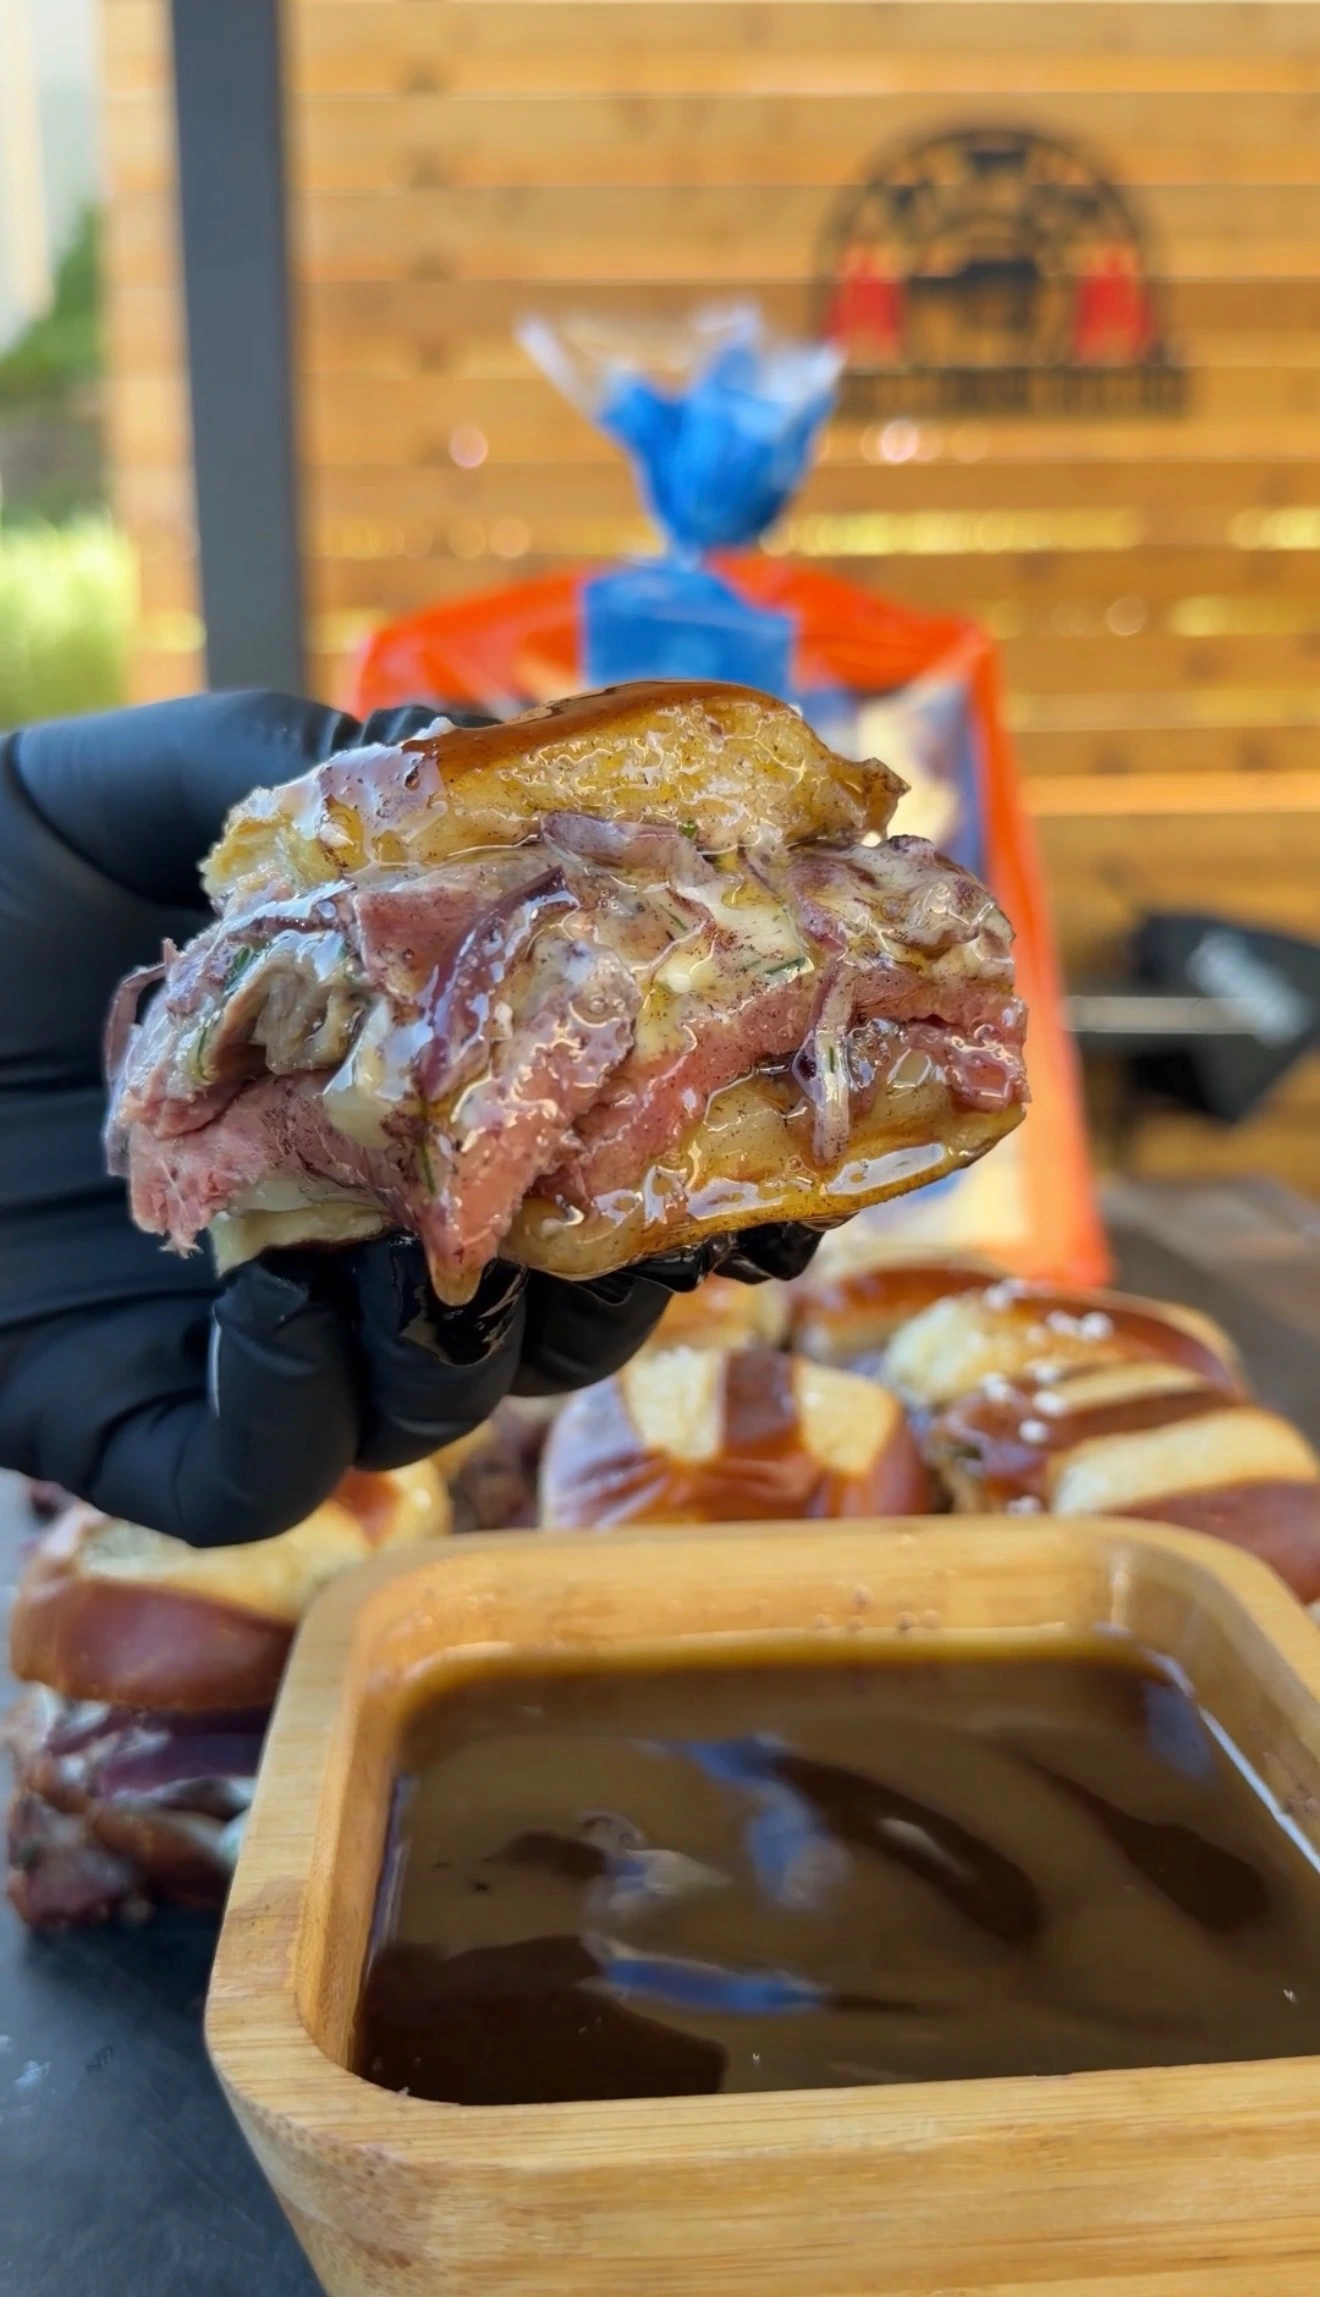
Transfer the warm prime rib sliders to a serving platter. The melted provolone should be holding everything together nicely. The sliders should look appetizing with visible layers of beef, caramelized onions, and melted cheese between sweet pretzel buns. Pour the reduced au jus into small individual dipping cups or one communal bowl.
Serve immediately while the sliders are hot and the au jus is warm. Instruct guests to dip sliders into the au jus before each bite or pour a small amount over the top. The rich, wine-infused au jus adds moisture and intensifies the beefy flavor. The combination of tender prime rib, sweet-savory onions, sharp horseradish mayo, melted provolone, and concentrated au jus creates complex, restaurant-quality sliders.
Provide plenty of napkins since these sliders are intentionally juicy and messy. The au jus will drip, and that’s part of the appeal. These smoked prime rib sliders work perfectly for parties, game day, or special dinners where you want impressive handheld food that still feels elevated.
Prime Rib Sliders with Red Wine Onions and Horseradish Mayo
Ingredients
Method
- Tie boneless prime rib with butcher’s twine every 2-3 inches to create uniform thickness. Mix steak seasoning with olive oil to form wet rub. Coat entire roast.
- In disposable foil pan, combine thinly sliced onions, rosemary, thyme, beef broth, red wine, and butter.
- Preheat smoker to 275°F. Place drip pan on lower grate. Position prime rib on grate above drip pan. Smoke until internal temperature reaches 125-130°F for medium-rare, approximately 2-3 hours.
- Remove prime rib and rest 15 minutes loosely tented with foil. Strain drip pan contents, reserving onions separately. Transfer liquid to saucepan and reduce by half over medium heat, about 8-12 minutes, to make au jus.
- Make horseradish mayo by mixing mayo, horseradish, and chives. Remove twine from rested prime rib and slice thin.
- Slice slider buns. Spread horseradish mayo on bottom buns. Layer with 2-3 slices prime rib, red wine onions, and provolone cheese. Top with bun tops.
- Place assembled sliders on baking sheet. Warm at 275-300°F for 10 minutes until cheese melts. Serve immediately with au jus for dipping.
Tried this recipe?
Let us know how it was!Frequently Asked Questions
Can I use bone-in prime rib instead of boneless?
Yes, bone-in prime rib works for sliders but requires more prep work. You’ll need to remove the meat from the bones after cooking and resting to create sliceable portions. The bones add flavor during cooking but make uniform slicing difficult. Boneless is preferred for sliders since it creates consistent slices without carving around bones. If using bone-in, plan for 15-20 extra minutes to remove meat from bones after resting.
The cooking technique remains identical. Place the drip pan below, smoke at 275°F to target temperature, and rest before slicing. Bone-in may take slightly longer to reach temperature since bone conducts heat differently. Check temperature in the thickest part of meat away from bone. For prime rib sliders where uniform thin slices matter, boneless is superior despite bone-in having slightly more flavor.
How far ahead can I prep components?
The horseradish mayo can be made 2-3 days ahead and refrigerated. The flavor actually improves as the horseradish infuses the mayo. You can smoke the prime rib completely, cool, wrap tightly, and refrigerate for up to 2 days. Reheat gently in a 300°F oven for 20-30 minutes before slicing. The au jus can be made ahead and refrigerated for 3-4 days, reheating when needed.
For best results, smoke the prime rib the day of serving. The freshly smoked bark and warm, juicy meat create optimal texture. The red wine onions from the drip pan don’t keep as well since they’re so soft and delicate, but they can be refrigerated overnight and gently reheated. Assemble sliders immediately before serving. Pre-assembled sliders get soggy within 30 minutes as the au jus and onion moisture saturates the buns.
What if I don’t have a smoker?
Roast in a 275°F oven with the same drip pan setup underneath. Place the prime rib on a roasting rack over the drip pan in a large roasting pan or directly on the oven rack with the drip pan on the rack below. The cooking time and temperature targets remain identical. You won’t get smoke flavor, but the red wine onions and au jus still develop excellent flavor from the beef drippings.
For smoke flavor without a smoker, add 1 teaspoon liquid smoke to the drip pan liquid. This approximates smoke character in the au jus and onions. Alternatively, briefly smoke the prime rib for 30-60 minutes on a grill with wood chips, then transfer to a 275°F oven to finish cooking. This hybrid approach provides smoke ring and authentic smoke flavor while using your oven for temperature control.
Can I use different cheese or buns?
Other cheese options include Swiss, white cheddar, or horseradish cheddar for stronger flavor. Gruyere adds nutty richness. Blue cheese crumbles work for bold flavor enthusiasts though they can overpower the beef. Provolone is ideal because it melts smoothly, has mild flavor that doesn’t compete with prime rib, and adds creamy richness.
For buns, regular King’s Hawaiian sweet rolls work if you can’t find the pretzel version. Brioche slider buns add richness. Potato rolls provide soft texture. Avoid hard rolls or ciabatta which are too chewy for tender prime rib. The slight sweetness of Hawaiian bread balances the savory beef and onions perfectly. Whatever buns you choose, warm them on the grill with the sliders to achieve proper texture.
What sides pair well with prime rib sliders?
Classic sides that complement prime rib sliders include crispy fries (regular or sweet potato), onion rings, coleslaw, potato salad, or chips. The rich, beefy sliders need sides with different texture and lighter flavor to provide balance. A simple green salad with vinaigrette cuts through the richness. Pickles, pickled vegetables, or pickled onions add acidity.
For parties, set up a slider bar with sides served separately. Provide the warm sliders on a platter with au jus in dipping cups. Set out bowls of extra red wine onions, horseradish mayo, cheese, and pickles so guests can customize. Add sides like fries, salad, and vegetables as a buffet. This interactive setup works well for casual entertaining where guests build their perfect slider combination.
Ready to Take Your Cooking to the Next Level?
This is where I keep all my most-used products, gear, and favorite cooking tools — check it out:
🔥 View My Cooking Gear & ToolsRecipe Categories
If you loved this recipe, you’ll find more to savor across our diverse categories. From beef to pork, chicken to turkey, seafood to appetizers, there’s a wealth of flavors waiting for you. Explore them all at CWFeats.